
Use & Care
Page 1
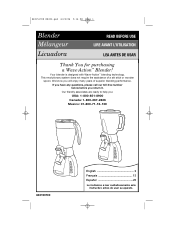
... stick or wooden spoon. This revolutionary system does not require the assistance of superior blending performance. Your blender is designed with Wave ˜ Action™ blending technology. 840153700 ENv02.qxd 6/22/06 5:16 PM Page 1 Blender Mélangeur Licuadora READ BEFORE USE LIRE AVANT L'UTILISATION LEA ANTES DE USAR Thank You for...
... stick or wooden spoon. This revolutionary system does not require the assistance of superior blending performance. Your blender is designed with Wave ˜ Action™ blending technology. 840153700 ENv02.qxd 6/22/06 5:16 PM Page 1 Blender Mélangeur Licuadora READ BEFORE USE LIRE AVANT L'UTILISATION LEA ANTES DE USAR Thank You for...
Use & Care
Page 2
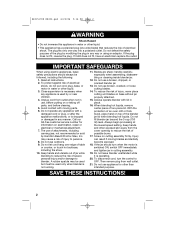
...jar while blending to reduce the risk of the plug by Hamilton Beach/Proctor-Silex, Inc. When blending hot liquids, remove center piece of table or counter, or touch hot surfaces, including the stove. 10. Do not fill blender jar beyond the 3-cup (750 ml) level. Injury can...mitt or thick towel, place hand on examination, repair or electrical or mechanical adjustment. 7. especially when assembling, disassembling or cleaning inside blender jar. 12. Always operate blender with lid in place. 16. Keep hands and other liquid. 3. SAVE THESE INSTRUCTIONS! 2 Call our toll-free customer service ...
...jar while blending to reduce the risk of the plug by Hamilton Beach/Proctor-Silex, Inc. When blending hot liquids, remove center piece of table or counter, or touch hot surfaces, including the stove. 10. Do not fill blender jar beyond the 3-cup (750 ml) level. Injury can...mitt or thick towel, place hand on examination, repair or electrical or mechanical adjustment. 7. especially when assembling, disassembling or cleaning inside blender jar. 12. Always operate blender with lid in place. 16. Keep hands and other liquid. 3. SAVE THESE INSTRUCTIONS! 2 Call our toll-free customer service ...
Use & Care
Page 3
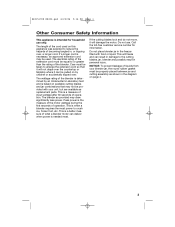
840153700 ENv02.qxd 6/22/06 5:16 PM Page 3 Other Consumer Safety Information This appliance is intended for information. Peak power is when a blender requires the most . Do not use only. Call the toll-free customer service number for household use . This is the measure of the motor ... in, or tripping over the countertop or tabletop where it can be used on page 4. 3 Care must be taken to the cutting blades, jar, blender and possibly result in the diagram on this appliance was selected to reduce the hazards of operation. This is necessary, an approved extension cord may...
840153700 ENv02.qxd 6/22/06 5:16 PM Page 3 Other Consumer Safety Information This appliance is intended for information. Peak power is when a blender requires the most . Do not use only. Call the toll-free customer service number for household use . This is the measure of the motor ... in, or tripping over the countertop or tabletop where it can be used on page 4. 3 Care must be taken to the cutting blades, jar, blender and possibly result in the diagram on this appliance was selected to reduce the hazards of operation. This is necessary, an approved extension cord may...
Use & Care
Page 4
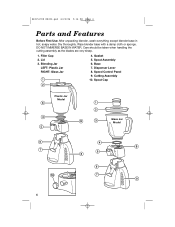
Filler Cap 2. Gasket 5. Cutting Assembly 10. Speed Control Panel 9. Dry thoroughly. Spout Assembly 6. DO NOT IMMERSE BASE IN WATER. Care should be taken when handling the cutting assembly as the blades are very sharp. 1. 840153700 ENv02.qxd 6/22/06 5:16 PM Page 4 Parts and Features Before First Use: After unpacking blender, wash everything except blender base in hot, soapy water. Blending Jar LEFT: Plastic Jar RIGHT: Glass Jar 4. Dispenser Lever 8. Wipe blender base with a damp cloth or sponge. Base 7. Lid 3. Spout Cap Plastic Jar Model Glass Jar Model 4
Filler Cap 2. Gasket 5. Cutting Assembly 10. Speed Control Panel 9. Dry thoroughly. Spout Assembly 6. DO NOT IMMERSE BASE IN WATER. Care should be taken when handling the cutting assembly as the blades are very sharp. 1. 840153700 ENv02.qxd 6/22/06 5:16 PM Page 4 Parts and Features Before First Use: After unpacking blender, wash everything except blender base in hot, soapy water. Blending Jar LEFT: Plastic Jar RIGHT: Glass Jar 4. Dispenser Lever 8. Wipe blender base with a damp cloth or sponge. Base 7. Lid 3. Spout Cap Plastic Jar Model Glass Jar Model 4
Use & Care
Page 5
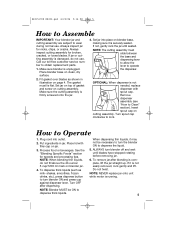
... on clean, dry surface. 2. NOTE: When blending thin liquids, do not use . OPTIONAL: When dispenser is unplugged. NOTE: Blender MUST be necessary to turn blender off and wait until seated. shakes, smoothies, frozen drinks, etc.), press dispense button to Clean" section). ALWAYS turn the... blender ON to dispense thick liquids. 840153700 ENv02.qxd 6/22/06 5:16 PM Page 5 How to Assemble IMPORTANT: Your blender jar and cutting assembly are subject to Operate 1. Set jar on top of ...
... on clean, dry surface. 2. NOTE: When blending thin liquids, do not use . OPTIONAL: When dispenser is unplugged. NOTE: Blender MUST be necessary to turn blender off and wait until seated. shakes, smoothies, frozen drinks, etc.), press dispense button to Clean" section). ALWAYS turn the... blender ON to dispense thick liquids. 840153700 ENv02.qxd 6/22/06 5:16 PM Page 5 How to Assemble IMPORTANT: Your blender jar and cutting assembly are subject to Operate 1. Set jar on top of ...
Use & Care
Page 6
... during blending or ingredients stick to reduce the risk of the jar. NOTES: • Speed increases as the buttons are covered to sides of the blender jar lid and hold down while blending. Ensure skin and hands are pushed top to mash potatoes, mix stiff dough, whip egg whites, grind raw... jar to blend effectively. • Do not try to bottom. • The dispenser button also serves as button is one cup (8 ounces/250 ml). For blenders with the protection of an oven mitt or thick towel, place hand on by pressing the dispense button when dispensing the thick contents of burns...
... during blending or ingredients stick to reduce the risk of the jar. NOTES: • Speed increases as the buttons are covered to sides of the blender jar lid and hold down while blending. Ensure skin and hands are pushed top to mash potatoes, mix stiff dough, whip egg whites, grind raw... jar to blend effectively. • Do not try to bottom. • The dispenser button also serves as button is one cup (8 ounces/250 ml). For blenders with the protection of an oven mitt or thick towel, place hand on by pressing the dispense button when dispensing the thick contents of burns...
Use & Care
Page 7
... speed control button for 30 seconds or until smooth. Process until blended. Press a desired speed control button for liquid, place the liquid in blender jar. Process 1 cup (250 ml) at a time. Remove jar from freezer. 7 Press desired speed control button for 10 seconds or ...until desired consistency. Frozen Juice Concentrate Place 6 ounces (170 g) frozen juice in iced tea. Place in blender jar. Press a desired speed control button for 10 seconds or until ice is crushed to redistribute pieces. Crushing Ice For best performance, when...
... speed control button for 30 seconds or until smooth. Process until blended. Press a desired speed control button for liquid, place the liquid in blender jar. Process 1 cup (250 ml) at a time. Remove jar from freezer. 7 Press desired speed control button for 10 seconds or ...until desired consistency. Frozen Juice Concentrate Place 6 ounces (170 g) frozen juice in iced tea. Place in blender jar. Press a desired speed control button for 10 seconds or until ice is crushed to redistribute pieces. Crushing Ice For best performance, when...
Use & Care
Page 8
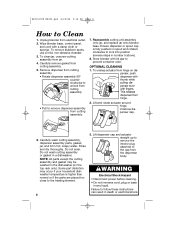
... from hinge on dispenser, push dispenser with thumb while pulling dispenser lever with fingers. Reassemble cutting unit assembly onto jar, and replace jar onto blender base. wWARNING Electrical Shock Hazard • Disconnect power before cleaning. • Do not immerse cord, plug or base in hot, soapy water... the cutting assembly and gasket may occur if your household dishwasher temperature is fully pushed on the top rack only). Wipe blender base, control panel, and cord with lid ajar to lock into position (reverse steps in a dishwasher. Failure to the heating element. 8 3....
... from hinge on dispenser, push dispenser with thumb while pulling dispenser lever with fingers. Reassemble cutting unit assembly onto jar, and replace jar onto blender base. wWARNING Electrical Shock Hazard • Disconnect power before cleaning. • Do not immerse cord, plug or base in hot, soapy water... the cutting assembly and gasket may occur if your household dishwasher temperature is fully pushed on the top rack only). Wipe blender base, control panel, and cord with lid ajar to lock into position (reverse steps in a dishwasher. Failure to the heating element. 8 3....
Use & Care
Page 9
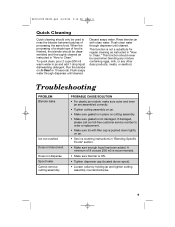
... or seafood. To quick clean, pour 2 cups (500 ml) warm water in "How to rinse the blender between batches of 8 ounces (250 ml) is recommended. • Make sure blender is not a substitute for 10 seconds. Flush soapy water through dispenser until cleaned. This function is ON....disassembled and thoroughly cleaned as instructed in "Blending Specific Foods" section. • Make sure enough liquid has been added. Troubleshooting PROBLEM Blender leaks. A minimum of processing the same food. This function should be used to Clean." When the processing of a single type ...
... or seafood. To quick clean, pour 2 cups (500 ml) warm water in "How to rinse the blender between batches of 8 ounces (250 ml) is recommended. • Make sure blender is not a substitute for 10 seconds. Flush soapy water through dispenser until cleaned. This function is ON....disassembled and thoroughly cleaned as instructed in "Blending Specific Foods" section. • Make sure enough liquid has been added. Troubleshooting PROBLEM Blender leaks. A minimum of processing the same food. This function should be used to Clean." When the processing of a single type ...
Use & Care
Page 10
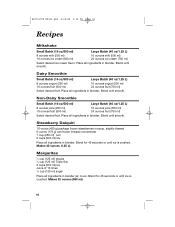
... frozen strawberries in syrup, slightly thawed 6-ounce (170 g) can frozen limeade concentrate 1 cup (250 ml) rum 2 cups (500 ml) ice Place all ingredients in blender. Blend for 45 seconds or until ice is crushed. Non-Dairy Smoothie Small Batch (16 oz/500 ml) Large Batch (40 oz/1.25 L) 8 ounces juice... 1⁄2 cup (125 ml) Triple Sec 2 cups (500 ml) ice Juice of 16 limes 1⁄2 cup (125 ml) sugar Place all ingredients in blender. cover. Blend until smooth. Makes 40 ounces (1.25 L). 840153700 ENv02.qxd 6/22/06 5:16 PM Page 10 Recipes Milkshake Small Batch (16 oz/500 ml...
... frozen strawberries in syrup, slightly thawed 6-ounce (170 g) can frozen limeade concentrate 1 cup (250 ml) rum 2 cups (500 ml) ice Place all ingredients in blender. Blend for 45 seconds or until ice is crushed. Non-Dairy Smoothie Small Batch (16 oz/500 ml) Large Batch (40 oz/1.25 L) 8 ounces juice... 1⁄2 cup (125 ml) Triple Sec 2 cups (500 ml) ice Juice of 16 limes 1⁄2 cup (125 ml) sugar Place all ingredients in blender. cover. Blend until smooth. Makes 40 ounces (1.25 L). 840153700 ENv02.qxd 6/22/06 5:16 PM Page 10 Recipes Milkshake Small Batch (16 oz/500 ml...
Use & Care
Page 11
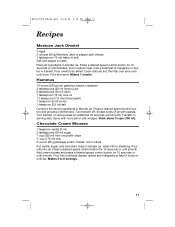
...sugar, and chocolate chips in a skillet. Over medium heat, melt a small pat of jar with rye toast or pita wedges. Turn blender off. Turn blender on and process an additional 30 seconds until blended. Hummus 19-ounce (535 g) can garbanzo beans, undrained 3 tablespoons (45 ml) ...olive oil 11⁄2 teaspoons (7.5 ml) minced garlic 1 teaspoon (5 ml) cumin 1⁄2 teaspoon (2.5 ml) salt Combine the seven ingredients in blender jar. Press a desired speed control button for 15 seconds or until blended. Press a desired speed control button for 10 seconds or until done. Pour...
...sugar, and chocolate chips in a skillet. Over medium heat, melt a small pat of jar with rye toast or pita wedges. Turn blender off. Turn blender on and process an additional 30 seconds until blended. Hummus 19-ounce (535 g) can garbanzo beans, undrained 3 tablespoons (45 ml) ...olive oil 11⁄2 teaspoons (7.5 ml) minced garlic 1 teaspoon (5 ml) cumin 1⁄2 teaspoon (2.5 ml) salt Combine the seven ingredients in blender jar. Press a desired speed control button for 15 seconds or until blended. Press a desired speed control button for 10 seconds or until done. Pour...
Use & Care
Page 12
...in accordance with the printed directions. or Canada. Some states or provinces do not allow limitations on the bottom of three (3) years for Hamilton Beach products or one hundred eighty (180) days for Proctor-Silex and Traditions products from state to state, or province to province. This ...DO NOT RETURN THE APPLIANCE TO THE STORE! LIMITED WARRANTY This product is no cost. During this period, we will help us answer your blender, call our CUSTOMER SERVICE NUMBER. (For faster service please have a question about your question much more quickly. THE FOREGOING WARRANTY IS IN...
...in accordance with the printed directions. or Canada. Some states or provinces do not allow limitations on the bottom of three (3) years for Hamilton Beach products or one hundred eighty (180) days for Proctor-Silex and Traditions products from state to state, or province to province. This ...DO NOT RETURN THE APPLIANCE TO THE STORE! LIMITED WARRANTY This product is no cost. During this period, we will help us answer your blender, call our CUSTOMER SERVICE NUMBER. (For faster service please have a question about your question much more quickly. THE FOREGOING WARRANTY IS IN...


