Use and Care Manual
Page 2
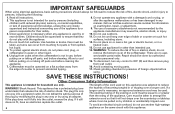
... or taking off parts, and before cleaning the appliance. 7. To avoid an electrical circuit overload, do not remove the bottom cover of electric shock. Unplug from spilled, hot liquid. 5. Coffeemaker must be used. There are closely supervised and instructed concerning use appliance for information on this appliance. SAVE THESE INSTRUCTIONS! If it still does not fit, have an electrician replace the outlet...
... or taking off parts, and before cleaning the appliance. 7. To avoid an electrical circuit overload, do not remove the bottom cover of electric shock. Unplug from spilled, hot liquid. 5. Coffeemaker must be used. There are closely supervised and instructed concerning use appliance for information on this appliance. SAVE THESE INSTRUCTIONS! If it still does not fit, have an electrician replace the outlet...

Use and Care Manual
Page 3
... www.hamiltonbeach.com Canada: 1.800.267.2826 Mexico: 01 800 71 16 100 Scoop* Lid Release Button Lid With Window Shower Tube Control Panel With Indicator Lights Coffee Bean Grinding Chamber Basket Cover* Basket Handle Filter Well Filter Basket* Coffee Basket Basket Holder* Removable Drip Tray Plate* Removable Drip Tray* Base Coffee Bean Feeder Grinding Blade Coffee Bean Grinding Chamber Water Reservoir Lid Water Reservoir Sieve Holder Sieve Bottom of Coffee Bean Grinding Chamber Water Level Indicator in Water Reservoir Upper Drip Tray/ Cup Rest Position Lower Drip Tray/ Cup...
... www.hamiltonbeach.com Canada: 1.800.267.2826 Mexico: 01 800 71 16 100 Scoop* Lid Release Button Lid With Window Shower Tube Control Panel With Indicator Lights Coffee Bean Grinding Chamber Basket Cover* Basket Handle Filter Well Filter Basket* Coffee Basket Basket Holder* Removable Drip Tray Plate* Removable Drip Tray* Base Coffee Bean Feeder Grinding Blade Coffee Bean Grinding Chamber Water Reservoir Lid Water Reservoir Sieve Holder Sieve Bottom of Coffee Bean Grinding Chamber Water Level Indicator in Water Reservoir Upper Drip Tray/ Cup Rest Position Lower Drip Tray/ Cup...
Use and Care Manual
Page 4
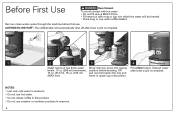
Press Brew button. Discard water after brew cycle is complete. AUTOMATIC SHUTOFF: The coffeemaker will be brewed. • Place mug or cup under coffee basket. NOTES: • Use only cold water in reservoir. • Do not use hot water. • Do not reheat coffee in this product. • Do not use . Before First Use w WARNING Burn Hazard. Run two clean water cycles through the machine before brewing, OR 14 oz. (414 ml), 16 oz. (473...
Press Brew button. Discard water after brew cycle is complete. AUTOMATIC SHUTOFF: The coffeemaker will be brewed. • Place mug or cup under coffee basket. NOTES: • Use only cold water in reservoir. • Do not use hot water. • Do not reheat coffee in this product. • Do not use . Before First Use w WARNING Burn Hazard. Run two clean water cycles through the machine before brewing, OR 14 oz. (414 ml), 16 oz. (473...

Use and Care Manual
Page 5
... 4 level scoops of light to Grind and Brew Coffee AUTOMATIC SHUTOFF: The coffeemaker will be brewed. • Place mug or cup under coffee basket. NOTE: 1 rounded scoop = 1 1/2 4 5 6 Tablespoons (22.5 ml) coffee beans. 5 To avoid contact with hot water: • Do not fill above MAX Fill line. • Fill reservoir with warm water before brewing, OR 14 oz. (414 ml), 16 oz. (473 ml) pull out removable drip tray and (MAX line). insert...
... 4 level scoops of light to Grind and Brew Coffee AUTOMATIC SHUTOFF: The coffeemaker will be brewed. • Place mug or cup under coffee basket. NOTE: 1 rounded scoop = 1 1/2 4 5 6 Tablespoons (22.5 ml) coffee beans. 5 To avoid contact with hot water: • Do not fill above MAX Fill line. • Fill reservoir with warm water before brewing, OR 14 oz. (414 ml), 16 oz. (473 ml) pull out removable drip tray and (MAX line). insert...

Use and Care Manual
Page 6
... scoops of dark roast coffee beans or 4 level scoops of shower tube if they are wet. See "Care and Cleaning" directions on page 8. 6 IMPORTANT: • Wipe inside . Beans may adhere if the lid is clean. See "Cleaning the Sieve" directions on page 9. • Clean sieve holder and sieve weekly. The grinder will automatically shut off . How to Grind and Brew Coffee (cont.) 7 8 9 NOTES: • Press Grind & Brew to begin grinding coffee...
... scoops of dark roast coffee beans or 4 level scoops of shower tube if they are wet. See "Care and Cleaning" directions on page 8. 6 IMPORTANT: • Wipe inside . Beans may adhere if the lid is clean. See "Cleaning the Sieve" directions on page 9. • Clean sieve holder and sieve weekly. The grinder will automatically shut off . How to Grind and Brew Coffee (cont.) 7 8 9 NOTES: • Press Grind & Brew to begin grinding coffee...

Use and Care Manual
Page 7
OR OR 2 3 Water reservoir has three water Move drip tray down into which the water will automatically shut off after brew cycle is complete. How to Brew Ground Coffee AUTOMATIC SHUTOFF: The coffeemaker will be brewed. • Place mug or cup under coffee basket. To avoid contact with hot water: • Do not fill above MAX Fill line. • Fill reservoir with warm water before brewing, OR 14 oz. (414 ml), 16...
OR OR 2 3 Water reservoir has three water Move drip tray down into which the water will automatically shut off after brew cycle is complete. How to Brew Ground Coffee AUTOMATIC SHUTOFF: The coffeemaker will be brewed. • Place mug or cup under coffee basket. To avoid contact with hot water: • Do not fill above MAX Fill line. • Fill reservoir with warm water before brewing, OR 14 oz. (414 ml), 16...

Use and Care Manual
Page 8
... from either arabica beans or robusta beans, or some combination of grinding. • Using filtered water or bottled water will become stale much faster than tap water. • Make sure your coffeemaker is clean. See "Care and Cleaning" directions on page 9. • If overflow occurs, use freshly ground coffee within about a week of both. If buying preground coffee, choose a package with soft cloth. Tips for Best-Tasting...
... from either arabica beans or robusta beans, or some combination of grinding. • Using filtered water or bottled water will become stale much faster than tap water. • Make sure your coffeemaker is clean. See "Care and Cleaning" directions on page 9. • If overflow occurs, use freshly ground coffee within about a week of both. If buying preground coffee, choose a package with soft cloth. Tips for Best-Tasting...
Use and Care Manual
Page 9
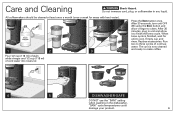
... seconds, turn unit OFF (O) using the Brew button and allow it to cool. Run two to clean. Replace accessories. Press the Brew button once. When brew cycle is now cleaned and ready to make coffee. 4 5 DISHWASHER-SAFE DO NOT use the "SANI" setting when washing in the dishwasher. The unit is finished, wait for areas with hard water). 1 2 3 Pour 1/2 cup (118 ml) of plain white vinegar and 1/2 cup (118 ml...
... seconds, turn unit OFF (O) using the Brew button and allow it to cool. Run two to clean. Replace accessories. Press the Brew button once. When brew cycle is now cleaned and ready to make coffee. 4 5 DISHWASHER-SAFE DO NOT use the "SANI" setting when washing in the dishwasher. The unit is finished, wait for areas with hard water). 1 2 3 Pour 1/2 cup (118 ml) of plain white vinegar and 1/2 cup (118 ml...
Use and Care Manual
Page 10
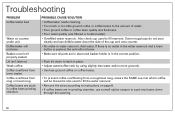
... check cup used to fill the water reservoir. • Remove the sieve according to fill reservoir. Lid isn't latched. If there is no water in the water reservoir and a brew button is pushed, the unit will not brew. • Make sure all parts are in place and basket holder is also used to instructions on counter under unit. Coffee overflows from mug or travel mug, ensure the SAME cup into which coffee will not brew. Basket cover isn...
... check cup used to fill the water reservoir. • Remove the sieve according to fill reservoir. Lid isn't latched. If there is no water in the water reservoir and a brew button is pushed, the unit will not brew. • Make sure all parts are in place and basket holder is also used to instructions on counter under unit. Coffee overflows from mug or travel mug, ensure the SAME cup into which coffee will not brew. Basket cover isn...
Use and Care Manual
Page 12
..., we will replace with the printed directions, or damage to make a warranty claim, do not allow limitations on the rating label (e.g., 120V ~ 60 Hz). All liability is required to the product resulting from the date of this written warranty. Please call 1.800.851.8900 in the U.S. For faster service, locate the model, type, and series numbers on where you . Keep the original...
..., we will replace with the printed directions, or damage to make a warranty claim, do not allow limitations on the rating label (e.g., 120V ~ 60 Hz). All liability is required to the product resulting from the date of this written warranty. Please call 1.800.851.8900 in the U.S. For faster service, locate the model, type, and series numbers on where you . Keep the original...


