
Use & Care
Page 2
... be used on examination, repair, or adjustment. 8. Read all instructions. 2. Use handles or knobs. Coffee brewer must be equal to or greater than intended use. It must be taken to reduce the hazards of fire or electric shock, do not remove the bottom cover. Do not use and before cleaning. Do not use appliance for information on a range top or in use a cracked carafe or...
... be used on examination, repair, or adjustment. 8. Read all instructions. 2. Use handles or knobs. Coffee brewer must be equal to or greater than intended use. It must be taken to reduce the hazards of fire or electric shock, do not remove the bottom cover. Do not use and before cleaning. Do not use appliance for information on a range top or in use a cracked carafe or...
Use & Care
Page 3
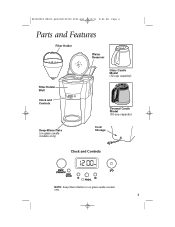
840202800 ENv02.qxd:840135000 Ev00.qxd 4/13/11 8:40 AM Page 3 Parts and Features Filter Holder Water Reservoir Filter Holder Well Clock and Controls Glass Carafe Model (12-cup capacity) Thermal Carafe Model (10-cup capacity) Keep-Warm Plate (on glass carafe models only) Cord Storage Clock and Controls NOTE: Keep-Warm Button is on glass carafe models only. 3
840202800 ENv02.qxd:840135000 Ev00.qxd 4/13/11 8:40 AM Page 3 Parts and Features Filter Holder Water Reservoir Filter Holder Well Clock and Controls Glass Carafe Model (12-cup capacity) Thermal Carafe Model (10-cup capacity) Keep-Warm Plate (on glass carafe models only) Cord Storage Clock and Controls NOTE: Keep-Warm Button is on glass carafe models only. 3
Use & Care
Page 4
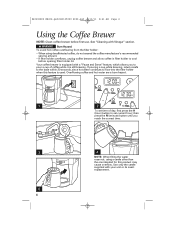
...) button to flow into the filter holder when this product may cause overflow. Use only the carafe supplied with Vinegar" section. Overflowing coffee and hot water are a burn hazard. 1 2 To set current hour; 840202800 ENv02.qxd:840135000 Ev00.qxd 4/13/11 8:41 AM Page 4 Using the Coffee Brewer NOTE: Clean coffee brewer before opening filter holder lid. If pouring a cup while brewing, return carafe to the base within 20 seconds, since hot water continues to set time of coffee while...
...) button to flow into the filter holder when this product may cause overflow. Use only the carafe supplied with Vinegar" section. Overflowing coffee and hot water are a burn hazard. 1 2 To set current hour; 840202800 ENv02.qxd:840135000 Ev00.qxd 4/13/11 8:41 AM Page 4 Using the Coffee Brewer NOTE: Clean coffee brewer before opening filter holder lid. If pouring a cup while brewing, return carafe to the base within 20 seconds, since hot water continues to set time of coffee while...
Use & Care
Page 5
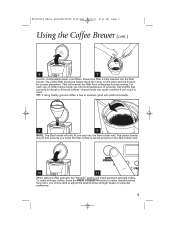
... AM Page 5 Using the Coffee Brewer (cont.) 6 7 Use No. 4 disposable paper cone filters. This will only fit one level tablespoon of coffee being made, use one way into the filter holder. The coffee filter should fold towards you will make stronger coffee, press the BREW STRENGTH button to medium grind will yield best results. 8 9 NOTE: The filter holder will prevent the filter from collapsing during brewing. TIP: If using freshly ground coffee, a fine...
... AM Page 5 Using the Coffee Brewer (cont.) 6 7 Use No. 4 disposable paper cone filters. This will only fit one level tablespoon of coffee being made, use one way into the filter holder. The coffee filter should fold towards you will make stronger coffee, press the BREW STRENGTH button to medium grind will yield best results. 8 9 NOTE: The filter holder will prevent the filter from collapsing during brewing. TIP: If using freshly ground coffee, a fine...
Use & Care
Page 6
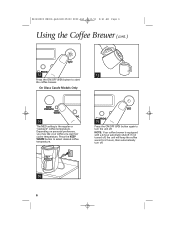
... 6 Using the Coffee Brewer (cont.) 12 13 Press the ON/OFF (I /O) button again to start the coffee brewer. Depending on personal preference, you may like your coffee at a warmer/ cooler temperature. NOTE: Your coffee brewer is the regular or "standard" coffee temperature. If not turned off, the unit will keep the coffee warm for 2 hours, then automatically turn the unit off . 16 6 Press the KEEP WARM button to select desired coffee...
... 6 Using the Coffee Brewer (cont.) 12 13 Press the ON/OFF (I /O) button again to start the coffee brewer. Depending on personal preference, you may like your coffee at a warmer/ cooler temperature. NOTE: Your coffee brewer is the regular or "standard" coffee temperature. If not turned off, the unit will keep the coffee warm for 2 hours, then automatically turn the unit off . 16 6 Press the KEEP WARM button to select desired coffee...
Use & Care
Page 7
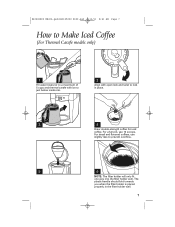
... coffee. 840202800 ENv02.qxd:840135000 Ev00.qxd 4/13/11 8:41 AM Page 7 How to Make Iced Coffee (For Thermal Carafe models only) 1 Fill water reservoir to a maximum of 5 cups and thermal carafe with ice to just below inside rim. 2 Align with open lock and twist to prevent overflow. 5 6 NOTE: The filter holder will only fit one way into the filter holder well. For decaf and flavored coffees, use 10 scoops...
... coffee. 840202800 ENv02.qxd:840135000 Ev00.qxd 4/13/11 8:41 AM Page 7 How to Make Iced Coffee (For Thermal Carafe models only) 1 Fill water reservoir to a maximum of 5 cups and thermal carafe with ice to just below inside rim. 2 Align with open lock and twist to prevent overflow. 5 6 NOTE: The filter holder will only fit one way into the filter holder well. For decaf and flavored coffees, use 10 scoops...
Use & Care
Page 8
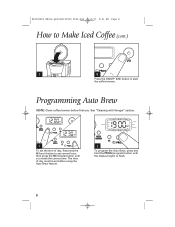
Programming Auto Brew NOTE: Clean coffee brewer before using the Auto Brew feature. 2 To program the Auto Brew, press and hold the PROG (program) button until you reach the correct time. See "Cleaning with Vinegar" section. 1 To set the time of day must be set current hour; The time of day, first press the H (hour) button to set before first use. then press the M (minute) button until the display begins to start the coffee brewer. 840202800 ENv02.qxd:840135000 Ev00.qxd 4/13/11 8:41 AM Page 8 How to Make Iced Coffee (cont.) 7 8 Press the ON/OFF (I/O) button to flash. 8
Programming Auto Brew NOTE: Clean coffee brewer before using the Auto Brew feature. 2 To program the Auto Brew, press and hold the PROG (program) button until you reach the correct time. See "Cleaning with Vinegar" section. 1 To set the time of day must be set current hour; The time of day, first press the H (hour) button to set before first use. then press the M (minute) button until the display begins to start the coffee brewer. 840202800 ENv02.qxd:840135000 Ev00.qxd 4/13/11 8:41 AM Page 8 How to Make Iced Coffee (cont.) 7 8 Press the ON/OFF (I/O) button to flash. 8
Use & Care
Page 9
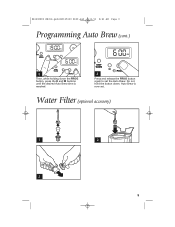
Auto Brew is reached. 4 Press and release the PROG button again to set . Do not hold the button down the PROG button, press the H and M buttons until the desired Auto Brew time is now set the Auto Brew. 840202800 ENv02.qxd:840135000 Ev00.qxd 4/13/11 8:41 AM Page 9 Programming Auto Brew (cont.) 3 Then, while holding down . Water Filter (optional accessory) 1 2 3 9
Auto Brew is reached. 4 Press and release the PROG button again to set . Do not hold the button down the PROG button, press the H and M buttons until the desired Auto Brew time is now set the Auto Brew. 840202800 ENv02.qxd:840135000 Ev00.qxd 4/13/11 8:41 AM Page 9 Programming Auto Brew (cont.) 3 Then, while holding down . Water Filter (optional accessory) 1 2 3 9
Use & Care
Page 10
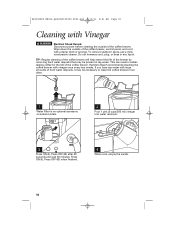
... 4/13/11 8:41 AM Page 10 Cleaning with large amounts of hard water deposits, it may be necessary to clean the coffee brewer more often. 1 Water Filter is an optional accessory on select models. 2 Pour 1 pint (2 cups/500 ml) vinegar into water reservoir. 3 Press ON (I ). To remove stubborn spots, use a mild, nonabrasive cleaner. Disconnect power before cleaning the outside of the coffee brewer, control panel, and cord with...
... 4/13/11 8:41 AM Page 10 Cleaning with large amounts of hard water deposits, it may be necessary to clean the coffee brewer more often. 1 Water Filter is an optional accessory on select models. 2 Pour 1 pint (2 cups/500 ml) vinegar into water reservoir. 3 Press ON (I ). To remove stubborn spots, use a mild, nonabrasive cleaner. Disconnect power before cleaning the outside of the coffee brewer, control panel, and cord with...
Use & Care
Page 11
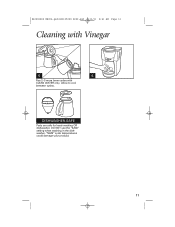
"SANI" cycle temperatures could damage your product. 11 840202800 ENv02.qxd:840135000 Ev00.qxd 4/13/11 8:41 AM Page 11 Cleaning with Vinegar 5 6 Run 2-3 more brew cycles with CLEAN WATER only. Allow to cool between cycles. DISHWASHER-SAFE Parts are safe for hand-washing OR dishwasher. DO NOT use the "SANI" setting when washing in the dishwasher.
"SANI" cycle temperatures could damage your product. 11 840202800 ENv02.qxd:840135000 Ev00.qxd 4/13/11 8:41 AM Page 11 Cleaning with Vinegar 5 6 Run 2-3 more brew cycles with CLEAN WATER only. Allow to cool between cycles. DISHWASHER-SAFE Parts are safe for hand-washing OR dishwasher. DO NOT use the "SANI" setting when washing in the dishwasher.
Use & Care
Page 12
... purchaser or gift recipient. Please call 1.877.293.9091 in Canada. All liability is repair or replacement of this product or any statutory warranty or condition of merchantability or fitness for a period of one of the purchase price. ...limitations may have other warranty or condition. and Canada. For faster service, locate the model, type, and series numbers on where you . This warranty does not cover glass, filters, wear from normal use, use or subjected to the store. Every implied warranty, including any component found to make a warranty claim, do not...
... purchaser or gift recipient. Please call 1.877.293.9091 in Canada. All liability is repair or replacement of this product or any statutory warranty or condition of merchantability or fitness for a period of one of the purchase price. ...limitations may have other warranty or condition. and Canada. For faster service, locate the model, type, and series numbers on where you . This warranty does not cover glass, filters, wear from normal use, use or subjected to the store. Every implied warranty, including any component found to make a warranty claim, do not...


