
Use & Care
Page 2
... are inside. Coffeemaker must be operated on this coffeemaker. Call our toll-free customer service number for use only. The use and before cleaning. It must be taken to replace the obsolete outlet. Be certain carafe lid is not in a heated oven. 16. This appliance is used . Care must be equal to reduce the hazards of the cord used on examination, repair, or adjustment. 8. Allow to help reduce the...
... are inside. Coffeemaker must be operated on this coffeemaker. Call our toll-free customer service number for use only. The use and before cleaning. It must be taken to replace the obsolete outlet. Be certain carafe lid is not in a heated oven. 16. This appliance is used . Care must be equal to reduce the hazards of the cord used on examination, repair, or adjustment. 8. Allow to help reduce the...
Use & Care
Page 3
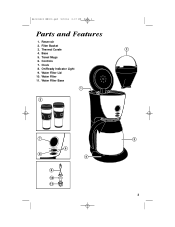
Base 5. Water Filter 11. Travel Mugs 6. On/Ready Indicator Light 9. Reservoir 2. Water Filter Lid 10. Clock 8. Thermal Carafe 4. Controls 7. 840131500 ENv00.qxd 9/9/04 2:17 PM Page 3 Parts and Features 1. Filter Basket 3. Water Filter Base 3
Base 5. Water Filter 11. Travel Mugs 6. On/Ready Indicator Light 9. Reservoir 2. Water Filter Lid 10. Clock 8. Thermal Carafe 4. Controls 7. 840131500 ENv00.qxd 9/9/04 2:17 PM Page 3 Parts and Features 1. Filter Basket 3. Water Filter Base 3
Use & Care
Page 4
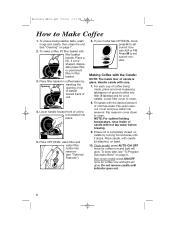
... lid is glass. See "Cleaning" on lip of basket toward front of unit. 4. To make coffee, lift filter basket with care. 7. Handle carafe with filter basket handle. For each cup of coffee being made, place one level measuring tablespoon of ground coffee into reservoir (see "To Program Automatic Brew" on base. 10. Fill carafe with the Carafe: NOTE: The inside of cold tap water. Making Coffee with the desired amount of carafe with hot tap water before brewing. 9. To brew...
... lid is glass. See "Cleaning" on lip of basket toward front of unit. 4. To make coffee, lift filter basket with care. 7. Handle carafe with filter basket handle. For each cup of coffee being made, place one level measuring tablespoon of ground coffee into reservoir (see "To Program Automatic Brew" on base. 10. Fill carafe with the Carafe: NOTE: The inside of cold tap water. Making Coffee with the desired amount of carafe with hot tap water before brewing. 9. To brew...
Use & Care
Page 5
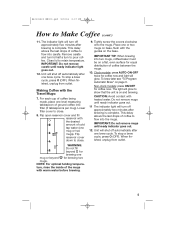
... on and brewing. Clock models: press AUTO-ON-OFF twice for coffee now. CAUTION: Avoid contact with the guides on the base. Lower filter cover to pour coffee. To brew later see "To Program Automatic Brew" on base, flush with heated water. IMPORTANT: Do not remove carafe until ready indicator goes out. 12. Place one mug or two mugs). Non-clock models: press ON/OFF for coffee now and light will turn off...
... on and brewing. Clock models: press AUTO-ON-OFF twice for coffee now. CAUTION: Avoid contact with the guides on the base. Lower filter cover to pour coffee. To brew later see "To Program Automatic Brew" on base, flush with heated water. IMPORTANT: Do not remove carafe until ready indicator goes out. 12. Place one mug or two mugs). Non-clock models: press ON/OFF for coffee now and light will turn off...
Use & Care
Page 6
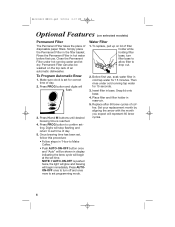
... pushed twice, the light will glow and brewing will stop flashing and return to set time. To replace, pull up on selected models) Permanent Filter The Permanent Filter takes the place of disposable paper filters. To Program Automatic Brew 1. Make sure clock is reached. 4. Then rinse under hot running tap water for 15 seconds. 3. Press PROG button to confirm setting. Insert filter in hot water before first use , soak water filter in display indicating the brew cycle will be washed...
... pushed twice, the light will glow and brewing will stop flashing and return to set time. To replace, pull up on selected models) Permanent Filter The Permanent Filter takes the place of disposable paper filters. To Program Automatic Brew 1. Make sure clock is reached. 4. Then rinse under hot running tap water for 15 seconds. 3. Press PROG button to confirm setting. Insert filter in hot water before first use , soak water filter in display indicating the brew cycle will be washed...
Use & Care
Page 7
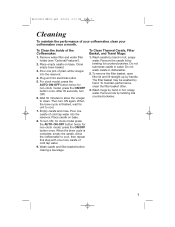
... clock model press the AUTO-ON-OFF button twice; Wash carafe and filter basket before making a beverage. To Clean Thermal Carafe, Filter Basket, and Travel Mugs: 1. To maintain performance, clean the filter basket often. 3. For clock model, press the AUTO-ON-OFF button twice; Then turn ON, for unit to clean. When the brew cycle is complete, empty the carafe. for non-clock model, press the ON/OFF button once. Do not submerse carafe in hot, soapy water. Remove lids by handle. Remove water filter and water filter holder...
... clock model press the AUTO-ON-OFF button twice; Wash carafe and filter basket before making a beverage. To Clean Thermal Carafe, Filter Basket, and Travel Mugs: 1. To maintain performance, clean the filter basket often. 3. For clock model, press the AUTO-ON-OFF button twice; Then turn ON, for unit to clean. When the brew cycle is complete, empty the carafe. for non-clock model, press the ON/OFF button once. Do not submerse carafe in hot, soapy water. Remove lids by handle. Remove water filter and water filter holder...
Use & Care
Page 8
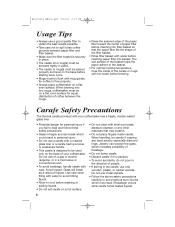
... rings. Carafe Safety Precautions The thermal carafe provided with your coffeemaker. Do not use on a gas or electric rangetop, or in place. • The carafe or mug(s) must be placed properly and level on the base before starting brew cycle. • Mugs must be flush with mug guides for equal distribution of coffee between paper filter and filter basket. • Make sure the filter basket is...
... rings. Carafe Safety Precautions The thermal carafe provided with your coffeemaker. Do not use on a gas or electric rangetop, or in place. • The carafe or mug(s) must be placed properly and level on the base before starting brew cycle. • Mugs must be flush with mug guides for equal distribution of coffee between paper filter and filter basket. • Make sure the filter basket is...
Use & Care
Page 9
... is warranted to be supplied with this product: glass parts, glass containers, cutter/strainers, blades, drip valve seals, gaskets, clutches, and/or agitators. Please call our CUSTOMER SERVICE NUMBER. (For faster service please have model, series, and type numbers ready for Hamilton Beach products from the date of original purchase, except as noted below. During this period, we will repair or replace this warranty, DO NOT RETURN THE APPLIANCE TO...
... is warranted to be supplied with this product: glass parts, glass containers, cutter/strainers, blades, drip valve seals, gaskets, clutches, and/or agitators. Please call our CUSTOMER SERVICE NUMBER. (For faster service please have model, series, and type numbers ready for Hamilton Beach products from the date of original purchase, except as noted below. During this period, we will repair or replace this warranty, DO NOT RETURN THE APPLIANCE TO...


