
Use and Care Manual
Page 2
... is removed during brew cycle and when serving coffee. 12. Allow to cool before putting on or taking off parts and before cleaning. Do not let cord hang over the countertop or tabletop where it still does not fit, have an electrician replace the outlet. 2 The length of electric shock. Other Consumer Safety Information This appliance is used by...
... is removed during brew cycle and when serving coffee. 12. Allow to cool before putting on or taking off parts and before cleaning. Do not let cord hang over the countertop or tabletop where it still does not fit, have an electrician replace the outlet. 2 The length of electric shock. Other Consumer Safety Information This appliance is used by...

Use and Care Manual
Page 4
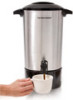
...;4 cup (175 ml) *Always keep small particles of ground coffee from sifting through). 4 Make sure stem is acceptable. However, coffee marked "For All Coffeemakers" is properly seated in heating unit well in a percolatortype coffeemaker. If using coffee that has been ground specifically for use cold, fresh tap water. 1 Remove cover, coffee basket, and stem. 2 Fill urn to desired water level. How to Make Coffee BEFORE FIRST USE: Clean the urn by following the steps...
...;4 cup (175 ml) *Always keep small particles of ground coffee from sifting through). 4 Make sure stem is acceptable. However, coffee marked "For All Coffeemakers" is properly seated in heating unit well in a percolatortype coffeemaker. If using coffee that has been ground specifically for use cold, fresh tap water. 1 Remove cover, coffee basket, and stem. 2 Fill urn to desired water level. How to Make Coffee BEFORE FIRST USE: Clean the urn by following the steps...

Use and Care Manual
Page 5
..., remove coffee basket and stem when cycle is hot when the ready light glows. 5 Lock cover in place and plug in the urn. Burn Hazard. Remove cover, coffee basket, and stem. Water is complete. The metal urn parts will remain at serving temperature until unplugged. Fill urn with cold water and repeat Steps 1 through 9. If keeping coffee warm for brewing time. • Urn will be hot. then turn to lock. WARNING! TO HEAT WATER...
..., remove coffee basket and stem when cycle is hot when the ready light glows. 5 Lock cover in place and plug in the urn. Burn Hazard. Remove cover, coffee basket, and stem. Water is complete. The metal urn parts will remain at serving temperature until unplugged. Fill urn with cold water and repeat Steps 1 through 9. If keeping coffee warm for brewing time. • Urn will be hot. then turn to lock. WARNING! TO HEAT WATER...

Use and Care Manual
Page 6
Periodically clean coffee urn with warm, soapy water. 4 Wipe exterior of the coffee urn. 6 See "How to Clean w WARNING Electrical Shock Hazard. The metal urn parts will be hot. How to Clean Mineral Deposits and Buildup." 1 Unplug unit. 2 Remove cover, coffee basket, and stem. NOTICE: To avoid damage to remove the cover. 3 Clean inside of coffee urn with water and white vinegar solution. Use a pot holder or oven mitt to the urn, do...
Periodically clean coffee urn with warm, soapy water. 4 Wipe exterior of the coffee urn. 6 See "How to Clean w WARNING Electrical Shock Hazard. The metal urn parts will be hot. How to Clean Mineral Deposits and Buildup." 1 Unplug unit. 2 Remove cover, coffee basket, and stem. NOTICE: To avoid damage to remove the cover. 3 Clean inside of coffee urn with water and white vinegar solution. Use a pot holder or oven mitt to the urn, do...

Use and Care Manual
Page 7
.... Drain liquid from urn using hard water. 1 Remove coffee basket and cover. How to remove mineral deposits and buildup, or more frequently if using dispensing bar. then clean. See "How to 42-cup fill line. 2 Replace stem and coffee basket. Let cool; Pour equal parts water and white vinegar into urn. 2 Replace coffee basket and cover. Once urn is completely cool, follow steps in "How to Clean" section. 1 Add water to Clean" section. 7 Plug in...
.... Drain liquid from urn using hard water. 1 Remove coffee basket and cover. How to remove mineral deposits and buildup, or more frequently if using dispensing bar. then clean. See "How to 42-cup fill line. 2 Replace stem and coffee basket. Let cool; Pour equal parts water and white vinegar into urn. 2 Replace coffee basket and cover. Once urn is completely cool, follow steps in "How to Clean" section. 1 Add water to Clean" section. 7 Plug in...

Use and Care Manual
Page 8
Troubleshooting PROBLEM Coffee not brewing/ coffee stops brewing/ unit will not turn on. Coffee difficult to Clean." • Water tank is empty. • Unit is unplugged. • Power outage. • Stem is not aligned with heating unit well. • Flush coffee grounds from serving spout. 8 Clean the urn following instructions in "How to dispense. PROBABLE CAUSE • Mineral deposits have built up.
Troubleshooting PROBLEM Coffee not brewing/ coffee stops brewing/ unit will not turn on. Coffee difficult to Clean." • Water tank is empty. • Unit is unplugged. • Power outage. • Stem is not aligned with heating unit well. • Flush coffee grounds from serving spout. 8 Clean the urn following instructions in "How to dispense. PROBABLE CAUSE • Mineral deposits have built up.
Use and Care Manual
Page 9
... liability is in the U.S. This warranty gives you live. or hamiltonbeach.ca in the U.S. For faster service, locate the model, type, and series numbers on implied warranties or special, incidental, or consequential damages, so the foregoing limitations may have other warranty or condition. This warranty is void if the product is used in lieu of this written warranty. To make a warranty claim. Please call 1.800...
... liability is in the U.S. This warranty gives you live. or hamiltonbeach.ca in the U.S. For faster service, locate the model, type, and series numbers on implied warranties or special, incidental, or consequential damages, so the foregoing limitations may have other warranty or condition. This warranty is void if the product is used in lieu of this written warranty. To make a warranty claim. Please call 1.800...


