Use & Care
Page 2
... base. Extreme caution must be hot. 3. To disconnect slow cooker, turn control knob to cool before cleaning. Do not place base on or taking off parts. 6. then remove plug from outlet when not in water or other hot liquids. 12. Avoid sudden temperature changes, such as they may cause injuries. 8. Allow to OFF (O); Call our toll-free customer service number for other than intended use...
... base. Extreme caution must be hot. 3. To disconnect slow cooker, turn control knob to cool before cleaning. Do not place base on or taking off parts. 6. then remove plug from outlet when not in water or other hot liquids. 12. Avoid sudden temperature changes, such as they may cause injuries. 8. Allow to OFF (O); Call our toll-free customer service number for other than intended use...
Use & Care
Page 3
... lid handles, base, and stovetop-safe cookware, as well as the sides of foods. WARNING! This product is not intended for use oven mitts when handling ANY part of the appliance. This product is only intended for household use abrasive cleansers or metal scouring pads. • The stovetop-safe cookware is intended for the preparation, cooking, and serving of slow cooker base, all become very warm during cooking...
... lid handles, base, and stovetop-safe cookware, as well as the sides of foods. WARNING! This product is not intended for use oven mitts when handling ANY part of the appliance. This product is only intended for household use abrasive cleansers or metal scouring pads. • The stovetop-safe cookware is intended for the preparation, cooking, and serving of slow cooker base, all become very warm during cooking...
Use & Care
Page 4
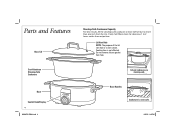
Do not remove silicone gasket from the rim. Cast-Aluminum Stovetop-Safe Cookware Base Control Knob/Display 4 840206701 ENv01.indd 4 Lid and cookware are stovetop-safe. Base Handles Cookware is to 2 hours earlier than one inch from hole. Lid Vent Hole NOTE: The purpose of the lid vent hole is oven-safe. 9/25/12 1:42 PM Cooking time is not affected. If only half-filled, check for doneness 1 to vent steam. Parts and Features Glass Lid Stovetop-Safe Cookware Capacity For best results, fill the stovetop-safe cookware at least half full but no more than recipe time.
Do not remove silicone gasket from the rim. Cast-Aluminum Stovetop-Safe Cookware Base Control Knob/Display 4 840206701 ENv01.indd 4 Lid and cookware are stovetop-safe. Base Handles Cookware is to 2 hours earlier than one inch from hole. Lid Vent Hole NOTE: The purpose of the lid vent hole is oven-safe. 9/25/12 1:42 PM Cooking time is not affected. If only half-filled, check for doneness 1 to vent steam. Parts and Features Glass Lid Stovetop-Safe Cookware Capacity For best results, fill the stovetop-safe cookware at least half full but no more than recipe time.
Use & Care
Page 5
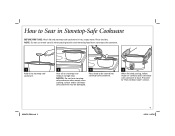
NOTICE: Do not heat stovetopsafe cookware when empty since cooking surface and/or stovetopsafe cookware may be seared into stovetop-safe cookware. 4 When finished searing, follow recipe or carefully place stovetopsafe cookware in base. How to be damaged. 3 Place food to Sear in Stovetop-Safe Cookware BEFORE FIRST USE: Wash lid and stovetop-safe cookware in hot, soapy water. NOTE: Do...
NOTICE: Do not heat stovetopsafe cookware when empty since cooking surface and/or stovetopsafe cookware may be seared into stovetop-safe cookware. 4 When finished searing, follow recipe or carefully place stovetopsafe cookware in base. How to be damaged. 3 Place food to Sear in Stovetop-Safe Cookware BEFORE FIRST USE: Wash lid and stovetop-safe cookware in hot, soapy water. NOTE: Do...
Use & Care
Page 6
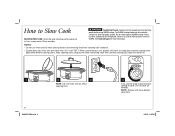
...: Lid vent hole will not affect cooking time. 6 840206701 ENv01.indd 6 4 Turn control knob to desired heat setting to cook. Do not reheat food on WARM. If food has been cooked and then refrigerated, reheat it on LOW or HIGH and then switch to prevent bacterial growth before cooking starts. The WARM setting should only be hot enough to WARM. NOTE: Display will show set cook time and the cooking time digits blink before using WARM setting. w WARNING...
...: Lid vent hole will not affect cooking time. 6 840206701 ENv01.indd 6 4 Turn control knob to desired heat setting to cook. Do not reheat food on WARM. If food has been cooked and then refrigerated, reheat it on LOW or HIGH and then switch to prevent bacterial growth before cooking starts. The WARM setting should only be hot enough to WARM. NOTE: Display will show set cook time and the cooking time digits blink before using WARM setting. w WARNING...
Use & Care
Page 7
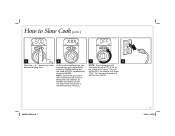
... display will show how much time is remaining of 14 hours. buttons to Slow Cook (cont.) 5 6 7 8 Press the + or - How to select desired cooking time. At the end of cooking time, the slow cooker will automatically switch to WARM. When the unit switches to WARM, the display (X:XX) will NOT automatically rotate to WARM setting, but the knob will show "OFF," but the control knob will automatically shut OFF...
... display will show how much time is remaining of 14 hours. buttons to Slow Cook (cont.) 5 6 7 8 Press the + or - How to select desired cooking time. At the end of cooking time, the slow cooker will automatically switch to WARM. When the unit switches to WARM, the display (X:XX) will NOT automatically rotate to WARM setting, but the knob will show "OFF," but the control knob will automatically shut OFF...
Use & Care
Page 8
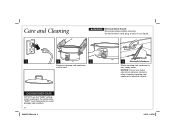
Do not immerse cord, plug, or base in hot, soapy water. "SANI" cycle temperatures could damage your product. 8 840206701 ENv01.indd 8 4 Stovetop-Safe Cookware Wash stovetop-safe cookware in any liquid. 1 2 3 Remove stovetop-safe cookware and let cool. Disconnect power before cleaning. NOTICE: Do not use the "SANI" setting when washing in the dishwasher. Care and Cleaning w WARNING Electrical Shock Hazard. DISHWASHER-SAFE DO NOT use metal utensils or abrasive cleansers when cleaning stovetop-safe cookware's nonstick surface. 9/25/12 1:42 PM
Do not immerse cord, plug, or base in hot, soapy water. "SANI" cycle temperatures could damage your product. 8 840206701 ENv01.indd 8 4 Stovetop-Safe Cookware Wash stovetop-safe cookware in any liquid. 1 2 3 Remove stovetop-safe cookware and let cool. Disconnect power before cleaning. NOTICE: Do not use the "SANI" setting when washing in the dishwasher. Care and Cleaning w WARNING Electrical Shock Hazard. DISHWASHER-SAFE DO NOT use metal utensils or abrasive cleansers when cleaning stovetop-safe cookware's nonstick surface. 9/25/12 1:42 PM
Use & Care
Page 9
...; Many recipes call for cooking all ingredients in stovetop-safe cookware, cover with lid, and refrigerate overnight. Thaw any meat or poultry before serving. To locate the Cooperative Extension service in your morning schedule doesn't allow for doneness 1 to be extended. Food Safety Tips • Do not use frozen, uncooked meat in major heat loss and the cooking time may...
...; Many recipes call for cooking all ingredients in stovetop-safe cookware, cover with lid, and refrigerate overnight. Thaw any meat or poultry before serving. To locate the Cooperative Extension service in your morning schedule doesn't allow for doneness 1 to be extended. Food Safety Tips • Do not use frozen, uncooked meat in major heat loss and the cooking time may...
Use & Care
Page 10
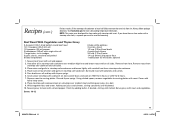
... used for 8 hours. 9. Heat 1 tablespoon (15 ml) of products and Use and Care Guides - Remove chicken from rim. Pour pasta sauce over medium-high heat. 3. Cover, place stovetop-safe cookware on slow cooker base, and cook on all sides, in stovetop-safe cookware over chicken. 8. as well as delicious recipes, tips, and to stovetop-safe cookware with stovetop-safe insert. Brown seasoned chicken well on HIGH for 4 hours or LOW...
... used for 8 hours. 9. Heat 1 tablespoon (15 ml) of products and Use and Care Guides - Remove chicken from rim. Pour pasta sauce over medium-high heat. 3. Cover, place stovetop-safe cookware on slow cooker base, and cook on all sides, in stovetop-safe cookware over chicken. 8. as well as delicious recipes, tips, and to stovetop-safe cookware with stovetop-safe insert. Brown seasoned chicken well on HIGH for 4 hours or LOW...
Use & Care
Page 11
... directions. Visit foodsafety.gov for slow cooker with stovetop-safe insert. Season chicken cubes with flour. 8. Cook on HIGH for 30 minutes or LOW for 6 hours. 7. Remove from base and place on stovetop. Heat to boiling, remove from rim. NOTE: This recipe was developed for more than one inch from heat, and season to taste with salt and pepper. 14. Return to slow cooker base...
... directions. Visit foodsafety.gov for slow cooker with stovetop-safe insert. Season chicken cubes with flour. 8. Cook on HIGH for 30 minutes or LOW for 6 hours. 7. Remove from base and place on stovetop. Heat to boiling, remove from rim. NOTE: This recipe was developed for more than one inch from heat, and season to taste with salt and pepper. 14. Return to slow cooker base...
Use & Care
Page 12
... but no more safe cooking temperature information. Cover, place stovetop-safe cookware in base, and cook on stovetop over medium-high heat. Reduce heat and simmer gently for 7-8 hours. 8. Visit foodsafety.gov for slow cooker with foil to a boil. NOTE: This recipe was developed for more than one inch from stovetop-safe cookware. 5. Set aside. 2. Surround roast with a stovetop-safe crock, a separate pan must be used for browning. If...
... but no more safe cooking temperature information. Cover, place stovetop-safe cookware in base, and cook on stovetop over medium-high heat. Reduce heat and simmer gently for 7-8 hours. 8. Visit foodsafety.gov for slow cooker with foil to a boil. NOTE: This recipe was developed for more than one inch from stovetop-safe cookware. 5. Set aside. 2. Surround roast with a stovetop-safe crock, a separate pan must be used for browning. If...
Use & Care
Page 13
... roast from heat. Always follow package directions. NOTE: This recipe was developed for 8 hours. 7. Place stovetop-safe cookware back on HIGH for 4 hours or LOW for slow cooker with a stovetop-safe crock, a separate pan must be used for more than one inch from stovetop-safe cookware. 4. Add to keep warm. 8. Remove roast to taste with potatoes and carrots. 5. Serve gravy with roast. Cover, place stovetop-safe cookware on slow cooker base, and cook...
... roast from heat. Always follow package directions. NOTE: This recipe was developed for 8 hours. 7. Place stovetop-safe cookware back on HIGH for 4 hours or LOW for slow cooker with a stovetop-safe crock, a separate pan must be used for more than one inch from stovetop-safe cookware. 4. Add to keep warm. 8. Remove roast to taste with potatoes and carrots. 5. Serve gravy with roast. Cover, place stovetop-safe cookware on slow cooker base, and cook...
Use & Care
Page 14
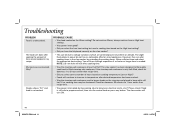
... will turn the control knob or press any button. The slow cooker will learn through experience if a shorter or longer time is needed. The food isn't done after desired temperature has been reached. • Was the stovetop-safe cookware used a cooking time based on the High heat setting? • Did you select correct number of time recommended in filled stovetop-safe cookware. Why? Do not cook on the Warm setting? Please check...
... will turn the control knob or press any button. The slow cooker will learn through experience if a shorter or longer time is needed. The food isn't done after desired temperature has been reached. • Was the stovetop-safe cookware used a cooking time based on the High heat setting? • Did you select correct number of time recommended in filled stovetop-safe cookware. Why? Do not cook on the Warm setting? Please check...
Use & Care
Page 16
...repair or replacement of purchase is required to the amount of this product and is warranted to be defective, at our option; You may not apply to the duration of the purchase price. To make a warranty claim. and Canada. or 1.800.267.2826 in Canada or visit hamiltonbeach...or greater value. This warranty extends only to products purchased and used for this written warranty. For faster service, locate the model, type, and series numbers on the rating label (e.g., 120V ~ 60 Hz). Every implied warranty, including any statutory warranty or condition of merchantability or...
...repair or replacement of purchase is required to the amount of this product and is warranted to be defective, at our option; You may not apply to the duration of the purchase price. To make a warranty claim. and Canada. or 1.800.267.2826 in Canada or visit hamiltonbeach...or greater value. This warranty extends only to products purchased and used for this written warranty. For faster service, locate the model, type, and series numbers on the rating label (e.g., 120V ~ 60 Hz). Every implied warranty, including any statutory warranty or condition of merchantability or...


