Use & Care
Page 2
...! heated oven. 4. This product is dropped or damaged in removable crock. 840203300 ENv04.qxd:Layout 1 4/29/11 9:15 AM Page 2 IMPORTANT SAFEGUARDS When using an adapter. To protect against electric shock, do not cook or after the appliance malfunctions or is only intended for 14. Call our toll-free customer service number for the preparation, cooking, and serving of the cord used when...
...! heated oven. 4. This product is dropped or damaged in removable crock. 840203300 ENv04.qxd:Layout 1 4/29/11 9:15 AM Page 2 IMPORTANT SAFEGUARDS When using an adapter. To protect against electric shock, do not cook or after the appliance malfunctions or is only intended for 14. Call our toll-free customer service number for the preparation, cooking, and serving of the cord used when...
Use & Care
Page 3
... slow cooker's base get very warm because the heating elements are located here. Use handles on any unprotected surface or countertop. • The crock is very rough and can become very hot. Do not place lid in a microwave oven, conventional oven, or on a burner or stove top. Use caution. Never place lid on stove top. Use oven mitts to remove crock. 3 The sides of crock is microwave-safe and oven...
... slow cooker's base get very warm because the heating elements are located here. Use handles on any unprotected surface or countertop. • The crock is very rough and can become very hot. Do not place lid in a microwave oven, conventional oven, or on a burner or stove top. Use caution. Never place lid on stove top. Use oven mitts to remove crock. 3 The sides of crock is microwave-safe and oven...
Use & Care
Page 4
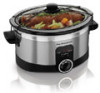
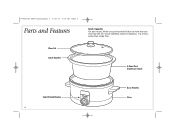
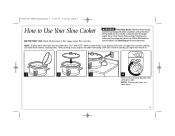
Glass Lid Crock Handles 6-Quart Oval Stoneware Crock Control Knob/Display 4 Base Handles Base 840203300 ENv04.qxd:Layout 1 4/29/11 9:15 AM Page 4 Parts and Features Crock Capacity For best results, fill the crock at least half full but no more than recipe time. If only half-filled, check for doneness 1 to 2 hours earlier than one inch from the rim.
Glass Lid Crock Handles 6-Quart Oval Stoneware Crock Control Knob/Display 4 Base Handles Base 840203300 ENv04.qxd:Layout 1 4/29/11 9:15 AM Page 4 Parts and Features Crock Capacity For best results, fill the crock at least half full but no more than recipe time. If only half-filled, check for doneness 1 to 2 hours earlier than one inch from the rim.
Use & Care
Page 5
... refrigerated, reheat it on Warm setting. Rinse and dry. The Warm setting should only be hot enough to cook. When control knob is set, display will show any text other than "Err" and "OFF." Food must be used after a recipe has been thoroughly cooked. Do not reheat food on LOW or HIGH and then switch to Use Your Slow Cooker BEFORE FIRST USE: Wash lid and crock in hot, soapy water. 840203300...
... refrigerated, reheat it on Warm setting. Rinse and dry. The Warm setting should only be hot enough to cook. When control knob is set, display will show any text other than "Err" and "OFF." Food must be used after a recipe has been thoroughly cooked. Do not reheat food on LOW or HIGH and then switch to Use Your Slow Cooker BEFORE FIRST USE: Wash lid and crock in hot, soapy water. 840203300...
Use & Care
Page 6
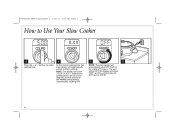
The unit will be OFF, the display will show "X:XX" (X:XX = 14:00 minus cooking time), which is how long the unit will remain on the WARM setting before automatically shutting OFF. 7 8 NOTE: The slow cooker will automatically shut OFF if left on for a total of cooking time, the slow cooker will NOT turn to Use Your Slow Cooker 5 Press the + or - 840203300 ENv04.qxd:Layout 1 4/29/11 9:15 AM Page 6 How to OFF/O. 6 buttons to Warm setting. NOTE: The display will show "OFF," but the control knob will automatically switch to select cooking time. 6 At the end of 14 hours.
The unit will be OFF, the display will show "X:XX" (X:XX = 14:00 minus cooking time), which is how long the unit will remain on the WARM setting before automatically shutting OFF. 7 8 NOTE: The slow cooker will automatically shut OFF if left on for a total of cooking time, the slow cooker will NOT turn to Use Your Slow Cooker 5 Press the + or - 840203300 ENv04.qxd:Layout 1 4/29/11 9:15 AM Page 6 How to OFF/O. 6 buttons to Warm setting. NOTE: The display will show "OFF," but the control knob will automatically switch to select cooking time. 6 At the end of 14 hours.
Use & Care
Page 7
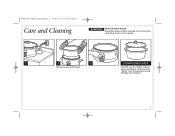
Do not immerse cord, plug, or base in the dishwasher. Disconnect power before cleaning. "SANI" cycle temperatures could damage your product. 7 840203300 ENv04.qxd:Layout 1 4/29/11 9:15 AM Page 7 Care and Cleaning w WARNING Electrical Shock Hazard. DO NOT use the "SANI" setting when washing in any liquid. 1 2 3 DISHWASHER-SAFE Remove crock and let cool.
Do not immerse cord, plug, or base in the dishwasher. Disconnect power before cleaning. "SANI" cycle temperatures could damage your product. 7 840203300 ENv04.qxd:Layout 1 4/29/11 9:15 AM Page 7 Care and Cleaning w WARNING Electrical Shock Hazard. DO NOT use the "SANI" setting when washing in any liquid. 1 2 3 DISHWASHER-SAFE Remove crock and let cool.

Use & Care
Page 8
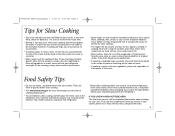
Do not use Lid Latch™ while cooking. 1 Place latch under other handle. 2 Once attached, latch can also be crossed over knob to Use Lid Latch™ (optional feature on some models) The Lid Latch™ helps secure lid while moving, transporting, or storing slow cooker. 840203300 ENv04.qxd:Layout 1 4/29/11 9:15 AM Page 8 How to further secure lid. 8 Stretch to other side and secure under one handle.
Do not use Lid Latch™ while cooking. 1 Place latch under other handle. 2 Once attached, latch can also be crossed over knob to Use Lid Latch™ (optional feature on some models) The Lid Latch™ helps secure lid while moving, transporting, or storing slow cooker. 840203300 ENv04.qxd:Layout 1 4/29/11 9:15 AM Page 8 How to further secure lid. 8 Stretch to other side and secure under one handle.
Use & Care
Page 9
... to prevent scorching on High, you may need to prepare a recipe, do NOT place the entire crock in the refrigerator since contents will need to be liquid in the recipe to a simmer. • Many recipes call for doneness 1 to 2 hours earlier than recipe time. • Stirring is not necessary when slow cooking and removing glass lid results in original recipe. Pasta, seafood, milk, cream...
... to prevent scorching on High, you may need to prepare a recipe, do NOT place the entire crock in the refrigerator since contents will need to be liquid in the recipe to a simmer. • Many recipes call for doneness 1 to 2 hours earlier than recipe time. • Stirring is not necessary when slow cooking and removing glass lid results in original recipe. Pasta, seafood, milk, cream...
Use & Care
Page 10
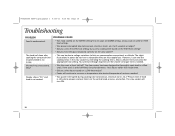
... power interrupted during cooking (due to increase in temperature after cooking the amount of time recommended in a filled crock. Allow sufficient time and select the appropriate heat setting. If the crock is only half-filled, check for 5 seconds or longer? • Did you select the LOW heat setting, but used a cooking time based on the HIGH heat setting? • Did you select hours based on the slow cooker? • This can alter the cooking times...
... power interrupted during cooking (due to increase in temperature after cooking the amount of time recommended in a filled crock. Allow sufficient time and select the appropriate heat setting. If the crock is only half-filled, check for 5 seconds or longer? • Did you select the LOW heat setting, but used a cooking time based on the HIGH heat setting? • Did you select hours based on the slow cooker? • This can alter the cooking times...

Use & Care
Page 12
... available, we will replace with the printed directions, or damage to the product resulting from defects in conformity with a similar one of this product and is disclaimed except to the extent prohibited by breach of any voltage and waveform other warranty or condition. This warranty gives you . For faster service, locate the model, type, and series numbers on the rating label...
... available, we will replace with the printed directions, or damage to the product resulting from defects in conformity with a similar one of this product and is disclaimed except to the extent prohibited by breach of any voltage and waveform other warranty or condition. This warranty gives you . For faster service, locate the model, type, and series numbers on the rating label...


