

Use And Care
Page 1
840115700 Ev00.qxd 6/6/03 8:58 AM Page 1 Humidifier 840115700 Humidifier Safety 2 Know Your Humidifier 4 How to Assemble and Use 5 How to Clean 11 Troubleshooting Guide 14 Customer Service 16 In USA: 1-800-851-8900 In Canada: 1-800-267-2826
840115700 Ev00.qxd 6/6/03 8:58 AM Page 1 Humidifier 840115700 Humidifier Safety 2 Know Your Humidifier 4 How to Assemble and Use 5 How to Clean 11 Troubleshooting Guide 14 Customer Service 16 In USA: 1-800-851-8900 In Canada: 1-800-267-2826
Use And Care
Page 2
... humidifier requires regular cleaning and maintenance. Never clean the humidifier in any openings. 5. To disconnect cord, turn the control to move the humidifier or supporting surface while it is dropped or damaged in a manner other replacement parts not recommended or sold by Hamilton Beach/Proctor-Silex, Inc. 17. SAVE THESE INSTRUCTIONS! 2 Never connect the humidifier to clean the humidifier, other than 120 V AC. 8. Always unplug the humidifier before removing the water tank...
... humidifier requires regular cleaning and maintenance. Never clean the humidifier in any openings. 5. To disconnect cord, turn the control to move the humidifier or supporting surface while it is dropped or damaged in a manner other replacement parts not recommended or sold by Hamilton Beach/Proctor-Silex, Inc. 17. SAVE THESE INSTRUCTIONS! 2 Never connect the humidifier to clean the humidifier, other than 120 V AC. 8. Always unplug the humidifier before removing the water tank...

Use And Care
Page 3
... to help reduce the risk of plug has one way. Hamilton Beach/ProctorSilex, Inc. Some units can be responsible for household use only. This appliance is a safety feature intended to insert the plug into an electrical outlet only one blade wider than the rating of the polarized plug by water. The suggested level for the humidifier that...
... to help reduce the risk of plug has one way. Hamilton Beach/ProctorSilex, Inc. Some units can be responsible for household use only. This appliance is a safety feature intended to insert the plug into an electrical outlet only one blade wider than the rating of the polarized plug by water. The suggested level for the humidifier that...
Use And Care
Page 5
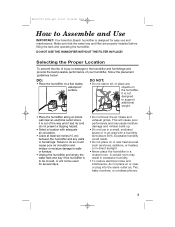
... air intake and exhaust grilles. DO NOT USE THE HUMIDIFIER WITHOUT THE FILTER IN PLACE! Failure to the humidifier and furnishings and provide the best possible performance of injury or damage to do not present a tripping hazard. • Select a location with a humidity level above 50%. Make sure that the water tray and filter are properly installed before filling the tank and operating the humidifier...
... air intake and exhaust grilles. DO NOT USE THE HUMIDIFIER WITHOUT THE FILTER IN PLACE! Failure to the humidifier and furnishings and provide the best possible performance of injury or damage to do not present a tripping hazard. • Select a location with a humidity level above 50%. Make sure that the water tray and filter are properly installed before filling the tank and operating the humidifier...

Use And Care
Page 6
Excess cord can be stored in the base. 3. Set the fan enclosure onto the humidifier base. 840115700 Ev00.qxd 6/6/03 8:58 AM Page 6 Humidifier Assembly 1. Place the filter on the water tray as shown. 4. Slide the cord through the notch at the bottom of the cord wrap compartment. Make sure that it is securely seated in the indent in the cord wrap compartment. 2. Insert the water tray into the humidifier base. Be sure that the filter lines up with the fan cover. 6
Excess cord can be stored in the base. 3. Set the fan enclosure onto the humidifier base. 840115700 Ev00.qxd 6/6/03 8:58 AM Page 6 Humidifier Assembly 1. Place the filter on the water tray as shown. 4. Slide the cord through the notch at the bottom of the cord wrap compartment. Make sure that it is securely seated in the indent in the cord wrap compartment. 2. Insert the water tray into the humidifier base. Be sure that the filter lines up with the fan cover. 6

Use And Care
Page 7
... COOL tap water. DO NOT USE HOT WATER. When carrying the tank, use the carry handle and support the tank from the other side. Be sure to an upright position. Return the tank to keep the tank free of the filter, it counter- NOTE: Using distilled or deionized water will prolong the life of the tank by turning it is in place before inverting water tank. Filter Tip! Fill the tank...
... COOL tap water. DO NOT USE HOT WATER. When carrying the tank, use the carry handle and support the tank from the other side. Be sure to an upright position. Return the tank to keep the tank free of the filter, it counter- NOTE: Using distilled or deionized water will prolong the life of the tank by turning it is in place before inverting water tank. Filter Tip! Fill the tank...

Use And Care
Page 8
...! If it is unplugged and remove the water tank first. Plugging in the Humidifier WARNING: To reduce the risk of the tank and into the water tray when the tank is properly seated, using the fan enclosure and the base to align the tank. CAUTION: Once the humidifier has been filled, do not ...does not fit, contact a qualified electrician to splash into air intake or exhaust grilles. Never pour water into or allow water to replace the obsolete outlet. 8 840115700 Ev00.qxd 6/6/03 8:58 AM Page 8 Placing the Water Tank on the Base Lower the tank into place until it is in position.
...! If it is unplugged and remove the water tank first. Plugging in the Humidifier WARNING: To reduce the risk of the tank and into the water tray when the tank is properly seated, using the fan enclosure and the base to align the tank. CAUTION: Once the humidifier has been filled, do not ...does not fit, contact a qualified electrician to splash into air intake or exhaust grilles. Never pour water into or allow water to replace the obsolete outlet. 8 840115700 Ev00.qxd 6/6/03 8:58 AM Page 8 Placing the Water Tank on the Base Lower the tank into place until it is in position.

Use And Care
Page 9
Setting the Controls - 2-Speed Humidifier with Humidistat Setting the fan speed Turn the fan speed knob to the desired setting. Turn the knob clockwise for higher humidity, counterclockwise for a more gradual increase, set the knob to maintain a selected humidity level. Once the desired humidity level is reached, the desired humidity indicator will light and the fan will turn off to Quietmist™. Indicator lights The power on indicator will light to indicate that the...
Setting the Controls - 2-Speed Humidifier with Humidistat Setting the fan speed Turn the fan speed knob to the desired setting. Turn the knob clockwise for higher humidity, counterclockwise for a more gradual increase, set the knob to maintain a selected humidity level. Once the desired humidity level is reached, the desired humidity indicator will light and the fan will turn off to Quietmist™. Indicator lights The power on indicator will light to indicate that the...

Use And Care
Page 10
... operation, set the humidity within a range from 20% to HI. The current room humidity level is displayed in the humidity level, set the knob to Quietmist™. If it is displayed in 5% increments. 840115700 Ev00.qxd 6/6/03 8:59 AM Page 10 Setting the Controls - 3-Speed Humidifier with Electronic Humidistat Setting the fan speed Turn the fan speed knob to adjust the humidity level. Fan Speed Knob 2. To increase the humidity in a room...
... operation, set the humidity within a range from 20% to HI. The current room humidity level is displayed in the humidity level, set the knob to Quietmist™. If it is displayed in 5% increments. 840115700 Ev00.qxd 6/6/03 8:59 AM Page 10 Setting the Controls - 3-Speed Humidifier with Electronic Humidistat Setting the fan speed Turn the fan speed knob to adjust the humidity level. Fan Speed Knob 2. To increase the humidity in a room...
Use And Care
Page 11
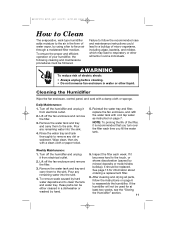
... or washed by using a fan to the sink. Cleaning the Humidifier Wipe the fan enclosure, control panel, and cord with a clean cloth or paper towel. 5. Weekly Maintenance: 1. If the humidifier will not be replaced. wWARNING To reduce risk of water vapor, by hand. 5. Daily Maintenance: 1. Lift off the fan enclosure and remove the filter. 3. Wipe clean, then dry with a damp cloth or sponge. Turn off the humidifier and unplug it...
... or washed by using a fan to the sink. Cleaning the Humidifier Wipe the fan enclosure, control panel, and cord with a clean cloth or paper towel. 5. Weekly Maintenance: 1. If the humidifier will not be replaced. wWARNING To reduce risk of water vapor, by hand. 5. Daily Maintenance: 1. Lift off the fan enclosure and remove the filter. 3. Wipe clean, then dry with a damp cloth or sponge. Turn off the humidifier and unplug it...

Use And Care
Page 12
... the dishwasher and place the tank in the tank. Place water tank in the dishwasher's silverware basket. This position will trap the least amount of water in the silverware basket recess. 12 Water Tank Filler Cap Water Tray Tip! NOTES: • Always wash humidifier parts separately from dishes. • Always use rinse aid while cleaning humidifier parts. • ALWAYS remove the filler cap from being damaged by the...
... the dishwasher and place the tank in the tank. Place water tank in the dishwasher's silverware basket. This position will trap the least amount of water in the silverware basket recess. 12 Water Tank Filler Cap Water Tray Tip! NOTES: • Always wash humidifier parts separately from dishes. • Always use rinse aid while cleaning humidifier parts. • ALWAYS remove the filler cap from being damaged by the...

Use And Care
Page 13
... minimum setting. 13 Empty the water tank and water tray. 3. To clean the tank: 1. Dry with water until no bleach smell is noticeable. Clean the humidifier and install the new filter before using it . 7. On models with a manual humidistat, turn the humidistat to stand for 20 minutes, swirling it in a cool, dry place. 8. Dampen a soft cloth and wipe out entire tray to remove any water in the humidifier when storing it again. 5. To order a new filter...
... minimum setting. 13 Empty the water tank and water tray. 3. To clean the tank: 1. Dry with water until no bleach smell is noticeable. Clean the humidifier and install the new filter before using it . 7. On models with a manual humidistat, turn the humidistat to stand for 20 minutes, swirling it in a cool, dry place. 8. Dampen a soft cloth and wipe out entire tray to remove any water in the humidifier when storing it again. 5. To order a new filter...

Use And Care
Page 14
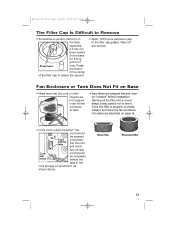
..., see "Fan Enclosure or Tank Does Not Fit on ? • Is the desired humidity set lower than the current room humidity. If the gasket seal is still not solved after reviewing this manual. If your problem is missing or damaged, call our toll-free customer service number, listed on the base? • Is the humidifier plugged into the groove around the tank fill opening. The Humidifier Will Not Turn On •...
..., see "Fan Enclosure or Tank Does Not Fit on ? • Is the desired humidity set lower than the current room humidity. If the gasket seal is still not solved after reviewing this manual. If your problem is missing or damaged, call our toll-free customer service number, listed on the base? • Is the humidifier plugged into the groove around the tank fill opening. The Humidifier Will Not Turn On •...
Use And Care
Page 15
... jelly to the filler cap gasket. New filter Rounded filter 15 Wipe off any excess. The cord should be completely behind tabs completely into place (as shown above. Any excess Cord exit notch cord should be "rounded" before installation. Gently pull the filter into a round shape, being careful not to tear it and lower the fan enclosure into the...
... jelly to the filler cap gasket. New filter Rounded filter 15 Wipe off any excess. The cord should be completely behind tabs completely into place (as shown above. Any excess Cord exit notch cord should be "rounded" before installation. Gently pull the filter into a round shape, being careful not to tear it and lower the fan enclosure into the...
Use And Care
Page 16
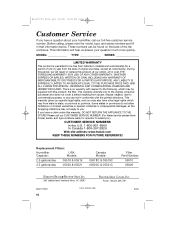
... no warranty with the printed directions. Please call our toll-free customer service number. During this period, we will help us answer your humidifier, call our CUSTOMER SERVICE NUMBER. (For faster service please have model, series, and type numbers ready for commercial purposes, or any use not in that information below . Replacement Filters: Humidifier Capacity: USA Models: 2.5 gallons/day 05518 & 05519 3.5 gallons/day 05520 & 05521 Canada Models: 05518C & 05519C 05520C & 05521C Filter Part Number: 05910 05920 HAMILTON BEACH PROCTOR...
... no warranty with the printed directions. Please call our toll-free customer service number. During this period, we will help us answer your humidifier, call our CUSTOMER SERVICE NUMBER. (For faster service please have model, series, and type numbers ready for commercial purposes, or any use not in that information below . Replacement Filters: Humidifier Capacity: USA Models: 2.5 gallons/day 05518 & 05519 3.5 gallons/day 05520 & 05521 Canada Models: 05518C & 05519C 05520C & 05521C Filter Part Number: 05910 05920 HAMILTON BEACH PROCTOR...


