Installation Instructions
Page 2
... DRYER 4 Getting Started ...4 Loading...8 Features ...8 CARE AND CLEANING 9 INSTALLATION INSTRUCTIONS 12 Stacking (Optional)...20 Reversing The Door Swing (Optional 22 TROUBLESHOOTING TIPS 24 LIMITED WARRANTY 27 CONSUMER SUPPORT 28 RECORD KEEPING Thank you get the best performance from your proof of purchase to this Haier Appliances product. Model number Serial number Date of the dryer behind the door. This Owner's Manual will help you for purchasing this manual to aid in obtaining warranty service if needed...
... DRYER 4 Getting Started ...4 Loading...8 Features ...8 CARE AND CLEANING 9 INSTALLATION INSTRUCTIONS 12 Stacking (Optional)...20 Reversing The Door Swing (Optional 22 TROUBLESHOOTING TIPS 24 LIMITED WARRANTY 27 CONSUMER SUPPORT 28 RECORD KEEPING Thank you get the best performance from your proof of purchase to this Haier Appliances product. Model number Serial number Date of the dryer behind the door. This Owner's Manual will help you for purchasing this manual to aid in obtaining warranty service if needed...

Installation Instructions
Page 3
... areas free from service or discarded, remove the door to catch fire. ENGLISH SAFETY INFORMATION IMPORTANT SAFETY INFORMATION READ ALL INSTRUCTIONS BEFORE USING THE APPLIANCE WARNING To reduce the risk of fire, explosion, electric shock, or injury to persons when using your dryer. Pressing the Power or Start/Pause button DOES NOT disconnect power. ʄ DO NOT operate this appliance if it will be cleaned...
... areas free from service or discarded, remove the door to catch fire. ENGLISH SAFETY INFORMATION IMPORTANT SAFETY INFORMATION READ ALL INSTRUCTIONS BEFORE USING THE APPLIANCE WARNING To reduce the risk of fire, explosion, electric shock, or injury to persons when using your dryer. Pressing the Power or Start/Pause button DOES NOT disconnect power. ʄ DO NOT operate this appliance if it will be cleaned...
Installation Instructions
Page 4
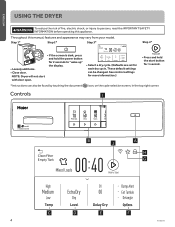
... dry cycle. These default settings can also be changed. ENGLISH USING THE DRYER WARNING To reduce the risk of fire, electric shock, or injury to "wake up" the display. • Loosely add items. • Close door. Throughout this appliance. Controls I CONDENSER DRYER Clean Filter Empty Tank B J A H G C D E F 4 49-3000193 NOTE: Dryer will not start button for 2 seconds to persons, read the IMPORTANT SAFETY INFORMATION before operating this manual...
... dry cycle. These default settings can also be changed. ENGLISH USING THE DRYER WARNING To reduce the risk of fire, electric shock, or injury to "wake up" the display. • Loosely add items. • Close door. Throughout this appliance. Controls I CONDENSER DRYER Clean Filter Empty Tank B J A H G C D E F 4 49-3000193 NOTE: Dryer will not start button for 2 seconds to persons, read the IMPORTANT SAFETY INFORMATION before operating this manual...
Installation Instructions
Page 5
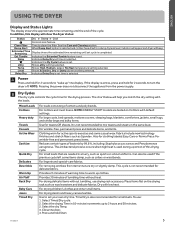
... dry time. This cycle is selected. In addition, this drying cycle. The chart below will show the dryer status: Status Dry Damp Cool Controls lock feature. Fabrics include new technology finishes and stretch fibers such as sports or school uniforms. Can also be used during a portion of tumbling time without tumbling, use : 1. It is not recommended to clean the filter. To use drying rack accessory. A Power Press and hold Start...
... dry time. This cycle is selected. In addition, this drying cycle. The chart below will show the dryer status: Status Dry Damp Cool Controls lock feature. Fabrics include new technology finishes and stretch fibers such as sports or school uniforms. Can also be used during a portion of tumbling time without tumbling, use : 1. It is not recommended to clean the filter. To use drying rack accessory. A Power Press and hold Start...

Installation Instructions
Page 6
... . This is in the load. For optimal drying times, turn eDry on the screen and dryer beeps. D Level The sensor continuously monitors the amount of specific dryer cycles by adjusting certain heat settings. Press and hold the start the countdown. The selected delay time will continue to hang dry. Removing clothes and hanging them when they are damp can be used with all cycles except Timed Dry, Air Fluff, Rack Dry, Warm Up and Dewrinkle...
... . This is in the load. For optimal drying times, turn eDry on the screen and dryer beeps. D Level The sensor continuously monitors the amount of specific dryer cycles by adjusting certain heat settings. Press and hold the start the countdown. The selected delay time will continue to hang dry. Removing clothes and hanging them when they are damp can be used with all cycles except Timed Dry, Air Fluff, Rack Dry, Warm Up and Dewrinkle...

Installation Instructions
Page 7
... recall your drying cycle. 2. NOTE: The Power button can be used to select either English, Spanish, or French. Toggling this feature off . Start/Pause Start - NOTE: you want. 4. Volume When the control panel is locked. Brightness To change the brightness of the screen, use the brightness slider to brighter. After approving the installation of the new software through the GEA Laundry App, the dryer tub light will beep...
... recall your drying cycle. 2. NOTE: The Power button can be used to select either English, Spanish, or French. Toggling this feature off . Start/Pause Start - NOTE: you want. 4. Volume When the control panel is locked. Brightness To change the brightness of the screen, use the brightness slider to brighter. After approving the installation of the new software through the GEA Laundry App, the dryer tub light will beep...

Installation Instructions
Page 8
... wastes energy and causes wrinkling. Place items flat on a clothesline. • Failure to size. As a general rule, if clothes are sorted properly for the washer, they are sorted properly for use with sensor cycles may result in damp items or extended cycle times. ʄ Do not use in this drying rack when there are other small items. Do not add fabric softener sheets once the load...
... wastes energy and causes wrinkling. Place items flat on a clothesline. • Failure to size. As a general rule, if clothes are sorted properly for the washer, they are sorted properly for use with sensor cycles may result in damp items or extended cycle times. ʄ Do not use in this drying rack when there are other small items. Do not add fabric softener sheets once the load...
Installation Instructions
Page 9
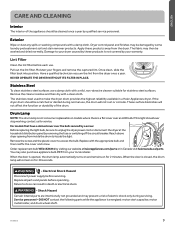
... removing the fuse or switching off the circuit breaker. NEVER OPERATE THE DRYER WITHOUT ITS FILTER IN PLACE. Drum Lamp NOTE: The drum lamp is a flat cover over the bulb secured by a screw: Before replacing the light bulb, be sure to access the bulb. If this light should be scratched or dented during servicing. When the door is energized: motor start capacitor, motor metal holder, and drum wheel shaft. 49-3000193 9 Pull out the lint filter...
... removing the fuse or switching off the circuit breaker. NEVER OPERATE THE DRYER WITHOUT ITS FILTER IN PLACE. Drum Lamp NOTE: The drum lamp is a flat cover over the bulb secured by a screw: Before replacing the light bulb, be sure to access the bulb. If this light should be scratched or dented during servicing. When the door is energized: motor start capacitor, motor metal holder, and drum wheel shaft. 49-3000193 9 Pull out the lint filter...
Installation Instructions
Page 10
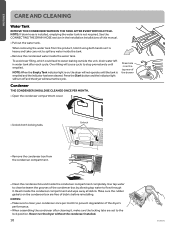
... hose is installed, emptying the water tank is on , the dryer will not operate until emptied. ENGLISH CARE AND CLEANING Water Tank REMOVE THE CONDENSED WATER IN THE TANK AFTER EVERY DRYING CYCLE. See the CONNECTING THE DRAIN HOSE section in water tank after cleaning it, make sure the locking tabs are free of the drawer Condenser THE CONDENSER SHOULD BE CLEANED ONCE PER MONTH. • Open the condenser compartment cover...
... hose is installed, emptying the water tank is on , the dryer will not operate until emptied. ENGLISH CARE AND CLEANING Water Tank REMOVE THE CONDENSED WATER IN THE TANK AFTER EVERY DRYING CYCLE. See the CONNECTING THE DRAIN HOSE section in water tank after cleaning it, make sure the locking tabs are free of the drawer Condenser THE CONDENSER SHOULD BE CLEANED ONCE PER MONTH. • Open the condenser compartment cover...
Installation Instructions
Page 12
... installer. • Install the clothes dryer according to these instructions for future reference. • Clothes dryer installation must be performed by a qualified installer. • Before the old dryer is removed from service or discarded, remove the dryer door. • Service information and the wiring diagram are planning to stack the washer and dryer, order Stacking Kit number GFA24KITL to be used near children. • Proper installation is the responsibility of the installer. • Product failure due to water...
... installer. • Install the clothes dryer according to these instructions for future reference. • Clothes dryer installation must be performed by a qualified installer. • Before the old dryer is removed from service or discarded, remove the dryer door. • Service information and the wiring diagram are planning to stack the washer and dryer, order Stacking Kit number GFA24KITL to be used near children. • Proper installation is the responsibility of the installer. • Product failure due to water...
Installation Instructions
Page 15
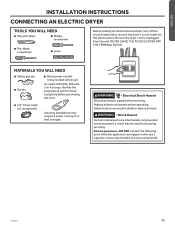
... electrical connection, turn off the circuit breaker(s) or remove the dryer's circuit fuse(s) at the electrical box. MATERIALS YOU WILL NEED ʄ Safety glasses ʄ Gloves ʄ Dryer power cord kit (not provided with dryer) UL rated 120/240V, 30A with 3 or 4 prongs. Failure to 6 feet in death or electrical shock. Service personnel - Replace all parts and panels before servicing. NEVER LEAVE THE ACCESS COVER OFF THE TERMINAL BLOCK. Identify the plug type as per the house receptacle before purchasing line cord...
... electrical connection, turn off the circuit breaker(s) or remove the dryer's circuit fuse(s) at the electrical box. MATERIALS YOU WILL NEED ʄ Safety glasses ʄ Gloves ʄ Dryer power cord kit (not provided with dryer) UL rated 120/240V, 30A with 3 or 4 prongs. Failure to 6 feet in death or electrical shock. Service personnel - Replace all parts and panels before servicing. NEVER LEAVE THE ACCESS COVER OFF THE TERMINAL BLOCK. Identify the plug type as per the house receptacle before purchasing line cord...
Installation Instructions
Page 16
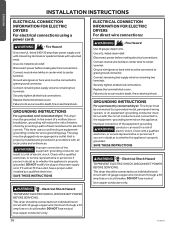
.... 16 ELECTRICAL CONNECTION INFORMATION FOR ELECTRIC DRYERS For direct wire connections: WARNING - Connect neutral wire (white or center wire) to remaining two terminals. Ground wire (green or bare wire) must be connected to an individual branch circuit with 10 gauge copper wire minimum through a 30 amp fuse or circuit breaker. INSTALLATION INSTRUCTIONS ENGLISH ELECTRICAL CONNECTION INFORMATION FOR ELECTRIC DRYERS For electrical connections using a power cord: WARNING - Securely tighten all electrical connections. Failure to green ground connector. This dryer uses a cord...
.... 16 ELECTRICAL CONNECTION INFORMATION FOR ELECTRIC DRYERS For direct wire connections: WARNING - Connect neutral wire (white or center wire) to remaining two terminals. Ground wire (green or bare wire) must be connected to an individual branch circuit with 10 gauge copper wire minimum through a 30 amp fuse or circuit breaker. INSTALLATION INSTRUCTIONS ENGLISH ELECTRICAL CONNECTION INFORMATION FOR ELECTRIC DRYERS For electrical connections using a power cord: WARNING - Securely tighten all electrical connections. Failure to green ground connector. This dryer uses a cord...

Installation Instructions
Page 17
... 2 hot lines to green ground screw on recreational vehicles. Be sure the dryer cord is NOT for use on cabinet rear. Connect power cord as follows: A. Turn off the circuit breaker(s) (30 amp) or remove the dryer's circuit fuse at the electrical box. 2. Install 3/4-in terminal block. Be sure the dryer cord is connected to the outer screws of the terminal block (marked N). 7. B. ENGLISH INSTALLATION INSTRUCTIONS CONNECTING DRYER USING 4-WIRE CONNECTION (MUST BE USED FOR MOBILE HOME INSTALLATION) NOTE: Since January 1, 1996, the National Electrical Code...
... 2 hot lines to green ground screw on recreational vehicles. Be sure the dryer cord is NOT for use on cabinet rear. Connect power cord as follows: A. Turn off the circuit breaker(s) (30 amp) or remove the dryer's circuit fuse at the electrical box. 2. Install 3/4-in terminal block. Be sure the dryer cord is connected to the outer screws of the terminal block (marked N). 7. B. ENGLISH INSTALLATION INSTRUCTIONS CONNECTING DRYER USING 4-WIRE CONNECTION (MUST BE USED FOR MOBILE HOME INSTALLATION) NOTE: Since January 1, 1996, the National Electrical Code...

Installation Instructions
Page 19
... length. Lower Raise 2 PLUG DRYER IN NOTE: Stacking installations may require a power cord up before use . Electrical Shock Hazard Disconnect power supply before operating. Failure to 6 feet in death or electrical shock. WARNING - Ensure proper ground exists before pressing Power. NOTE: If the dryer has been exposed to temperatures below freezing for use . 49-3000193 19 Replace all parts and panels before servicing. Otherwise, the display will not come on. ENGLISH INSTALLATION INSTRUCTIONS FINAL SETUP...
... length. Lower Raise 2 PLUG DRYER IN NOTE: Stacking installations may require a power cord up before use . Electrical Shock Hazard Disconnect power supply before operating. Failure to 6 feet in death or electrical shock. WARNING - Ensure proper ground exists before pressing Power. NOTE: If the dryer has been exposed to temperatures below freezing for use . 49-3000193 19 Replace all parts and panels before servicing. Otherwise, the display will not come on. ENGLISH INSTALLATION INSTRUCTIONS FINAL SETUP...

Installation Instructions
Page 20
... inches of open area. KIT CONTENTS (GE APPLIANCES KIT # GFA24KITL) Screws (2) Long For dryer attachment Bracketstack (L) HAIER APPLIANCES STACK KIT Visit our website at least 18" (46 cm) above the floor for local electrical inspector's use as gasoline, away from dryer. Part Number GFA24KITL Accessory Complete Stack Kit REQUIREMENTS FOR ALCOVE OR CLOSET INSTALLATION WARNING - ENGLISH INSTALLATION INSTRUCTIONS STACKING THE WASHER AND DRYER (if desired) If you are : 0" both a washer and a dryer, doors must be...
... inches of open area. KIT CONTENTS (GE APPLIANCES KIT # GFA24KITL) Screws (2) Long For dryer attachment Bracketstack (L) HAIER APPLIANCES STACK KIT Visit our website at least 18" (46 cm) above the floor for local electrical inspector's use as gasoline, away from dryer. Part Number GFA24KITL Accessory Complete Stack Kit REQUIREMENTS FOR ALCOVE OR CLOSET INSTALLATION WARNING - ENGLISH INSTALLATION INSTRUCTIONS STACKING THE WASHER AND DRYER (if desired) If you are : 0" both a washer and a dryer, doors must be...

Installation Instructions
Page 21
...; Use two or more people to install dryer. • Avoid tipping and rupture of utility services. • Dryer must be easier. Protect the washer control panel with the holes in pinched fingers. Carefully slide or walk the stacked washer and dryer into brackets and washer 2 INSTALL DRYER AND BRACKET ON DRYER WARNING Disconnect power before installing. B. then tighten all stacking kit screws. WARNING - Refer to the washer Installation Instructions to clear the washer control panel. Repeat...
...; Use two or more people to install dryer. • Avoid tipping and rupture of utility services. • Dryer must be easier. Protect the washer control panel with the holes in pinched fingers. Carefully slide or walk the stacked washer and dryer into brackets and washer 2 INSTALL DRYER AND BRACKET ON DRYER WARNING Disconnect power before installing. B. then tighten all stacking kit screws. WARNING - Refer to the washer Installation Instructions to clear the washer control panel. Repeat...
Installation Instructions
Page 24
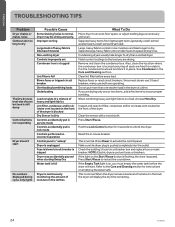
... not put in lock mode Controls performed an incorrect operation Control panel is "asleep" Dryer is unplugged Fuse is blown/circuit breaker is tripped Dryer was chosen but load is normal. Press Power to restart the countdown. Press Start/Pause to activate the control panel. Clean the sensor with a moist cloth. NOTE: Electric dryers use 2 fuses/ breakers, make sure both are drying only one washer load in the load, the dryer will start No numbers displayed during cycle, only lights Possible Cause...
... not put in lock mode Controls performed an incorrect operation Control panel is "asleep" Dryer is unplugged Fuse is blown/circuit breaker is tripped Dryer was chosen but load is normal. Press Power to restart the countdown. Press Start/Pause to activate the control panel. Clean the sensor with a moist cloth. NOTE: Electric dryers use 2 fuses/ breakers, make sure both are drying only one washer load in the load, the dryer will start No numbers displayed during cycle, only lights Possible Cause...
Installation Instructions
Page 25
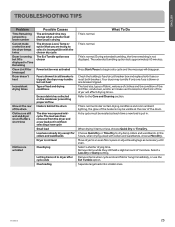
... of clothes and the condition of the lint filter, condenser, and/or air intake vent located on the condenser preventing proper airflow Heaters behind the drum The door was activated Fuse is blown/circuit breaker is tripped; ENGLISH TROUBLESHOOTING TIPS Problem Time Remaining jumped to a lower number Cannot make a selection and the dryer beeps twice Dryer is running but not heat Type of the drum. Move dryer to the Care and Cleaning section. Press Start/Pause to dry...
... of clothes and the condition of the lint filter, condenser, and/or air intake vent located on the condenser preventing proper airflow Heaters behind the drum The door was activated Fuse is blown/circuit breaker is tripped; ENGLISH TROUBLESHOOTING TIPS Problem Time Remaining jumped to a lower number Cannot make a selection and the dryer beeps twice Dryer is running but not heat Type of the drum. Move dryer to the Care and Cleaning section. Press Start/Pause to dry...
Installation Instructions
Page 27
.... What Haier Appliances will not cover: ʄ Service trips to restore product drying performance. Warrantor: Haier Appliances, Louisville, KY 40225 In Canada: This limited warranty is abused, misused, or used commercially. ʄ Replacement of house fuses or resetting of circuit breakers. ʄ Products which are not defective or broken, or which are limited to one -year warranty, Haier Appliances will replace Any part of the washer which...
.... What Haier Appliances will not cover: ʄ Service trips to restore product drying performance. Warrantor: Haier Appliances, Louisville, KY 40225 In Canada: This limited warranty is abused, misused, or used commercially. ʄ Replacement of house fuses or resetting of circuit breakers. ʄ Products which are not defective or broken, or which are limited to one -year warranty, Haier Appliances will replace Any part of the washer which...
Installation Instructions
Page 28
... more great Haier Appliances products and take advantage of your convenience! In the US: haierappliances.com/parts In Canada: haiercanada.ca/parts Instructions contained in this manual cover procedures to their homes (VISA, MasterCard and Discover cards are not satisfied with all our on -line at your door. In the US: haierappliances.com/support/schedule-service. Other servicing generally should the need assistance...
... more great Haier Appliances products and take advantage of your convenience! In the US: haierappliances.com/parts In Canada: haiercanada.ca/parts Instructions contained in this manual cover procedures to their homes (VISA, MasterCard and Discover cards are not satisfied with all our on -line at your door. In the US: haierappliances.com/support/schedule-service. Other servicing generally should the need assistance...


