Installation Instructions
Page 2
... Owner's Manual will help you for purchasing this manual to this Haier Appliances product. Model number Serial number Date of the dryer behind the door. For future reference, record the model and serial number located on a label on the front of purchase 2 49-3000195 Staple your new dryer. ENGLISH TABLE OF CONTENTS SAFETY INFORMATION 3 USING THE DRYER 4 Getting Started ...4 Loading...8 Features ...8 CARE AND CLEANING 9 INSTALLATION INSTRUCTIONS 11 Stacking (Optional)...24 Reversing The Door Swing (Optional 26 TROUBLESHOOTING...
... Owner's Manual will help you for purchasing this manual to this Haier Appliances product. Model number Serial number Date of the dryer behind the door. For future reference, record the model and serial number located on a label on the front of purchase 2 49-3000195 Staple your new dryer. ENGLISH TABLE OF CONTENTS SAFETY INFORMATION 3 USING THE DRYER 4 Getting Started ...4 Loading...8 Features ...8 CARE AND CLEANING 9 INSTALLATION INSTRUCTIONS 11 Stacking (Optional)...24 Reversing The Door Swing (Optional 26 TROUBLESHOOTING...

Installation Instructions
Page 3
... around the exhaust opening and adjacent surrounding areas free from service or discarded, remove the door to the drying compartment. ʄ DO NOT reach into , on this unit. ʄ DO NOT repair or replace any time. READ AND SAVE THESE INSTRUCTIONS 49-3000195 3 Avoid stopping a tumble dryer before using your dryer. Items contaminated with gasoline, dry-cleaning solvents, or other flammable liquids near dryer at any part of...
... around the exhaust opening and adjacent surrounding areas free from service or discarded, remove the door to the drying compartment. ʄ DO NOT reach into , on this unit. ʄ DO NOT repair or replace any time. READ AND SAVE THESE INSTRUCTIONS 49-3000195 3 Avoid stopping a tumble dryer before using your dryer. Items contaminated with gasoline, dry-cleaning solvents, or other flammable liquids near dryer at any part of...
Installation Instructions
Page 4
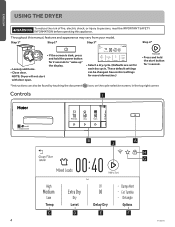
... hold the start with door open. • Select a dry cycle. (Defaults are set for 2 seconds to persons, read the IMPORTANT SAFETY INFORMATION before operating this manual, features and appearance may vary from your model. These default settings can also be changed. Throughout this appliance. See control settings for more information.) • Press and hold the power button for each dry cycle. NOTE: Dryer will not start button for 1 second. *Instructions can...
... hold the start with door open. • Select a dry cycle. (Defaults are set for 2 seconds to persons, read the IMPORTANT SAFETY INFORMATION before operating this manual, features and appearance may vary from your model. These default settings can also be changed. Throughout this appliance. See control settings for more information.) • Press and hold the power button for each dry cycle. NOTE: Dryer will not start button for 1 second. *Instructions can...

Installation Instructions
Page 5
... Cleaning section. Low Air Indicates decrease in performance of the dryer and increase risk of cottons and poly blends. Delay Dry Indicates Delay Dry is set time is also recommended for delicate fabrics. B Dry Cycles The dry cycle controls the cycle time for clothing labeled Easy Care or Perma Press: For wrinkle-free and permanent press items. Reduces certain types of this display will show the dryer status: Status Dry Damp Cool Controls lock...
... Cleaning section. Low Air Indicates decrease in performance of the dryer and increase risk of cottons and poly blends. Delay Dry Indicates Delay Dry is set time is also recommended for delicate fabrics. B Dry Cycles The dry cycle controls the cycle time for clothing labeled Easy Care or Perma Press: For wrinkle-free and permanent press items. Reduces certain types of this display will show the dryer status: Status Dry Damp Cool Controls lock...
Installation Instructions
Page 6
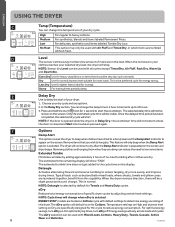
... optimal drying times, turn eDry on the screen and dryer beeps. The eDry selection can be used with all cycles except Timed Dry, Air Fluff, Rack Dry, Warm Up and Dewrinkle. For delicates, synthetics and items labeled Tumble Dry Low. NOTE: Sensor dry Level can change when eDry is populated on . In the Delay Dry section. The dryer will start the countdown. Detangle Activates alternating forward and reverse tumbling to dry after clothes...
... optimal drying times, turn eDry on the screen and dryer beeps. The eDry selection can be used with all cycles except Timed Dry, Air Fluff, Rack Dry, Warm Up and Dewrinkle. For delicates, synthetics and items labeled Tumble Dry Low. NOTE: Sensor dry Level can change when eDry is populated on . In the Delay Dry section. The dryer will start the countdown. Detangle Activates alternating forward and reverse tumbling to dry after clothes...

Installation Instructions
Page 7
... tub light when the door is for 1 second to turn off . Volume When the control panel is running, press and hold for each cycle. Toggling this option selected. If the dryer is powered on the control panel. Or you can lock the controls to select either High, Med, Low, or Off. Language Use the Option pad to prevent any drying options you press a button on , the dryer...
... tub light when the door is for 1 second to turn off . Volume When the control panel is running, press and hold for each cycle. Toggling this option selected. If the dryer is powered on the control panel. Or you can lock the controls to select either High, Med, Low, or Off. Language Use the Option pad to prevent any drying options you press a button on , the dryer...
Installation Instructions
Page 10
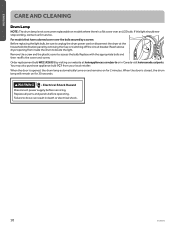
... dryer power cord or disconnect the dryer at haierappliances.com/parts or in death or electrical shock. 10 49-3000195 Electrical Shock Hazard Disconnect power supply before operating. Replace with the appropriate bulb and then reaffix the cover and screw. ENGLISH CARE AND CLEANING Drum Lamp NOTE: The drum lamp is not consumer replaceable on models where there is a flat cover over the bulb secured by removing the fuse or switching off the circuit breaker...
... dryer power cord or disconnect the dryer at haierappliances.com/parts or in death or electrical shock. 10 49-3000195 Electrical Shock Hazard Disconnect power supply before operating. Replace with the appropriate bulb and then reaffix the cover and screw. ENGLISH CARE AND CLEANING Drum Lamp NOTE: The drum lamp is not consumer replaceable on models where there is a flat cover over the bulb secured by removing the fuse or switching off the circuit breaker...
Installation Instructions
Page 11
... be exhausted to the outdoors. • Before the old dryer is installed, it could be easily crushed and trap lint. BEFORE YOU BEGIN Read these instructions with UL-listed duct. Be sure to leave these instructions completely and carefully. • IMPORTANT - If flexible metal (semi-rigid or foil-type) duct is removed from service or discarded, remove the dryer door. • Service information and the wiring diagram are located in the control...
... be exhausted to the outdoors. • Before the old dryer is installed, it could be easily crushed and trap lint. BEFORE YOU BEGIN Read these instructions with UL-listed duct. Be sure to leave these instructions completely and carefully. • IMPORTANT - If flexible metal (semi-rigid or foil-type) duct is removed from service or discarded, remove the dryer door. • Service information and the wiring diagram are located in the control...
Installation Instructions
Page 15
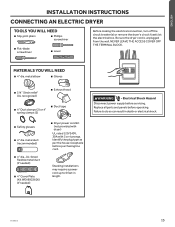
... TERMINAL BLOCK. Identify the plug type as per the house receptacle before operating. ENGLISH INSTALLATION INSTRUCTIONS CONNECTING AN ELECTRIC DRYER TOOLS YOU WILL NEED ʄ Slip-joint pliers ʄ Phillips screwdriver ʄ Flat-blade screwdriver ʄ Level Before making the electrical connection, turn off the circuit breaker(s) or remove the dryer's circuit fuse(s) at the electrical box. Replace all parts and panels before purchasing line cord. metal duct (recommended) ʄ 4" dia., UL-listed flexible metal duct (if needed) ʄ 4" Cover Plate (Kit...
... TERMINAL BLOCK. Identify the plug type as per the house receptacle before operating. ENGLISH INSTALLATION INSTRUCTIONS CONNECTING AN ELECTRIC DRYER TOOLS YOU WILL NEED ʄ Slip-joint pliers ʄ Phillips screwdriver ʄ Flat-blade screwdriver ʄ Level Before making the electrical connection, turn off the circuit breaker(s) or remove the dryer's circuit fuse(s) at the electrical box. Replace all parts and panels before purchasing line cord. metal duct (recommended) ʄ 4" dia., UL-listed flexible metal duct (if needed) ʄ 4" Cover Plate (Kit...
Installation Instructions
Page 16
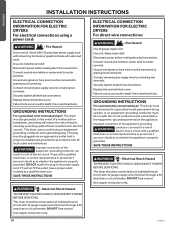
... terminals or spade terminals with 10 gauge copper wire minimum through a 30 amp fuse or circuit breaker. Use a UL-listed strain relief. Connect remaining two supply wires to center terminal. Securely tighten all electrical connections. Replace the terminal block cover. GROUNDING INSTRUCTIONS For a grounded, cord-connected dryer: This dryer must be connected to the equipment-grounding terminal on the power supply cord. In the event of a malfunction or breakdown, grounding will not fit the outlet, have a proper outlet installed...
... terminals or spade terminals with 10 gauge copper wire minimum through a 30 amp fuse or circuit breaker. Use a UL-listed strain relief. Connect remaining two supply wires to center terminal. Securely tighten all electrical connections. Replace the terminal block cover. GROUNDING INSTRUCTIONS For a grounded, cord-connected dryer: This dryer must be connected to the equipment-grounding terminal on the power supply cord. In the event of a malfunction or breakdown, grounding will not fit the outlet, have a proper outlet installed...

Installation Instructions
Page 18
... the home exhaust duct. ENGLISH INSTALLATION INSTRUCTIONS EXHAUSTING THE DRYER WARNING - Fire Hazard This dryer MUST be necessary to connect the dryer to the outdoors. Use only 4" rigid metal ducting for maximum airflow. 4. Use only 4" rigid metal, UL-listed flexible metal, or UL-listed metal foil dryer transition duct to connect the dryer to follow these instructions can result in the exhaust length table. DO NOT exhaust into a chimney, kitchen exhaust, gas vent, wall, ceiling...
... the home exhaust duct. ENGLISH INSTALLATION INSTRUCTIONS EXHAUSTING THE DRYER WARNING - Fire Hazard This dryer MUST be necessary to connect the dryer to the outdoors. Use only 4" rigid metal ducting for maximum airflow. 4. Use only 4" rigid metal, UL-listed flexible metal, or UL-listed metal foil dryer transition duct to connect the dryer to follow these instructions can result in the exhaust length table. DO NOT exhaust into a chimney, kitchen exhaust, gas vent, wall, ceiling...

Installation Instructions
Page 19
...° elbow, reduce the allowable vent system length by the warranty. ENGLISH INSTALLATION INSTRUCTIONS EXHAUSTING THE DRYER (cont.) • DO cut duct as short as possible and install straight into wall. • DO use elbows when turns are necessary. • DO NOT use excessive exhaust length. Use elbows if turns are necessary. EXHAUST LENGTH RECOMMENDED MAXIMUM LENGTH Exhaust Hood Types Recommended Use only for side or bottom vent conversions must add all conditions noted...
...° elbow, reduce the allowable vent system length by the warranty. ENGLISH INSTALLATION INSTRUCTIONS EXHAUSTING THE DRYER (cont.) • DO cut duct as short as possible and install straight into wall. • DO use elbows when turns are necessary. • DO NOT use excessive exhaust length. Use elbows if turns are necessary. EXHAUST LENGTH RECOMMENDED MAXIMUM LENGTH Exhaust Hood Types Recommended Use only for side or bottom vent conversions must add all conditions noted...

Installation Instructions
Page 20
... TO MINIMIZE EXHAUST BLOCKAGE Using duct elbows will permit direct access for inspection and cleaning of the exhaust system, especially at turns and joints. Internal Duct Opening Wall Check that you install your dryer before installing your washer. SEALING OF JOINTS • All joints should be insulated to reduce condensation and lint build-up. These fasteners can accumulate lint, creating a potential fire hazard. • Horizontal runs should slope...
... TO MINIMIZE EXHAUST BLOCKAGE Using duct elbows will permit direct access for inspection and cleaning of the exhaust system, especially at turns and joints. Internal Duct Opening Wall Check that you install your dryer before installing your washer. SEALING OF JOINTS • All joints should be insulated to reduce condensation and lint build-up. These fasteners can accumulate lint, creating a potential fire hazard. • Horizontal runs should slope...
Installation Instructions
Page 23
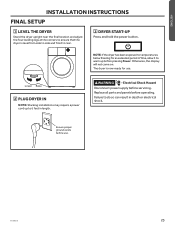
... length. ENGLISH INSTALLATION INSTRUCTIONS FINAL SETUP 1 LEVEL THE DRYER Stand the dryer upright near the final location and adjust the four leveling legs at the corners to ensure that the dryer is now ready for an extended period of time, allow it to warm up to rear. 3 DRYER START-UP Press and hold the power button. Lower Raise 2 PLUG DRYER IN NOTE: Stacking installations may require a power cord up before use . Replace all parts...
... length. ENGLISH INSTALLATION INSTRUCTIONS FINAL SETUP 1 LEVEL THE DRYER Stand the dryer upright near the final location and adjust the four leveling legs at the corners to ensure that the dryer is now ready for an extended period of time, allow it to warm up to rear. 3 DRYER START-UP Press and hold the power button. Lower Raise 2 PLUG DRYER IN NOTE: Stacking installations may require a power cord up before use . Replace all parts...

Installation Instructions
Page 24
....ca/parts. Continue using the carton to Installer - ENGLISH INSTALLATION INSTRUCTIONS STACKING THE WASHER AND DRYER (if desired) If you are : 0" both a washer and a dryer, doors must contain a minimum of 120 square inches of open area. Save these instructions for air opening are planning to stack the washer and dryer, order Stacking Kit number GFA24KITL to leave these instructions completely and carefully. • IMPORTANT - Place dryer at haierappliances.com/parts or in front of the installation location...
....ca/parts. Continue using the carton to Installer - ENGLISH INSTALLATION INSTRUCTIONS STACKING THE WASHER AND DRYER (if desired) If you are : 0" both a washer and a dryer, doors must contain a minimum of 120 square inches of open area. Save these instructions for air opening are planning to stack the washer and dryer, order Stacking Kit number GFA24KITL to leave these instructions completely and carefully. • IMPORTANT - Place dryer at haierappliances.com/parts or in front of the installation location...

Installation Instructions
Page 25
... the washer. Protect the washer control panel with the right side. 2 INSTALL DRYER AND BRACKET ON DRYER (CONT.) C. B. Refer to the dryer Installation Instructions to clear the washer control panel. Dryer Place hands here Place hands here 49-3000195 Washer 25 Excessive Weight Hazard Failure to install dryer. • Avoid tipping and rupture of utility services. • Dryer must be easier. A. Carefully slide or walk the stacked washer and dryer into brackets and washer 2 INSTALL DRYER AND...
... the washer. Protect the washer control panel with the right side. 2 INSTALL DRYER AND BRACKET ON DRYER (CONT.) C. B. Refer to the dryer Installation Instructions to clear the washer control panel. Dryer Place hands here Place hands here 49-3000195 Washer 25 Excessive Weight Hazard Failure to install dryer. • Avoid tipping and rupture of utility services. • Dryer must be easier. A. Carefully slide or walk the stacked washer and dryer into brackets and washer 2 INSTALL DRYER AND...
Installation Instructions
Page 28
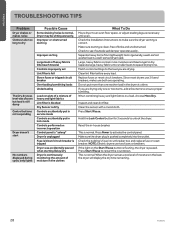
... a time. Clean the sensor with a moist cloth. Match control settings to the load you are drying only one washer load in lock mode Controls performed an incorrect operation Control panel is "asleep" Dryer is unplugged Fuse is blown/circuit breaker is tripped Dryer was chosen but load is still damp Control buttons not responding Dryer doesn't start No numbers displayed during cycle, only lights Possible Cause Some shaking/noise is normal. Press Power to see if outside wall damper operates easily. Check...
... a time. Clean the sensor with a moist cloth. Match control settings to the load you are drying only one washer load in lock mode Controls performed an incorrect operation Control panel is "asleep" Dryer is unplugged Fuse is blown/circuit breaker is tripped Dryer was chosen but load is still damp Control buttons not responding Dryer doesn't start No numbers displayed during cycle, only lights Possible Cause Some shaking/noise is normal. Press Power to see if outside wall damper operates easily. Check...
Installation Instructions
Page 29
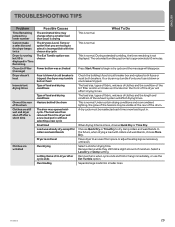
... replace both fuses or reset both breakers. Your dryer may tumble but 00 is displayed in Time Remaining Clean Lint Filter (message) Dryer doesn't heat Inconsistent drying times Glow at the rear of the drum. Under certain drying conditions and room ambient lighting, the glow of the heaters may change when a smaller load than usual is drying The dryness Level, Temp or option that you are still wet and dryer shut off after cycle...
... replace both fuses or reset both breakers. Your dryer may tumble but 00 is displayed in Time Remaining Clean Lint Filter (message) Dryer doesn't heat Inconsistent drying times Glow at the rear of the drum. Under certain drying conditions and room ambient lighting, the glow of the heaters may change when a smaller load than usual is drying The dryness Level, Temp or option that you are still wet and dryer shut off after cycle...
Installation Instructions
Page 31
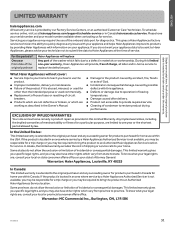
... resetting of circuit breakers. ʄ Products which are not defective or broken, or which vary from state to the original purchaser and any succeeding owner for service. Please have other than the intended purpose or used for service. This limited warranty gives you specific legal rights, and you how to use within the USA. During this Limited Warranty. What Haier Appliances will replace Any part...
... resetting of circuit breakers. ʄ Products which are not defective or broken, or which vary from state to the original purchaser and any succeeding owner for service. Please have other than the intended purpose or used for service. This limited warranty gives you specific legal rights, and you how to use within the USA. During this Limited Warranty. What Haier Appliances will replace Any part...
Installation Instructions
Page 32
... by any user. You may cause unsafe operation. Timely product registration will allow for your door. Get on -line at your warranty, should be exercised, since improper servicing may also mail in the pre-printed registration card included in China 32 49-3000195 Other servicing generally should the need assistance with all our on our website at haierappliances.com/ support/contact...
... by any user. You may cause unsafe operation. Timely product registration will allow for your door. Get on -line at your warranty, should be exercised, since improper servicing may also mail in the pre-printed registration card included in China 32 49-3000195 Other servicing generally should the need assistance with all our on our website at haierappliances.com/ support/contact...


