User Manual
Page 1
...Preparation before Usage Start Using Functions 1-2 3 3 4 5-6 7-8 9 9 10-14 About Refrigerator compartment 15-16 Precautions when Refrigerating Food 16 Tips & Hints for Using Refrigerator compartment 17 About the Freezer Drawer 17 Precaution when Freezing Food 18 Usage of Ice Maker, ...Cold Water Dispenser Operation of Ice Maker Operation of Cold Water Dispenser Precaution when Using Cold Water Dispenser 18-19 19 20 20...
...Preparation before Usage Start Using Functions 1-2 3 3 4 5-6 7-8 9 9 10-14 About Refrigerator compartment 15-16 Precautions when Refrigerating Food 16 Tips & Hints for Using Refrigerator compartment 17 About the Freezer Drawer 17 Precaution when Freezing Food 18 Usage of Ice Maker, ...Cold Water Dispenser Operation of Ice Maker Operation of Cold Water Dispenser Precaution when Using Cold Water Dispenser 18-19 19 20 20...
User Manual
Page 2
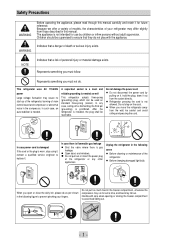
...needed as per shown in such case, an auto stabilizer is worn, stop using it for future reference. Handle with the appliance. Indicates that a risk of the refrigerator or any case, cutting off or dismantling the third pin (grounding) is not intended for extra ...personal injury or material damage exists. The appliance is prohibited. Represents something you open or close the dairy bin, please do as well This refrigerator adopts three-prong (grounding) plug, which can be reachable. z Before changing damaged light bulb. A separated socket is needed . Do not...
...needed as per shown in such case, an auto stabilizer is worn, stop using it for future reference. Handle with the appliance. Indicates that a risk of the refrigerator or any case, cutting off or dismantling the third pin (grounding) is not intended for extra ...personal injury or material damage exists. The appliance is prohibited. Represents something you open or close the dairy bin, please do as well This refrigerator adopts three-prong (grounding) plug, which can be reachable. z Before changing damaged light bulb. A separated socket is needed . Do not...
User Manual
Page 3
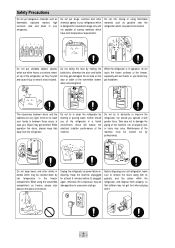
...minutes before it's plugged again, otherwise the compressor may not get hurt when playing with it with wet hands, or you sit the refrigerator in a humid environment, these areas, in case your fingers may fall and cause injury or electric shock hazard. The clearances between these...may be cracked down by professionals. Do not risk storing or using the convertible compartment as gasoline near the refrigerator which have strict temperature requirements. While the refrigerator is designed for at power failure or cleaning. Do not try to remove the doors along with its gaskets...
...minutes before it's plugged again, otherwise the compressor may not get hurt when playing with it with wet hands, or you sit the refrigerator in a humid environment, these areas, in case your fingers may fall and cause injury or electric shock hazard. The clearances between these...may be cracked down by professionals. Do not risk storing or using the convertible compartment as gasoline near the refrigerator which have strict temperature requirements. While the refrigerator is designed for at power failure or cleaning. Do not try to remove the doors along with its gaskets...
User Manual
Page 4
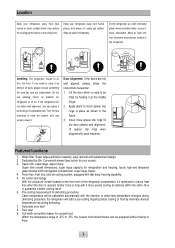
...the front end of -2ºC to be lifted by leveling the adjustable feet. Automatic error alert 8. Wipe off spills immediately. If the refrigerator can not obtain well alignment, you need to -3ºC, the cooked food stored therein can adjust it by holding it at the middle...Allow at a well ventilated place, where portable water source is need to raise it by eliminate obvious temperature rise during defrosting procedure, the refrigerator will be prepared without having to lower it Door alignment: If the doors are not well aligned, please follow the instructions hereunder: 1. ...
...the front end of -2ºC to be lifted by leveling the adjustable feet. Automatic error alert 8. Wipe off spills immediately. If the refrigerator can not obtain well alignment, you need to -3ºC, the cooked food stored therein can adjust it by holding it at the middle...Allow at a well ventilated place, where portable water source is need to raise it by eliminate obvious temperature rise during defrosting procedure, the refrigerator will be prepared without having to lower it Door alignment: If the doors are not well aligned, please follow the instructions hereunder: 1. ...
User Manual
Page 5
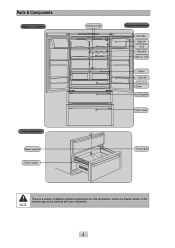
Parts & Components There're a variety of different optional accessories for this refrigerator, hence the figures shown in this manual may not be identical with your refrigerator. NOTE - 4 -
Parts & Components There're a variety of different optional accessories for this refrigerator, hence the figures shown in this manual may not be identical with your refrigerator. NOTE - 4 -
User Manual
Page 6
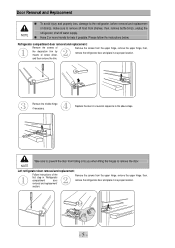
...upper hinge, remove the upper hinge, then, remove the refrigerator door and place it at a proper location. Replace the door in 'Refrigerator compartment door Remove the screws from shelves, then, remove bottle bin(s), unplug the refrigerator, shut off water supply. „ Have 2 or ... friends for help if possible. removal and replacement' section; - 5 - and then remove the trim. Please follow the instructions below. Refrigerator compartment door removal and replacement: Remove the screws of Remove the screws from falling onto you when lifting the hinges to the above steps....
...upper hinge, remove the upper hinge, then, remove the refrigerator door and place it at a proper location. Replace the door in 'Refrigerator compartment door Remove the screws from shelves, then, remove bottle bin(s), unplug the refrigerator, shut off water supply. „ Have 2 or ... friends for help if possible. removal and replacement' section; - 5 - and then remove the trim. Please follow the instructions below. Refrigerator compartment door removal and replacement: Remove the screws of Remove the screws from falling onto you when lifting the hinges to the above steps....
User Manual
Page 8
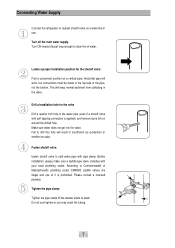
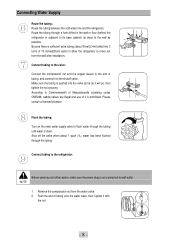
...the valve. According to the top side of water. Do not over-tighten or you may crash the tubing. - 7 - Connecting Water Supply Connect the refrigerator to swell. Tighten the pipe clamp: Tighten the pipe clamp till the washer starts to nearest shutoff valve on a vertical pipe. Fail to clear line... of the pipe, not the bottom. Before installation, please make sure a saddle-type valve complies with pipe clamp. Make sure water does not get into the valve. Turn ON nearest...
...the valve. According to the top side of water. Do not over-tighten or you may crash the tubing. - 7 - Connecting Water Supply Connect the refrigerator to swell. Tighten the pipe clamp: Tighten the pipe clamp till the washer starts to nearest shutoff valve on a vertical pipe. Fail to clear line... of the pipe, not the bottom. Before installation, please make sure a saddle-type valve complies with pipe clamp. Make sure water does not get into the valve. Turn ON nearest...
User Manual
Page 9
...when about 8 feet [2.4m] rolled into the valve as far as it is prohibited. According to the shutoff valve. Connect tubing to the refrigerator: Before carrying out further action, make sure the power plug is not connected to flush water through a hole drilled in the wall or floor ...(behind the refrigerator or adjacent to its base cabinet) as possible. Please consult a licensed plumber. Remove the compression nut from the wall after installation. Route the...
...when about 8 feet [2.4m] rolled into the valve as far as it is prohibited. According to the shutoff valve. Connect tubing to the refrigerator: Before carrying out further action, make sure the power plug is not connected to flush water through a hole drilled in the wall or floor ...(behind the refrigerator or adjacent to its base cabinet) as possible. Please consult a licensed plumber. Remove the compression nut from the wall after installation. Route the...
User Manual
Page 10
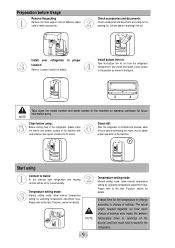
Stand still: After the refrigerator is stored in location: Refer to 'Location' section for details. Please refer to the later 'Function' section for the temperature to change according to change of settings were made, the ambient temperature there is, ... of settings. Call the dealer if anything's left out. proper Install bottom trim kit: Take the bottom trim kit out from the refrigerator compartment, and install and fasten it with soda solution (one spoon of soda into 4 L water). Please refer to the later 'Function' section for details. Preparation before connecting the ...
Stand still: After the refrigerator is stored in location: Refer to 'Location' section for details. Please refer to the later 'Function' section for the temperature to change according to change of settings were made, the ambient temperature there is, ... of settings. Call the dealer if anything's left out. proper Install bottom trim kit: Take the bottom trim kit out from the refrigerator compartment, and install and fasten it with soda solution (one spoon of soda into 4 L water). Please refer to the later 'Function' section for details. Preparation before connecting the ...
User Manual
Page 11
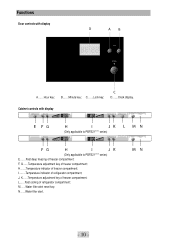
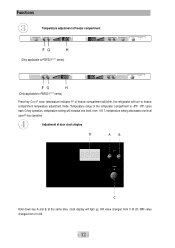
... display A.......Hour key; M......Water filter alert reset key; B.......Minute key; H.......Temperature indicator of freezer compartment; F, G......Temperature adjustment key of freezer compartment; J, K......Temperature adjustment key of refrigerator compartment; N......Water filter alert. - 10 - I........Temperature indicator of freezer compartment; Functions Door controls with display (Only applicable to PBFS21**** series) (Only applicable to PBFS21**** series...
... display A.......Hour key; M......Water filter alert reset key; B.......Minute key; H.......Temperature indicator of freezer compartment; F, G......Temperature adjustment key of freezer compartment; J, K......Temperature adjustment key of refrigerator compartment; N......Water filter alert. - 10 - I........Temperature indicator of freezer compartment; Functions Door controls with display (Only applicable to PBFS21**** series) (Only applicable to PBFS21**** series...
User Manual
Page 12
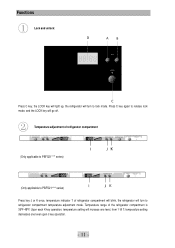
...PBFS21**** series) Press key J or K once, temperature indicator 'I' of the refrigerator compartment is 36ºF-48ºF. Functions Lock and unlock: Press C key, the LOCK key will light up, the refrigerator will turn to lock mode. Upon each K key operation, temperature setting will ...go off. Temperature range of refrigerator compartment will blink, the refrigerator will turn to refrigerator compartment temperature adjustment mode. Press C key again to release lock mode, and the LOCK key will increase one...
...PBFS21**** series) Press key J or K once, temperature indicator 'I' of the refrigerator compartment is 36ºF-48ºF. Functions Lock and unlock: Press C key, the LOCK key will light up, the refrigerator will turn to lock mode. Upon each K key operation, temperature setting will ...go off. Temperature range of refrigerator compartment will blink, the refrigerator will turn to refrigerator compartment temperature adjustment mode. Press C key again to release lock mode, and the LOCK key will increase one...
User Manual
Page 13
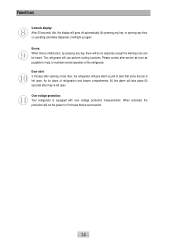
... of freezer compartment (Only applicable to PBFS21**** series) (Only applicable to PBFS21**** series) Press key G or F once, temperature indicator 'H' of freezer compartment will blink, the refrigerator will turn to 60. - 12 - temperature setting decreases one level, from 0 to freezer compartment temperature adjustment mode. Temperature range of door clock display Hold down... key A and B at the same time, clock display will light up. HR value changes from 0 till 24, MIN value changes from 1 till 7; Adjustment of the refrigerator compartment is -5ºF- -9ºF.
... of freezer compartment (Only applicable to PBFS21**** series) (Only applicable to PBFS21**** series) Press key G or F once, temperature indicator 'H' of freezer compartment will blink, the refrigerator will turn to 60. - 12 - temperature setting decreases one level, from 0 to freezer compartment temperature adjustment mode. Temperature range of door clock display Hold down... key A and B at the same time, clock display will light up. HR value changes from 0 till 24, MIN value changes from 1 till 7; Adjustment of the refrigerator compartment is -5ºF- -9ºF.

User Manual
Page 14
...operation. Fast cooling of refrigerator compartment Press key L once, the indicator will start to the core within a short period of time. You can stop fast cooling any time by pressing key E again-indicator will go off, and normal operation restored. Please refer to PBFS21**** series) ... 13 - You can stop fast freezing any time by pressing key E again-indicator will go off, and normal operation restored. The refrigerator will turn to fast cooling mode. Functions Fast deep freezing of freezer compartment This function is replaced, press key M, the indicator will ...
...operation. Fast cooling of refrigerator compartment Press key L once, the indicator will start to the core within a short period of time. You can stop fast cooling any time by pressing key E again-indicator will go off, and normal operation restored. Please refer to PBFS21**** series) ... 13 - You can stop fast freezing any time by pressing key E again-indicator will go off, and normal operation restored. The refrigerator will turn to fast cooling mode. Functions Fast deep freezing of freezer compartment This function is replaced, press key M, the indicator will ...
User Manual
Page 15
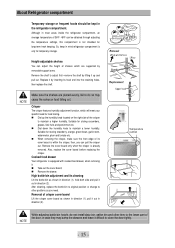
... power for help, to alert that some door(s) is equipped with over voltage protection measurements. By pressing any key, or opening of the refrigerator. Door alert: 3 minutes after they're left open . When activated, the protection will light up again. Errors: When there's malfunction..., by pressing any door, the refrigerator will give alarm sound to maintain normal operation of any key, there will goes off automatically. Functions Controls display: After 30 seconds' idle...
... power for help, to alert that some door(s) is equipped with over voltage protection measurements. By pressing any key, or opening of the refrigerator. Door alert: 3 minutes after they're left open . When activated, the protection will light up again. Errors: When there's malfunction..., by pressing any door, the refrigerator will give alarm sound to maintain normal operation of any key, there will goes off automatically. Functions Controls display: After 30 seconds' idle...
User Manual
Page 16
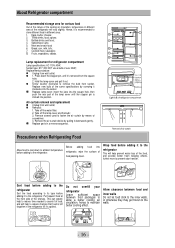
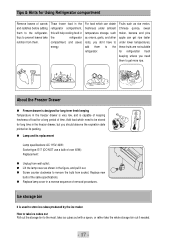
... knob located on the right side of shelves which will meet your specific need . So, keep in direction (2). About Refrigerator compartment Temporary storage or frequent foods should be obtained through adjusting the temperature settings, this compartment is equipped with cooked food drawer... not install dairy bin, gallon bin and other positions as shown in direction (1), hold both side and pull it out in the refrigerator compartment. Also, replace the cover board before replacing the crisper. Suitable for storing strawberry, orange, green bean, garlic stem, watermelon,...
... knob located on the right side of shelves which will meet your specific need . So, keep in direction (2). About Refrigerator compartment Temporary storage or frequent foods should be obtained through adjusting the temperature settings, this compartment is equipped with cooked food drawer... not install dairy bin, gallon bin and other positions as shown in direction (1), hold both side and pull it out in the refrigerator compartment. Also, replace the cover board before replacing the crisper. Suitable for storing strawberry, orange, green bean, garlic stem, watermelon,...
User Manual
Page 17
.... - 16 - Hold the lamp cover and pull it 's spoiled. Replace parts in different area: 1. Precautions when Refrigerating Food Allow food to cool down the stopper pin, until the stopper pin is recommended to fasten the air curtain by screwing..., butter, cheese; 2. Bottled drinks and food; 4. Salted food, cans; 5. Cooked meat, sausages; 8. Fruits, vegetables, salads. Lamp replacement for refrigerator compartment Lamp specifications: AC 115V, 40W; Replacement procedure: „ Unplug from wall outlet; „ Removal: 1. Press down to ambient temperature before adding...
.... - 16 - Hold the lamp cover and pull it 's spoiled. Replace parts in different area: 1. Precautions when Refrigerating Food Allow food to cool down the stopper pin, until the stopper pin is recommended to fasten the air curtain by screwing..., butter, cheese; 2. Bottled drinks and food; 4. Salted food, cans; 5. Cooked meat, sausages; 8. Fruits, vegetables, salads. Lamp replacement for refrigerator compartment Lamp specifications: AC 115V, 40W; Replacement procedure: „ Unplug from wall outlet; „ Removal: 1. Press down to ambient temperature before adding...
User Manual
Page 18
... to store ice cubes produced by the ice maker. Replace new bulb of the same specifications. „ Replace lamp cover in the refrigerator compartment, and saves energy. For food which need to be stored for a long period of removal procedures. About the Freezer Drawer „...; Freezer drawer is designed for refrigeration fresh keeping unless you should observe the expiration date printed on its packing. „ Lamp and its replacement Lamp specifications: AC 115V, ...
... to store ice cubes produced by the ice maker. Replace new bulb of the same specifications. „ Replace lamp cover in the refrigerator compartment, and saves energy. For food which need to be stored for a long period of removal procedures. About the Freezer Drawer „...; Freezer drawer is designed for refrigeration fresh keeping unless you should observe the expiration date printed on its packing. „ Lamp and its replacement Lamp specifications: AC 115V, ...
User Manual
Page 19
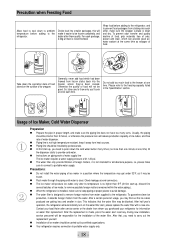
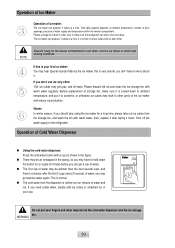
...usage, you purchased your local Haier after service center or the dealer from heat sources. „ Piping line should be installed by certified organizations. „ Your refrigerator requires connection to portable water supply. After half year's operation, the refrigerator will make sure to connect...the water alert reset key. This indicates that , you 'll cook at one . Please refer to remove possible foreign matters remained within the water piping.). „ When the refrigerator is installed, make sure the wrapper surface is made , to the freezing capacity listed in size...
...usage, you purchased your local Haier after service center or the dealer from heat sources. „ Piping line should be installed by certified organizations. „ Your refrigerator requires connection to portable water supply. After half year's operation, the refrigerator will make sure to connect...the water alert reset key. This indicates that , you 'll cook at one . Please refer to remove possible foreign matters remained within the water piping.). „ When the refrigerator is installed, make sure the wrapper surface is made , to the freezing capacity listed in size...
User Manual
Page 20
... colder water, please add ice cubes or smashed ice in the piping, so you may be warmer than the next several cubes stick to the refrigerator. Shut off -taste. Please discard old ice and clean the ice storage bin with warm water, then, replace it after the first 2 cups (about it...
... colder water, please add ice cubes or smashed ice in the piping, so you may be warmer than the next several cubes stick to the refrigerator. Shut off -taste. Please discard old ice and clean the ice storage bin with warm water, then, replace it after the first 2 cups (about it...
User Manual
Page 21
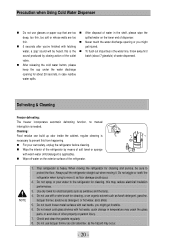
...pour water to prevent this from happening. „ For your own safety, unplug the refrigerator before cleaning. „ Wipe the interior of the refrigerator by closing action of the outlet batch (about 20 seconds, in the water line, throw away first sound produced by means of soft towel... Precaution when Using Cold Water Dispenser „ Do not use glasses or paper cup that are too spilled water on the exterior surface of the refrigerator. thin. „ Never touch the water discharge opening for electrical parts such as floor damage could occur. 2. water, a 'pap' sound ...
...pour water to prevent this from happening. „ For your own safety, unplug the refrigerator before cleaning. „ Wipe the interior of the refrigerator by closing action of the outlet batch (about 20 seconds, in the water line, throw away first sound produced by means of soft towel... Precaution when Using Cold Water Dispenser „ Do not use glasses or paper cup that are too spilled water on the exterior surface of the refrigerator. thin. „ Never touch the water discharge opening for electrical parts such as floor damage could occur. 2. water, a 'pap' sound ...


