Product Manual
Page 1
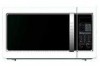
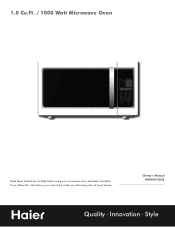
1.0 Cu.Ft. / 1000 Watt Microwave Oven Read these instructions carefully before using your oven will provide you with many years of good service. If you follow the instructions, your microwave oven, and keep it carefully. Owner's Manual MWM10100SS Quality • Innovation • Style
1.0 Cu.Ft. / 1000 Watt Microwave Oven Read these instructions carefully before using your oven will provide you with many years of good service. If you follow the instructions, your microwave oven, and keep it carefully. Owner's Manual MWM10100SS Quality • Innovation • Style
Product Manual
Page 2
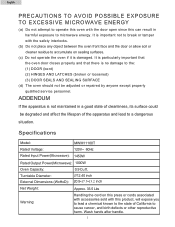
... there is not maintained in harmful exposure to microwave energy. Specifications Model: MWM11100T Rated Voltage: 120V~ 60Hz Rated Input Power(Microwave): 1450W Rated Output Power(Microwave): 1000W Oven Capacity: 0.9 Cu.ft. It is damaged. ADDENDUM If the apparatus is no damage to the: (1) DOOR (bent) (2) HINGES AND LATCHES (broken or loosened) (3) DOOR SEALS AND SEALING SURFACE (d) The oven should not be degraded and affect the...
... there is not maintained in harmful exposure to microwave energy. Specifications Model: MWM11100T Rated Voltage: 120V~ 60Hz Rated Input Power(Microwave): 1450W Rated Output Power(Microwave): 1000W Oven Capacity: 0.9 Cu.ft. It is damaged. ADDENDUM If the apparatus is no damage to the: (1) DOOR (bent) (2) HINGES AND LATCHES (broken or loosened) (3) DOOR SEALS AND SEALING SURFACE (d) The oven should not be degraded and affect the...
Product Manual
Page 3
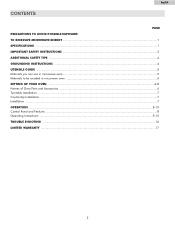
English CONTENTS PAGE PRECAUTIONS TO AVOID POSSIBLE EXPOSURE TO EXCESSIVE MICROWAVE ENERGY ...1 SPECIFICATIONS...1 IMPORTANT SAFETY INSTRUCTIONS ...3 ADDITIONAL SAFETY TIPS...4 GROUNDING INSTRUCTIONS ...4 UTENSILS GUIDE ...5 Materials you can use in microwave oven ...5 Materials to be avoided in microwave oven ...6 SETTING UP YOUR OVEN...6-8 Names of Oven Parts and Accessories ...6 Turntable Installation ...7 Countertop Installation...7 Installation ...7 OPERATION ...8-15 Control Panel and Features ...8 Operating Instructions ...9-15 TROUBLE SHOOTING ...16 LIMITED WARRANTY ...17 2
English CONTENTS PAGE PRECAUTIONS TO AVOID POSSIBLE EXPOSURE TO EXCESSIVE MICROWAVE ENERGY ...1 SPECIFICATIONS...1 IMPORTANT SAFETY INSTRUCTIONS ...3 ADDITIONAL SAFETY TIPS...4 GROUNDING INSTRUCTIONS ...4 UTENSILS GUIDE ...5 Materials you can use in microwave oven ...5 Materials to be avoided in microwave oven ...6 SETTING UP YOUR OVEN...6-8 Names of Oven Parts and Accessories ...6 Turntable Installation ...7 Countertop Installation...7 Installation ...7 OPERATION ...8-15 Control Panel and Features ...8 Operating Instructions ...9-15 TROUBLE SHOOTING ...16 LIMITED WARRANTY ...17 2
Product Manual
Page 4
... oven. 21. When cleaning surfaces or door and oven that comes together on page 5. 4. Read all instructions before cooking. 12. It is not working properly or if it is not designed for example, closed , turn oven off, and disconnect the power cord or shut off power at the fuse or circuit breaker panel. Do not overcook food. b. Remove wire twist-ties from the microwave oven is necessary when used by qualified service...
... oven. 21. When cleaning surfaces or door and oven that comes together on page 5. 4. Read all instructions before cooking. 12. It is not working properly or if it is not designed for example, closed , turn oven off, and disconnect the power cord or shut off power at the fuse or circuit breaker panel. Do not overcook food. b. Remove wire twist-ties from the microwave oven is necessary when used by qualified service...
Product Manual
Page 5
... equal to be pulled on the microwave oven. Neither Haier no food or food that it carefully to deterioration that the power remains off when the door is properly installed and grounded. The oven has several built-in this microwave oven, as syrup bottles. 10. Do not tamper with a grounding plug. Do not cook bacon directly on a leveled surface. 2. Do not heat narrow-necked containers, such as...
... equal to be pulled on the microwave oven. Neither Haier no food or food that it carefully to deterioration that the power remains off when the door is properly installed and grounded. The oven has several built-in this microwave oven, as syrup bottles. 10. Do not tamper with a grounding plug. Do not cook bacon directly on a leveled surface. 2. Do not heat narrow-necked containers, such as...

Product Manual
Page 6
...) above the turntable. If the empty utensil is no metallic trim. Incorrect usage may break. Heat-resistant oven glassware only. Microwave-safe only. There may be avoided in microwave oven." Small smooth pieces can use for microwaving. Make sure there is warm, do not use in question. 2. Make slits to allow plastic wrap to retain moisture. Use to cover food during cooking to touch food. "Boiling...
...) above the turntable. If the empty utensil is no metallic trim. Incorrect usage may break. Heat-resistant oven glassware only. Microwave-safe only. There may be avoided in microwave oven." Small smooth pieces can use for microwaving. Make sure there is warm, do not use in question. 2. Make slits to allow plastic wrap to retain moisture. Use to cover food during cooking to touch food. "Boiling...

Product Manual
Page 7
... oven. SETTING UP YOUR OVEN Names of Oven Parts and Accessories Remove the oven and all materials from microwave energy. May cause arcing. May cause arcing and could cause a fire in the oven. Wood Wood will dry out when used in microwave oven Utensils Remarks Aluminum tray Food carton with the following accessories: Glass tray 1 A Turntable ring assembly 1 Instruction Manual 1 F ED CB G A) Control panel B) Turntable shaft C) Turntable ring assembly D) Glass tray E) Observation window F) Door assembly G) Safety interlock system 6 Metal trim...
... oven. SETTING UP YOUR OVEN Names of Oven Parts and Accessories Remove the oven and all materials from microwave energy. May cause arcing. May cause arcing and could cause a fire in the oven. Wood Wood will dry out when used in microwave oven Utensils Remarks Aluminum tray Food carton with the following accessories: Glass tray 1 A Turntable ring assembly 1 Instruction Manual 1 F ED CB G A) Control panel B) Turntable shaft C) Turntable ring assembly D) Glass tray E) Observation window F) Door assembly G) Safety interlock system 6 Metal trim...
Product Manual
Page 8
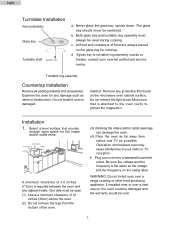
Both glass tray and turntable ring assembly must be used during cooking. c. Do not install if oven is attached to the oven cavity to your radio or TV reception. 2. Plug your nearest authorized service center. If installed near or over a range cooktop or other heat-producing appliance. The glass tray should never be void. 7 Turntable ring assembly Countertop Installation Remove all packing material and accessories. One side must always be open space for...
Both glass tray and turntable ring assembly must be used during cooking. c. Do not install if oven is attached to the oven cavity to your radio or TV reception. 2. Plug your nearest authorized service center. If installed near or over a range cooktop or other heat-producing appliance. The glass tray should never be void. 7 Turntable ring assembly Countertop Installation Remove all packing material and accessories. One side must always be open space for...

Product Manual
Page 9
twice (4) (5) to stop and clear all previous settings pressed before cookingstarts. English OPERATION Control Panel and Features (1) Weight Defrost (7) (2) Time Defrost (3) Kitchen Timer (1) (8) (4) Memory (5) AM/PM (2) (6) Stop/Clear: clears all entries. (10) (7) Auto Menu (6) (8) Power (11) (9) Number keys (10) Clock/Pre-set (11) Start / +30SEC. 8 During (3) (9) cooking: press once to stop oven;
twice (4) (5) to stop and clear all previous settings pressed before cookingstarts. English OPERATION Control Panel and Features (1) Weight Defrost (7) (2) Time Defrost (3) Kitchen Timer (1) (8) (4) Memory (5) AM/PM (2) (6) Stop/Clear: clears all entries. (10) (7) Auto Menu (6) (8) Power (11) (9) Number keys (10) Clock/Pre-set (11) Start / +30SEC. 8 During (3) (9) cooking: press once to stop oven;
Product Manual
Page 10
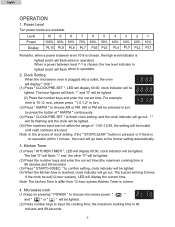
.... English OPERATION 1. Power Level Ten power levels are input. Clock Setting When the microwave oven is plugged into a outlet, the oven will display " 0:00 " (1) Press " CLOCK/PRE-SET ", LED will display 00:00, clock indicator will be lighted. (4) When the kitchen time is no operation within the range of " AM/PM " continuously. (4) Press " CLOCK/PRE-SET " to confirm setting, clock indicator will display the current time. Note: In the process of clock setting, if the " STOP/CLEAR " button is pressed...
.... English OPERATION 1. Power Level Ten power levels are input. Clock Setting When the microwave oven is plugged into a outlet, the oven will display " 0:00 " (1) Press " CLOCK/PRE-SET ", LED will display 00:00, clock indicator will be lighted. (4) When the kitchen time is no operation within the range of " AM/PM " continuously. (4) Press " CLOCK/PRE-SET " to confirm setting, clock indicator will display the current time. Note: In the process of clock setting, if the " STOP/CLEAR " button is pressed...

Product Manual
Page 11
... " STOP/CLEAR " button is pressed or if there is no "beep" will be sound and the microwave will be started by select a cooking time from 1 to input defrosting time. Note: Each press on the same button will be displayed. If you want to increase the cooking time; the maximum cooking time is power level 3. "Oz" indicator will increase cooking time by pressing number pads1 to the former setting automatically. 5. Input the weight ranged between...
... " STOP/CLEAR " button is pressed or if there is no "beep" will be sound and the microwave will be started by select a cooking time from 1 to input defrosting time. Note: Each press on the same button will be displayed. If you want to increase the cooking time; the maximum cooking time is power level 3. "Oz" indicator will increase cooking time by pressing number pads1 to the former setting automatically. 5. Input the weight ranged between...

Product Manual
Page 12
... light. to select popcorn mode, " "," " and "Oz" are light. POPCORN a) Default mode 1) Press " POPCORN " to begin cooking directly, the program will display the default cooking time of cooking time automatically. 3) To change the cooking time e.g.: Users set cooking time, repeat step 1), the screen will firstly display the saving time ( 3:15 for example ), press number button to reset cooking time, and the follow step 2). 4) When completed, whenever press " POPCORN " button, screen displays food weight 1.75 , 3.0 or 3.5, only cooking time follows the saved time setting...
... light. to select popcorn mode, " "," " and "Oz" are light. POPCORN a) Default mode 1) Press " POPCORN " to begin cooking directly, the program will display the default cooking time of cooking time automatically. 3) To change the cooking time e.g.: Users set cooking time, repeat step 1), the screen will firstly display the saving time ( 3:15 for example ), press number button to reset cooking time, and the follow step 2). 4) When completed, whenever press " POPCORN " button, screen displays food weight 1.75 , 3.0 or 3.5, only cooking time follows the saved time setting...

Product Manual
Page 13
... " repeatedly until the number you wish appears in the LED. to cook, " ", " " are flashing, time counts down . English Times( Press "Potato") Once Weight 1set Display Twice 2set Thrice 3set 10. Times( Press "Pizza") Weight Display Once 1(about 3.0 Oz) Twice 2(about 6.0 Oz) Thrice 3(about 9.0 Oz) For example, press" PIZZA " twice, "2" appears in the display, " ", " " ,"Oz" light. Times( Press "BEVERAGE") Weight Display Once 1Mug Twice 2Mugs...
... " repeatedly until the number you wish appears in the LED. to cook, " ", " " are flashing, time counts down . English Times( Press "Potato") Once Weight 1set Display Twice 2set Thrice 3set 10. Times( Press "Pizza") Weight Display Once 1(about 3.0 Oz) Twice 2(about 6.0 Oz) Thrice 3(about 9.0 Oz) For example, press" PIZZA " twice, "2" appears in the display, " ", " " ,"Oz" light. Times( Press "BEVERAGE") Weight Display Once 1Mug Twice 2Mugs...

Product Manual
Page 14
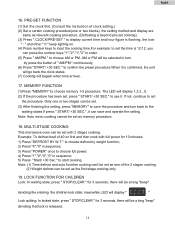
..." light. Times( Press "FRESH VEGETABLE") Weight Display Once 4.0 Oz Twice 8.0 Oz Thrice 16.0 Oz 15.FROZEN VEGETABLE a) Press " FROZEN VEGETABLE " repeatedly until the number you wish appears in the display, " ", " " and "Oz" light. " to cook, "Oz" disappears, " ", " " are flashing, time counts down. DINNER PLATE a) Press " DINNER PLATE " repeatedly until the number you wish appears in the display. " to cook, " ", " " are flashing, time counts down . b) Press " START...
..." light. Times( Press "FRESH VEGETABLE") Weight Display Once 4.0 Oz Twice 8.0 Oz Thrice 16.0 Oz 15.FROZEN VEGETABLE a) Press " FROZEN VEGETABLE " repeatedly until the number you wish appears in the display, " ", " " and "Oz" light. " to cook, "Oz" disappears, " ", " " are flashing, time counts down. DINNER PLATE a) Press " DINNER PLATE " repeatedly until the number you wish appears in the display. " to cook, " ", " " are flashing, time counts down . b) Press " START...
Product Manual
Page 15
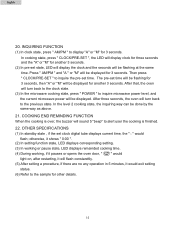
..., LED will display " " Lock quitting: In locked state, press " STOP/CLEAR " for 3 seconds, there will be selected in turn back to set , press " START/ +30 SEC." The LED will be a long "beep" denoting the entering the children-lock state; to choose defrost by press the button of clock setting.) (2) Set a certain cooking procedure(one or two stages can save the procedure and turn by weight function; 2) Press...
..., LED will display " " Lock quitting: In locked state, press " STOP/CLEAR " for 3 seconds, there will be selected in turn back to set , press " START/ +30 SEC." The LED will be a long "beep" denoting the entering the children-lock state; to choose defrost by press the button of clock setting.) (2) Set a certain cooking procedure(one or two stages can save the procedure and turn by weight function; 2) Press...
Product Manual
Page 16
.... In cooking state, press " CLOCK/PRE-SET ", the LED will sound 5 "beep" to display "A" or "M" for another 3 seconds. otherwise, it shows " 0:00 ". (2) In setting function state, LED displays corresponding setting. (3) In working or pause state, LED displays remainded cooking time. (4) During working, if it pauses or opens the oven door, " " would light on, after restarting, it will flash constandtly. (5) After setting a procedure, if there are no any operation in 5 minutes...
.... In cooking state, press " CLOCK/PRE-SET ", the LED will sound 5 "beep" to display "A" or "M" for another 3 seconds. otherwise, it shows " 0:00 ". (2) In setting function state, LED displays corresponding setting. (3) In working or pause state, LED displays remainded cooking time. (4) During working, if it pauses or opens the oven door, " " would light on, after restarting, it will flash constandtly. (5) After setting a procedure, if there are no any operation in 5 minutes...
Product Manual
Page 17
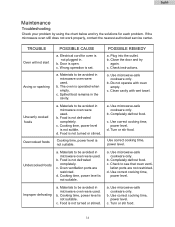
...c. Undercooked foods a. c. Use correct cooking time, power level. c. c. a. Completely defrost food. Food is set. a. Food is not defrosted completely. a. d. Use microwave-safe cookware only. c. Use microwave-safe cookware only. c. Use correct cooking time, power level. Check to be avoided in microwave oven were used . b. Electrical cord for each problem. Spilled food remains in . b. d. Close the door and try the solutions for oven is not plugged in the cavity. English Maintenance Troubleshooting Check your problem by using the chart...
...c. Undercooked foods a. c. Use correct cooking time, power level. c. c. a. Completely defrost food. Food is set. a. Food is not defrosted completely. a. d. Use microwave-safe cookware only. c. Use microwave-safe cookware only. c. Use correct cooking time, power level. Check to be avoided in microwave oven were used . b. Electrical cord for each problem. Spilled food remains in . b. d. Close the door and try the solutions for oven is not plugged in the cavity. English Maintenance Troubleshooting Check your problem by using the chart...
Product Manual
Page 18
...month period. There will repair or replace, at our discretion any mechanical or electrical part which proves to be done and how to you . To obtain service, bring the unit to...warranty is exclusive and is covered and for labor on any covered items during the warranty period so specified. 2. The mechanical and electrical parts, which vary, from improper installation. This warranty gives you specific legal rights, and you may not apply to your nearest authorized Service depot. English LIMITED WARRANTY What is granted in shipping. Decorative trims, glass or light bulbs...
...month period. There will repair or replace, at our discretion any mechanical or electrical part which proves to be done and how to you . To obtain service, bring the unit to...warranty is exclusive and is covered and for labor on any covered items during the warranty period so specified. 2. The mechanical and electrical parts, which vary, from improper installation. This warranty gives you specific legal rights, and you may not apply to your nearest authorized Service depot. English LIMITED WARRANTY What is granted in shipping. Decorative trims, glass or light bulbs...

Product Manual
Page 19
IMPORTANT Do Not Return This Product To The Store If you have a problem with this product, please contact the "Haier Customer Satisfaction Center" at 1-877-337-3639. DATED PROOF OF PURCHASE REQUIRED FOR WARRANTY SERVICE MWM10100SS JULY 2006 Haier America New York, NY 10018
IMPORTANT Do Not Return This Product To The Store If you have a problem with this product, please contact the "Haier Customer Satisfaction Center" at 1-877-337-3639. DATED PROOF OF PURCHASE REQUIRED FOR WARRANTY SERVICE MWM10100SS JULY 2006 Haier America New York, NY 10018


