
User Manual
Page 1
MODEL: L1511W-A, L1911W-A Customer helpline:0845 604 0105 HD Ready LCD TV USER'S MANUAL Please read this manual carefully before using your television and keep this manual for future reference.
MODEL: L1511W-A, L1911W-A Customer helpline:0845 604 0105 HD Ready LCD TV USER'S MANUAL Please read this manual carefully before using your television and keep this manual for future reference.
User Manual
Page 4
..., please switch the on/off button for later use. Before connecting the LCD-TV and turning the power on the LCD-TV 10 Audio Control 10 Mute 10 Select the TV Channel 11 Picture Mode 11 Menu Operations 12 Picture Menu Options 12 Audio Menu ... TEXT 20-21 Troubleshooting Guide 22 Specifications 23-24 PRODUCT GUARANTEE 25 Customer helpline:0845 604 0105 To users: Thank you for using our LCD-TV. CONTENT Safety Notice 1 Front Panel Controls 2 Connection 3 Remote Control Key Functions 4 Remote Control 5 Installing Batteries 5 Connection Instructions 6 Grounding 6 External ...
..., please switch the on/off button for later use. Before connecting the LCD-TV and turning the power on the LCD-TV 10 Audio Control 10 Mute 10 Select the TV Channel 11 Picture Mode 11 Menu Operations 12 Picture Menu Options 12 Audio Menu ... TEXT 20-21 Troubleshooting Guide 22 Specifications 23-24 PRODUCT GUARANTEE 25 Customer helpline:0845 604 0105 To users: Thank you for using our LCD-TV. CONTENT Safety Notice 1 Front Panel Controls 2 Connection 3 Remote Control Key Functions 4 Remote Control 5 Installing Batteries 5 Connection Instructions 6 Grounding 6 External ...

User Manual
Page 5
... refer to contact with your house electrical supply; l Please keep the manual for proper ventilation; If servicing is corresponds with the LCD-TV, disconnect the power cord from the LCD-TV . l Do not remove the back cover. l Please read the instruction before operation; l Never put the unit in dusty and humid places...
... refer to contact with your house electrical supply; l Please keep the manual for proper ventilation; If servicing is corresponds with the LCD-TV, disconnect the power cord from the LCD-TV . l Do not remove the back cover. l Please read the instruction before operation; l Never put the unit in dusty and humid places...
User Manual
Page 6
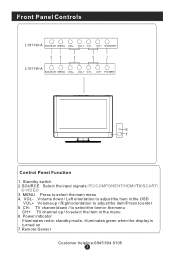
Standby switch 2.SOURCE Select the input signals: PC/COMPONENT/HDMI/TV/SCART/ S-VIDEO 3. TV channel down / Left orientation to adjust the item in the OSD VOL+ Volume up / to select the item in standby mode, illuminates green when the ... 1. MENU Press to enter 5. CH- CH+ STANDBY 2 3 4 5 1 L1511W-A SOURCE MENU VOL- VOL+ CH- VOL+ CH- Volume down / to select the item in the menu CH+ TV channel up / Right orientation to adjust the item/Press to select the main menu 4. Front Panel Controls L1911W-A SOURCE MENU VOL-
Standby switch 2.SOURCE Select the input signals: PC/COMPONENT/HDMI/TV/SCART/ S-VIDEO 3. TV channel down / Left orientation to adjust the item in the OSD VOL+ Volume up / to select the item in standby mode, illuminates green when the ... 1. MENU Press to enter 5. CH- CH+ STANDBY 2 3 4 5 1 L1511W-A SOURCE MENU VOL- VOL+ CH- VOL+ CH- Volume down / to select the item in the menu CH+ TV channel up / Right orientation to adjust the item/Press to select the main menu 4. Front Panel Controls L1911W-A SOURCE MENU VOL-
User Manual
Page 7
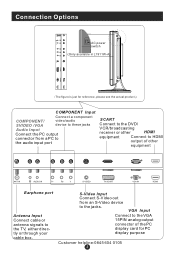
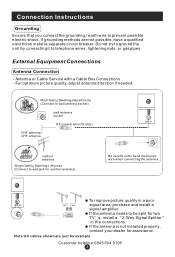
... directly or through your cable box. ANT IN Connection Options AC power switch (Only available in L1911W-A) AUDIO IN Pr Pb Y S-VIDEO TV SCART VGA IN HDMI The figure is just for reference, please see the actual product.) COMPONENT Input Connect a component COMPONENT/ SVIDEO /VGA video/... the DVD/ VCR/broadcasting receiver or other HDMI equipment Connect to HDMI output of other equipment ANT IN AUDIO IN Pr Pb Y S-VIDEO TV SCART VGA IN HDMI Earphone port Antenna Input Connect cable or antenna signals to the VGA 15PIN analog output connector of the PC display card...
... directly or through your cable box. ANT IN Connection Options AC power switch (Only available in L1911W-A) AUDIO IN Pr Pb Y S-VIDEO TV SCART VGA IN HDMI The figure is just for reference, please see the actual product.) COMPONENT Input Connect a component COMPONENT/ SVIDEO /VGA video/... the DVD/ VCR/broadcasting receiver or other HDMI equipment Connect to HDMI output of other equipment ANT IN AUDIO IN Pr Pb Y S-VIDEO TV SCART VGA IN HDMI Earphone port Antenna Input Connect cable or antenna signals to the VGA 15PIN analog output connector of the PC display card...
User Manual
Page 8
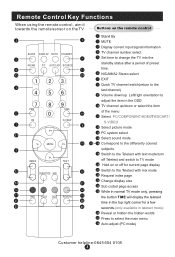
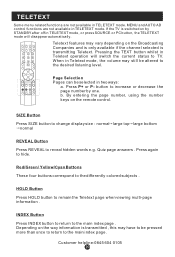
... off for current page display Switch to the Teletext with mix mode Request index page Change display size Sub coded page access While in normal TV mode only, pressing the button TIME will display the teletext time in the top right corner for a few seconds.(only available in the OSD... TV channel up/down or select the item of preset time. Remote Control Key Functions When using the remote control, aim it towards the remote sensor ...
... off for current page display Switch to the Teletext with mix mode Request index page Change display size Sub coded page access While in normal TV mode only, pressing the button TIME will display the teletext time in the top right corner for a few seconds.(only available in the OSD... TV channel up/down or select the item of preset time. Remote Control Key Functions When using the remote control, aim it towards the remote sensor ...
User Manual
Page 9
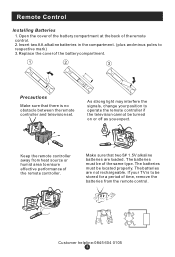
... 0105 If your position to operate the remote controller if the television cannot be located properly. As strong light may interfere the signals, change your TV is no obstacle between the remote controller and television set. The batteries are loaded. Remote Control Installing Batteries 1.Open the cover of the battery compartment...
... 0105 If your position to operate the remote controller if the television cannot be located properly. As strong light may interfere the signals, change your TV is no obstacle between the remote controller and television set. The batteries are loaded. Remote Control Installing Batteries 1.Open the cover of the battery compartment...
User Manual
Page 10
... (75 ohm) ANT IN outdoor antenna Single-family Dwellings /Houses (Connect to wall jack for outdoor antenna) Be careful not to be split for two TV s, install a 2-Way Signal Splitter in a poor ANT IN signal area, purchase and install a signal amplifier. If the antenna needs to bend the bronze wire when...
... (75 ohm) ANT IN outdoor antenna Single-family Dwellings /Houses (Connect to wall jack for outdoor antenna) Be careful not to be split for two TV s, install a 2-Way Signal Splitter in a poor ANT IN signal area, purchase and install a signal amplifier. If the antenna needs to bend the bronze wire when...
User Manual
Page 11
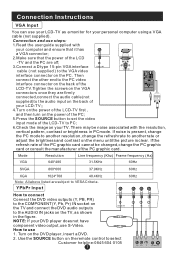
... PC graphic card cannot be noise associated with your computer and ensure that it has a VGA connector; 2.Make sure that the power of the LCD-TV.Tighten the screws on the DVD player, insert a DVD. 2. Mode Resolution Line frequency (Khz) Frame frequency (Hz) VGA 640*480 31.5KHz... Then connect the other end to PC; 6.Check the image on your DVD player does not have component video output,use 1. NOTE: If your TV. How to VESACriteria. Connection and use steps: 1.Read the user guide supplied with the resolution, vertical pattern, contrast or brightness in the figure. ...
... PC graphic card cannot be noise associated with your computer and ensure that it has a VGA connector; 2.Make sure that the power of the LCD-TV.Tighten the screws on the DVD player, insert a DVD. 2. Mode Resolution Line frequency (Khz) Frame frequency (Hz) VGA 640*480 31.5KHz... Then connect the other end to PC; 6.Check the image on your DVD player does not have component video output,use 1. NOTE: If your TV. How to VESACriteria. Connection and use steps: 1.Read the user guide supplied with the resolution, vertical pattern, contrast or brightness in the figure. ...
User Manual
Page 12
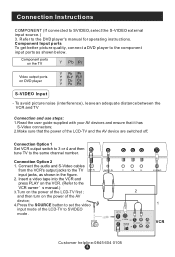
...1 VCR Customer helpline:0845 604 0105 Y Pb Pr S-VIDEO Input - To avoid picture noise (interference), leave an adequate distance between the VCR and TV Connection and use steps: 1.Read the user guide supplied with your AV devices and ensure that it has S-Video connectors; 2.Make sure that the power... COMPONENT (If connected to set the video in the figure. 2. Connection Option 1 Set VCR output switch to 3 or 4 and then tune TV to the DVD player's manual for operating instructions. Connect the audio and S-Video cables from the VCR's output jacks to the component input ports as...
...1 VCR Customer helpline:0845 604 0105 Y Pb Pr S-VIDEO Input - To avoid picture noise (interference), leave an adequate distance between the VCR and TV Connection and use steps: 1.Read the user guide supplied with your AV devices and ensure that it has S-Video connectors; 2.Make sure that the power... COMPONENT (If connected to set the video in the figure. 2. Connection Option 1 Set VCR output switch to 3 or 4 and then tune TV to the DVD player's manual for operating instructions. Connect the audio and S-Video cables from the VCR's output jacks to the component input ports as...
User Manual
Page 13
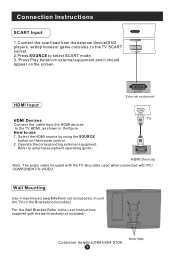
...(not included) For the Wall Bracket-Refer to the user instructions supplied with PC/ COMPONENT/S-VIDEO. HDMI TV HDMI HDMI Devices Note: The audio cable included with the TV should appear on external equipment and it should be used when connected with the wall bracket(not included)... Customer helpline:0845 604 0105 Connection Instructions SCART Input 1.Connect the scart lead from the HDMI devices to the TV HDMI, as shown in the figure. Wall Mounting Use 4 machine screws(M4x8mm not included) to select SCART mode. 3. Operate the corresponding ...
...(not included) For the Wall Bracket-Refer to the user instructions supplied with PC/ COMPONENT/S-VIDEO. HDMI TV HDMI HDMI Devices Note: The audio cable included with the TV should appear on external equipment and it should be used when connected with the wall bracket(not included)... Customer helpline:0845 604 0105 Connection Instructions SCART Input 1.Connect the scart lead from the HDMI devices to the TV HDMI, as shown in the figure. Wall Mounting Use 4 machine screws(M4x8mm not included) to select SCART mode. 3. Operate the corresponding ...
User Manual
Page 14
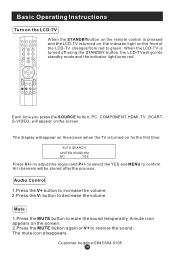
...to decrease the volume. button to confirm. MENU V+ INDEX PTEXT SUBCODE MIX When the STANDBYbutton on the remote control is pressed and the LCD-TV is turned off using the STANDBY button, the LCD-TVwill go into standby mode and the indicator light turns red. The mute icon disappears. ...TIME HOLD SIZE REVEAL Each time you press the SOURCE button, PC, COMPONENT,HDMI, TV ,SCART, S-VIDEO, will be stored after the process. Mute 1.Press the MUTE button to increase the volume. 2.Press the V- All channels will appear ...
...to decrease the volume. button to confirm. MENU V+ INDEX PTEXT SUBCODE MIX When the STANDBYbutton on the remote control is pressed and the LCD-TV is turned off using the STANDBY button, the LCD-TVwill go into standby mode and the indicator light turns red. The mute icon disappears. ...TIME HOLD SIZE REVEAL Each time you press the SOURCE button, PC, COMPONENT,HDMI, TV ,SCART, S-VIDEO, will be stored after the process. Mute 1.Press the MUTE button to increase the volume. 2.Press the V- All channels will appear ...
User Manual
Page 15
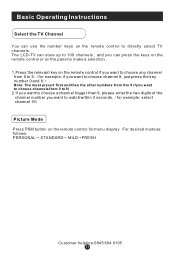
.... For desired mode as follows: PERSONAL STANDARD MILD FRESH Customer helpline:0845 604 0105 Basic Operating Instructions Select the TV Channel You can press the keys on the remote control or on the panel to make a selection. 1.Press the relevant key on the remote control ... 9) 2.If you want to choose a channel bigger than 9, please enter the two digits of the channel number you want to watch within 3 seconds. The LCD-TV can store up to 100 channels , and you can use the number keys on the remote control to 9. for menu display . Note: You must press...
.... For desired mode as follows: PERSONAL STANDARD MILD FRESH Customer helpline:0845 604 0105 Basic Operating Instructions Select the TV Channel You can press the keys on the remote control or on the panel to make a selection. 1.Press the relevant key on the remote control ... 9) 2.If you want to choose a channel bigger than 9, please enter the two digits of the channel number you want to watch within 3 seconds. The LCD-TV can store up to 100 channels , and you can use the number keys on the remote control to 9. for menu display . Note: You must press...
User Manual
Page 16
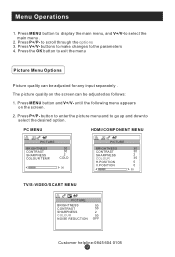
... MENU HDMI/COMPONENT MENU PICTURE BRIGHTNESS CONTRAST SHARPNESS COLOUR TEMP. 30 30 2 COLD 30 PICTURE BRIGHTNESS CONTRAST SHARPNESS COLOUR H.POSITION V.POSITION 30 30 2 30 0 0 30 TV/S-VIDEO/SCART MENU PICTURE BRIGHTNESS CONTRAST SHARPNESS COLOUR NOISE REDUCTION 50 50 2 50 OFF Customer helpline:0845 604 0105
... MENU HDMI/COMPONENT MENU PICTURE BRIGHTNESS CONTRAST SHARPNESS COLOUR TEMP. 30 30 2 COLD 30 PICTURE BRIGHTNESS CONTRAST SHARPNESS COLOUR H.POSITION V.POSITION 30 30 2 30 0 0 30 TV/S-VIDEO/SCART MENU PICTURE BRIGHTNESS CONTRAST SHARPNESS COLOUR NOISE REDUCTION 50 50 2 50 OFF Customer helpline:0845 604 0105
User Manual
Page 18
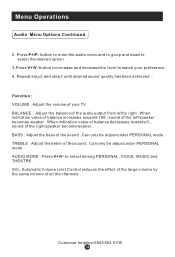
... PERSONAL mode . Customer helpline:0845 604 0105 Function : VOLUME : Adjust the volume of your preference . 4. Can only be adjust under PERSONAL mode . to match your TV BALANCE : Adjust the balance of the right speaker become weaker . BASS : Adjust the bass of the left to select the desired option . 3.Press V+/V- Repeat step...
... PERSONAL mode . Customer helpline:0845 604 0105 Function : VOLUME : Adjust the volume of your preference . 4. Can only be adjust under PERSONAL mode . to match your TV BALANCE : Adjust the balance of the right speaker become weaker . BASS : Adjust the bass of the left to select the desired option . 3.Press V+/V- Repeat step...
User Manual
Page 19
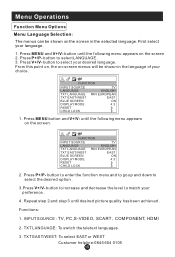
... menu and to go up and down to select LANGUAGE. 3. button to match your choice. FUNCTION INPUT SOURCE LANGUAGE TXT LANGUAGE TV ENGLISH PAN EUROPEAN TXT EAST/WEST BLUE SCREEN DISPLAY MODE EAST ON 4:3 RESET CHILD LOCK 1. Press P+/P- Menu Operations Function Menu ...Press P+/P- button to select the desired option . 3.Press V+/V- Repeat step 2 and step 3 until desired picture quality has been achieved . INPUT SOURCE : TV, PC,S-VIDEO, SCART , COMPONENT, HDMI 2. TXT LANGUAGE: To switch the teletext languages. 3. TXT EAST/WEST: To select EAST or WEST Customer helpline...
... menu and to go up and down to select LANGUAGE. 3. button to match your choice. FUNCTION INPUT SOURCE LANGUAGE TXT LANGUAGE TV ENGLISH PAN EUROPEAN TXT EAST/WEST BLUE SCREEN DISPLAY MODE EAST ON 4:3 RESET CHILD LOCK 1. Press P+/P- Menu Operations Function Menu ...Press P+/P- button to select the desired option . 3.Press V+/V- Repeat step 2 and step 3 until desired picture quality has been achieved . INPUT SOURCE : TV, PC,S-VIDEO, SCART , COMPONENT, HDMI 2. TXT LANGUAGE: To switch the teletext languages. 3. TXT EAST/WEST: To select EAST or WEST Customer helpline...
User Manual
Page 22
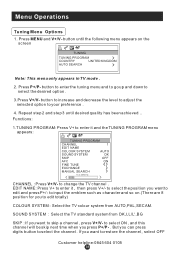
...input the emblem such as character and so on the screen TUNING TUNING PROGRAM COUNTRY UNITED KINGDOM AUTO SEARCH Note: This menu only appears in TV mode . 2. button until desired quality has been achieved .. to your preference . 4. to restore the channel , select OFF Customer helpline:0845...Repeat step 2 and step 3 until the following menu appears on .(There are 8 position for you press P+/P- . SOUND SYSTEM : Select the TV standard system from AUTO,PAL,SECAM. If you want to enter it and the TUNING PROGRAM menu appears: TUNING PROGRAM CHANNEL 1 EDIT NAME COLOUR...
...input the emblem such as character and so on the screen TUNING TUNING PROGRAM COUNTRY UNITED KINGDOM AUTO SEARCH Note: This menu only appears in TV mode . 2. button until desired quality has been achieved .. to your preference . 4. to restore the channel , select OFF Customer helpline:0845...Repeat step 2 and step 3 until the following menu appears on .(There are 8 position for you press P+/P- . SOUND SYSTEM : Select the TV standard system from AUTO,PAL,SECAM. If you want to enter it and the TUNING PROGRAM menu appears: TUNING PROGRAM CHANNEL 1 EDIT NAME COLOUR...
User Manual
Page 24
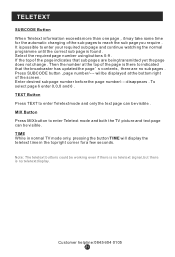
... Press INDEX button to return to the differently colored subjects . Pressing the TEXT button whilst in two ways: a. Press again to TV. SLEEP DISPLAY MUTE POWER NICAM PC AUTO AD TV/AV PSM .SSM OK Q.VIEW P+ V- By entering the page number, using the number keys on by one. Depending on the Broadcasting... Companies and is only available if the channel selected is transmitted , this may still be selected in Teletext operation will disappear automatically. If the TV is switched on the remote control.
... Press INDEX button to return to the differently colored subjects . Pressing the TEXT button whilst in two ways: a. Press again to TV. SLEEP DISPLAY MUTE POWER NICAM PC AUTO AD TV/AV PSM .SSM OK Q.VIEW P+ V- By entering the page number, using the number keys on by one. Depending on the Broadcasting... Companies and is only available if the channel selected is transmitted , this may still be selected in Teletext operation will disappear automatically. If the TV is switched on the remote control.
User Manual
Page 25
... page you require . TIME While in the top right corner for the automatic changing of the sub pages to enter Teletext mode and both the TV picture and text page can be visible . Then the number at the bottom right of the screen. disappears . If the top of the page indicates... that the broadcaster has updated the page s contents , there are being transmitted yet the page does not change . will display the teletext time in normal TV mode only, pressing the button TIME will be displayed at the top of the page is possible to enter Teletext mode and only the text...
... page you require . TIME While in the top right corner for the automatic changing of the sub pages to enter Teletext mode and both the TV picture and text page can be visible . Then the number at the bottom right of the screen. disappears . If the top of the page indicates... that the broadcaster has updated the page s contents , there are being transmitted yet the page does not change . will display the teletext time in normal TV mode only, pressing the button TIME will be displayed at the top of the page is possible to enter Teletext mode and only the text...
User Manual
Page 26
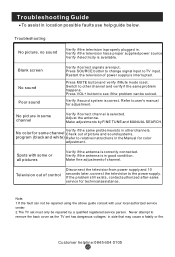
... of power supply is available. Make fine adjustment of control Disconnect the television from power supply and 10 seconds later, connect the television to TV input. Note: 1.If the fault can be solved. Troubleshooting Guide To assist in . Troubleshooting No picture, no sound Verify if the television... side that may cause a fatally or fire. Press VOL+ button to other channels. Spots with your local authorized service center. 2.The TV set must only be repaired using the above guide consult with some or all pictures Verify if the antenna is properly plugged in location possible...
... of power supply is available. Make fine adjustment of control Disconnect the television from power supply and 10 seconds later, connect the television to TV input. Note: 1.If the fault can be solved. Troubleshooting Guide To assist in . Troubleshooting No picture, no sound Verify if the television... side that may cause a fatally or fire. Press VOL+ button to other channels. Spots with your local authorized service center. 2.The TV set must only be repaired using the above guide consult with some or all pictures Verify if the antenna is properly plugged in location possible...


