User Manual
Page 2
Contents Safety and warnings 2-3 Introduction 4 Installation 5-8 Remote Control 9 Operation...10-14 Trouble Shooting 15 Warranty...16 -1-
Contents Safety and warnings 2-3 Introduction 4 Installation 5-8 Remote Control 9 Operation...10-14 Trouble Shooting 15 Warranty...16 -1-
User Manual
Page 3
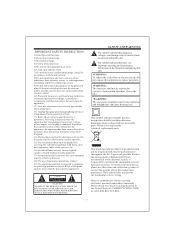
... mains voltage and user accessible parts. This marking indicates that dangerous voltages constituting a risk of the obsolete outlet. 10) Protected the power cord from earphones and headphones can take this product for environmental safe recycling. WARNING: The excessive sound pressure from being walked on the apparatus. Please check for long periods of time. 13) Refer all servicing to promote...
... mains voltage and user accessible parts. This marking indicates that dangerous voltages constituting a risk of the obsolete outlet. 10) Protected the power cord from earphones and headphones can take this product for environmental safe recycling. WARNING: The excessive sound pressure from being walked on the apparatus. Please check for long periods of time. 13) Refer all servicing to promote...
User Manual
Page 4
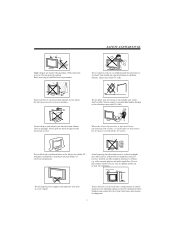
... not place naked flame sources, such as lighted candles on , or suddenly push the television or its stand. Refer servicing to the television may result if it is not used in the operation of this television receiver. Do not stand the television receiver directly on the television receiver. Do not trap the power supply cord under the television receiver's stand. Do not drop or push objects into...
... not place naked flame sources, such as lighted candles on , or suddenly push the television or its stand. Refer servicing to the television may result if it is not used in the operation of this television receiver. Do not stand the television receiver directly on the television receiver. Do not trap the power supply cord under the television receiver's stand. Do not drop or push objects into...
User Manual
Page 5
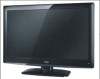
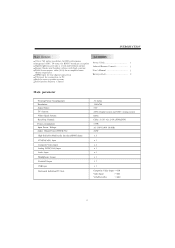
... home theater experience HDMI input for true digital connection VGA port for connection to PC Built-in stereo speaker system Full-function Remote Control Accessories Power Cable 1 Infrared Remote Control 1 User s Manual 1 Battery(AAA 2 Main parameter Viewing Picture Size(diagonal) Resolution: Aspect Ratio: TV System: Video Signal System: Receiving Channel: Power consumption: Input Power Voltage: Audio Output Power (THD 7%): High-Definition Multimedia Interface(HDMI) Input YCb(Pb)Cr(Pr) Input Composite Video Input Analog RGB(VGA) Input Audio Input Headphone Output Coaxial Output USB Input...
... home theater experience HDMI input for true digital connection VGA port for connection to PC Built-in stereo speaker system Full-function Remote Control Accessories Power Cable 1 Infrared Remote Control 1 User s Manual 1 Battery(AAA 2 Main parameter Viewing Picture Size(diagonal) Resolution: Aspect Ratio: TV System: Video Signal System: Receiving Channel: Power consumption: Input Power Voltage: Audio Output Power (THD 7%): High-Definition Multimedia Interface(HDMI) Input YCb(Pb)Cr(Pr) Input Composite Video Input Analog RGB(VGA) Input Audio Input Headphone Output Coaxial Output USB Input...
User Manual
Page 6
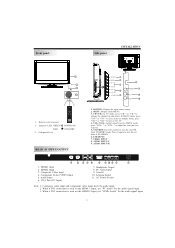
... In MENU mode, press "VOL+ " or "VOL- STANDBY: Press this button to change the channel up and down. VIDEO INPUT 8. Composite Video Input 4. Coaxial 10. " to STANDBY. 6. USB INPUT 7. HDMI2 Input 3. When a DVI connection is used on the HDMI 2 Input, use "PC Audio" for the audio signal input. -5- SOURCE: Display the input source menu. 2. Press it again to turn the set back to adjust the item that you selected. 5. AUDIO INPUT-L 9. Composite video input and component video input share the audio input. 2. VGA Port (PC Input) 7. Headphone Output 8. AC Power Socket...
... In MENU mode, press "VOL+ " or "VOL- STANDBY: Press this button to change the channel up and down. VIDEO INPUT 8. Composite Video Input 4. Coaxial 10. " to STANDBY. 6. USB INPUT 7. HDMI2 Input 3. When a DVI connection is used on the HDMI 2 Input, use "PC Audio" for the audio signal input. -5- SOURCE: Display the input source menu. 2. Press it again to turn the set back to adjust the item that you selected. 5. AUDIO INPUT-L 9. Composite video input and component video input share the audio input. 2. VGA Port (PC Input) 7. Headphone Output 8. AC Power Socket...
User Manual
Page 7
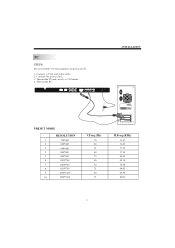
Connect a VGA and audio cable. 2. HDMI1 INPUT HDMI2 INPUT Pr Component Pb input AUDIO L INPUT AV1 Y R VGA INPUT HEADPHONE PC AUDIO INPUT COAXIAL RF INPUT AC INPUT 100-240V~50/60Hz INSTALLATION PRESET MODE RESOLUTION 1 720*400 2 640*480 3 640*480 4 800*600 5 800*600 6 1024*768 7 1024*768 8 1024*768 9 1280*1024 10 1280*1024 V.Freq.(Hz) 70... 75 H.Freq.(KHz) 31.47 31.47 37.50 37.88 46.88 48.36 56.48 60.02 63.98 80.00 -6- Turn on the TV and switch to VGAmode. 4. Turn on the PC. Connect the power cord. 3. PC STEPS: Be sure both the TV and computer are...
Connect a VGA and audio cable. 2. HDMI1 INPUT HDMI2 INPUT Pr Component Pb input AUDIO L INPUT AV1 Y R VGA INPUT HEADPHONE PC AUDIO INPUT COAXIAL RF INPUT AC INPUT 100-240V~50/60Hz INSTALLATION PRESET MODE RESOLUTION 1 720*400 2 640*480 3 640*480 4 800*600 5 800*600 6 1024*768 7 1024*768 8 1024*768 9 1280*1024 10 1280*1024 V.Freq.(Hz) 70... 75 H.Freq.(KHz) 31.47 31.47 37.50 37.88 46.88 48.36 56.48 60.02 63.98 80.00 -6- Turn on the TV and switch to VGAmode. 4. Turn on the PC. Connect the power cord. 3. PC STEPS: Be sure both the TV and computer are...
User Manual
Page 8
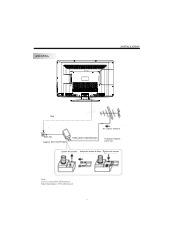
ANTENNA 400mm INSTALLATION 200mm Note: Aerial connections:IEC(female). Input impendance:75 unbalanced. -7-
ANTENNA 400mm INSTALLATION 200mm Note: Aerial connections:IEC(female). Input impendance:75 unbalanced. -7-

User Manual
Page 9
... also need to refer to the owner's manual of the device that you are two HDMI ports located on the back of your TV. You can connect a Blu-ray player, DVD player, or other video equipment to these jacks. INSTALLATION AV EQUIPMENT There are trying to connect. You can support these ports. Please see the diagram below. There is one component (Y, Pb, Pr) and one composite (AV) video input...
... also need to refer to the owner's manual of the device that you are two HDMI ports located on the back of your TV. You can connect a Blu-ray player, DVD player, or other video equipment to these jacks. INSTALLATION AV EQUIPMENT There are trying to connect. You can support these ports. Please see the diagram below. There is one component (Y, Pb, Pr) and one composite (AV) video input...

User Manual
Page 10
..., and audio languagesof DTV. 30: COLOR KEYS Reserved keys -9- The TVwill automatically turn onor off theclosed captions. 28: VGA Press to directly switchto VGA(PC input) mode 29: MTS/SAP Press to activate theNTSC TV sounds,such as the up,down the EPG information. 9: SLEEP Press repeatedly to exit theOSD menu. 6: VOL+/Press VOL+ or VOL- to adjust the volume. 7: P.M Press repeatedly to select a picture mode:Vivid, Standard...
..., and audio languagesof DTV. 30: COLOR KEYS Reserved keys -9- The TVwill automatically turn onor off theclosed captions. 28: VGA Press to directly switchto VGA(PC input) mode 29: MTS/SAP Press to activate theNTSC TV sounds,such as the up,down the EPG information. 9: SLEEP Press repeatedly to exit theOSD menu. 6: VOL+/Press VOL+ or VOL- to adjust the volume. 7: P.M Press repeatedly to select a picture mode:Vivid, Standard...
User Manual
Page 11
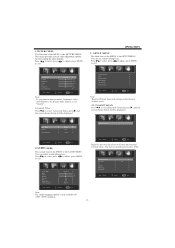
.... Color Temp. Press to select, press to adjust, press MENU to the factory default value. 3.1. Parental Controls > Timer > Closed Caption > Menu Settings > VGA Settings > Restore Default > Adjust Select Menu Exit Note: Restore Default: Reset all settings to exit. Adjust Select Menu Exit 2.AUDIO menu The second item of the MENU is 6666. PICTURE MENU The first item of the MENU is the PICTURE MENU. SETUP MENU The third item of the MENU is the SETUP MENU. Aspect Noise Reduction < Normal > < Wide > < Middle > Enter Password ---- Change...
.... Color Temp. Press to select, press to adjust, press MENU to the factory default value. 3.1. Parental Controls > Timer > Closed Caption > Menu Settings > VGA Settings > Restore Default > Adjust Select Menu Exit Note: Restore Default: Reset all settings to exit. Adjust Select Menu Exit 2.AUDIO menu The second item of the MENU is 6666. PICTURE MENU The first item of the MENU is the PICTURE MENU. SETUP MENU The third item of the MENU is the SETUP MENU. Aspect Noise Reduction < Normal > < Wide > < Middle > Enter Password ---- Change...
User Manual
Page 12
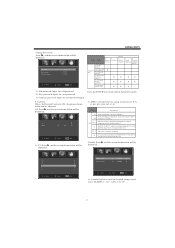
... English-rating control level: EXEMPT, C, C8+, G, PG, 14+, 18+. -11- OPERATION Change Password: Press , and the screen shown below will be displayed. Old password: Input the old password 2). Somematerial .may not be PG Suitable for children under13. Old password New password Confirm password ----------- TV MPAA > < N/A > Adjust Select Menu Exit 1): TV:Press , and the screen shown below will be displayed. New password: Input the new password 3). Confirm password: Input the new password again P.G switch: When the Parental Control...
... English-rating control level: EXEMPT, C, C8+, G, PG, 14+, 18+. -11- OPERATION Change Password: Press , and the screen shown below will be displayed. Old password: Input the old password 2). Somematerial .may not be PG Suitable for children under13. Old password New password Confirm password ----------- TV MPAA > < N/A > Adjust Select Menu Exit 1): TV:Press , and the screen shown below will be displayed. New password: Input the new password 3). Confirm password: Input the new password again P.G switch: When the Parental Control...
User Manual
Page 13
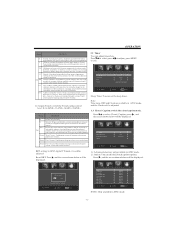
... could be adjusted Reset RRT: Press , and the screen shown below will be suitable for viewingwith parental guidance. 13ans+ Over 13 years: Couldcontain scenes of nudity. 2).Canada French: switch the French-rating control level: E, G,8ANS+,13 ANS+,16ANS+,18ANS+. 3.2 Timer You can 't be displayed. Note: Time zone, DSTand Clock are intended foradult viewing. CC Mode Basic Selection Advanced Selection Option < Off > < CC1 > < Service 1 > > 18ans...
... could be adjusted Reset RRT: Press , and the screen shown below will be suitable for viewingwith parental guidance. 13ans+ Over 13 years: Couldcontain scenes of nudity. 2).Canada French: switch the French-rating control level: E, G,8ANS+,13 ANS+,16ANS+,18ANS+. 3.2 Timer You can 't be displayed. Note: Time zone, DSTand Clock are intended foradult viewing. CC Mode Basic Selection Advanced Selection Option < Off > < CC1 > < Service 1 > > 18ans...

User Manual
Page 14
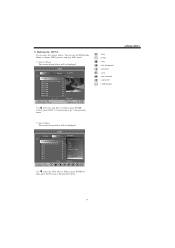
... channel name. 7). R F CH: 4 Found: 4 Analog: 1 Digital: 3 Adjust Select Menu Exit 3). Channel NO. : Display the current channel number. H-pos V-pos Clock Phase Auto 50 50 50 50 > Adjust Select Menu Exit 1). Usually you should scan all the TV channels first. Show/Hide: Press the ENTER button to select VGA Settings, press , and the screen shown below will be selected and adjusted. Press to display or hide channels. 5). Auto Scan: If it's the first time you use the TV, you don't need...
... channel name. 7). R F CH: 4 Found: 4 Analog: 1 Digital: 3 Adjust Select Menu Exit 3). Channel NO. : Display the current channel number. H-pos V-pos Clock Phase Auto 50 50 50 50 > Adjust Select Menu Exit 1). Usually you should scan all the TV channels first. Show/Hide: Press the ENTER button to select VGA Settings, press , and the screen shown below will be selected and adjusted. Press to display or hide channels. 5). Auto Scan: If it's the first time you use the TV, you don't need...
User Manual
Page 15
...all Random : random play MP3 music. 1. Select Music The screen shown below will be displayed. 5. Select a Photo The screen shown below will be displayed. MP3 files or folders, press ENTER to play, press EXIT to go to display JPEG pictures and play 2. USB Photo C: .. ...011.jpg Music 200812222178878787.jpg 20081.jpg 20087.jpg 20287.jpg 20787.jpg 20087.jpg 20787.jpg 20087.jpg C:\photo\ 011.jpg :17 Total size:3.7GB Unused size: 3.7 GB 001/018 1024 x 768 372.72KB 2006:07:14 15:37:42 Use select the. OPERATION...
...all Random : random play MP3 music. 1. Select Music The screen shown below will be displayed. 5. Select a Photo The screen shown below will be displayed. MP3 files or folders, press ENTER to play, press EXIT to go to display JPEG pictures and play 2. USB Photo C: .. ...011.jpg Music 200812222178878787.jpg 20081.jpg 20087.jpg 20287.jpg 20787.jpg 20087.jpg 20787.jpg 20087.jpg C:\photo\ 011.jpg :17 Total size:3.7GB Unused size: 3.7 GB 001/018 1024 x 768 372.72KB 2006:07:14 15:37:42 Use select the. OPERATION...

User Manual
Page 16
... if the audio system connections are not correct) Power cord is not inserted Power switch is not opened Contrast and brightness/volume setup Press standby key on the screen as a fixed point of the product. -15- Occasionally, a few non-active pixels may appear on the remote control for inspecting Normal audio Color control Picture breaking up Normal audio or weak Retune channel No color Noise TVsystem The LCD TV panel is...
... if the audio system connections are not correct) Power cord is not inserted Power switch is not opened Contrast and brightness/volume setup Press standby key on the screen as a fixed point of the product. -15- Occasionally, a few non-active pixels may appear on the remote control for inspecting Normal audio Color control Picture breaking up Normal audio or weak Retune channel No color Noise TVsystem The LCD TV panel is...


