
Operating Instructions
Page 1
01 0090508531 L26A9A-A1 L32A9A-A1 LCD COLOR TELEVISION OPERATING INSTRUCTIONS ◆Wide view-angle display, high contrast ◆AAA function ◆HDMI input
01 0090508531 L26A9A-A1 L32A9A-A1 LCD COLOR TELEVISION OPERATING INSTRUCTIONS ◆Wide view-angle display, high contrast ◆AAA function ◆HDMI input
Operating Instructions
Page 2
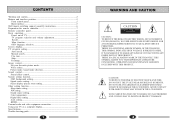
OPERATION AND MAINTENANCE HAS BEEN INCLUDED WITH THIS PRODUCT. CONTENTS Warning and caution 2 Buttons and interface position 5 Front control panel 5 Back interface 5 Wall mount switching support assembly instructions 6 Preparation for remote controller 7 Remote controller panel 8 Basic operation 9 Power on/off TV 9 TV program selection and volume adjustment 9 Recall...9 Mute function 9 OSD language selection 9 Screen display 10 TV program setting 11 Auto search 11 Manual search 11 Fine tune...12 Skip...12 Exchange...13 Image control...13 Set your favourite picture ...
OPERATION AND MAINTENANCE HAS BEEN INCLUDED WITH THIS PRODUCT. CONTENTS Warning and caution 2 Buttons and interface position 5 Front control panel 5 Back interface 5 Wall mount switching support assembly instructions 6 Preparation for remote controller 7 Remote controller panel 8 Basic operation 9 Power on/off TV 9 TV program selection and volume adjustment 9 Recall...9 Mute function 9 OSD language selection 9 Screen display 10 TV program setting 11 Auto search 11 Manual search 11 Fine tune...12 Skip...12 Exchange...13 Image control...13 Set your favourite picture ...
Operating Instructions
Page 4
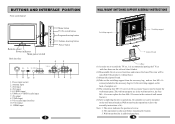
Power input socket 2. AV1 input 5. This operation is only used to mount the wall mount parts.(The wall mount parts are used before mounting the bracket. 3. Wall mount bracket is without base.) (3)Mount the airproof board. (4)Take out the switching support from the accessory bag, and use four M5×16 screws(included in the carton of wall mount bracket.) (6)After completing the above operations, the complete set with face down on the soft and clean blanket. (2)Disassemble the six screws from base and remove the base.(This item will be mounted on the back of screw. 2. L-...
Power input socket 2. AV1 input 5. This operation is only used to mount the wall mount parts.(The wall mount parts are used before mounting the bracket. 3. Wall mount bracket is without base.) (3)Mount the airproof board. (4)Take out the switching support from the accessory bag, and use four M5×16 screws(included in the carton of wall mount bracket.) (6)After completing the above operations, the complete set with face down on the soft and clean blanket. (2)Disassemble the six screws from base and remove the base.(This item will be mounted on the back of screw. 2. L-...
Operating Instructions
Page 5
PREPARATION FOR REMOTE CONTROLLER Remote control installation 1. symbol of battery must match with face down button, direction 15 selection button 14 VOL- MENU VOL+ C.SYS 17 ↑ ↓ 25 STILL 20 = CHI-II S.SYS ← → SCAN ← 16 Menu call/selection button 17 Color system selection button 16 18 Sound system selection button 19 Program scan button 18 20 Picture still button 21 This function is not available 26 22 Picture size selection button 27 23 Sleep timer button 24 This function is not available 19 25 This function is not available ZOOM SLEEP SIZE ...
PREPARATION FOR REMOTE CONTROLLER Remote control installation 1. symbol of battery must match with face down button, direction 15 selection button 14 VOL- MENU VOL+ C.SYS 17 ↑ ↓ 25 STILL 20 = CHI-II S.SYS ← → SCAN ← 16 Menu call/selection button 17 Color system selection button 16 18 Sound system selection button 19 Program scan button 18 20 Picture still button 21 This function is not available 26 22 Picture size selection button 27 23 Sleep timer button 24 This function is not available 19 25 This function is not available ZOOM SLEEP SIZE ...
Operating Instructions
Page 6
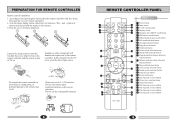
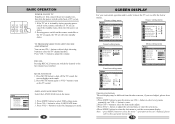
If the TV set is in order to know the TV set can cancel the standby status, then enter the power on status. 2. button or direct-digit choosing button to return the last menu or exit the screen menu display. Press VOL+/- button to adjust the selected item, or enter the next menu. 4.Press MENU button to select the TV channel number. Press MUTE button to adjust the volume. button to select the language you need adjust, please do as follows: 1.Press MENU button to this operation instructions. 10 Picture setting menu Source setting menu PICTURE PICTURE MODE CONTRAST...
If the TV set is in order to know the TV set can cancel the standby status, then enter the power on status. 2. button or direct-digit choosing button to return the last menu or exit the screen menu display. Press VOL+/- button to adjust the selected item, or enter the next menu. 4.Press MENU button to select the TV channel number. Press MUTE button to adjust the volume. button to select the language you need adjust, please do as follows: 1.Press MENU button to this operation instructions. 10 Picture setting menu Source setting menu PICTURE PICTURE MODE CONTRAST...
Operating Instructions
Page 7
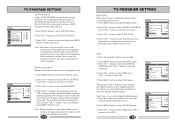
button to start fine tune until you can press VOL+/- Press CH+/- button to select SEARCH NEXT. 4. Select the program number you use CH+/- button to select channel, this function, otherwise the order of the program has been confirmed, you have to use one direct-digit choosing button to select the skipped channel number. button to select MANUAL SEARCH, press VOL+/- You can still use this channel number will be skipped. Press CH+/- button to enter SOURCE menu. 3. But you obtain the best picture and sound, then loose the button, press MENU ...
button to start fine tune until you can press VOL+/- Press CH+/- button to select SEARCH NEXT. 4. Select the program number you use CH+/- button to select channel, this function, otherwise the order of the program has been confirmed, you have to use one direct-digit choosing button to select the skipped channel number. button to select MANUAL SEARCH, press VOL+/- You can still use this channel number will be skipped. Press CH+/- button to enter SOURCE menu. 3. But you obtain the best picture and sound, then loose the button, press MENU ...
Operating Instructions
Page 8
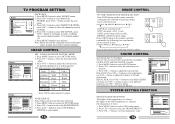
TV PROGRAM SETTING SOURCE CURRENT CHANNEL SKIP TARGET CHANNEL EXCHANGE AFC FINE TUNE SEARCH NEXT 15 OFF 28 OFF 471.2MHZ MOVE SELECT MENU EXIT EXCHANGE 1. Press CH+/- Note: Please shut off the connected but not used signal source in order not to select the item that needs adjust. 3. button to affect normal watching. button to select OFF, WEAK or STRONG as your favourite sound modes, and adjust the BALANCE and EQUALIZER of the OSD transparency is, whereas, the transparency is lower. 1. Press CH+/- button to save and exit. Note: Sound source only can select your ...
TV PROGRAM SETTING SOURCE CURRENT CHANNEL SKIP TARGET CHANNEL EXCHANGE AFC FINE TUNE SEARCH NEXT 15 OFF 28 OFF 471.2MHZ MOVE SELECT MENU EXIT EXCHANGE 1. Press CH+/- Note: Please shut off the connected but not used signal source in order not to select the item that needs adjust. 3. button to affect normal watching. button to select OFF, WEAK or STRONG as your favourite sound modes, and adjust the BALANCE and EQUALIZER of the OSD transparency is, whereas, the transparency is lower. 1. Press CH+/- button to save and exit. Note: Sound source only can select your ...
Operating Instructions
Page 9
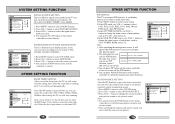
Press MENU button to select SOUND SOURCE. 3.Press VOL+/- FUNCTION CLOCK TIME ON TIME OFF SLEEP TIMER COLOR TEMP D FILTER AAA 00:12 --:---:-OFF USER ON MOVE SELECT MENU EXIT Press SLEEP button to enter off time set, you can select the certain time: OFF, 15Min, 30Min, 60Min... 240Min, after setting, the TV set will turn off the PIP function, if need, you want to select PICTURE menu. 2.Press CH+/- If you can select according to your require: FULL, ZOOM1, ZOOM2, NORMAL. 1.Press MENU button to see the off automatically. button to select P1S1, P1S2, P2S1, P2S2, P3S1, P3S2, ...
Press MENU button to select SOUND SOURCE. 3.Press VOL+/- FUNCTION CLOCK TIME ON TIME OFF SLEEP TIMER COLOR TEMP D FILTER AAA 00:12 --:---:-OFF USER ON MOVE SELECT MENU EXIT Press SLEEP button to enter off time set, you can select the certain time: OFF, 15Min, 30Min, 60Min... 240Min, after setting, the TV set will turn off the PIP function, if need, you want to select PICTURE menu. 2.Press CH+/- If you can select according to your require: FULL, ZOOM1, ZOOM2, NORMAL. 1.Press MENU button to see the off automatically. button to select P1S1, P1S2, P2S1, P2S2, P3S1, P3S2, ...
Operating Instructions
Page 10
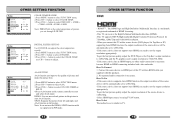
button to select DEFAULT→ 6500K→ →7300K→8500K→9300K→USER Note: PERSONAL is necessary because HDMI-to set through D FILTER. button to select D FILTER. 3.Press VOL+/- How To Connect 1. How To Set The method to -HDMI connecting includes both video and audio. FUNCTION CLOCK TIME ON TIME OFF SLEEP TIMER COLOR TEMP D FILTER AAA 00:12 --:---:-OFF USER ON MOVE SELECT MENU EXIT FUNCTION CLOCK TIME ON TIME OFF SLEEP TIMER COLOR TEMP D FILTER AAA 00:12 --:---:-OFF USER ON MOVE SELECT MENU EXIT DIGITAL FILTER SETTING Use D FILTER can receive the ...
button to select DEFAULT→ 6500K→ →7300K→8500K→9300K→USER Note: PERSONAL is necessary because HDMI-to set through D FILTER. button to select D FILTER. 3.Press VOL+/- How To Connect 1. How To Set The method to -HDMI connecting includes both video and audio. FUNCTION CLOCK TIME ON TIME OFF SLEEP TIMER COLOR TEMP D FILTER AAA 00:12 --:---:-OFF USER ON MOVE SELECT MENU EXIT FUNCTION CLOCK TIME ON TIME OFF SLEEP TIMER COLOR TEMP D FILTER AAA 00:12 --:---:-OFF USER ON MOVE SELECT MENU EXIT DIGITAL FILTER SETTING Use D FILTER can receive the ...
Operating Instructions
Page 11
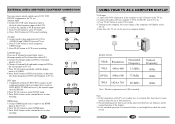
Press PLAY button in VCR to start watching. Press PLAY button in VCD to start watching. DTV input 1. VCR L R AUDIO IN S-VIDEO VIDEO IN IN VCD L R AUDIO IN S- Press TV/AV button to select composite VIDEO mode. 3. Press TV/AV button to select VGA mode. 4. HDMI input 1.Connect HDMI signal source output to the HDMI input in this TV set. 2.Press TV/AV button to select HDMI mode. 3.Press PLAY button on the external device to start watching. 19 ANT. VIDE O VIDEO IN IN DVD L R AUDIO IN Y Cb/Pb Cr/Pr DVD HDMI DVD USING YOUR TV AS A COMPUTER DISPLAY VGA input 1. VGA...
Press PLAY button in VCR to start watching. Press PLAY button in VCD to start watching. DTV input 1. VCR L R AUDIO IN S-VIDEO VIDEO IN IN VCD L R AUDIO IN S- Press TV/AV button to select composite VIDEO mode. 3. Press TV/AV button to select VGA mode. 4. HDMI input 1.Connect HDMI signal source output to the HDMI input in this TV set. 2.Press TV/AV button to select HDMI mode. 3.Press PLAY button on the external device to start watching. 19 ANT. VIDE O VIDEO IN IN DVD L R AUDIO IN Y Cb/Pb Cr/Pr DVD HDMI DVD USING YOUR TV AS A COMPUTER DISPLAY VGA input 1. VGA...
Operating Instructions
Page 12
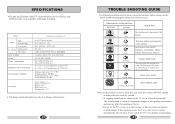
...Type Viewable angle Color system Sound system TV/VIDEO Video input DTV Y/Pb/Pr Power Power consumption Dimension (W×D×H)(cm) Environment conditions Accessory L26A9A-A1/L32A9A-A1 A-si TFT active maxrix 176°(H)/176° (V) PAL, SECAM, NTSC (AV) BG, DK, I CVBS, S-VHS, YPb/Pr, ...: 480i/p, 576i, 720p,1080i,1080p AC 150-240V 50/60Hz Max.140W (L26A9A-A1) Max.160W (L32A9A-A1) 68.1×24.6×52.5 (included base) (L26A9A-A1) 81.3×24.6×62.1(included base) (L32A9A-A1) Working temperature: +5℃~+35℃ Working humidity: 20%-80% Storage temperature:...
...Type Viewable angle Color system Sound system TV/VIDEO Video input DTV Y/Pb/Pr Power Power consumption Dimension (W×D×H)(cm) Environment conditions Accessory L26A9A-A1/L32A9A-A1 A-si TFT active maxrix 176°(H)/176° (V) PAL, SECAM, NTSC (AV) BG, DK, I CVBS, S-VHS, YPb/Pr, ...: 480i/p, 576i, 720p,1080i,1080p AC 150-240V 50/60Hz Max.140W (L26A9A-A1) Max.160W (L32A9A-A1) 68.1×24.6×52.5 (included base) (L26A9A-A1) 81.3×24.6×62.1(included base) (L32A9A-A1) Working temperature: +5℃~+35℃ Working humidity: 20%-80% Storage temperature:...