User Manual
Page 1
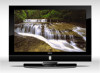
01 009050**** L26A8A-A1 L32A8A-A1 L37A8A-A1 L40A8A-A1 LCD COLOR TELEVISION OPERATING INSTRUCTIONS ◆Wide view-angle display, high contrast ◆Nicam ◆Teletext ◆HDMI ◆Double scarts
01 009050**** L26A8A-A1 L32A8A-A1 L37A8A-A1 L40A8A-A1 LCD COLOR TELEVISION OPERATING INSTRUCTIONS ◆Wide view-angle display, high contrast ◆Nicam ◆Teletext ◆HDMI ◆Double scarts
User Manual
Page 2
... mount switching support assembly instructions 6 Base disassembly/assembly method 6 Preparation for remote control 7 Remote control panel 8 Basic operation 9 Screen display 10 TV program setting 11 Image control 14 Sound control 15 Function setting 16 Time setting...18 Signal source setting 19 Child lock setting 20 Teletext function...21 Other setting function 23 External audio and video equipment connection 24 Using your TV as a computer display 25 Specifications 26 Trouble shooting guide 27 1 WARNING AND CAUTION CAUTION ! NO USER SERVICEABLE PARTS INSIDE.FOR ANY PROBLEM...
... mount switching support assembly instructions 6 Base disassembly/assembly method 6 Preparation for remote control 7 Remote control panel 8 Basic operation 9 Screen display 10 TV program setting 11 Image control 14 Sound control 15 Function setting 16 Time setting...18 Signal source setting 19 Child lock setting 20 Teletext function...21 Other setting function 23 External audio and video equipment connection 24 Using your TV as a computer display 25 Specifications 26 Trouble shooting guide 27 1 WARNING AND CAUTION CAUTION ! NO USER SERVICEABLE PARTS INSIDE.FOR ANY PROBLEM...

User Manual
Page 3
During thunderstorms, unplug both the antenna and power plug to prevent rain from the AC wall outlet. Place the set along the wire connected to the outside antenna. All service work must be used for an extended period, unplug the unit from entering the set on a level surface to avoid shock and potential fire. Do not plug / unplug the unit while your hands...
During thunderstorms, unplug both the antenna and power plug to prevent rain from the AC wall outlet. Place the set along the wire connected to the outside antenna. All service work must be used for an extended period, unplug the unit from entering the set on a level surface to avoid shock and potential fire. Do not plug / unplug the unit while your hands...

User Manual
Page 4
... position to fix the switching support on the wall mount bracket.(Wall mount bracket operations refer to scratch the TV set, it .) Note: 1. VOL+ Volume down /up button Power button POWER HDMI L-AUDIO-R - BUTTONS AND INTERFACE POSITION Front control panel L26A8A-A1/L32A8A-A1/L37A8A-A1 ME NU TV /AV CH CH + VO LVO L+ L40A8A-A1 Power indicator Remote sensor Back interface Power indicator Remote sensor MENU Menu button TV/AV TV/AV switch button CH- VOL+ Volume down /up button Power button MENU Menu button TV/AV TV/AV switch button CH- Earphone output 3.
... position to fix the switching support on the wall mount bracket.(Wall mount bracket operations refer to scratch the TV set, it .) Note: 1. VOL+ Volume down /up button Power button POWER HDMI L-AUDIO-R - BUTTONS AND INTERFACE POSITION Front control panel L26A8A-A1/L32A8A-A1/L37A8A-A1 ME NU TV /AV CH CH + VO LVO L+ L40A8A-A1 Power indicator Remote sensor Back interface Power indicator Remote sensor MENU Menu button TV/AV TV/AV switch button CH- VOL+ Volume down /up button Power button MENU Menu button TV/AV TV/AV switch button CH- Earphone output 3.

User Manual
Page 5
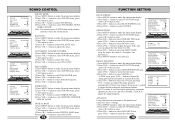
... remote control. Install the batteries as the correct polarities. MENU VOL+ CH- Do not put the remote control in the figure display below , place the remote control with the marks on the remote). 3.Close the cover of battery apartment. 1 2 3 + Cautions for using remote control Confirm there is not available 6 Sleep timer button 7 Scan button 9 8 Nicam button 9 One digit selection button 10 Swap button 11 TV/AV selection button 112 Picture mode selection button 10 13 Sound mode selection button 14 Program up/down button, direction 13 selection button 15 Volume...
... remote control. Install the batteries as the correct polarities. MENU VOL+ CH- Do not put the remote control in the figure display below , place the remote control with the marks on the remote). 3.Close the cover of battery apartment. 1 2 3 + Cautions for using remote control Confirm there is not available 6 Sleep timer button 7 Scan button 9 8 Nicam button 9 One digit selection button 10 Swap button 11 TV/AV selection button 112 Picture mode selection button 10 13 Sound mode selection button 14 Program up/down button, direction 13 selection button 15 Volume...
User Manual
Page 6
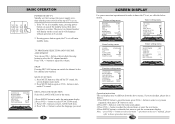
... TUNER Timer setting menu SLEEP TIMER CLOCK TIME OFF TIME ON ON CHANNEL BK.TIME BK. CHANNEL OFF OFF - - : - - 0 SOUND Function setting menu LANGUAGE ENGLISH BLUE SCREEN OFF OSD SETTING IMAGE POSITION ADVANCE SAVE MODE AUTO TXT LANGUAGE WEST TIMER FUNCTION Operation instructions The real display may be different from the above menus, if you need adjust, please do as follows: 1.Press MENU button to select LANGUAGE item. 4. button to adjust the volume. button to select the TV channel number. Note: "press VOL+/- button or direct-digit choosing button to select...
... TUNER Timer setting menu SLEEP TIMER CLOCK TIME OFF TIME ON ON CHANNEL BK.TIME BK. CHANNEL OFF OFF - - : - - 0 SOUND Function setting menu LANGUAGE ENGLISH BLUE SCREEN OFF OSD SETTING IMAGE POSITION ADVANCE SAVE MODE AUTO TXT LANGUAGE WEST TIMER FUNCTION Operation instructions The real display may be different from the above menus, if you need adjust, please do as follows: 1.Press MENU button to select LANGUAGE item. 4. button to adjust the volume. button to select the TV channel number. Note: "press VOL+/- button or direct-digit choosing button to select...
User Manual
Page 7
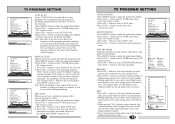
... . 3.When you use one direct-digit choosing button to select the skipped channel number. 4.If you use this channel number will display before channel number on searching or press MENU button to make the main menu display. 2.Press VOL+/- button to select the channel you need operate, press red button to select EDIT PROGRAM item, press VOL+/- EDIT PROGRAM Using this TV set will be changed. S SYS. button to enter. 3.Press CH+/- SKIP 1.Press CH+/- FINE TUNE MANUAL SCAN AUTO SCAN EDIT PROGRAM COUNTRY 11 PAL...
... . 3.When you use one direct-digit choosing button to select the skipped channel number. 4.If you use this channel number will display before channel number on searching or press MENU button to make the main menu display. 2.Press VOL+/- button to select the channel you need operate, press red button to select EDIT PROGRAM item, press VOL+/- EDIT PROGRAM Using this TV set will be changed. S SYS. button to enter. 3.Press CH+/- SKIP 1.Press CH+/- FINE TUNE MANUAL SCAN AUTO SCAN EDIT PROGRAM COUNTRY 11 PAL...

User Manual
Page 8
...+/- button to select channel5, then press VOL+/- button or one digit selection button to make the main menu display. 2.Press VOL+/- Press VOL+/- SOFT: the image effect is only valid in channel 2. 4.Using this position, during operating, press green button to select the channel you can arrange the program order as following table. COLOR TEMPERATURE 1.Press MENU button to select this position and save . 3.The deleted channel will disappear from the channel list...
...+/- button to select channel5, then press VOL+/- button or one digit selection button to make the main menu display. 2.Press VOL+/- Press VOL+/- SOFT: the image effect is only valid in channel 2. 4.Using this position, during operating, press green button to select the channel you can arrange the program order as following table. COLOR TEMPERATURE 1.Press MENU button to select this position and save . 3.The deleted channel will disappear from the channel list...
User Manual
Page 9
... select SOUND menu, press CH- button to select SOUND item. 4.Press VOL+/- ADVANCE Using this function can adjust the image position automatically. AUTOMATIC VOLUME CONTROL 1.Press MENU button to make the main menu display. 2.Press VOL+/- button to select FUNCTION menu, press CH- button to select AVC item. 4.Press VOL+/- button to select STANDARD, NEWS, USER or MUSIC. button to select BLUE SCREEN item. 4.Press VOL+/- button to select DIGITAL BASS item. 4.Press VOL+/- button to enter. 3.Press CH+/- button to select SOUND menu...
... select SOUND menu, press CH- button to select SOUND item. 4.Press VOL+/- ADVANCE Using this function can adjust the image position automatically. AUTOMATIC VOLUME CONTROL 1.Press MENU button to make the main menu display. 2.Press VOL+/- button to select FUNCTION menu, press CH- button to select AVC item. 4.Press VOL+/- button to select STANDARD, NEWS, USER or MUSIC. button to select BLUE SCREEN item. 4.Press VOL+/- button to select DIGITAL BASS item. 4.Press VOL+/- button to enter. 3.Press CH+/- button to select SOUND menu...

User Manual
Page 10
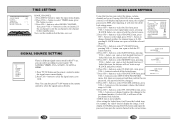
... TV set the sleep timer you need. CLOCK 1.Press MENU button to make the main menu display. 2.Press VOL+/- button to adjust the value. button to enter setting. TIME OFF 1.Press MENU button to make the image more natural. button to enter setting. button to select TIME OFF item, press VOL+/- CHANNEL OFF 0 TIMER SLEEP TIMER CLOCK TIME OFF BOOK.TIME BOOK. CHANNEL OFF 0 TIMER SLEEP TIMER CLOCK TIME OFF BOOK.TIME BOOK. CTI: opening this function can select OFF, 15,30, ......, 240. DNR: use digital mode...
... TV set the sleep timer you need. CLOCK 1.Press MENU button to make the main menu display. 2.Press VOL+/- button to adjust the value. button to enter setting. TIME OFF 1.Press MENU button to make the image more natural. button to enter setting. button to select TIME OFF item, press VOL+/- CHANNEL OFF 0 TIMER SLEEP TIMER CLOCK TIME OFF BOOK.TIME BOOK. CHANNEL OFF 0 TIMER SLEEP TIMER CLOCK TIME OFF BOOK.TIME BOOK. CTI: opening this function can select OFF, 15,30, ......, 240. DNR: use digital mode...
User Manual
Page 11
...+/- button to unlock all the locked items. 7.Press CH+/- SIGNAL SOURCE SETTING TV AV S-VIDEO YPBPR VGA SCART1 SCART2 HDMI There is different signal source mode in the current status. 20 20 button to select digit, press VOL+/- button to select signal input source, pressing H.LOCK button can control the image, volume, channel and so on the remote control, it will not work . 5.Press CH+/- button to make the signal source menu display. 2.Press CH+/- CHANNEL OFF 0 TIMER BOOK.CHANNEL 1.Press MENU button to select the signal...
...+/- button to unlock all the locked items. 7.Press CH+/- SIGNAL SOURCE SETTING TV AV S-VIDEO YPBPR VGA SCART1 SCART2 HDMI There is different signal source mode in the current status. 20 20 button to select digit, press VOL+/- button to select signal input source, pressing H.LOCK button can control the image, volume, channel and so on the remote control, it will not work . 5.Press CH+/- button to make the signal source menu display. 2.Press CH+/- CHANNEL OFF 0 TIMER BOOK.CHANNEL 1.Press MENU button to select the signal...

User Manual
Page 12
... channels, which a particular program is being broadcast (cable networks, satellite channels, etc.). It also provides subtitles for people with hearing difficulties or those who are unfamiliar with the language in Teletext mode". "Note all menu functions are : Volume adjustment Mute function Page up/down Use the P+/- buttons to hide the teletext information. Mix mode To view the TV picture while in Text mode press the button, this button...
... channels, which a particular program is being broadcast (cable networks, satellite channels, etc.). It also provides subtitles for people with hearing difficulties or those who are unfamiliar with the language in Teletext mode". "Note all menu functions are : Volume adjustment Mute function Page up/down Use the P+/- buttons to hide the teletext information. Mix mode To view the TV picture while in Text mode press the button, this button...

User Manual
Page 13
... Multimedia Interface is S-VIDEO. 4.Press PLAY button in DVD to the SCART1 or SCART2 in the TV set . How To Connect 1. Connect the antenna to start watching. S-VIDEO input If you connect this TV with this product). 2. At this TV with an HDMI cable (not supplied with a source device (DVD player, Set Top Box or PC) supporting Auto HDMI function, the output resolution of HDMI Licensing. -This TV can connect outside signal source VCR, VCD DVD, PC equipment...
... Multimedia Interface is S-VIDEO. 4.Press PLAY button in DVD to the SCART1 or SCART2 in the TV set . How To Connect 1. Connect the antenna to start watching. S-VIDEO input If you connect this TV with this product). 2. At this TV with an HDMI cable (not supplied with a source device (DVD player, Set Top Box or PC) supporting Auto HDMI function, the output resolution of HDMI Licensing. -This TV can connect outside signal source VCR, VCD DVD, PC equipment...
User Manual
Page 14
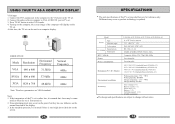
... screen. 25 SPECIFICATIONS The part specifications of the computer will display on the TV set provided here are subject to select VGA mode. 4. Difference may be used as product technology is first turned on the computer, the screen image of this time, the TV set . 2. Connect the audio cable in computer to the VGA port in TV set is updated. Model Screen Type Viewable angle Color system Sound system TV/VIDEO Video input DTV Y/Pb/Pr Power Power consumption Dimension (W×D×H)(cm) L26A8A-A1/L32A8A-A1...
... screen. 25 SPECIFICATIONS The part specifications of the computer will display on the TV set provided here are subject to select VGA mode. 4. Difference may be used as product technology is first turned on the computer, the screen image of this time, the TV set . 2. Connect the audio cable in computer to the VGA port in TV set is updated. Model Screen Type Viewable angle Color system Sound system TV/VIDEO Video input DTV Y/Pb/Pr Power Power consumption Dimension (W×D×H)(cm) L26A8A-A1/L32A8A-A1...

User Manual
Page 15
... dynamic programming. 27 Normal Volume Adjust color control Normal or Weak Volume Adjust channel again Note:1.If the problem can not be fixed after 12 hours if you call for service: BREAKDOWN PHENOMENON PICTURE SOUND CHECK FOR Picture with Snow The direction and connection of the Noise antenna Double or Triple Image Normal Disturb Noise Direction, station and connection of the antenna Interference from the cabinet of contrast, brightness and volume. TROUBLE SHOOTING GUIDE...
... dynamic programming. 27 Normal Volume Adjust color control Normal or Weak Volume Adjust channel again Note:1.If the problem can not be fixed after 12 hours if you call for service: BREAKDOWN PHENOMENON PICTURE SOUND CHECK FOR Picture with Snow The direction and connection of the Noise antenna Double or Triple Image Normal Disturb Noise Direction, station and connection of the antenna Interference from the cabinet of contrast, brightness and volume. TROUBLE SHOOTING GUIDE...


