User Manual
Page 4
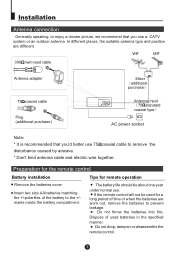
...used batteries in the specified manner. Do not throw the batteries into fire. Do not drop, dampen or disassemble the remote control. If the remote control will not be about one year under normal use 75 coaxial cable to prevent leakage. Installation Antenna connection Generally speaking,...disturbance caused by airwave. * Don't bind antenna cable and electric wire together. Dispose of used for remote operation Remove the batteries cover. Preparation for the remote control Battery installation Tips for a long period of the battery to the +/marks inside the battery compartment....
...used batteries in the specified manner. Do not throw the batteries into fire. Do not drop, dampen or disassemble the remote control. If the remote control will not be about one year under normal use 75 coaxial cable to prevent leakage. Installation Antenna connection Generally speaking,...disturbance caused by airwave. * Don't bind antenna cable and electric wire together. Dispose of used for remote operation Remove the batteries cover. Preparation for the remote control Battery installation Tips for a long period of the battery to the +/marks inside the battery compartment....
User Manual
Page 7
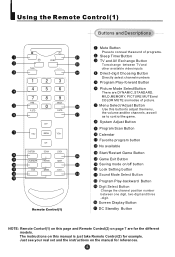
Just see your real set and the instructions on this manual is just take Remote Control(2) for references. Menu Select/ Adjust Button Use this page and Remote Control(2) on /off button Lock Setting button Sound Mode Select Button Program Play-backward Button Digit Select Button Change the channel...the manual for example. Screen Display Button DC Standby Button NOTE: Remote Contorl(1) on this button to adjust the menu, the volume and the channels, as well as to conceal the sound of picture. Using the Remote Control(1) Buttons and Descriptions TV/AV DISP PRE P.STD BACK S.STD CH...
Just see your real set and the instructions on this manual is just take Remote Control(2) for references. Menu Select/ Adjust Button Use this page and Remote Control(2) on /off button Lock Setting button Sound Mode Select Button Program Play-backward Button Digit Select Button Change the channel...the manual for example. Screen Display Button DC Standby Button NOTE: Remote Contorl(1) on this button to adjust the menu, the volume and the channels, as well as to conceal the sound of picture. Using the Remote Control(1) Buttons and Descriptions TV/AV DISP PRE P.STD BACK S.STD CH...
User Manual
Page 8
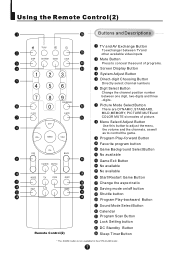
...Directly select channel numbers Digit Select Button Change the channel position number between TV and other available video inputs Mute Button Press to control the game. Program Play-forward Button Favorite program button Game Background Select Button No available Game Exit Button No available No available...Use this button to adjust the menu, the volume and the channels, as well as to conceal the sound of picture. Using the Remote Control(2) Buttons and Descriptions TV/AV DISP SYSTEM SCAN LOCK P.STD CALENDAR S.STD CH+ VOL- PRE BACK FAVORITE SHUTTLE MODE TDX ZOOM QSET EXIT...
...Directly select channel numbers Digit Select Button Change the channel position number between TV and other available video inputs Mute Button Press to control the game. Program Play-forward Button Favorite program button Game Background Select Button No available Game Exit Button No available No available...Use this button to adjust the menu, the volume and the channels, as well as to conceal the sound of picture. Using the Remote Control(2) Buttons and Descriptions TV/AV DISP SYSTEM SCAN LOCK P.STD CALENDAR S.STD CH+ VOL- PRE BACK FAVORITE SHUTTLE MODE TDX ZOOM QSET EXIT...
User Manual
Page 9
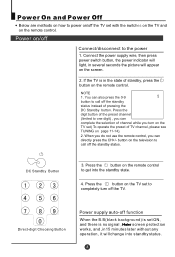
...Press the button on the TV set to completely turn on the TV set( To operate the preset of standby, press the button on the remote control. Press the button on /off Connect/disconnect to the power 1. DC Standby Button 3. Direct-digit Choosing Button Power supply auto-off function When ... button of the preset channel (limited to one digit) , you can directly press the CH+/- button on the screen. 2. Power on the remote control to get into standby status. Connect the power supply wire, then press power switch button, the power indicator will light, in the state of TV...
...Press the button on the TV set to completely turn on the TV set( To operate the preset of standby, press the button on the remote control. Press the button on /off Connect/disconnect to the power 1. DC Standby Button 3. Direct-digit Choosing Button Power supply auto-off function When ... button of the preset channel (limited to one digit) , you can directly press the CH+/- button on the screen. 2. Power on the remote control to get into standby status. Connect the power supply wire, then press power switch button, the power indicator will light, in the state of TV...
User Manual
Page 13
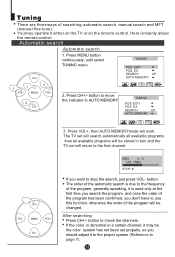
...UP AUTO MEMORY 3. Press VOL+, then AUTO MEMORYmode will be stored in a certain channel, it may operate it either on the TV or on the remote control. ASM U 0 STOP If you don't have to use this function, otherwise the order of the program has been confirmed, you want to page 7).... search, manual search and MFT (manual fine tune). Tuning There are three ways of the program, generally speaking, it is mainly about the remote control. Here is used only at the first time you search the program, and once the order of the program will work. SEARCH UP AUTO MEMORY...
...UP AUTO MEMORY 3. Press VOL+, then AUTO MEMORYmode will be stored in a certain channel, it may operate it either on the TV or on the remote control. ASM U 0 STOP If you don't have to use this function, otherwise the order of the program has been confirmed, you want to page 7).... search, manual search and MFT (manual fine tune). Tuning There are three ways of the program, generally speaking, it is mainly about the remote control. Here is used only at the first time you search the program, and once the order of the program will work. SEARCH UP AUTO MEMORY...
User Manual
Page 16
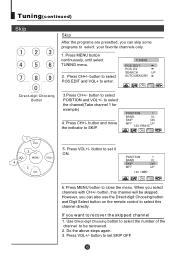
... only. 1. Tuning(continued) Skip Skip After the programs are presetted, you can also use the Direct-digit Choosing button and Digit Select button on the remote control to set SKIP OFF. button and move the indicator to select POSITION and VOL+/- button, this channel directly. button to SKIP. POSITION 1 BAND VL SKIP...
... only. 1. Tuning(continued) Skip Skip After the programs are presetted, you can also use the Direct-digit Choosing button and Digit Select button on the remote control to set SKIP OFF. button and move the indicator to select POSITION and VOL+/- button, this channel directly. button to SKIP. POSITION 1 BAND VL SKIP...
User Manual
Page 17
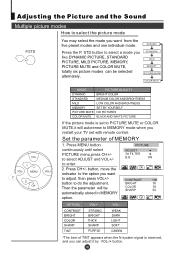
DYNAMIC Press the P. Set the parameter of TINT appears when the N system signal is set with remote control. Press CH+/- STD button to select a mode you like.DYNAMIC PICTURE, STANDARD PICTURE, MILD PICTURE, MEMORY, PICTURE MUTE and COLOR MUTE, totally six picture modes ...
DYNAMIC Press the P. Set the parameter of TINT appears when the N system signal is set with remote control. Press CH+/- STD button to select a mode you like.DYNAMIC PICTURE, STANDARD PICTURE, MILD PICTURE, MEMORY, PICTURE MUTE and COLOR MUTE, totally six picture modes ...
User Manual
Page 31
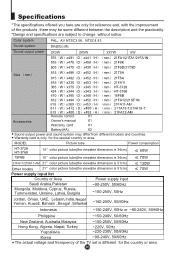
Specifications *The specifications offered you here are subject to change without notice. MODEL Picture tube Power consumption HT-3728 HT-3768 15F6B 14 color picture tube(the viewable dimension is 34cm) 15 color picture tube(the viewable dimension is 34cm) 60W 70W... W x330 D x453 H mm 21FA11 365 W x375 D x345 H 424 W x344 D x343 H 410 W x365 D x348 H 612 W x494 D x452 H 615 W x389 D x453 H W D H W D Remote control H X1 mm HT-3728 mm HT-3768 mm 15F6B mm 21FA12/21SF1N mm 21FA11-AM mm 21TA18-T/21FA18-T mm 21FA12-AM Accessories Owner's manual X1 Warranty card X1 Battery(AA...
Specifications *The specifications offered you here are subject to change without notice. MODEL Picture tube Power consumption HT-3728 HT-3768 15F6B 14 color picture tube(the viewable dimension is 34cm) 15 color picture tube(the viewable dimension is 34cm) 60W 70W... W x330 D x453 H mm 21FA11 365 W x375 D x345 H 424 W x344 D x343 H 410 W x365 D x348 H 612 W x494 D x452 H 615 W x389 D x453 H W D H W D Remote control H X1 mm HT-3728 mm HT-3768 mm 15F6B mm 21FA12/21SF1N mm 21FA11-AM mm 21TA18-T/21FA18-T mm 21FA12-AM Accessories Owner's manual X1 Warranty card X1 Battery(AA...


