
User Manual
Page 1
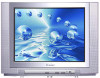
21F99 COLOUR TELEVISION OPERATING INSTRUCTIONS ◆Stage curtain for open and close effect ◆Digital I2C bus control ◆Auto search tuning & 218 programs stored ◆Full infrared remote control ◆Multi-picture modes selection ◆Multi-function timer,appointing programme
21F99 COLOUR TELEVISION OPERATING INSTRUCTIONS ◆Stage curtain for open and close effect ◆Digital I2C bus control ◆Auto search tuning & 218 programs stored ◆Full infrared remote control ◆Multi-picture modes selection ◆Multi-function timer,appointing programme
User Manual
Page 2
... specification 2 Preparing for a long time, or there is a severe thunder & lightening storm, it at a well ventilated location. 5. Do not place the TV set near heat source. 6. When you clean the TV set . The back cover must only be used for operations 3 Function buttons and external sockets 4 AV connection...5 Remote controller guide 6 Power supply...7 Tuning procedure...7 Picture adjustment 9 Other functions...10 Multi function timer 14 Lock function...15 Trouble shooting guide...
... specification 2 Preparing for a long time, or there is a severe thunder & lightening storm, it at a well ventilated location. 5. Do not place the TV set near heat source. 6. When you clean the TV set . The back cover must only be used for operations 3 Function buttons and external sockets 4 AV connection...5 Remote controller guide 6 Power supply...7 Tuning procedure...7 Picture adjustment 9 Other functions...10 Multi function timer 14 Lock function...15 Trouble shooting guide...

User Manual
Page 3
...: 5.ANTENNA INPUT : 6.SOUND OUTPUT POWER: 7.POWER CONSUMPTION: 8.NET WEIGHT(kg): 9.NET DIMENSION(mm): See rating plate PAL NTSC4.43/3.58(AV) B/G 21" 75Ω Standard Coaxial Cable 3W See rating plate 25 610 x 470 x 465 Supplied accessories: Infrared remote control handset 1 Battery(AA) 2 Operating instruction 1 Design and specifications are subject to change without notice. 2 PREPARING FOR OPERATIONS Figure A Antenna connection Antenna Connect an antenna to the antenna socket on the TV set, We recommend using a Cable TV...
...: 5.ANTENNA INPUT : 6.SOUND OUTPUT POWER: 7.POWER CONSUMPTION: 8.NET WEIGHT(kg): 9.NET DIMENSION(mm): See rating plate PAL NTSC4.43/3.58(AV) B/G 21" 75Ω Standard Coaxial Cable 3W See rating plate 25 610 x 470 x 465 Supplied accessories: Infrared remote control handset 1 Battery(AA) 2 Operating instruction 1 Design and specifications are subject to change without notice. 2 PREPARING FOR OPERATIONS Figure A Antenna connection Antenna Connect an antenna to the antenna socket on the TV set, We recommend using a Cable TV...
User Manual
Page 4
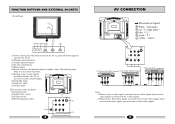
...switch button (5)Menu button (6)Power indicator: the indicator lights in standby status .The indicator glints when you use remote controller. (7)Remote sensor: let the remote controller aim here, the TV set can receive remote control signal. (8)Audio(R) input (9)Audio(L) input (10)Video input 2.The sockets on the rear panel (1)Antenna socket (2)Audio/Video socket (3)S-Video socket (4)DVD component socket Y IN IN Cb Cr 3 S-VIDEO VIDEO OUT L AUDIO R Y Cb Cr 3 IN (1) S-VIDEO VIDEO L AUDIO R (3) OUT 4 (2) (4) AV CONNECTION Direction of signal W White(left audio) R red...
...switch button (5)Menu button (6)Power indicator: the indicator lights in standby status .The indicator glints when you use remote controller. (7)Remote sensor: let the remote controller aim here, the TV set can receive remote control signal. (8)Audio(R) input (9)Audio(L) input (10)Video input 2.The sockets on the rear panel (1)Antenna socket (2)Audio/Video socket (3)S-Video socket (4)DVD component socket Y IN IN Cb Cr 3 S-VIDEO VIDEO OUT L AUDIO R Y Cb Cr 3 IN (1) S-VIDEO VIDEO L AUDIO R (3) OUT 4 (2) (4) AV CONNECTION Direction of signal W White(left audio) R red...
User Manual
Page 5
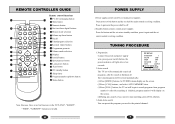
... LIGHT 8 SHORT WIDE NARROW SECOND 9 Remote control functions 1 TV/AV exchanging button 18 2 Mute button 3 Numeric button 17 4 One/two/three digital buttons 5 Picture mode selection 16 6 Volume up/dwon button 15 7 Recall 8 Calendar/game selection 14 13 9 Second timer button 12 10 Programme promote 10 11 Volume mode selection 11 12 Display 19 13 Invalid button 14 System preset button 15 Lock preset button 10 16 Scan button 17 DC standby button 18 Sleep timer 19 Program number up/down button 20 Menu button...
... LIGHT 8 SHORT WIDE NARROW SECOND 9 Remote control functions 1 TV/AV exchanging button 18 2 Mute button 3 Numeric button 17 4 One/two/three digital buttons 5 Picture mode selection 16 6 Volume up/dwon button 15 7 Recall 8 Calendar/game selection 14 13 9 Second timer button 12 10 Programme promote 10 11 Volume mode selection 11 12 Display 19 13 Invalid button 14 System preset button 15 Lock preset button 10 16 Scan button 17 DC standby button 18 Sleep timer 19 Program number up/down button 20 Menu button...
User Manual
Page 6
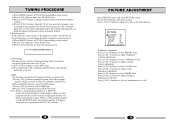
... adjustment: Press [-CH+] buttons to select SHARP item. And pointed program is in pointed channel. 4.Selecting band In the semi-auto search mode, if the signal you want to skip. (for example: channel 002) (2)Press [MENU] button to select TUNING menu. (3)Press [-CH+] buttons to select SKIP item. (4)Press [-VOL+] buttons to adjust the value of the picture and audio are good. 6.Skip The function can change channel number into pointed channel number. (4)Press [-VOL+] buttons...
... adjustment: Press [-CH+] buttons to select SHARP item. And pointed program is in pointed channel. 4.Selecting band In the semi-auto search mode, if the signal you want to skip. (for example: channel 002) (2)Press [MENU] button to select TUNING menu. (3)Press [-CH+] buttons to select SKIP item. (4)Press [-VOL+] buttons to adjust the value of the picture and audio are good. 6.Skip The function can change channel number into pointed channel number. (4)Press [-VOL+] buttons...

User Manual
Page 7
... 1.FUNCTI ON 1 The function can select OSD language, curtain mode, volume mode and volume memory mode. (1)Press [MENU] button, and select FUNCTION1menu. (2)Press [-CH+] buttons, and select an item. (3)Press [-VOL+] buttons to set function of receiving TV program (except standby time). (2)Soft-exchanging channel No. Note: (1)If you select COUNT item , you exchange channel No., the picture will change with changing channel No. .(The channel No. The program in channel No. 1 will fade in...
... 1.FUNCTI ON 1 The function can select OSD language, curtain mode, volume mode and volume memory mode. (1)Press [MENU] button, and select FUNCTION1menu. (2)Press [-CH+] buttons, and select an item. (3)Press [-VOL+] buttons to set function of receiving TV program (except standby time). (2)Soft-exchanging channel No. Note: (1)If you select COUNT item , you exchange channel No., the picture will change with changing channel No. .(The channel No. The program in channel No. 1 will fade in...
User Manual
Page 8
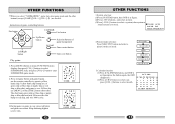
... red game button and game begins , use [MENU] or blue [FIRE] button shoot shots. Yellow ship use the remote controller to select a system(color system or sound system) you select"SUBMARINE"game item, enter game mode and the other buttons (except [GAME],[VOL-/+],[CH+/-], ) are invalid. MENU FIRE VOL+ CH- Yellow battle ship bump one of game controlling buttons Fire button CH+ VOL- Ship obtaining highest scores wins. COLOR AUTO SOUND B/G SELECT ADJUST 4.Picture mode selection: Press [SELC.PIC] button and select a picture mode you need . Instructions...
... red game button and game begins , use [MENU] or blue [FIRE] button shoot shots. Yellow ship use the remote controller to select a system(color system or sound system) you select"SUBMARINE"game item, enter game mode and the other buttons (except [GAME],[VOL-/+],[CH+/-], ) are invalid. MENU FIRE VOL+ CH- Yellow battle ship bump one of game controlling buttons Fire button CH+ VOL- Ship obtaining highest scores wins. COLOR AUTO SOUND B/G SELECT ADJUST 4.Picture mode selection: Press [SELC.PIC] button and select a picture mode you need . Instructions...

User Manual
Page 9
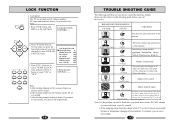
... UNLOCK 1.Press [LOCK] button, OSD is appointing time, the TV set changes channel No. TIMER OFF TIMER ON TIMER OFF 0:00 OFF Note: At first, you must set present time. Press [CH-] button, and enter "appointing program" sub-menu. CH+ MENU FIRE CH- into appointing channel No. . 3.The function is valid only in TV mode.) Press [DISPLAY] button and exit APPOINTMENT 003 0:03 004 0:04 005 0:05 006 0:06 SELECT ADJUST menu. 14 LOCK...
... UNLOCK 1.Press [LOCK] button, OSD is appointing time, the TV set changes channel No. TIMER OFF TIMER ON TIMER OFF 0:00 OFF Note: At first, you must set present time. Press [CH-] button, and enter "appointing program" sub-menu. CH+ MENU FIRE CH- into appointing channel No. . 3.The function is valid only in TV mode.) Press [DISPLAY] button and exit APPOINTMENT 003 0:03 004 0:04 005 0:05 006 0:06 SELECT ADJUST menu. 14 LOCK...
User Manual
Page 10
... Volume off power. LOCK FUNCTION Lock preset The TV set can use the follow trouble shooting guide before you call for four times (or press the VOLFIRE VOL+ four-digit password you need to select "ON" or 456 "OFF". LOCK 1.Press LOCK button, and OSD is normal, you can lock search, channel number, AV, timer and child lock items, if you have changed) to enter LOCK OR CH- CH+ 2.Press "0" button directly MENU for service: BREAKDOWN PHENOMENON PICTURE SOUND...
... Volume off power. LOCK FUNCTION Lock preset The TV set can use the follow trouble shooting guide before you call for four times (or press the VOLFIRE VOL+ four-digit password you need to select "ON" or 456 "OFF". LOCK 1.Press LOCK button, and OSD is normal, you can lock search, channel number, AV, timer and child lock items, if you have changed) to enter LOCK OR CH- CH+ 2.Press "0" button directly MENU for service: BREAKDOWN PHENOMENON PICTURE SOUND...


