
User Manual
Page 1
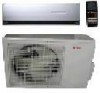
NO.0010520880 OPERATING MANUAL MANUAL DE FUNCIONAMIENTO MANUALE DI ISTRUZIONI NOTICE D'UTILISATION ROOM AIR CONDITIONER WALL MOUNTED TYPE HSU-09RD03/R2(SDB) HSU-12RD03/R2(SDB) Please read this operation manual for future reference. Keep this operation manual before using the conditioner.
NO.0010520880 OPERATING MANUAL MANUAL DE FUNCIONAMIENTO MANUALE DI ISTRUZIONI NOTICE D'UTILISATION ROOM AIR CONDITIONER WALL MOUNTED TYPE HSU-09RD03/R2(SDB) HSU-12RD03/R2(SDB) Please read this operation manual for future reference. Keep this operation manual before using the conditioner.
User Manual
Page 6
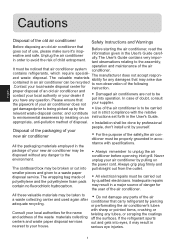
... outlet. Installation shall be disposed without any tubes, or scraping the coatings off the surfaces. All electrical repairs must be noticed that carry refrigerant by professional Disposal of the packaging of your dealer if Damaged air conditioners are not to your supplier. The User's Guide contains very important observations relating to the assembly, operation and maintenance of the air It must...
... outlet. Installation shall be disposed without any tubes, or scraping the coatings off the surfaces. All electrical repairs must be noticed that carry refrigerant by professional Disposal of the packaging of your dealer if Damaged air conditioners are not to your supplier. The User's Guide contains very important observations relating to the assembly, operation and maintenance of the air It must...

User Manual
Page 8
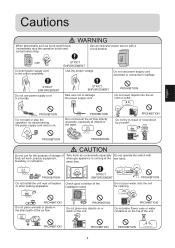
... the instructions are classified into two levels, WARNING and CAUTION according to vapor or oil steam. Installation WARNING Please call Sales/Service Shop for safety use . CAUTION Connect the earth cable. Do not get the unit exposed to the seriousness of possible risks and damages as follows. Do not attempt to install the air conditioner by yourself because improper works...
... the instructions are classified into two levels, WARNING and CAUTION according to vapor or oil steam. Installation WARNING Please call Sales/Service Shop for safety use . CAUTION Connect the earth cable. Do not get the unit exposed to the seriousness of possible risks and damages as follows. Do not attempt to install the air conditioner by yourself because improper works...
User Manual
Page 9
... PROHIBITION CAUTION Do not use power supply cord in the direct path of the air flow PROHIBITION Do not place any objects on or climb on . PROHIBITION Do not start or stop the operation button and contact sales shop. breeding, or cultivation. STRICT ENFORCEMENT PROHIBITION Check good condition of the installation stand Do not pour water onto the unit for the purpose of...
... PROHIBITION CAUTION Do not use power supply cord in the direct path of the air flow PROHIBITION Do not place any objects on or climb on . PROHIBITION Do not start or stop the operation button and contact sales shop. breeding, or cultivation. STRICT ENFORCEMENT PROHIBITION Check good condition of the installation stand Do not pour water onto the unit for the purpose of...

User Manual
Page 10
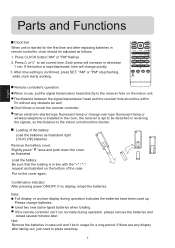
Parts and Functions Indoor unit Air filter(inside) Inlet grille Anion generator (inside) Horizontal louver(inside ) Outlet Vertical flap (adjust left and right air flow) Power plug Outdoor unit 3 1 OUTLET 2 INLET 3 CONNECTING PIPING AND ELECTRICAL WIRING 4 DRAIN HOSE 5 Don't adjust it manually) Inlet display board(inside ) (adjust up and down air flow.
Parts and Functions Indoor unit Air filter(inside) Inlet grille Anion generator (inside) Horizontal louver(inside ) Outlet Vertical flap (adjust left and right air flow) Power plug Outdoor unit 3 1 OUTLET 2 INLET 3 CONNECTING PIPING AND ELECTRICAL WIRING 4 DRAIN HOSE 5 Don't adjust it manually) Inlet display board(inside ) (adjust up and down air flow.

User Manual
Page 11
...8. Left/right air flow display 20. SLEEP button Used to select fan speed: LOW,MED, HI, AUTO. 25. TIMER OFF display 22. display appears. Operation mode display 29 3 30 Operation mode AUTO COOL DRY FAN HEAT 31 Remote controller 2 32 Display board 1 17.Singal sending display 18. FAN button Used to select sleep mode. 6. HEALTH button 31. SWING UP/DOWN display 6 26 14. HEALTH display 4 28 16. SET button Used to display the TEMP setting. 21. Used for unit start and stop. 11 21 10. TEMP display 1.RESET When the remote controller appears abnormal, use a sharp...
...8. Left/right air flow display 20. SLEEP button Used to select fan speed: LOW,MED, HI, AUTO. 25. TIMER OFF display 22. display appears. Operation mode display 29 3 30 Operation mode AUTO COOL DRY FAN HEAT 31 Remote controller 2 32 Display board 1 17.Singal sending display 18. FAN button Used to select sleep mode. 6. HEALTH button 31. SWING UP/DOWN display 6 26 14. HEALTH display 4 28 16. SET button Used to display the TEMP setting. 21. Used for unit start and stop. 11 21 10. TEMP display 1.RESET When the remote controller appears abnormal, use a sharp...
User Manual
Page 12
... down the cover as illustrated. Put on the cover again. Confirmation indicator: After pressing power ON/OFF, if no display, reload the batteries. If the remote controller can't run normally during operation indicates the batteries have been used up. Parts and Functions Clock Set When unit is started type fluorescent lamp or change-over type fluorescent lamp or wireless telephone is installed in the room, the receiver...
... down the cover as illustrated. Put on the cover again. Confirmation indicator: After pressing power ON/OFF, if no display, reload the batteries. If the remote controller can't run normally during operation indicates the batteries have been used up. Parts and Functions Clock Set When unit is started type fluorescent lamp or change-over type fluorescent lamp or wireless telephone is installed in the room, the receiver...
User Manual
Page 13
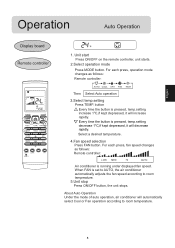
... the mode of auto operation, air conditioner will decrease rapidly. button Every time the button is running under displayed fan speed. For each press, operation mode changes as follows: Remote controller: LOW MED HI AUTO Air conditioner is pressed, temp.setting increase 1oC,if kept depressed, it will automatically select Cool or Fan operation according to room temperature. 5.Unit stop Press ON/OFF button, the unit stops. Operation Auto Operation Display board Remote controller 5 4 1. Unit start Press ON/OFF on the remote controller, unit starts. 2.Select operation mode...
... the mode of auto operation, air conditioner will decrease rapidly. button Every time the button is running under displayed fan speed. For each press, operation mode changes as follows: Remote controller: LOW MED HI AUTO Air conditioner is pressed, temp.setting increase 1oC,if kept depressed, it will automatically select Cool or Fan operation according to room temperature. 5.Unit stop Press ON/OFF button, the unit stops. Operation Auto Operation Display board Remote controller 5 4 1. Unit start Press ON/OFF on the remote controller, unit starts. 2.Select operation mode...
User Manual
Page 14
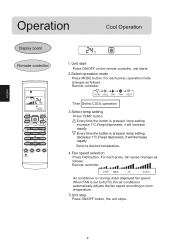
...mode changes as follows: Remote controller: LOW MED HI AUTO Air conditioner is running under displayed fan speed. Unit start Press ON/OFF on the remote controller, unit starts. 2.Select operation mode Press MODE button. When FAN is pressed, temp.setting decrease 1oC,if kept depressed, it will decrease rapidly Select a desired temperature. 4.Fan speed selection Press FAN button. Operation Cool Operation Display board Remote controller 1. For each press, fan speed changes as follows: Remote controller: AUTO COOL DRY FAN HEAT Then Select COOL operation 3.Select temp.setting...
...mode changes as follows: Remote controller: LOW MED HI AUTO Air conditioner is running under displayed fan speed. Unit start Press ON/OFF on the remote controller, unit starts. 2.Select operation mode Press MODE button. When FAN is pressed, temp.setting decrease 1oC,if kept depressed, it will decrease rapidly Select a desired temperature. 4.Fan speed selection Press FAN button. Operation Cool Operation Display board Remote controller 1. For each press, fan speed changes as follows: Remote controller: AUTO COOL DRY FAN HEAT Then Select COOL operation 3.Select temp.setting...
User Manual
Page 15
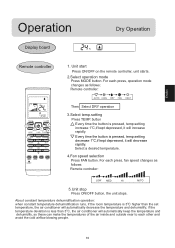
... keep the temperature and dehumidify, so these can make the temperatures of the air inside and outside near to each press, fan speed changes as follows: Remote controller: AUTO COOL DRY FAN HEAT Then Select DRY operation 3.Select temp.setting Press TEMP. Operation Display board Dry Operation Remote controller 5 1. For each other and avoid the cold airflow blowing people. 10 button Every time the button is 3oC higher than 3oC, the air conditioner will decrease rapidly. Select a desired temperature. 4.Fan speed selection Press FAN button.
... keep the temperature and dehumidify, so these can make the temperatures of the air inside and outside near to each press, fan speed changes as follows: Remote controller: AUTO COOL DRY FAN HEAT Then Select DRY operation 3.Select temp.setting Press TEMP. Operation Display board Dry Operation Remote controller 5 1. For each other and avoid the cold airflow blowing people. 10 button Every time the button is 3oC higher than 3oC, the air conditioner will decrease rapidly. Select a desired temperature. 4.Fan speed selection Press FAN button.
User Manual
Page 16
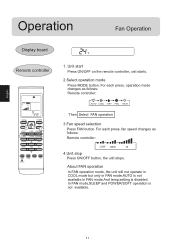
... HI 4.Unit stop Press ON/OFF button, the unit stops. In FAN mode,SLEEP and POWER/SOFT operation is disabled. About FAN operation In FAN operation mode, the unit will not operate in COOL mode but only in FAN mode,AUTO is not available in FAN mode.And temp.setting is not available. 11 Unit start Press ON/OFF on the remote controller, unit starts. 2.Select operation mode Press MODE button. Operation Fan Operation Display board Remote controller 1. For each press, fan speed changes as follows: Remote controller: AUTO COOL DRY FAN HEAT Then Select FAN operation 3.Fan speed...
... HI 4.Unit stop Press ON/OFF button, the unit stops. In FAN mode,SLEEP and POWER/SOFT operation is disabled. About FAN operation In FAN operation mode, the unit will not operate in COOL mode but only in FAN mode,AUTO is not available in FAN mode.And temp.setting is not available. 11 Unit start Press ON/OFF on the remote controller, unit starts. 2.Select operation mode Press MODE button. Operation Fan Operation Display board Remote controller 1. For each press, fan speed changes as follows: Remote controller: AUTO COOL DRY FAN HEAT Then Select FAN operation 3.Fan speed...
User Manual
Page 17
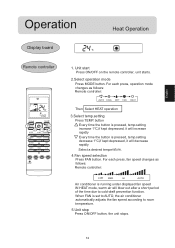
Unit start Press ON/OFF on the remote controller, unit starts. 2.Select operation mode Press MODE button. For each press, fan speed changes as follows: Remote controller: AUTO COOL DRY FAN HEAT Then Select HEAT operation 3.Select temp.setting Press TEMP. For each press, operation mode changes as follows: Remote controller: LOW MED HI AUTO Air conditioner is pressed, temp.setting decrease 1oC,if kept depressed, it will increase rapidly Every time the button is running under displayed fan speed IN HEAT mode, warm air will decrease rapidly Select a desired temperature. 4.Fan speed...
Unit start Press ON/OFF on the remote controller, unit starts. 2.Select operation mode Press MODE button. For each press, fan speed changes as follows: Remote controller: AUTO COOL DRY FAN HEAT Then Select HEAT operation 3.Select temp.setting Press TEMP. For each press, operation mode changes as follows: Remote controller: LOW MED HI AUTO Air conditioner is pressed, temp.setting decrease 1oC,if kept depressed, it will increase rapidly Every time the button is running under displayed fan speed IN HEAT mode, warm air will decrease rapidly Select a desired temperature. 4.Fan speed...
User Manual
Page 18
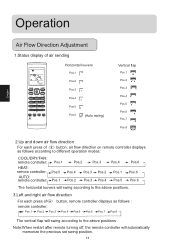
... and down air flow direction For each press of button, air flow direction on remote controller displays as follows according to different operation modes: COOL/DRY/FAN: remote controller: HEAT: remote controller: AUTO: remote controller: Pos.1 Pos.5 Pos.1 Pos.2 Pos.3 Pos.4 Pos.2 Pos.3 Pos.2 Pos.3 Pos.4 Pos.4 Pos.1 Pos.5 Pos.6 Pos.6 Pos.6 The horizontal louvers will swing according to the above positions. 3.Left and right air flow direction For each press of remote controller: button, remote controller displays as...
... and down air flow direction For each press of button, air flow direction on remote controller displays as follows according to different operation modes: COOL/DRY/FAN: remote controller: HEAT: remote controller: AUTO: remote controller: Pos.1 Pos.5 Pos.1 Pos.2 Pos.3 Pos.4 Pos.2 Pos.3 Pos.2 Pos.3 Pos.4 Pos.4 Pos.1 Pos.5 Pos.6 Pos.6 Pos.6 The horizontal louvers will swing according to the above positions. 3.Left and right air flow direction For each press of remote controller: button, remote controller displays as...
User Manual
Page 19
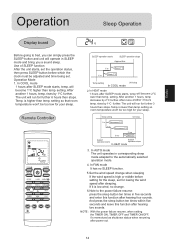
... then stops. Temp. Remote Controller Temp.setting Unit stop In COOL mode 2. If it 's memorized as shutdown status when resuming after sleeping. Use of SLEEP function After the unit starts, set the operation status, then press SLEEP button before setting for the sleep, set . Operation Mode 1. setting. setting. setting so room temperature won 't be too Iow for your sleep. NOTE: With the power failure resume, when setting the TIMER ON, TIMER OFF and TIMER ON/OFF, it is higher than temp. In COOL mode 1 hours after SLEEP mode starts, temp will become...
... then stops. Temp. Remote Controller Temp.setting Unit stop In COOL mode 2. If it 's memorized as shutdown status when resuming after sleeping. Use of SLEEP function After the unit starts, set the operation status, then press SLEEP button before setting for the sleep, set . Operation Mode 1. setting. setting. setting so room temperature won 't be too Iow for your sleep. NOTE: With the power failure resume, when setting the TIMER ON, TIMER OFF and TIMER ON/OFF, it is higher than temp. In COOL mode 1 hours after SLEEP mode starts, temp will become...
User Manual
Page 20
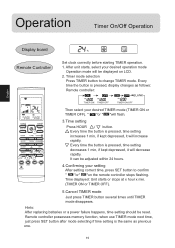
..., press SET button to change TIMER mode. After unit starts, select your desired operation mode Operation mode will decrease rapidly. Timer mode selection Press TIMER button to confirm " "or" "on LCD. 2. Hints: After replacing batteries or a power failure happens, time setting should be displayed on the remote controller stops flashing. It can be adjusted within 24 hours. 4.Confirming your desired TIMER mode (TIMER ON or TIMER OFF). Remote controller possesses memory function, when use TIMER mode next time, just press SET button after mode selecting...
..., press SET button to change TIMER mode. After unit starts, select your desired operation mode Operation mode will decrease rapidly. Timer mode selection Press TIMER button to confirm " "or" "on LCD. 2. Hints: After replacing batteries or a power failure happens, time setting should be displayed on the remote controller stops flashing. It can be adjusted within 24 hours. 4.Confirming your desired TIMER mode (TIMER ON or TIMER OFF). Remote controller possesses memory function, when use TIMER mode next time, just press SET button after mode selecting...
User Manual
Page 24
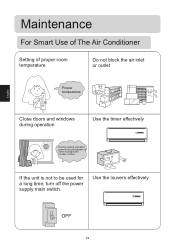
Maintenance For Smart Use of The Air Conditioner Setting of proper room temperature Do not block the air inlet or outlet Proper temperature Close doors and windows during operation Use the timer effectively During cooling operation prevent the penetration of direct sunlight with curtain or blind If the unit is not to be used for a long time, turn off the power supply main switch. Use the louvers effectively OFF 19
Maintenance For Smart Use of The Air Conditioner Setting of proper room temperature Do not block the air inlet or outlet Proper temperature Close doors and windows during operation Use the timer effectively During cooling operation prevent the penetration of direct sunlight with curtain or blind If the unit is not to be used for a long time, turn off the power supply main switch. Use the louvers effectively OFF 19
User Manual
Page 25
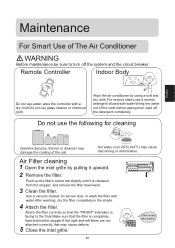
..., and remove the filter downward. Remote Controller Indoor Body Do not use water, wipe the controller with a dry cloth.Do not use the following for cleaning Gasoline,benzine, thinner or cleanser may damage the coating of the unit. Attach the filter. Once every two weeks 20 Air Filter cleaning Open the inlet grille by using a soft and dry cloth.For serious stains,use a neutral detergent diluted with water.After washing, dry the filter completely...
..., and remove the filter downward. Remote Controller Indoor Body Do not use water, wipe the controller with a dry cloth.Do not use the following for cleaning Gasoline,benzine, thinner or cleanser may damage the coating of the unit. Attach the filter. Once every two weeks 20 Air Filter cleaning Open the inlet grille by using a soft and dry cloth.For serious stains,use a neutral detergent diluted with water.After washing, dry the filter completely...

User Manual
Page 27
Maintenance To Keep Your Air conditioner in cooling mode for 2-3 hours. Cleaning the body. To prevent breeding mold or bad smell, be sure to operate at the designated temperature or 30OC,cooling mode and High speed fan mode for 2-3 hours. Put off the power supply cord. Take out the batteries from the wireless remote controller. 22 Operate in Good Condition after Season.
Maintenance To Keep Your Air conditioner in cooling mode for 2-3 hours. Cleaning the body. To prevent breeding mold or bad smell, be sure to operate at the designated temperature or 30OC,cooling mode and High speed fan mode for 2-3 hours. Put off the power supply cord. Take out the batteries from the wireless remote controller. 22 Operate in Good Condition after Season.
User Manual
Page 28
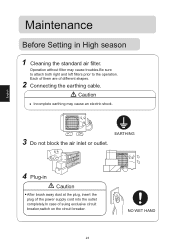
Plug-in High season Cleaning the standard air filter. Maintenance Before Setting in Caution After brush away dust at the plug, insert the plug of the power supply cord into the outlet completely.In case of different shapes. Operation without filter may cause an electric shock. Caution Incomplete earthing may cause troubles.Be sure to attach both right and left filters prior to the operation. Connecting the earthing cable. EARTHING Do not block the air inlet or outlet. Each of them are of suing exclusive circuit breaker,switch on the circuit breaker. 23 NO WET HAND
Plug-in High season Cleaning the standard air filter. Maintenance Before Setting in Caution After brush away dust at the plug, insert the plug of the power supply cord into the outlet completely.In case of different shapes. Operation without filter may cause an electric shock. Caution Incomplete earthing may cause troubles.Be sure to attach both right and left filters prior to the operation. Connecting the earthing cable. EARTHING Do not block the air inlet or outlet. Each of them are of suing exclusive circuit breaker,switch on the circuit breaker. 23 NO WET HAND
User Manual
Page 29
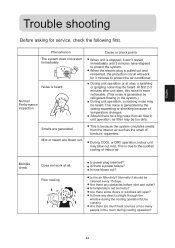
... to the sudden cooling of temperature changes. Are there any direct sunlight through the window during the cooling operation?(Use curtain) Are there too much heat sources or too many people in the system.) During unit operation, a cracking noise may blow out mist. Mist or steam are generated. When the electric plug is stopped, it should be heard. Is the air filter dirty? During COOL or DRY operation, indoor unit may be too...
... to the sudden cooling of temperature changes. Are there any direct sunlight through the window during the cooling operation?(Use curtain) Are there too much heat sources or too many people in the system.) During unit operation, a cracking noise may blow out mist. Mist or steam are generated. When the electric plug is stopped, it should be heard. Is the air filter dirty? During COOL or DRY operation, indoor unit may be too...


