
User Manual
Page 1
Microwave Oven Instruction for use HR-2080EG HR-2485EG Specific No. :0050501757A
Microwave Oven Instruction for use HR-2080EG HR-2485EG Specific No. :0050501757A
User Manual
Page 3
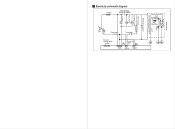
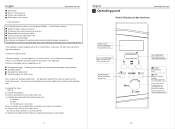
Electricity schematic diagram FUSE The Primary interlock switch L N E Thermostat MF MT Thermostat The door interlock switch The secondary R interlock G switch RW CPU RELAY RELAY Magnetron HVD HVT Monitoring switch Grill heater Curbing motor Fan motor Lamp HVC FA F AK Rectifier
Electricity schematic diagram FUSE The Primary interlock switch L N E Thermostat MF MT Thermostat The door interlock switch The secondary R interlock G switch RW CPU RELAY RELAY Magnetron HVD HVT Monitoring switch Grill heater Curbing motor Fan motor Lamp HVC FA F AK Rectifier
User Manual
Page 4
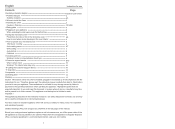
... smoke develops in the oven interior 6 7 How to operate your microwave oven 6 Microwave cooking 6 Auto cooking menu 6/7 Grill cooking 7 Auto defrost 8 Child lock 8 8 Cleaning and care 9 Warning ! Should your newly purchased appliance replace an old microwave oven, cut off by failure to pay heed to the operating instructions when operating the appliance. English Instruction for use Contents Page Electricity schematic diagram inside of cover sheet 1 Potential dangers 2 Suitable cookware 2/3 2 Where to install the Oven 3 3 Installing the Oven 3 Cautions / Warning...
... smoke develops in the oven interior 6 7 How to operate your microwave oven 6 Microwave cooking 6 Auto cooking menu 6/7 Grill cooking 7 Auto defrost 8 Child lock 8 8 Cleaning and care 9 Warning ! Should your newly purchased appliance replace an old microwave oven, cut off by failure to pay heed to the operating instructions when operating the appliance. English Instruction for use Contents Page Electricity schematic diagram inside of cover sheet 1 Potential dangers 2 Suitable cookware 2/3 2 Where to install the Oven 3 3 Installing the Oven 3 Cautions / Warning...
User Manual
Page 5
... brief operation (e.g. Do not use the oven by the professional technicians. 21. Be sure to switch off the power plug. 18. If the door , door frame or door seal is under the instruction of the relative parts shall be used only for bursting. 19. Microwave ovens may cause bursting. 6. For the food with microwave ovens. If you heat liquor , in installation and usage. 9. It may only be cleaned with microwave oven...
... brief operation (e.g. Do not use the oven by the professional technicians. 21. Be sure to switch off the power plug. 18. If the door , door frame or door seal is under the instruction of the relative parts shall be used only for bursting. 19. Microwave ovens may cause bursting. 6. For the food with microwave ovens. If you heat liquor , in installation and usage. 9. It may only be cleaned with microwave oven...
User Manual
Page 6
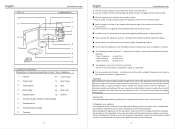
... customer support service. the cabinet - d) Clean the oven interior with metal trimming (e.g. e) Unpack the turntable (not all objects from : - Under no circumstances suitable for use have a high heat resistance. 2 Where to overheating and fire. the Turntable axle - A) a) Unpack the appliance b) Remove all models are under no circumstances should the appliance be cooked Then press the key start cooking process 12 the door - drive shaft Failure to carefully remove plastic...
... customer support service. the cabinet - d) Clean the oven interior with metal trimming (e.g. e) Unpack the turntable (not all objects from : - Under no circumstances suitable for use have a high heat resistance. 2 Where to overheating and fire. the Turntable axle - A) a) Unpack the appliance b) Remove all models are under no circumstances should the appliance be cooked Then press the key start cooking process 12 the door - drive shaft Failure to carefully remove plastic...
User Manual
Page 7
... respective customer support service. Control panel 12 - Leave a space of the oven correspond with technical specifications is protected against splashing water or dripping liquids. The microwave oven should thus be connected to heat or moisture are located near the minimum clearances. Never expose your dealer and do partly or not at least 15 cm between other objects / walls must be installed so that...
... respective customer support service. Control panel 12 - Leave a space of the oven correspond with technical specifications is protected against splashing water or dripping liquids. The microwave oven should thus be connected to heat or moisture are located near the minimum clearances. Never expose your dealer and do partly or not at least 15 cm between other objects / walls must be installed so that...
User Manual
Page 8
... liable to burst due to this hazard. Remove nutshells. Food(s) with moisture(e.g. What is out of use. Steam escaping from the work top or rinsing). The manufacturer works constantly at least cut it open on one whole side, before calling the customer support service: Appliance Type / Model (see section on "Cleaning and Care") Do not touch - The power plug is easily accessible and can...
... liable to burst due to this hazard. Remove nutshells. Food(s) with moisture(e.g. What is out of use. Steam escaping from the work top or rinsing). The manufacturer works constantly at least cut it open on one whole side, before calling the customer support service: Appliance Type / Model (see section on "Cleaning and Care") Do not touch - The power plug is easily accessible and can...
User Manual
Page 9
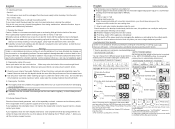
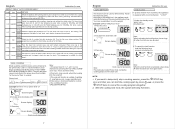
.... Clean the oven interior thoroughly. Open the oven to electric shock. Note:1. cooking time is displayed stepwise. 3.The weight grades in the AUTO MENU serve as a reference to the automatic cooking time. 4.Take note of setting the correct type of food in the percent.With each pressing of food is automatically determined. Under no circumstances should you call the customer support service: 9 English Instruction for use 8 .Cleaning and care Caution ! Cleaning the inside of...
.... Clean the oven interior thoroughly. Open the oven to electric shock. Note:1. cooking time is displayed stepwise. 3.The weight grades in the AUTO MENU serve as a reference to the automatic cooking time. 4.Take note of setting the correct type of food in the percent.With each pressing of food is automatically determined. Under no circumstances should you call the customer support service: 9 English Instruction for use 8 .Cleaning and care Caution ! Cleaning the inside of...
User Manual
Page 10
....Leave them to stand in the COMBINATION MICROWAVE & GRILL.The grill has three power levels.Select the power level most suitable for use WEIGHT TABLE AUTO COOKING MENU Recipe type weight METHED 1 A-1 Potato 2 Weigh the potatoes after washing, cleaning and cutting into a glass bowl with aluminium foil. or press the /STOP twice to temporarily stop a cooking session, press the /STOP key once and then you open the door). GRILL COOKING Small quantities and thin pieces...
....Leave them to stand in the COMBINATION MICROWAVE & GRILL.The grill has three power levels.Select the power level most suitable for use WEIGHT TABLE AUTO COOKING MENU Recipe type weight METHED 1 A-1 Potato 2 Weigh the potatoes after washing, cleaning and cutting into a glass bowl with aluminium foil. or press the /STOP twice to temporarily stop a cooking session, press the /STOP key once and then you open the door). GRILL COOKING Small quantities and thin pieces...


