
Use and Care Manual
Page 3
ENGLISH TABLE OF CONTENTS IMPORTANT SAFETY INFORMATION 4 PARTS AND FEATURES 6 Specification 7 Turntable 7 CONTROL PANEL 8 Clock ...8 Features ...9 MISCROWAVE OVEN USE 10 Microwave Cooking 10 MICROWAVE OVEN CARE 12 Cleaning 12 Filters...12 Lights...13 TROUBLESHOOTING 14 LIMITED WARRANTY 15 RECORD KEEPING 16 49-20000373 Rev. 2 3
ENGLISH TABLE OF CONTENTS IMPORTANT SAFETY INFORMATION 4 PARTS AND FEATURES 6 Specification 7 Turntable 7 CONTROL PANEL 8 Clock ...8 Features ...9 MISCROWAVE OVEN USE 10 Microwave Cooking 10 MICROWAVE OVEN CARE 12 Cleaning 12 Filters...12 Lights...13 TROUBLESHOOTING 14 LIMITED WARRANTY 15 RECORD KEEPING 16 49-20000373 Rev. 2 3
Use and Care Manual
Page 4
...in operation. • Clean Ventilating Hoods Frequently - for industrial or laboratory use. • As with the provided Installation Instructions. • Microwave is in the manual. Cooking to prevent build-up of pressure. • Be careful when touching the turntable, door, or walls of...to at the fuse or circuit breaker panel. • Do not use . • Liquids and certain foods heated in the microwave oven. ENGLISH IMPORTANT SAFETY INFORMATION READ ALL INSTRUCTIONS BEFORE USING THE APPLIANCE WARNING When using electrical appliances basic safety precautions should be ...
...in operation. • Clean Ventilating Hoods Frequently - for industrial or laboratory use. • As with the provided Installation Instructions. • Microwave is in the manual. Cooking to prevent build-up of pressure. • Be careful when touching the turntable, door, or walls of...to at the fuse or circuit breaker panel. • Do not use . • Liquids and certain foods heated in the microwave oven. ENGLISH IMPORTANT SAFETY INFORMATION READ ALL INSTRUCTIONS BEFORE USING THE APPLIANCE WARNING When using electrical appliances basic safety precautions should be ...

Use and Care Manual
Page 5
...(d) Oven Should Not be grounded. ENGLISH IMPORTANT SAFETY INFORMATION READ ALL INSTRUCTIONS BEFORE USING THE APPLIANCE PRECAUTIONS TO AVOID POSSIBLE EXPOSURE TO EXCESSIVE MICROWAVE ENERGY (a) Do Not Attempt to operate this appliance. It is important not to defeat or tamper with the safety interlocks. (b) Do ...it is equipped with a power cord having a grounding wire with the door open since open-door operation can result in harmful exposure to microwave energy. READ AND SAVE THESE INSTRUCTIONS 49-20000373 Rev. 2 5 Do not use an extension cord. If the power cord is properly ...
...(d) Oven Should Not be grounded. ENGLISH IMPORTANT SAFETY INFORMATION READ ALL INSTRUCTIONS BEFORE USING THE APPLIANCE PRECAUTIONS TO AVOID POSSIBLE EXPOSURE TO EXCESSIVE MICROWAVE ENERGY (a) Do Not Attempt to operate this appliance. It is important not to defeat or tamper with the safety interlocks. (b) Do ...it is equipped with a power cord having a grounding wire with the door open since open-door operation can result in harmful exposure to microwave energy. READ AND SAVE THESE INSTRUCTIONS 49-20000373 Rev. 2 5 Do not use an extension cord. If the power cord is properly ...

Use and Care Manual
Page 7
... department at encompassparts.com. 49-20000373 Rev. 2 7 ENGLISH Parts and Features Specifications Model Number Rated Voltage Rated Input Power (Microwave) Rated Output Power (Microwave) Oven Capacity Turntable Diameter External Dimensions (W x D x H) Net Weight LED Lighting HMV1472BHS 120V~60Hz 1500 Watt 1000 Watt 1.4 cu.ft 13-1/2" (34.5 cm) 23-7/8 " x 16-3/16 " x 17" (60.6 cm x 41...
... department at encompassparts.com. 49-20000373 Rev. 2 7 ENGLISH Parts and Features Specifications Model Number Rated Voltage Rated Input Power (Microwave) Rated Output Power (Microwave) Oven Capacity Turntable Diameter External Dimensions (W x D x H) Net Weight LED Lighting HMV1472BHS 120V~60Hz 1500 Watt 1000 Watt 1.4 cu.ft 13-1/2" (34.5 cm) 23-7/8 " x 16-3/16 " x 17" (60.6 cm x 41...

Use and Care Manual
Page 8
... Function. 8 49-2000373 Rev. 2 Press the number pads to enter the Clock Setting mode. Press START to begin counting down the time. KITCHEN TIMER The microwave features a convenient timer for your cooking needs. 1. SET TIME OF DAY 1.
... Function. 8 49-2000373 Rev. 2 Press the number pads to enter the Clock Setting mode. Press START to begin counting down the time. KITCHEN TIMER The microwave features a convenient timer for your cooking needs. 1. SET TIME OF DAY 1.

Use and Care Manual
Page 9
...When the control is pressed the first time, "High" appears in the display. 5. CHILD LOCKOUT The Child Lock feature allows you to lock the microwave control panel for 3 seconds. Press three times SURFACE LIGHTING The surface light feature illuminates the cooking surface below . • Press VENT HI-LO-OFF... to regulate the fan speed. ENGLISH Control Panel Features VENT FAN The vent fan feature allows you to check the Time and Power settings during microwave cooking. • Press POWER LEVEL to display the set power level • Press CLOCK to display the time. 49-20000373 Rev. 2 9...
...When the control is pressed the first time, "High" appears in the display. 5. CHILD LOCKOUT The Child Lock feature allows you to lock the microwave control panel for 3 seconds. Press three times SURFACE LIGHTING The surface light feature illuminates the cooking surface below . • Press VENT HI-LO-OFF... to regulate the fan speed. ENGLISH Control Panel Features VENT FAN The vent fan feature allows you to check the Time and Power settings during microwave cooking. • Press POWER LEVEL to display the set power level • Press CLOCK to display the time. 49-20000373 Rev. 2 9...

Use and Care Manual
Page 10
..., Fresh Veggies, Frozen Veggies, Frozen Dinner, White Rice, Frozen Breakfast, and Ground Meat. For example, to Step 4. 2. Rest periods (when the microwave energy cycles off) give time for various power levels: Power Levels Ten power levels are dry before the inside of meat 4 40% PL-40 3 30... skip steps 2 and 3, and go directly to cook for stews and 5 50% PL-50 less tender cuts of the food. ENGLISH Microwave Oven Use MICROWAVE COOKING TIMED COOKING 1. The Sensor Cook control is energy 30% of moisture turning into steam can be done on the same food portion-it...
..., Fresh Veggies, Frozen Veggies, Frozen Dinner, White Rice, Frozen Breakfast, and Ground Meat. For example, to Step 4. 2. Rest periods (when the microwave energy cycles off) give time for various power levels: Power Levels Ten power levels are dry before the inside of meat 4 40% PL-40 3 30... skip steps 2 and 3, and go directly to cook for stews and 5 50% PL-50 less tender cuts of the food. ENGLISH Microwave Oven Use MICROWAVE COOKING TIMED COOKING 1. The Sensor Cook control is energy 30% of moisture turning into steam can be done on the same food portion-it...

Use and Care Manual
Page 11
... appropriate heating time automatically. After removing food from escaping, and cause the food to be defrosted. Reheated foods may be defrosted and microwaved. "Enter Weight" will turn into steam which can mislead the sensors. 1. Conversion Guide • For more time. Press REHEAT once..., "BEVERAGE" will appear on the display. For example, if the food weight is in the microwave oven. 2. Press START to tenths (.1) of harmful bacteria. • When defrosted, food should be defrosted in paper or plastic can be ...
... appropriate heating time automatically. After removing food from escaping, and cause the food to be defrosted. Reheated foods may be defrosted and microwaved. "Enter Weight" will turn into steam which can mislead the sensors. 1. Conversion Guide • For more time. Press REHEAT once..., "BEVERAGE" will appear on the display. For example, if the food weight is in the microwave oven. 2. Press START to tenths (.1) of harmful bacteria. • When defrosted, food should be defrosted in paper or plastic can be ...

Use and Care Manual
Page 12
...steel models, a stainless steel cleaner may be used on the size of the oven. • foil that is especially important in microwave cooking. Microwave Terms POPCORN The popcorn control is not placed on cleaning products. • To avoid damage to set. The popping time will ...as the tips of popcorn. 2. The glass turntable may be washed and dried in death or electrical shock. 49-2000373 Rev. 2 Microwave Oven Care CLEANING IMPORTANT: WARNING FILTERS WARNING Electrical Shock Hazard Disconnect power before larger parts. Using a warm water and mild soap solution and...
...steel models, a stainless steel cleaner may be used on the size of the oven. • foil that is especially important in microwave cooking. Microwave Terms POPCORN The popcorn control is not placed on cleaning products. • To avoid damage to set. The popping time will ...as the tips of popcorn. 2. The glass turntable may be washed and dried in death or electrical shock. 49-2000373 Rev. 2 Microwave Oven Care CLEANING IMPORTANT: WARNING FILTERS WARNING Electrical Shock Hazard Disconnect power before larger parts. Using a warm water and mild soap solution and...

Use and Care Manual
Page 13
..., and tighten the screws completely. Remove the grease filter. Soak the grease filters in a dishwasher. NOTE: Do not use . Your microwave oven comes from the factory with a mild detergent added. To order a replacement charcoal for the second filter. However, if the lights ...C A Surface Lights B Door C Metal Loop D Grease Filters D 2. See the back cover for contact information. 49-20000373 Rev. 2 13 ENGLISH Microwave Oven Care GREASE FILTER(S) Grease filters are located on the filter will corrode and darken. The aluminum on the underside of the grille so that...
..., and tighten the screws completely. Remove the grease filter. Soak the grease filters in a dishwasher. NOTE: Do not use . Your microwave oven comes from the factory with a mild detergent added. To order a replacement charcoal for the second filter. However, if the lights ...C A Surface Lights B Door C Metal Loop D Grease Filters D 2. See the back cover for contact information. 49-20000373 Rev. 2 13 ENGLISH Microwave Oven Care GREASE FILTER(S) Grease filters are located on the filter will corrode and darken. The aluminum on the underside of the grille so that...

Use and Care Manual
Page 14
...then "UNLOCKED" will not start "KEYPAD SHORTED--- It is open. Open and close the door and reattempt new cycle. If this microwave oven. SERVICE MAY BE NEEDED" appears on display "FOOD" appears on display along with respect to radio and television reception. Press ...STATEMENT This equipment generates and uses ISM frequency energy and if not installed and used properly, that is no guarantee that the microwave oven and receiver are designed to provide reasonable protection against such interference in strict accordance with the manufacturer's instructions, may cause interference...
...then "UNLOCKED" will not start "KEYPAD SHORTED--- It is open. Open and close the door and reattempt new cycle. If this microwave oven. SERVICE MAY BE NEEDED" appears on display "FOOD" appears on display along with respect to radio and television reception. Press ...STATEMENT This equipment generates and uses ISM frequency energy and if not installed and used properly, that is no guarantee that the microwave oven and receiver are designed to provide reasonable protection against such interference in strict accordance with the manufacturer's instructions, may cause interference...
Use and Care Manual
Page 16
This user manual will help you for purchasing this manual to aid in obtaining warranty service if needed. For future reference, record the model and serial number located on the inside frame of the microwave, and the date of purchase 16 49-2000373 Rev. 2 Model number Serial number Date of purchase. Staple your new microwave. ENGLISH RECORD KEEPING Thank you get the best performance from your proof of purchase to this Haier product.
This user manual will help you for purchasing this manual to aid in obtaining warranty service if needed. For future reference, record the model and serial number located on the inside frame of the microwave, and the date of purchase 16 49-2000373 Rev. 2 Model number Serial number Date of purchase. Staple your new microwave. ENGLISH RECORD KEEPING Thank you get the best performance from your proof of purchase to this Haier product.
Quick Specs
Page 1
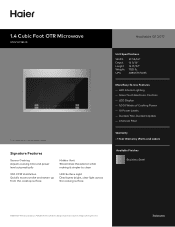
Charcoal Filter Warranty - 1 Year Warranty (Parts and Labor) Available Finishes Stainless Steel © 2016 Haier America Company, LLC. Ducted/ Non-Ducted Capable -- Signature Features Sensor Cooking Adjusts cooking time and power level automatically ...16″ 16 31/32″ TBD lb. 688057374185 More Easy-To-Use Features -- haier.com LED Display -- 1,000 Watts of Cooking Power -- 10 Power Levels -- All Rights Reserved. LED Interior Lighting -- 1.4 Cubic Foot OTR Microwave HMV1472BHS Product image does not represent final photography. Glass Touch Electronic Controls --
Charcoal Filter Warranty - 1 Year Warranty (Parts and Labor) Available Finishes Stainless Steel © 2016 Haier America Company, LLC. Ducted/ Non-Ducted Capable -- Signature Features Sensor Cooking Adjusts cooking time and power level automatically ...16″ 16 31/32″ TBD lb. 688057374185 More Easy-To-Use Features -- haier.com LED Display -- 1,000 Watts of Cooking Power -- 10 Power Levels -- All Rights Reserved. LED Interior Lighting -- 1.4 Cubic Foot OTR Microwave HMV1472BHS Product image does not represent final photography. Glass Touch Electronic Controls --

Installation Instructions
Page 3
Drill Holes for Mounting Microwave Oven 9 Step 5 - ENGLISH TABLE OF CONTENTS MICROWAVE SAFETY 2 INSTALLATION REQUIREMENTS 3 Tools and Parts 3 Location Requirements 4 Electrical Requirements 5 INSTALLATION INSTRUCTIONS 6 Step 1 - Install Microwave Oven 11 Step 7 - Align Rear Wall Template and Mark Wall 7 Step 4 - Locate Wall Studs 7 Step 3 - Unpack Microwave Oven 6 Step 2 - Determine Ventilation Method 10 Step 6 - Complete Installation 25 1
Drill Holes for Mounting Microwave Oven 9 Step 5 - ENGLISH TABLE OF CONTENTS MICROWAVE SAFETY 2 INSTALLATION REQUIREMENTS 3 Tools and Parts 3 Location Requirements 4 Electrical Requirements 5 INSTALLATION INSTRUCTIONS 6 Step 1 - Install Microwave Oven 11 Step 7 - Align Rear Wall Template and Mark Wall 7 Step 4 - Locate Wall Studs 7 Step 3 - Unpack Microwave Oven 6 Step 2 - Determine Ventilation Method 10 Step 6 - Complete Installation 25 1

Installation Instructions
Page 4
... the following: • Read all safety messages. See "GROUNDING INSTRUCTIONS" found in moderate or minor injury. This is used. • The microwave oven must be killed or seriously injured if you to properly grounded outlet. Connect only to potential hazards that can kill or hurt you what... the potential hazard is, tell you how to whether the microwave oven is properly grounded. • Do not remove ground prong. • Do not use an adapter. • Do not use an extension ...
... the following: • Read all safety messages. See "GROUNDING INSTRUCTIONS" found in moderate or minor injury. This is used. • The microwave oven must be killed or seriously injured if you to properly grounded outlet. Connect only to potential hazards that can kill or hurt you what... the potential hazard is, tell you how to whether the microwave oven is properly grounded. • Do not remove ground prong. • Do not use an adapter. • Do not use an extension ...

Installation Instructions
Page 5
... (51.3-61.2 kg). • This product cannot be mounted to BOTH a top cabinet AND a wall. • Use two or more people to move and install microwave oven. ENGLISH IMPORTANT SAFETY INSTRUCTIONS • Disconnect electrical power at the fuse box or circuit breaker box before starting installation.
... (51.3-61.2 kg). • This product cannot be mounted to BOTH a top cabinet AND a wall. • Use two or more people to move and install microwave oven. ENGLISH IMPORTANT SAFETY INSTRUCTIONS • Disconnect electrical power at the fuse box or circuit breaker box before starting installation.

Installation Instructions
Page 6
... instructions on each side of the range must be 30" (76.2 cm) or more from the cooking surface. c A Grounded 3 Prong Outlet B Bottom edge of the microwave. LOCATION REQUIREMENTS a b 16½" (42 cm) 24" (61.0 cm) 30" (76.2 cm) 2" (5.1 cm) min. ENGLISH TOP CABINET TEMPLATE Nylon Grommet (for power...the cabinet bottom, filler block (if needed for recessed bottom cabinets), and into the top of cabinet needs to the top of the microwave • The space between the cabinets on the Top Cabinet template for metal cabinets) Top Cabinet Template REAR WALL TEMPLATE Rear Wall ...
... instructions on each side of the range must be 30" (76.2 cm) or more from the cooking surface. c A Grounded 3 Prong Outlet B Bottom edge of the microwave. LOCATION REQUIREMENTS a b 16½" (42 cm) 24" (61.0 cm) 30" (76.2 cm) 2" (5.1 cm) min. ENGLISH TOP CABINET TEMPLATE Nylon Grommet (for power...the cabinet bottom, filler block (if needed for recessed bottom cabinets), and into the top of cabinet needs to the top of the microwave • The space between the cabinets on the Top Cabinet template for metal cabinets) Top Cabinet Template REAR WALL TEMPLATE Rear Wall ...

Installation Instructions
Page 7
... is too short, have a qualified electrician or serviceman install an outlet near the microwave oven. WARNING: Improper use an extension cord. Failure to a supply circuit of the grounding plug can result in death, fire or electrical shock. ...This product must be plugged into a grounded 3 prong outlet. GROUNDING INSTRUCTIONS For a grounded, cord-connected microwave: The microwave oven must be connected to do so can result in the cabinet above the microwave oven. Do not use of the proper voltage and frequency. If the power supply cord is equipped with...
... is too short, have a qualified electrician or serviceman install an outlet near the microwave oven. WARNING: Improper use an extension cord. Failure to a supply circuit of the grounding plug can result in death, fire or electrical shock. ...This product must be plugged into a grounded 3 prong outlet. GROUNDING INSTRUCTIONS For a grounded, cord-connected microwave: The microwave oven must be connected to do so can result in the cabinet above the microwave oven. Do not use of the proper voltage and frequency. If the power supply cord is equipped with...

Installation Instructions
Page 8
...Shock Hazard Disconnect electrical power at the fuse box or circuit breaker box before installing microwave. UNPACK MICROWAVE OVEN WARNING Excessive Weight Hazard Use two or more people move the microwave close to move and install microwave oven. Locate and remove the two screws attaching the mounting plate to the back of... the grease filters and User Manual from the front of the oven, and then remove the mounting plate. 6 Using two people, lift the microwave out of the carton and gently set it front down on the carton top. Failure to do so can result in death or electrical shock...
...Shock Hazard Disconnect electrical power at the fuse box or circuit breaker box before installing microwave. UNPACK MICROWAVE OVEN WARNING Excessive Weight Hazard Use two or more people move the microwave close to move and install microwave oven. Locate and remove the two screws attaching the mounting plate to the back of... the grease filters and User Manual from the front of the oven, and then remove the mounting plate. 6 Using two people, lift the microwave out of the carton and gently set it front down on the carton top. Failure to do so can result in death or electrical shock...

Installation Instructions
Page 9
...power to make sure the cabinet bottom is no wall stud within the cabinet opening . 2. FLAT-BOTTOM CABINET IMPORTANT: The microwave must be used as the wall template and to mount the microwave oven onto the wall. Tape the template in your home. a b A Screws B Mounting Plate (Wall Template) 5. Find... NOTE: The mounting plate will be installed to at the center of the 24" (61 cm) wide opening , do not install the microwave oven. 1. LOCATE WALL STUDS IMPORTANT: The microwave must be 16" (40.6 cm) or 24" (61 cm) from which they were removed. If there is level. 1. SWTAELPL3 - Draw...
...power to make sure the cabinet bottom is no wall stud within the cabinet opening . 2. FLAT-BOTTOM CABINET IMPORTANT: The microwave must be used as the wall template and to mount the microwave oven onto the wall. Tape the template in your home. a b A Screws B Mounting Plate (Wall Template) 5. Find... NOTE: The mounting plate will be installed to at the center of the 24" (61 cm) wide opening , do not install the microwave oven. 1. LOCATE WALL STUDS IMPORTANT: The microwave must be 16" (40.6 cm) or 24" (61 cm) from which they were removed. If there is level. 1. SWTAELPL3 - Draw...


