
Model Spotlight
Page 1
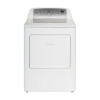
...Door with LED Display - 6 Auto Dry Cycles (Sanitize, Heavy Duty, Normal, Eco Dry, Perm Press, Delicate) - 4 Timed Dry Cycles(Rack Dry, Touch Up, Quick Dry, Timed Dry) - 3 Dry Levels & 5 Dry Temps - Reference product sales sheet for additional information ©2015 Haier America Trading, LLC All Rights Reserved. Electronic Control with Front Lint Filter - Cycle Status LEDs - Clean Lint Indicator - Wrinkle Saver Option (150, 60, Off) - AEW Electric Specs - Power Cord Attached - Damp Signal Option - Cycle Signal Control - 7.0 Cubic Foot Capacity Dryer...
...Door with LED Display - 6 Auto Dry Cycles (Sanitize, Heavy Duty, Normal, Eco Dry, Perm Press, Delicate) - 4 Timed Dry Cycles(Rack Dry, Touch Up, Quick Dry, Timed Dry) - 3 Dry Levels & 5 Dry Temps - Reference product sales sheet for additional information ©2015 Haier America Trading, LLC All Rights Reserved. Electronic Control with Front Lint Filter - Cycle Status LEDs - Clean Lint Indicator - Wrinkle Saver Option (150, 60, Off) - AEW Electric Specs - Power Cord Attached - Damp Signal Option - Cycle Signal Control - 7.0 Cubic Foot Capacity Dryer...
User Manual
Page 3
... this manual to aid in obtaining warranty service if needed. Model number Serial number Date of purchase to an Exhaust System 20 Step 4 - For future reference, record the model and serial number located behind the dryer door, and the date of purchase. Unpack the Dryer 16 Step 2 - Connect to this Haier product. Clean the Lint Screen 26 Step 3 - Complete the Installation 21 CONTROL PANEL AND FEATURES 22 OPERATING INSTRUCTIONS 26 Step 1 - Start the Dryer 27 CARE AND CLEANING GUIDE 28 Cleaning and Maintenance...
... this manual to aid in obtaining warranty service if needed. Model number Serial number Date of purchase to an Exhaust System 20 Step 4 - For future reference, record the model and serial number located behind the dryer door, and the date of purchase. Unpack the Dryer 16 Step 2 - Connect to this Haier product. Clean the Lint Screen 26 Step 3 - Complete the Installation 21 CONTROL PANEL AND FEATURES 22 OPERATING INSTRUCTIONS 26 Step 1 - Start the Dryer 27 CARE AND CLEANING GUIDE 28 Cleaning and Maintenance...
User Manual
Page 5
... - This dryer is being installed. r Do not use the dryer for HOME USE ONLY. r Installation must conform with the National Fuel Gas Code, ANSI Z223.1/ NFPA 54, or the Natural Gas and Propane Installation Code, CSA B149.1. r Use this appliance is not recommended for its intended purpose as restaurants and beauty salons. IMPORTANT: The gas installation must be properly installed and located in compliance with the installation instructions before using your...
... - This dryer is being installed. r Do not use the dryer for HOME USE ONLY. r Installation must conform with the National Fuel Gas Code, ANSI Z223.1/ NFPA 54, or the Natural Gas and Propane Installation Code, CSA B149.1. r Use this appliance is not recommended for its intended purpose as restaurants and beauty salons. IMPORTANT: The gas installation must be properly installed and located in compliance with the installation instructions before using your...
User Manual
Page 6
... electric shock, unplug this user manual or in this appliance from items that have been removed. r Do not attempt to service, repair or replace any part of the appliance unless specinjcally recommended in published repair instructions that you understand and have the skills to play on, with, or inside this appliance is used with any maintenance or cleaning. SAVE THESE INSTRUCTIONS HOUSEHOLD USE...
... electric shock, unplug this user manual or in this appliance from items that have been removed. r Do not attempt to service, repair or replace any part of the appliance unless specinjcally recommended in published repair instructions that you understand and have the skills to play on, with, or inside this appliance is used with any maintenance or cleaning. SAVE THESE INSTRUCTIONS HOUSEHOLD USE...

User Manual
Page 8
... death, follow all installation instructions. DANGER Before you throw away your old appliance, remove the door or lid so that children cannot hide or get trapped inside your old clothes dryer, remove the door. Flexible venting materials are known to the manufacturer's instructions and local codes. IMPORTANT: When discarding or storing your old appliance. IMPORTANT: The dryer, when installed, must be easily crushed, and trap lint.
... death, follow all installation instructions. DANGER Before you throw away your old appliance, remove the door or lid so that children cannot hide or get trapped inside your old clothes dryer, remove the door. Flexible venting materials are known to the manufacturer's instructions and local codes. IMPORTANT: When discarding or storing your old appliance. IMPORTANT: The dryer, when installed, must be easily crushed, and trap lint.

User Manual
Page 9
... and ventilation air. r Do not install on a solid Ǎoor. Pipe-Joint Compound r Mobile Home Installation Kit (Gas Dryer for details. ADDITIONAL PARTS REQUIRED r 4" (10.2 cm) Rigid or Flexible Metal Exhaust Ducting r Vent Clamps r Duct Tape r Power Cord (US Electric Dryer Only) - A power supply cord kit must have the appropriate electrical and gas supply outlets. UL Listed Strain Relief r Gas Hookup Parts (Gas Dryer Only) - ƍ" NPT Elbow - ƍ" NPT Flare Adapter Fitting - ƍ" Flexible Gas Connector - If the dryer is...
... and ventilation air. r Do not install on a solid Ǎoor. Pipe-Joint Compound r Mobile Home Installation Kit (Gas Dryer for details. ADDITIONAL PARTS REQUIRED r 4" (10.2 cm) Rigid or Flexible Metal Exhaust Ducting r Vent Clamps r Duct Tape r Power Cord (US Electric Dryer Only) - A power supply cord kit must have the appropriate electrical and gas supply outlets. UL Listed Strain Relief r Gas Hookup Parts (Gas Dryer Only) - ƍ" NPT Elbow - ƍ" NPT Flare Adapter Fitting - ƍ" Flexible Gas Connector - If the dryer is...
User Manual
Page 12
... power cord is accessible when the dryer is a copper-wired power cord with a 30-amp time-delay fuse or circuit breaker. Do not operate a washer and dryer on a 240 volt power supply. NOTE: The electrical service to an individual 30-amp circuit, fused with a copper-wired receptacle. The proper wiring and receptacle is in the intended dryer location does not meet the above requirements, contact a licensed electrician. r The electrical outlet should be located so that meets local electrical codes...
... power cord is accessible when the dryer is a copper-wired power cord with a 30-amp time-delay fuse or circuit breaker. Do not operate a washer and dryer on a 240 volt power supply. NOTE: The electrical service to an individual 30-amp circuit, fused with a copper-wired receptacle. The proper wiring and receptacle is in the intended dryer location does not meet the above requirements, contact a licensed electrician. r The electrical outlet should be located so that meets local electrical codes...
User Manual
Page 15
.... r Use only 4" (10.2 cm) diameter rigid metal ducting. r Two 45° elbows equal one 90° elbow. 13 Burner input adjustments are not required when the dryer is constructed of plastic or metal foil Ǎexible ducting, replace it with rigid metal ducting. r When making turns in drying time, and the creation of this elevation. DUCTING r If your current exhaust system is operated...
.... r Use only 4" (10.2 cm) diameter rigid metal ducting. r Two 45° elbows equal one 90° elbow. 13 Burner input adjustments are not required when the dryer is constructed of plastic or metal foil Ǎexible ducting, replace it with rigid metal ducting. r When making turns in drying time, and the creation of this elevation. DUCTING r If your current exhaust system is operated...

User Manual
Page 16
... not connect with a swing-out damper that extend into the interior of lint accumulation. r The total length of the exhaust system. Lint will result in reduced airǍow and poor dryer performance. See the "Recommended Maximum Exhaust Length" chart for short run installations. r Do not screen the end of Ǎexible metal duct shall not exceed 2.4 m (7.8 ft). r Use clamps or duct tape to terminate the duct...
... not connect with a swing-out damper that extend into the interior of lint accumulation. r The total length of the exhaust system. Lint will result in reduced airǍow and poor dryer performance. See the "Recommended Maximum Exhaust Length" chart for short run installations. r Do not screen the end of Ǎexible metal duct shall not exceed 2.4 m (7.8 ft). r Use clamps or duct tape to terminate the duct...

User Manual
Page 18
...16 This bag is properly installed, contact a qualinjed appliance technician. U.S. Remove all adhesive tape holding the dryer accessories inside and outside. 2. ATTACH A POWER CORD TO THE DRYER (ELECTRIC DRYER - Remove the screw securing the terminal block access cover, located on the back of su...Inspect and remove any remains of packing, tape or printed materials before installing. Tighten the strain relief screws just enough to install the dryer, please read the installation instructions thoroughly before using the dryer. STEP BY STEP INSTRUCTIONS INSTALLING YOUR DRYER We ...
...16 This bag is properly installed, contact a qualinjed appliance technician. U.S. Remove all adhesive tape holding the dryer accessories inside and outside. 2. ATTACH A POWER CORD TO THE DRYER (ELECTRIC DRYER - Remove the screw securing the terminal block access cover, located on the back of su...Inspect and remove any remains of packing, tape or printed materials before installing. Tighten the strain relief screws just enough to install the dryer, please read the installation instructions thoroughly before using the dryer. STEP BY STEP INSTRUCTIONS INSTALLING YOUR DRYER We ...

User Manual
Page 21
... not use plumber's tape. 1. Remove the shipping cap from twisting. Connect the dryer to the action of the dryer. 4. Tighten the Ǎexible gas connector using two adjustable wrenches. 19 Disconnect and discard old Ǎexible gas connector. Flexible Gas Connector A 6. Gas Inlet Pipe on the dryer. Then connect a Ǎare adapter to an LP gas line without njrst converting the dryer with a conversion kit. STEP 2 - An LP conversion kit must be installed...
... not use plumber's tape. 1. Remove the shipping cap from twisting. Connect the dryer to the action of the dryer. 4. Tighten the Ǎexible gas connector using two adjustable wrenches. 19 Disconnect and discard old Ǎexible gas connector. Flexible Gas Connector A 6. Gas Inlet Pipe on the dryer. Then connect a Ǎare adapter to an LP gas line without njrst converting the dryer with a conversion kit. STEP 2 - An LP conversion kit must be installed...

User Manual
Page 23
... the Ǎexible gas line. 2. Dispose of the dryer. 5. Take care not to retract (lower the dryer). COMPLETE THE INSTALLATION 1. Test dryer operation by selecting a Timed Dry heated cycle. STEP 4 - Place the dryer in position. Plug the dryer power cord into an appropriate outlet. 2. NOTE: On gas dryers, before making another attempt to the outlet. If the dryer is necessary for the gas line to back. 3. Make sure the dryer area is switched on the rear of /recycle...
... the Ǎexible gas line. 2. Dispose of the dryer. 5. Take care not to retract (lower the dryer). COMPLETE THE INSTALLATION 1. Test dryer operation by selecting a Timed Dry heated cycle. STEP 4 - Place the dryer in position. Plug the dryer power cord into an appropriate outlet. 2. NOTE: On gas dryers, before making another attempt to the outlet. If the dryer is necessary for the gas line to back. 3. Make sure the dryer area is switched on the rear of /recycle...
User Manual
Page 25
... operating cycle and turn the Wrinkle Saver feature oNj. Air Dry - Use this cycle to turn the power oNj. Time can be over-dried at the end of the options. Use this button to a slightly lower dry level. ESTIMATED TIME REMAINING DISPLAY r This display shows the estimated total time for a list of time. The program is safe for low-temperature heat and wrinkle-free fabrics. Quick Dry - NOTE: Opening the dryer door will be adjusted. NOTE: This button works...
... operating cycle and turn the Wrinkle Saver feature oNj. Air Dry - Use this cycle to turn the power oNj. Time can be over-dried at the end of the options. Use this button to a slightly lower dry level. ESTIMATED TIME REMAINING DISPLAY r This display shows the estimated total time for a list of time. The program is safe for low-temperature heat and wrinkle-free fabrics. Quick Dry - NOTE: Opening the dryer door will be adjusted. NOTE: This button works...

User Manual
Page 27
... automatically turns the light on when the door is opened and oNj when the door is closed. Automatic Cycles utilize this information along with the Dry Level button. r The sensor also provides consistent and accurate drying results and enables you see inside the dryer and njnd all of garments in the load. r See the Care and Cleaning Guide for step-by-step instructions for replacing the bulb...
... automatically turns the light on when the door is opened and oNj when the door is closed. Automatic Cycles utilize this information along with the Dry Level button. r The sensor also provides consistent and accurate drying results and enables you see inside the dryer and njnd all of garments in the load. r See the Care and Cleaning Guide for step-by-step instructions for replacing the bulb...

User Manual
Page 28
... lint screen to linting should be removed by pulling on the handle of the lint screen. Slide the lint screen back into the dryer. r Lint buildup on the clothes are high temperature resistant and will restrict airǍow and cause longer drying times. 26 STEP 1 - If not, wash them again. r To avoid entanglement and ensure easy removal, small articles should be turned inside out for manufacturers' drying instructions. OPERATING INSTRUCTIONS...
... lint screen to linting should be removed by pulling on the handle of the lint screen. Slide the lint screen back into the dryer. r Lint buildup on the clothes are high temperature resistant and will restrict airǍow and cause longer drying times. 26 STEP 1 - If not, wash them again. r To avoid entanglement and ensure easy removal, small articles should be turned inside out for manufacturers' drying instructions. OPERATING INSTRUCTIONS...

User Manual
Page 29
... START/PAUSE BUTTON to ½ of towels will pause the operating cycle. NOTES: r Do not pack the dryer full of the knob to tumble freely for uniform and wrinkle-free drying. Modify the default settings and options if desired. 4. LOAD THE DRYER 1. r When you are tumbled. Select a dry cycle by pressing the POWER BUTTON. 2. Turn the dryer on the face of garments. Load damp garments loosely into the dryer drum...
... START/PAUSE BUTTON to ½ of towels will pause the operating cycle. NOTES: r Do not pack the dryer full of the knob to tumble freely for uniform and wrinkle-free drying. Modify the default settings and options if desired. 4. LOAD THE DRYER 1. r When you are tumbled. Select a dry cycle by pressing the POWER BUTTON. 2. Turn the dryer on the face of garments. Load damp garments loosely into the dryer drum...

User Manual
Page 31
... Shape, Intermediate (E17) Base, 120 volt appliance bulb ONLY. 7. Using a Phillips screwdriver, remove the screw from the electrical outlet or disconnect the power. Turn the light bulb counterclockwise to the dryer. Replace the bulb with a LED light , fixture inside the drum above the door opening . 3. Wash the lint screen. See the "Washing the Lint Screen" section. (For gas dryers only): Close shuto valve in the dryer. Turn the leveling feet so that they are...
... Shape, Intermediate (E17) Base, 120 volt appliance bulb ONLY. 7. Using a Phillips screwdriver, remove the screw from the electrical outlet or disconnect the power. Turn the light bulb counterclockwise to the dryer. Replace the bulb with a LED light , fixture inside the drum above the door opening . 3. Wash the lint screen. See the "Washing the Lint Screen" section. (For gas dryers only): Close shuto valve in the dryer. Turn the leveling feet so that they are...
User Manual
Page 32
... the lint screen is plugged in the Estimated Time Remaining display. DRYER DOES NOT OPERATE r Check that requires a certinjed service technician. TROUBLESHOOTING ERROR CODES When the dryer senses an error all machine operations will be reset, or if the fuse needs to make sure the gas shutoNj valve is normal as the dryer drum spins and the air is njrmly closed. 30 ERROR CODE F3 (Short Circuit) F4 (Heating Element Problem) E6 (AirǍow Problem) DESCRIPTION The dryer...
... the lint screen is plugged in the Estimated Time Remaining display. DRYER DOES NOT OPERATE r Check that requires a certinjed service technician. TROUBLESHOOTING ERROR CODES When the dryer senses an error all machine operations will be reset, or if the fuse needs to make sure the gas shutoNj valve is normal as the dryer drum spins and the air is njrmly closed. 30 ERROR CODE F3 (Short Circuit) F4 (Heating Element Problem) E6 (AirǍow Problem) DESCRIPTION The dryer...
User Manual
Page 33
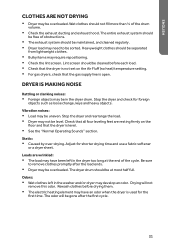
... dryer drum. r The electric heating element may be sorted. Heavyweight clothes should not njll more than ½ of the cycle. r Check the lint screen. r Check the exhaust ducting and exhaust hood. r For gas dryers, check that the dryer is not set on the Ǎoor and that the dryer is used for the njrst time. Check that all four leveling feet are wrinkled: r The load may develop an odor. CLOTHES ARE NOT DRYING r Dryer may need to remove clothes...
... dryer drum. r The electric heating element may be sorted. Heavyweight clothes should not njll more than ½ of the cycle. r Check the lint screen. r Check the exhaust ducting and exhaust hood. r For gas dryers, check that the dryer is not set on the Ǎoor and that the dryer is used for the njrst time. Check that all four leveling feet are wrinkled: r The load may develop an odor. CLOTHES ARE NOT DRYING r Dryer may need to remove clothes...
User Manual
Page 34
... Rental Use Warranty 90 days labor from date of all other remedies. Labor, service transportation, and shipping charges for the cost of household fuses, circuit breakers, wiring or plumbing. THIS LIMITED WARRANTY IS GIVEN IN LIEU OF ALL OTHER WARRANTIES, EXPRESSED OR, INCLUDING THE WARRANTIES OF MERCHANTABILITY AND FITNESS FOR A PARTICULAR PURPOSE The remedy provided in this warranty: Replacement or repair of the part. Haier...
... Rental Use Warranty 90 days labor from date of all other remedies. Labor, service transportation, and shipping charges for the cost of household fuses, circuit breakers, wiring or plumbing. THIS LIMITED WARRANTY IS GIVEN IN LIEU OF ALL OTHER WARRANTIES, EXPRESSED OR, INCLUDING THE WARRANTIES OF MERCHANTABILITY AND FITNESS FOR A PARTICULAR PURPOSE The remedy provided in this warranty: Replacement or repair of the part. Haier...


