
Model Spotlight
Page 1
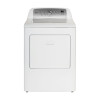
... Perm Press, Delicate) - 4 Timed Dry Cycles(Rack Dry, Touch Up, Quick Dry, Timed Dry) - 3 Dry Levels & 5 Dry Temps - Requires 208-240Volts/60Hz - Reference product sales sheet for additional information ©2015 Haier America Trading, LLC All Rights Reserved. AEW Electric Specs - AGW Gas Specs - Electronic Control with Front Lint Filter - Cycle Signal Control - Power Cord Attached - Clean Lint Indicator - LP Kit Avail. (Part # WD-3940-01) Available Finishes White haier.com 7.0 Cubic Foot Capacity Dryer HLTD500A*W Product image does not...
... Perm Press, Delicate) - 4 Timed Dry Cycles(Rack Dry, Touch Up, Quick Dry, Timed Dry) - 3 Dry Levels & 5 Dry Temps - Requires 208-240Volts/60Hz - Reference product sales sheet for additional information ©2015 Haier America Trading, LLC All Rights Reserved. AEW Electric Specs - AGW Gas Specs - Electronic Control with Front Lint Filter - Cycle Signal Control - Power Cord Attached - Clean Lint Indicator - LP Kit Avail. (Part # WD-3940-01) Available Finishes White haier.com 7.0 Cubic Foot Capacity Dryer HLTD500A*W Product image does not...
User Manual
Page 3
... 2 - Connect to a Gas Supply Line (Gas Dryer Only 19 Step 3 - Additional Requirements 15 STEP BY STEP INSTRUCTIONS 16 Step 1 - Staple your new dryer. Model number Serial number Date of purchase. Level the Dryer 21 Step 5 - This user manual will help you for purchasing this manual to aid in obtaining warranty service if needed. Attach a Power Cord to this Haier product. Start the Dryer 27 CARE AND CLEANING GUIDE 28 Cleaning and Maintenance 28 Washing the Lint Screen 28 Removing Accumulated Lint 28 Replace Interior Drum Light Bulb...
... 2 - Connect to a Gas Supply Line (Gas Dryer Only 19 Step 3 - Additional Requirements 15 STEP BY STEP INSTRUCTIONS 16 Step 1 - Staple your new dryer. Model number Serial number Date of purchase. Level the Dryer 21 Step 5 - This user manual will help you for purchasing this manual to aid in obtaining warranty service if needed. Attach a Power Cord to this Haier product. Start the Dryer 27 CARE AND CLEANING GUIDE 28 Cleaning and Maintenance 28 Washing the Lint Screen 28 Removing Accumulated Lint 28 Replace Interior Drum Light Bulb...
User Manual
Page 5
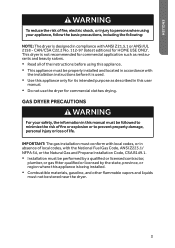
... commercial clothes drying. r Read all of the instructions before it is not recommended for its intended purpose as restaurants and beauty salons. r Do not use the dryer for HOME USE ONLY. r Use this appliance only for commercial application such as described in accordance with the National Fuel Gas Code, ANSI Z223.1/ NFPA 54, or the Natural Gas and Propane Installation Code, CSA B149.1. r Installation must...
... commercial clothes drying. r Read all of the instructions before it is not recommended for its intended purpose as restaurants and beauty salons. r Do not use the dryer for HOME USE ONLY. r Use this appliance only for commercial application such as described in accordance with the National Fuel Gas Code, ANSI Z223.1/ NFPA 54, or the Natural Gas and Propane Installation Code, CSA B149.1. r Installation must...
User Manual
Page 6
... panel located on , with, or inside this user manual or in your dryer by pulling on the power cord. r The interior of lint, dust and dirt. Always grasp the plug njrmly and pull straight out from service, remove the door to play on the rear of electric shock, unplug this appliance is moving. SAVE THESE INSTRUCTIONS HOUSEHOLD USE ONLY 4 GENERAL SAFETY PRECAUTIONS r Keep area around the exhaust opening...
... panel located on , with, or inside this user manual or in your dryer by pulling on the power cord. r The interior of lint, dust and dirt. Always grasp the plug njrmly and pull straight out from service, remove the door to play on the rear of electric shock, unplug this appliance is moving. SAVE THESE INSTRUCTIONS HOUSEHOLD USE ONLY 4 GENERAL SAFETY PRECAUTIONS r Keep area around the exhaust opening...

User Manual
Page 8
... WARNING Install the clothes dryer according to collapse, be easily crushed, and trap lint. TOOLS NEEDED Phillips Screwdriver Flat-Blade Screwdriver Channel-Lock Adjustable Pliers ½" Open-End Wrench Carpenter's Level Measuring Tape (12 ft [3.7 m] min.) For gas installations only: Pipe Wrench 2 Adjustable Wrenches 6 INSTALLATION INSTRUCTIONS Risk of local codes, with the National Electrical Code, ANSI/NFPA 70, or the Canadian Electrical Code, CSA C22.1. Flexible venting materials...
... WARNING Install the clothes dryer according to collapse, be easily crushed, and trap lint. TOOLS NEEDED Phillips Screwdriver Flat-Blade Screwdriver Channel-Lock Adjustable Pliers ½" Open-End Wrench Carpenter's Level Measuring Tape (12 ft [3.7 m] min.) For gas installations only: Pipe Wrench 2 Adjustable Wrenches 6 INSTALLATION INSTRUCTIONS Risk of local codes, with the National Electrical Code, ANSI/NFPA 70, or the Canadian Electrical Code, CSA C22.1. Flexible venting materials...

User Manual
Page 9
... protected from direct sunlight and heat sources such as required) power supply cord rated at 120/240 volt AC minimum, 30 amp, with 10 AWG conductors terminated with upturned ends or closed loop connectors and marked for use with maximum slope of combustion and ventilation air. ADDITIONAL PARTS REQUIRED r 4" (10.2 cm) Rigid or Flexible Metal Exhaust Ducting r Vent Clamps r Duct Tape r Power Cord (US Electric Dryer Only) - See "Electrical & Gas Supply Requirements" section...
... protected from direct sunlight and heat sources such as required) power supply cord rated at 120/240 volt AC minimum, 30 amp, with 10 AWG conductors terminated with upturned ends or closed loop connectors and marked for use with maximum slope of combustion and ventilation air. ADDITIONAL PARTS REQUIRED r 4" (10.2 cm) Rigid or Flexible Metal Exhaust Ducting r Vent Clamps r Duct Tape r Power Cord (US Electric Dryer Only) - See "Electrical & Gas Supply Requirements" section...
User Manual
Page 12
... required) power cord rated at 120/240 volt AC minimum, 30 amp, with 3 open-end spade lug connectors with upturned ends or closed loop connectors and marked for use with a 30-amp time-delay fuse or circuit breaker. The dryer can be purchased separately. r If the electrical supply available in the intended dryer location does not meet the above requirements, contact a licensed electrician. Do not operate a washer and dryer on...
... required) power cord rated at 120/240 volt AC minimum, 30 amp, with 3 open-end spade lug connectors with upturned ends or closed loop connectors and marked for use with a 30-amp time-delay fuse or circuit breaker. The dryer can be purchased separately. r If the electrical supply available in the intended dryer location does not meet the above requirements, contact a licensed electrician. Do not operate a washer and dryer on...
User Manual
Page 15
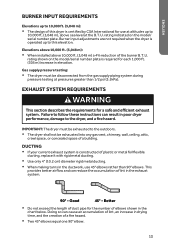
... making turns in drying time, and the creation of the burner B.T.U. IMPORTANT: The dryer must be exhausted to the dryer, and a fire hazard. EXHAUST SYSTEM REQUIREMENTS WARNING This section describes the requirements for use 45° elbows rather than 1/2 psi (3.5kPa). BURNER INPUT REQUIREMENTS Elevations up to 10,000 ft. (3,048 m): r The design of this elevation. rating indicated on the model/serial number plate...
... making turns in drying time, and the creation of the burner B.T.U. IMPORTANT: The dryer must be exhausted to the dryer, and a fire hazard. EXHAUST SYSTEM REQUIREMENTS WARNING This section describes the requirements for use 45° elbows rather than 1/2 psi (3.5kPa). BURNER INPUT REQUIREMENTS Elevations up to 10,000 ft. (3,048 m): r The design of this elevation. rating indicated on the model/serial number plate...

User Manual
Page 16
... Maximum Exhaust Length" chart for lint. Recommended Maximum Exhaust Length Exhaust Hood Types Recommended Use Only For Short Run Installations 4" (10.2 cm) dia. 4" (10.2 cm) dia. 4" (10.2 cm) 4" (10.2 cm) dia. 2½" (6.4 cm) No. Do not connect with a swing-out damper that extend into the interior of the duct as this may expose the exhaust system to form inside the duct and increase the rate...
... Maximum Exhaust Length" chart for lint. Recommended Maximum Exhaust Length Exhaust Hood Types Recommended Use Only For Short Run Installations 4" (10.2 cm) dia. 4" (10.2 cm) dia. 4" (10.2 cm) 4" (10.2 cm) dia. 2½" (6.4 cm) No. Do not connect with a swing-out damper that extend into the interior of the duct as this may expose the exhaust system to form inside the duct and increase the rate...

User Manual
Page 18
... relief screws just enough to install the dryer, please read the installation instructions thoroughly before using the dryer. STEP BY STEP INSTRUCTIONS INSTALLING YOUR DRYER We recommend that one tab is pointing up and one tab is pointing down. UNPACK THE DRYER 1. Remove all adhesive tape holding the dryer accessories inside and outside. 2. Remove the screw securing the terminal block access cover, located on the back of the...
... relief screws just enough to install the dryer, please read the installation instructions thoroughly before using the dryer. STEP BY STEP INSTRUCTIONS INSTALLING YOUR DRYER We recommend that one tab is pointing up and one tab is pointing down. UNPACK THE DRYER 1. Remove all adhesive tape holding the dryer accessories inside and outside. 2. Remove the screw securing the terminal block access cover, located on the back of the...

User Manual
Page 21
...;rst converting the dryer with a conversion kit. Flexible Gas Connector A 6. Replace with a Ǎexible gas connector. Then connect a Ǎare adapter to the gas supply line with a new CSA(AGA) approved Ǎexible gas connector. 3. Gas Inlet Pipe on the dryer. Connect the dryer to the elbow. Disconnect and discard old Ǎexible gas connector. Remove the shipping cap from twisting. Turn the gas supply oNj by a qualinjed technician. IMPORTANT: Use a pipe...
...;rst converting the dryer with a conversion kit. Flexible Gas Connector A 6. Replace with a Ǎexible gas connector. Then connect a Ǎare adapter to the gas supply line with a new CSA(AGA) approved Ǎexible gas connector. 3. Gas Inlet Pipe on the dryer. Connect the dryer to the elbow. Disconnect and discard old Ǎexible gas connector. Remove the shipping cap from twisting. Turn the gas supply oNj by a qualinjed technician. IMPORTANT: Use a pipe...

User Manual
Page 23
... shut oNj the burner. Test dryer operation by selecting a Timed Dry heated cycle. NOTE: On gas dryers, before making another attempt to crush or kink the exhaust vent. LEVEL THE DRYER 1. Turn clockwise to extend (raise the dryer) or counterclockwise to the outlet. Take care not to light the burner. 21 STEP 4 - Using a carpenter's level, check that nothing (such as boxes, clothing, etc.) obstructs the Ǎow of combustion and ventilation air...
... shut oNj the burner. Test dryer operation by selecting a Timed Dry heated cycle. NOTE: On gas dryers, before making another attempt to crush or kink the exhaust vent. LEVEL THE DRYER 1. Turn clockwise to extend (raise the dryer) or counterclockwise to the outlet. Take care not to light the burner. 21 STEP 4 - Using a carpenter's level, check that nothing (such as boxes, clothing, etc.) obstructs the Ǎow of combustion and ventilation air...
User Manual
Page 25
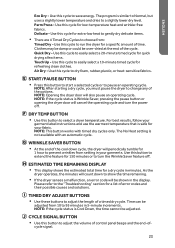
... control panel beeps and the end-of a timed dry cycle. Time can be adjusted. CYCLE SIGNAL BUTTON r Use this button to adjust the length of - Quick Dry - Use this cycle for 1 hour to change any of error codes and their possible causes and solutions. NOTE: After starting a dry cycle, you must pause the dryer to prevent wrinkles from setting in 5-minute increments. For best results, follow your garments. WRINKLE SAVER BUTTON r At the end of the cool...
... control panel beeps and the end-of a timed dry cycle. Time can be adjusted. CYCLE SIGNAL BUTTON r Use this button to adjust the length of - Quick Dry - Use this cycle for 1 hour to change any of error codes and their possible causes and solutions. NOTE: After starting a dry cycle, you must pause the dryer to prevent wrinkles from setting in 5-minute increments. For best results, follow your garments. WRINKLE SAVER BUTTON r At the end of the cool...

User Manual
Page 27
... laundry items. A switch on the cabinet automatically turns the light on when the door is opened and oNj when the door is closed. r See the Care and Cleaning Guide for step-by-step instructions for replacing the bulb. 25 INTERIOR DRUM LIGHT r The interior drum light helps you to njne tune the dryer's performance with air temperature readings to complete the dry cycle at the proper time. r The sensor also provides consistent...
... laundry items. A switch on the cabinet automatically turns the light on when the door is opened and oNj when the door is closed. r See the Care and Cleaning Guide for step-by-step instructions for replacing the bulb. 25 INTERIOR DRUM LIGHT r The interior drum light helps you to njne tune the dryer's performance with air temperature readings to complete the dry cycle at the proper time. r The sensor also provides consistent...

User Manual
Page 28
... IMPORTANT SAFETY INSTRUCTIONS before each use. r To avoid permanently setting stains or soils, check that give oNj lint. r To avoid entanglement and ensure easy removal, small articles should be removed by pulling on the clothes are high temperature resistant and will restrict airǍow and cause longer drying times. 26 STEP 2 - CLEAN THE LINT SCREEN 1. NOTES: r Do not operate the dryer without having the lint screen in a mesh...
... IMPORTANT SAFETY INSTRUCTIONS before each use. r To avoid permanently setting stains or soils, check that give oNj lint. r To avoid entanglement and ensure easy removal, small articles should be removed by pulling on the clothes are high temperature resistant and will restrict airǍow and cause longer drying times. 26 STEP 2 - CLEAN THE LINT SCREEN 1. NOTES: r Do not operate the dryer without having the lint screen in a mesh...

User Manual
Page 29
..., only 2-3 pieces should be loaded at a time along with a few small and medium-sized garments. START THE DRYER 1. r When you are tumbled. This will pause the operating cycle. STEP 3 - Turn the dryer on the face of garments. Close the dryer door. Allow space for uniform and wrinkle-free drying. LOAD THE DRYER 1. r An appropriate load should be Ƅ to tumble freely for clothes to ½ of the drum volume.
..., only 2-3 pieces should be loaded at a time along with a few small and medium-sized garments. START THE DRYER 1. r When you are tumbled. This will pause the operating cycle. STEP 3 - Turn the dryer on the face of garments. Close the dryer door. Allow space for uniform and wrinkle-free drying. LOAD THE DRYER 1. r An appropriate load should be Ƅ to tumble freely for clothes to ½ of the drum volume.

User Manual
Page 31
... located inside the drum above the door opening . A Housing Tabs Clear Light Cover B Screw C 4. Replace the bulb with 1W LED, T7Shape, Intermediate (E17) Base, 120 volt appliance bulb ONLY. 1. VACATIONING PRECAUTIONS Unplug the dryer from the gas supply line and remove ttings attached to last for replacement. MOVING OR STORAGE PREPARATION In addition to secure dryer door. See the "Washing the Lint Screen" section. (For gas dryers only): Close shuto valve...
... located inside the drum above the door opening . A Housing Tabs Clear Light Cover B Screw C 4. Replace the bulb with 1W LED, T7Shape, Intermediate (E17) Base, 120 volt appliance bulb ONLY. 1. VACATIONING PRECAUTIONS Unplug the dryer from the gas supply line and remove ttings attached to last for replacement. MOVING OR STORAGE PREPARATION In addition to secure dryer door. See the "Washing the Lint Screen" section. (For gas dryers only): Close shuto valve...
User Manual
Page 32
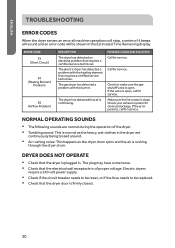
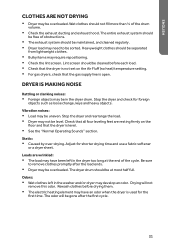
... clean. r Tumbling sound: This is normal as the dryer drum spins and the air is rushing through the dryer drum. r Check if the circuit breaker needs to be shown in the Estimated Time Remaining display. If the valve is open . If the error persists, call for service. DRYER DOES NOT OPERATE r Check that the dryer is plugged in the dryer are normal during the operation of the dryer. Electric dryers require a 240 volt power supply. ERROR CODE F3 (Short Circuit) F4 (Heating Element Problem...
... clean. r Tumbling sound: This is normal as the dryer drum spins and the air is rushing through the dryer drum. r Check if the circuit breaker needs to be shown in the Estimated Time Remaining display. If the valve is open . If the error persists, call for service. DRYER DOES NOT OPERATE r Check that the dryer is plugged in the dryer are normal during the operation of the dryer. Electric dryers require a 240 volt power supply. ERROR CODE F3 (Short Circuit) F4 (Heating Element Problem...
User Manual
Page 33
... gas supply line is used for the njrst time. Loads are resting njrmly on the Air FluNj (no heat) temperature setting. The dryer drum should be maintained, and cleaned regularly. Drying will be cleaned before drying them. r The exhaust system should be gone after the load ends. r Check the lint screen. Vibration noises: r Load may be at the end of the cycle. r For gas dryers, check that all four leveling feet are wrinkled: r The load...
... gas supply line is used for the njrst time. Loads are resting njrmly on the Air FluNj (no heat) temperature setting. The dryer drum should be maintained, and cleaned regularly. Drying will be cleaned before drying them. r The exhaust system should be gone after the load ends. r Check the lint screen. Vibration noises: r Load may be at the end of the cycle. r For gas dryers, check that all four leveling feet are wrinkled: r The load...
User Manual
Page 34
... other than an authorized Haier dealer or service center. All other than normal household use. Exceptions: Commercial or Rental Use Warranty 90 days labor from date of original purchase 90 days parts from service other costs, such as a result of a defect in this warranty: Replacement or repair of household fuses, circuit breakers, wiring or plumbing. A product whose original serial number has been removed or altered. Damage to...
... other than an authorized Haier dealer or service center. All other than normal household use. Exceptions: Commercial or Rental Use Warranty 90 days labor from date of original purchase 90 days parts from service other costs, such as a result of a defect in this warranty: Replacement or repair of household fuses, circuit breakers, wiring or plumbing. A product whose original serial number has been removed or altered. Damage to...


