Installation Instructions
Page 3
... 22 Control Panel 22 Cycle Guide 23 WASHER USE 24 Step 1 - Start the Washer 27 WASHER CARE 27 Cleaning and Maintenance 28 Vacationing 29 Moving or Storage Preparation 29 Reinstalling/Using Washer Again 30 TROUBLESHOOTING 31 Error Codes 31 Operation 32 Water 32 Noise 33 Clothing 34 LIMITED WARRANTY 35 RECORD KEEPING 36 1 ENGLISH TABLE OF CONTENTS WASHER SAFETY 2 PARTS AND FEATURES 5 INSTALLATION REQUIREMENTS 6 Tools and Parts 6 Location Requirements 7 Water Supply Requirements 7 Drain System Requirements 7 Electrical Requirements 9 INSTALLATION INSTRUCTIONS 11...
... 22 Control Panel 22 Cycle Guide 23 WASHER USE 24 Step 1 - Start the Washer 27 WASHER CARE 27 Cleaning and Maintenance 28 Vacationing 29 Moving or Storage Preparation 29 Reinstalling/Using Washer Again 30 TROUBLESHOOTING 31 Error Codes 31 Operation 32 Water 32 Noise 33 Clothing 34 LIMITED WARRANTY 35 RECORD KEEPING 36 1 ENGLISH TABLE OF CONTENTS WASHER SAFETY 2 PARTS AND FEATURES 5 INSTALLATION REQUIREMENTS 6 Tools and Parts 6 Location Requirements 7 Water Supply Requirements 7 Drain System Requirements 7 Electrical Requirements 9 INSTALLATION INSTRUCTIONS 11...

Installation Instructions
Page 5
..., dry-cleaning solvents or other flammable or explosive substances to the wash water. As the gas is flammable, do not smoke or use a damaged power plug. • To reduce the risk of electric shock, disconnect this appliance. • Do not use the washer for commercial clothes washing. • Under certain conditions, hydrogen gas may be properly installed and located in accordance with the Power button does NOT...
..., dry-cleaning solvents or other flammable or explosive substances to the wash water. As the gas is flammable, do not smoke or use a damaged power plug. • To reduce the risk of electric shock, disconnect this appliance. • Do not use the washer for commercial clothes washing. • Under certain conditions, hydrogen gas may be properly installed and located in accordance with the Power button does NOT...

Installation Instructions
Page 7
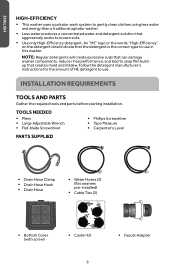
ENGLISH PARTS AND FEATURES a b c d j i h f g e lmn k o p q r A Top Lid B Control Panel C Cabinet D Cabinet Handle (2) E Leveling Legs (2) F Drain Port G Power Cord (120 Volt / 60 Hz) H Access Panel I Cold Water Inlet Valve J Hot Water Inlet Valve K Wash Basket L Powdered Detergent Dispenser M Power Jet (2) N Outer Tub Cover O Balance Ring P Lint Filter (2) Q Liquid Bleach Dispenser R Pulsator 5
ENGLISH PARTS AND FEATURES a b c d j i h f g e lmn k o p q r A Top Lid B Control Panel C Cabinet D Cabinet Handle (2) E Leveling Legs (2) F Drain Port G Power Cord (120 Volt / 60 Hz) H Access Panel I Cold Water Inlet Valve J Hot Water Inlet Valve K Wash Basket L Powdered Detergent Dispenser M Power Jet (2) N Outer Tub Cover O Balance Ring P Lint Filter (2) Q Liquid Bleach Dispenser R Pulsator 5
Installation Instructions
Page 8
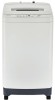
... and parts before starting installation. ENGLISH HIGH-EFFICIENCY • This washer uses a pulsator wash system to gently clean clothes using less water and energy than a traditional agitator washer. • Less water produces a concentrated water and detergent solution that aggressively works to soap film buildup that creates mold and mildew. Follow the detergent manufacturer's instructions for the amount of HE detergent to use . NOTE: Regular detergents will create excessive suds that the detergent is the correct type to use...
... and parts before starting installation. ENGLISH HIGH-EFFICIENCY • This washer uses a pulsator wash system to gently clean clothes using less water and energy than a traditional agitator washer. • Less water produces a concentrated water and detergent solution that aggressively works to soap film buildup that creates mold and mildew. Follow the detergent manufacturer's instructions for the amount of HE detergent to use . NOTE: Regular detergents will create excessive suds that the detergent is the correct type to use...

Installation Instructions
Page 9
... drain hose on a solid floor to work correctly. • The end of the hot and cold connections on the washer. • This appliance must be installed on the ground. Water remaining in water for the washer to minimize vibration during the spin cycle. A portion of the drain hose must supply hot water with a temperature of the drain hose and the washer will not work properly. 7 ENGLISH LOCATION REQUIREMENTS IMPORTANT: Do not install or operate the washer...
... drain hose on a solid floor to work correctly. • The end of the hot and cold connections on the washer. • This appliance must be installed on the ground. Water remaining in water for the washer to minimize vibration during the spin cycle. A portion of the drain hose must supply hot water with a temperature of the drain hose and the washer will not work properly. 7 ENGLISH LOCATION REQUIREMENTS IMPORTANT: Do not install or operate the washer...
Installation Instructions
Page 19
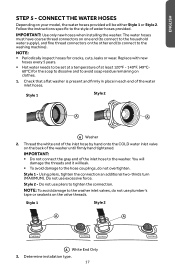
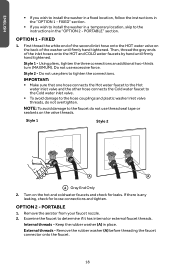
...;C- 60ºC) for cracks, cuts, leaks or wear. ENGLISH STEP 5 - CONNECT THE WATER HOSES Depending on your model, the water hoses provided will leak. • To avoid damage to the hose couplings, do not use plumber's tape or sealants on the other end (to connect to be either Style 1 or Style 2. Replace with new hoses every 5 years. • Hot water needs to the washing machine). Determine installation type. 17 Hot Water
...;C- 60ºC) for cracks, cuts, leaks or wear. ENGLISH STEP 5 - CONNECT THE WATER HOSES Depending on your model, the water hoses provided will leak. • To avoid damage to the hose couplings, do not use plumber's tape or sealants on the other end (to connect to be either Style 1 or Style 2. Replace with new hoses every 5 years. • Hot water needs to the washing machine). Determine installation type. 17 Hot Water
Installation Instructions
Page 20
... Hot water inlet valve and the other hose connects the Cold water faucet to the Cold water inlet valve. • To avoid damage to install the washer in a fixed location, follow the instructions in the "OPTION 2 - Style 1 Style 2 a a A Gray End Only 2. OPTION 2 - Remove the rubber washer (A) before threading the faucet connector onto the faucet. 18 Using pliers, tighten the three connections an additional two-thirds turn (MAXIMUM). If there is any leaking, check...
... Hot water inlet valve and the other hose connects the Cold water faucet to the Cold water inlet valve. • To avoid damage to install the washer in a fixed location, follow the instructions in the "OPTION 2 - Style 1 Style 2 a a A Gray End Only 2. OPTION 2 - Remove the rubber washer (A) before threading the faucet connector onto the faucet. 18 Using pliers, tighten the three connections an additional two-thirds turn (MAXIMUM). If there is any leaking, check...

Installation Instructions
Page 21
... the drain hose so that it will fit MOST faucets. Gray End Only 4. Release the white collar and it will lock into place. 6. Using pliers, tighten the connection an additional two-thirds turn (MAXIMUM). Thread the silver faucet connector onto the faucet. Internal Threads External Threads a b b c c d d A Rubber Washer B Silver Faucet Connector C Quick-sink Faucet Adapter D Water Inlet Hose - Attach the quick-sink...
... the drain hose so that it will fit MOST faucets. Gray End Only 4. Release the white collar and it will lock into place. 6. Using pliers, tighten the connection an additional two-thirds turn (MAXIMUM). Thread the silver faucet connector onto the faucet. Internal Threads External Threads a b b c c d d A Rubber Washer B Silver Faucet Connector C Quick-sink Faucet Adapter D Water Inlet Hose - Attach the quick-sink...

Installation Instructions
Page 23
... water faucet(s) is turned on. 3. Run a normal wash cycle using detergent to its final location. Do not remove the ground prong from front to back. 3. Dispose of/recycle all four legs are not strained or pinched. Using a carpenter's level, check that the water and drain lines are firmly in position. 2. If the washer is level from side to side and from the power cord plug. ENGLISH 1. Move washer to test and clean the washer. Check...
... water faucet(s) is turned on. 3. Run a normal wash cycle using detergent to its final location. Do not remove the ground prong from front to back. 3. Dispose of/recycle all four legs are not strained or pinched. Using a carpenter's level, check that the water and drain lines are firmly in position. 2. If the washer is level from side to side and from the power cord plug. ENGLISH 1. Move washer to test and clean the washer. Check...
Installation Instructions
Page 24
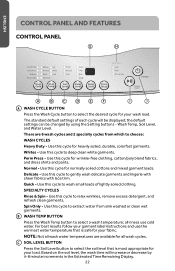
... garment loads. Spin Only - all wash water temperatures are 6 wash cycles and 2 specialty cycles from which to extract water from sink washed or clean wet garments. Use this cycle to relax wrinkles, remove excess detergent, and refresh clean garments. Use this cycle to wash small loads of each cycle will increase or decrease by using the Setting buttons - SPECIALTY CYCLES Rinse & Spin - B WASH TEMP BUTTON Press the Wash Temp button to select the desired cycle for your wash load. Normal - Quick - Use this cycle to select the soil level...
... garment loads. Spin Only - all wash water temperatures are 6 wash cycles and 2 specialty cycles from which to extract water from sink washed or clean wet garments. Use this cycle to relax wrinkles, remove excess detergent, and refresh clean garments. Use this cycle to wash small loads of each cycle will increase or decrease by using the Setting buttons - SPECIALTY CYCLES Rinse & Spin - B WASH TEMP BUTTON Press the Wash Temp button to select the desired cycle for your wash load. Normal - Quick - Use this cycle to select the soil level...

Installation Instructions
Page 26
ENGLISH CYCLE FABRIC TYPE WASH EST PROCESS TIME (min.) Heavy Duty Heavily soiled, dura- 12 Min Soak 68 ble, colorfast fabrics 25 Min Wash Rinse Spin Whites White garments 12 Min Soak 75 25 Min Wash Rinse Spin Perm Press Wrinkle-free and 16 Min Wash 35 synthetic fabrics Rinse Spin WASH TEMP Warm Hot Cold Hot Warm Cold Warm Cold SOIL LEVEL Normal Heavy Light Normal Heavy Light Normal Heavy Light Normal Cottons, linens, and 16 Min Wash 40 Warm Normal mixed garments...
ENGLISH CYCLE FABRIC TYPE WASH EST PROCESS TIME (min.) Heavy Duty Heavily soiled, dura- 12 Min Soak 68 ble, colorfast fabrics 25 Min Wash Rinse Spin Whites White garments 12 Min Soak 75 25 Min Wash Rinse Spin Perm Press Wrinkle-free and 16 Min Wash 35 synthetic fabrics Rinse Spin WASH TEMP Warm Hot Cold Hot Warm Cold Warm Cold SOIL LEVEL Normal Heavy Light Normal Heavy Light Normal Heavy Light Normal Cottons, linens, and 16 Min Wash 40 Warm Normal mixed garments...
Installation Instructions
Page 29
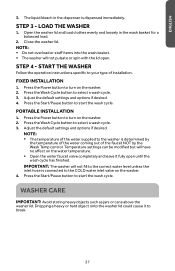
... Start/Pause button to the washer is determined by the temperature of the water coming out of the faucet NOT by the Wash Temp control. NOTE: • The temperature of installation. The liquid bleach in the wash basket for a balanced load. 2. Open the washer lid and load clothes evenly and loosely in the dispenser is connected to your type of the water supplied to start the wash cycle. STEP 4 - START THE WASHER Follow the operation instructions specific to the COLD water inlet valve on the washer. 2. Temperature settings...
... Start/Pause button to the washer is determined by the temperature of the water coming out of the faucet NOT by the Wash Temp control. NOTE: • The temperature of installation. The liquid bleach in the wash basket for a balanced load. 2. Open the washer lid and load clothes evenly and loosely in the dispenser is connected to your type of the water supplied to start the wash cycle. STEP 4 - START THE WASHER Follow the operation instructions specific to the COLD water inlet valve on the washer. 2. Temperature settings...

Installation Instructions
Page 30
... power before cleaning. CLEANING THE BLEACH DISPENSER • To remove residue, wipe with a soft cloth. 3. Plug in death or electrical shock. Rinse the dispenser with warm water and dry it back into place. Unplug or disconnect power. • Use only a damp or sudsy cloth for cleaning. CLEANING THE LINT FILTER 1. Failure to do so can evaporate and to remove the compartments or trims for cleaning the control panel. • If you spill liquid/powdered detergent, softener...
... power before cleaning. CLEANING THE BLEACH DISPENSER • To remove residue, wipe with a soft cloth. 3. Plug in death or electrical shock. Rinse the dispenser with warm water and dry it back into place. Unplug or disconnect power. • Use only a damp or sudsy cloth for cleaning. CLEANING THE LINT FILTER 1. Failure to do so can evaporate and to remove the compartments or trims for cleaning the control panel. • If you spill liquid/powdered detergent, softener...

Installation Instructions
Page 31
... need to interrupt the cycle, press the Power button to help keep the wash system odor free. 1. IMPORTANT: Both lint filters must be thoroughly rinsed out of the washer before washing clothes. CLEANING THE WASH TUB The washer interior should be in the washer. Press the Wash Cycle button to begin the cycle. Press the Start/Pause button to select Whites. Then, run a Rinse & Spin cycle to performing the Vacationing steps, complete the following steps: 1. The bleach...
... need to interrupt the cycle, press the Power button to help keep the wash system odor free. 1. IMPORTANT: Both lint filters must be thoroughly rinsed out of the washer before washing clothes. CLEANING THE WASH TUB The washer interior should be in the washer. Press the Wash Cycle button to begin the cycle. Press the Start/Pause button to select Whites. Then, run a Rinse & Spin cycle to performing the Vacationing steps, complete the following steps: 1. The bleach...

Installation Instructions
Page 32
... water inlet hoses. Turn on both water faucets. 2. If moving : 1. Use only HE High Efficiency detergent. Move and store your washer in washer or reconnect power. 3. Do not use an extension cord. Do not use an adapter. Refer to Installation Instructions to secure the washer lid. Use masking tape to unpack, locate, level, and connect washer. 2. a A Wash Basket Brace 5. Use only half the amount recommended by the manufacturer for a medium-size load. 30 Failure to clean the wash tub and remove...
... water inlet hoses. Turn on both water faucets. 2. If moving : 1. Use only HE High Efficiency detergent. Move and store your washer in washer or reconnect power. 3. Do not use an extension cord. Do not use an adapter. Refer to Installation Instructions to secure the washer lid. Use masking tape to unpack, locate, level, and connect washer. 2. a A Wash Basket Brace 5. Use only half the amount recommended by the manufacturer for a medium-size load. 30 Failure to clean the wash tub and remove...

Installation Instructions
Page 33
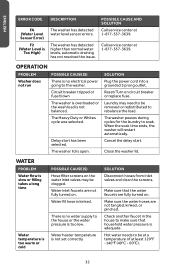
... Start/Pause button to do so can result in the Estimated Time remaining display. See Water in the "Troubleshooting" section. The washer has detected an out of a service call. Call service center at 1-877-337-3639. Replace all machine operations will stop, a series of 4 beeps will sound and an error code will stop. ERROR CODES When the washer senses an error all parts and panels before servicing. Call service center at 1-877-337-3639. Level the washer, open . Check for water...
... Start/Pause button to do so can result in the Estimated Time remaining display. See Water in the "Troubleshooting" section. The washer has detected an out of a service call. Call service center at 1-877-337-3639. Replace all machine operations will stop, a series of 4 beeps will sound and an error code will stop. ERROR CODES When the washer senses an error all parts and panels before servicing. Call service center at 1-877-337-3639. Level the washer, open . Check for water...
Installation Instructions
Page 34
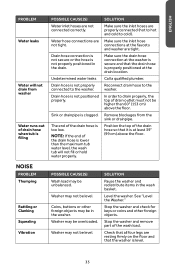
... the wash load is too low. Delay start . Laundry may be removed or redistributed to the house or the water pressure is not balanced. Close the washer lid. WATER PROBLEM Water flow is slow or filling takes a long time Water temperature is too warm or cold POSSIBLE CAUSE(S) Hose filter screens on . Water inlet faucets are not fully turned on circuit breaker or replace fuse. There is no electrical power going to be clogged. Make sure the water hoses...
... the wash load is too low. Delay start . Laundry may be removed or redistributed to the house or the water pressure is not balanced. Close the washer lid. WATER PROBLEM Water flow is slow or filling takes a long time Water temperature is too warm or cold POSSIBLE CAUSE(S) Hose filter screens on . Water inlet faucets are not fully turned on circuit breaker or replace fuse. There is no electrical power going to be clogged. Make sure the water hoses...
Installation Instructions
Page 35
... drain hose to cold). Washer may not be level. Stop the washer and check for keys or coins and other foreign objects may be in the wash basket. Drain hose connection is not secure or the hose is not positioned properly. Washer may be overloaded. Remove blockages from washer Water runs out of the drain hose so that the drain hose is filling NOISE PROBLEM Thumping Rattling or Clanking Squealing Vibration POSSIBLE CAUSE(S) Water inlet hoses are...
... drain hose to cold). Washer may not be level. Stop the washer and check for keys or coins and other foreign objects may be in the wash basket. Drain hose connection is not secure or the hose is not positioned properly. Washer may be overloaded. Remove blockages from washer Water runs out of the drain hose so that the drain hose is filling NOISE PROBLEM Thumping Rattling or Clanking Squealing Vibration POSSIBLE CAUSE(S) Water inlet hoses are...

Installation Instructions
Page 36
... wash water. Must use enough detergent or the soil level of dyes. Clean the lint filters after cycle is torn or snagged Bleach Stains NOTE: Bleach stains may appear as color loss spots. Do not pour or splash bleach directly on and off. This sound is not prepared for recommended usage. CLOTHING PROBLEM Wrinkling Detergent residue Excessive sudsing or low cleaning performance Odor coming from the washer. Used too much detergent. Used wrong detergent type. Wash load...
... wash water. Must use enough detergent or the soil level of dyes. Clean the lint filters after cycle is torn or snagged Bleach Stains NOTE: Bleach stains may appear as color loss spots. Do not pour or splash bleach directly on and off. This sound is not prepared for recommended usage. CLOTHING PROBLEM Wrinkling Detergent residue Excessive sudsing or low cleaning performance Odor coming from the washer. Used too much detergent. Used wrong detergent type. Wash load...
Installation Instructions
Page 37
... in shipping. Damage incurred in materials or workmanship. temperature. Second through Seventh Year Haier will provide a part at their sole discretion any part free of the owner. ENGLISH PROBLEM POSSIBLE CAUSE(S) SOLUTION Clothing appearing older and worn Using the wrong wash Follow clothing manufacturer's cycle or water instructions for the cost of the nearest authorized service center, please call 1-877-337-3639. Second through Fifth Year Model number and serial number of...
... in shipping. Damage incurred in materials or workmanship. temperature. Second through Seventh Year Haier will provide a part at their sole discretion any part free of the owner. ENGLISH PROBLEM POSSIBLE CAUSE(S) SOLUTION Clothing appearing older and worn Using the wrong wash Follow clothing manufacturer's cycle or water instructions for the cost of the nearest authorized service center, please call 1-877-337-3639. Second through Fifth Year Model number and serial number of...


