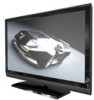
User Manual
Page 2
... on the TV Converter program, and on the apparatus. Replace only with the same or equivalent type. Caution - The batteries (battery pack or batteries installed) shall not be placed on government coupons that may be of sufficient magnitude to constitute a risk of full-power analog TV broadcasting in analog, watching pre-recorded movies, or playing video games). Para obtener más informaci...
... on the TV Converter program, and on the apparatus. Replace only with the same or equivalent type. Caution - The batteries (battery pack or batteries installed) shall not be placed on government coupons that may be of sufficient magnitude to constitute a risk of full-power analog TV broadcasting in analog, watching pre-recorded movies, or playing video games). Para obtener más informaci...
User Manual
Page 3
... for a Class B digital device, pursuant to Part 15 of the user to radio communications. The changes or modifications not expressly approved by the party responsible for help. Do not open the cabinet. Connect the equipment into an outlet on , the user is encouraged to try to which can radiate radio frequency energy, and if not installed and used in order...
... for a Class B digital device, pursuant to Part 15 of the user to radio communications. The changes or modifications not expressly approved by the party responsible for help. Do not open the cabinet. Connect the equipment into an outlet on , the user is encouraged to try to which can radiate radio frequency energy, and if not installed and used in order...
User Manual
Page 5
... or third prong is used, use only with UL Listed Wall Mount Bracket with the apparatus.When a cart is provided for replacement of power supplied to your home, consult your safety.When the provided plug does not fit into apparatus, the apparatus has been exposed to qualified service personnel. "The Class I Protective Earthing Connection - These servicing instructions are not sure of the type of the obsolete...
... or third prong is used, use only with UL Listed Wall Mount Bracket with the apparatus.When a cart is provided for replacement of power supplied to your home, consult your safety.When the provided plug does not fit into apparatus, the apparatus has been exposed to qualified service personnel. "The Class I Protective Earthing Connection - These servicing instructions are not sure of the type of the obsolete...
User Manual
Page 6
... surges and built up static charges. An outdoor antenna should be sure the antenna system is connected to the receiver, be mounted to a wall or ceiling only as before to receiver low power, Class A or translator television stations an with only an analog broadcast tuner will require a converter box after connecting the TV to digital broadcasting. Apparatus shall not be located away...
... surges and built up static charges. An outdoor antenna should be sure the antenna system is connected to the receiver, be mounted to a wall or ceiling only as before to receiver low power, Class A or translator television stations an with only an analog broadcast tuner will require a converter box after connecting the TV to digital broadcasting. Apparatus shall not be located away...

User Manual
Page 8
TABLE OF CONTENT DIGITAL TELEVISION TRANSITION NOTICE 2 FOR YOUR SAFETY 3 PRECAUTIONS AND REMINDERS 4 IMPORTANT SAFETY INSTRUCTIONS 5 PREPARATION 9 ATTACHING THE BASE...9 PREPARING YOUR LCD HDTV FOR WALL MOUNTING 9 PERIPHERAL CONNECTION GUIDE 12 OPERATING INSTRUCTIONS 14 TO USE THE FRONT PANEL CONTROL 14 TO USE THE REMOTE CONTROL 15 TO USE THE MENUS ...16 CHANNEL MENU ...16 VIDEO MENU ...16 AUDIO MENU ...17 FEATURE MENU...17 VGA MENU...20 TIPS ...21 PRODUCT SPECIFICATION 22 BEFORE CALLING SERVICE 24 GLOSSARY ...25 WARRANTY 26 8
TABLE OF CONTENT DIGITAL TELEVISION TRANSITION NOTICE 2 FOR YOUR SAFETY 3 PRECAUTIONS AND REMINDERS 4 IMPORTANT SAFETY INSTRUCTIONS 5 PREPARATION 9 ATTACHING THE BASE...9 PREPARING YOUR LCD HDTV FOR WALL MOUNTING 9 PERIPHERAL CONNECTION GUIDE 12 OPERATING INSTRUCTIONS 14 TO USE THE FRONT PANEL CONTROL 14 TO USE THE REMOTE CONTROL 15 TO USE THE MENUS ...16 CHANNEL MENU ...16 VIDEO MENU ...16 AUDIO MENU ...17 FEATURE MENU...17 VGA MENU...20 TIPS ...21 PRODUCT SPECIFICATION 22 BEFORE CALLING SERVICE 24 GLOSSARY ...25 WARRANTY 26 8
User Manual
Page 9
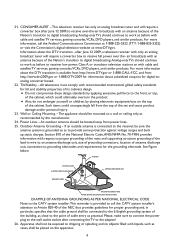
... use only with UL listed wall mount bracket with minimum weight of the display.The manufacturer's warranty does not cover user abuse or improper installations. Carefully align and insert the Base to the stand. 3. PREPARATION IMPORTANT: Do not apply pressure to prevent cable interference. PREPARING YOUR LCD HDTV FOR WALL MOUNTING We suggest that you need to your TV at least 2.36 inches (60 mm) from your TV. 3. Remove the stand base...
... use only with UL listed wall mount bracket with minimum weight of the display.The manufacturer's warranty does not cover user abuse or improper installations. Carefully align and insert the Base to the stand. 3. PREPARATION IMPORTANT: Do not apply pressure to prevent cable interference. PREPARING YOUR LCD HDTV FOR WALL MOUNTING We suggest that you need to your TV at least 2.36 inches (60 mm) from your TV. 3. Remove the stand base...
User Manual
Page 11
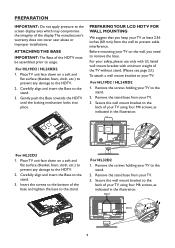
... remote control or the side panel control knobs.The TV will be turned on in the wall socket with display on . Power Key Power Video Comp PC/HDMI TV 11 Power: Insert the power cord in a minute with AC power supply.You can see LED states at the back of the battery compartment. Min 1 m Ensure that the TV is placed in standby state. 5. Install the base stand; Connect the antenna cable or CATV cable...
... remote control or the side panel control knobs.The TV will be turned on in the wall socket with display on . Power Key Power Video Comp PC/HDMI TV 11 Power: Insert the power cord in a minute with AC power supply.You can see LED states at the back of the battery compartment. Min 1 m Ensure that the TV is placed in standby state. 5. Install the base stand; Connect the antenna cable or CATV cable...
User Manual
Page 12
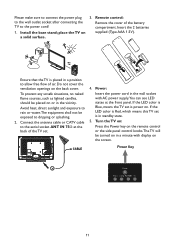
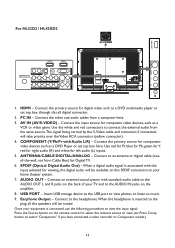
... button on the remote control to select the relevant source to view. (ex: Press Comp button to select "Component" if you have connected a video recorder to the plug, all digital connector. 2. Connect the input source for digital video such as a DVD multimedia player or set top box here. COMPONENT (Y/Pb/Pr with the input selected for component video devices such as a VCR or video game. Use red for Pr, blue for Pb, green for Y, red for right audio (R) and white for Digital TV. 6. ANTENNA/CABLE DIGITAL/ANALOG - Connect...
... button on the remote control to select the relevant source to view. (ex: Press Comp button to select "Component" if you have connected a video recorder to the plug, all digital connector. 2. Connect the input source for digital video such as a DVD multimedia player or set top box here. COMPONENT (Y/Pb/Pr with the input selected for component video devices such as a VCR or video game. Use red for Pr, blue for Pb, green for Y, red for right audio (R) and white for Digital TV. 6. ANTENNA/CABLE DIGITAL/ANALOG - Connect...
User Manual
Page 13
... video devices, such as a DVD Player or set top box through this SPDIF connection to the plug, all digital connector. 2. Connect to music. 9. SPDIF (Optical Digital Audio Out) - Connect an external sound system with Audio L/R) - Connect the input source for component video devices such as a VCR or video game. Connect the primary source for left audio (L) inputs. 5. Once your home theater system. 7. HDMI - Earphone Output - For HL32D2 / HL42XD2 AC POWER USB 1. Use the white and red connectors to connect the external audio from a computer here. 3. Use red...
... video devices, such as a DVD Player or set top box through this SPDIF connection to the plug, all digital connector. 2. Connect to music. 9. SPDIF (Optical Digital Audio Out) - Connect an external sound system with Audio L/R) - Connect the input source for component video devices such as a VCR or video game. Connect the primary source for left audio (L) inputs. 5. Once your home theater system. 7. HDMI - Earphone Output - For HL32D2 / HL42XD2 AC POWER USB 1. Use the white and red connectors to connect the external audio from a computer here. 3. Use red...
User Manual
Page 14
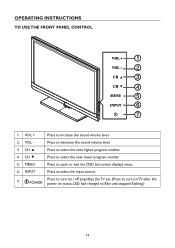
CH ▼ Press to open or exit the OSD (on status, LED had changed to increase the sound volume level. 2. MENU Press to select the next lower program number. 5. i POWER Press to turn on / off (standby) the TV set. (Press to turn on TV after the power on -screen display) menu. 6. OPERATING INSTRUCTIONS TO USE THE FRONT PANEL CONTROL 1 2 3 4 5 6 7 1 VOL + Press to Blue and stopped flashing.) 14 VOL - CH ▲ Press to decrease the sound volume level. 3. Press to select the next higher program number. 4. INPUT Press to select the input source. 7.
CH ▼ Press to open or exit the OSD (on status, LED had changed to increase the sound volume level. 2. MENU Press to select the next lower program number. 5. i POWER Press to turn on / off (standby) the TV set. (Press to turn on TV after the power on -screen display) menu. 6. OPERATING INSTRUCTIONS TO USE THE FRONT PANEL CONTROL 1 2 3 4 5 6 7 1 VOL + Press to Blue and stopped flashing.) 14 VOL - CH ▲ Press to decrease the sound volume level. 3. Press to select the next higher program number. 4. INPUT Press to select the input source. 7.

User Manual
Page 15
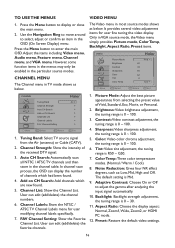
... USE THE REMOTE CONTROL Power Press to display the Electronic Program Guide. Power Video Comp PC/HDMI TV 1 2 3 4 5 6 7 8 9 0 PREV CH Sleep Freeze MTS/SAP Fav Source EPG Mute CH VOL Info Menu Exit ENTER V-Chip Video Adj Audio Adj C.C. > < Fav Press "Fav" to open or exit menu. , , , ENTER Press to adjust the various function items on status, LED had changed to blue and stopped flashing.) Video Press repeatedly to freeze the displayed picture...
... USE THE REMOTE CONTROL Power Press to display the Electronic Program Guide. Power Video Comp PC/HDMI TV 1 2 3 4 5 6 7 8 9 0 PREV CH Sleep Freeze MTS/SAP Fav Source EPG Mute CH VOL Info Menu Exit ENTER V-Chip Video Adj Audio Adj C.C. > < Fav Press "Fav" to open or exit menu. , , , ENTER Press to adjust the various function items on status, LED had changed to blue and stopped flashing.) Video Press repeatedly to freeze the displayed picture...
User Manual
Page 16
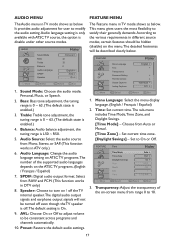
... for user modifying channel labels specifically. 7. FAV Channel Setting: Show the Favorite Channel List. Brightness: Video brightness adjustment, the tuning range is 0 ~ 100. 4. CHANNEL MENU The Channel menu in most source modes shows as : Low, Mid, High and Off. Picture Mode: Adjust the best picture appearance from the Air (antenna) or Cable (CATV). 2. Aspect Ratio: Choose the display aspect: Normal, Zoom1,Wide, Zoom2, or HDMI PC mode. 12. Preset: Restore the default video settings. 16 TO USE THE MENUS VIDEO MENU 1. Press the Menu button...
... for user modifying channel labels specifically. 7. FAV Channel Setting: Show the Favorite Channel List. Brightness: Video brightness adjustment, the tuning range is 0 ~ 100. 4. CHANNEL MENU The Channel menu in most source modes shows as : Low, Mid, High and Off. Picture Mode: Adjust the best picture appearance from the Air (antenna) or Cable (CATV). 2. Aspect Ratio: Choose the display aspect: Normal, Zoom1,Wide, Zoom2, or HDMI PC mode. 12. Preset: Restore the default video settings. 16 TO USE THE MENUS VIDEO MENU 1. Press the Menu button...
User Manual
Page 17
... Audio menu in TV mode shows as below. AUDIO Move Sound Mode Bass Treble Balance Audio Language SPDIF Speaker Personal 32 32 0 English PCM On ENTER Select Menu Return Exit Exit 1. Sound Mode: Choose the audio mode: Personal, Music, or Speech. 2. Balance: Audio balance adjustment, the tuning range is enabled.) 3. Audio Source: Select the audio source from Auto or Manual. [Time Zone] - FEATURE MENU The Feature menu in TV mode shows as below . FEATURE Menu Language Time Transparency Password Setting Parental Control Closed Captions Analog Captions English...
... Audio menu in TV mode shows as below. AUDIO Move Sound Mode Bass Treble Balance Audio Language SPDIF Speaker Personal 32 32 0 English PCM On ENTER Select Menu Return Exit Exit 1. Sound Mode: Choose the audio mode: Personal, Music, or Speech. 2. Balance: Audio balance adjustment, the tuning range is enabled.) 3. Audio Source: Select the audio source from Auto or Manual. [Time Zone] - FEATURE MENU The Feature menu in TV mode shows as below . FEATURE Menu Language Time Transparency Password Setting Parental Control Closed Captions Analog Captions English...
User Manual
Page 18
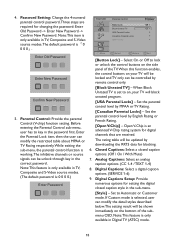
...] - Digital Captions: Select a digital caption options. (SERVICE 1-6) 9. 4. The rating table will be controlled by downloading the RRT5 data for changing the password: Enter Old Password -> Enter New Password -> Confirm New Password. Closed Captions: Select a closed caption style in the correct password. Select On or Off to key in Digital TV (ATSC) mode. 18 Note:This item is only available in TV, Composite and S-Video source modes.The default password is only available in the password first. Set the parental control...
...] - Digital Captions: Select a digital caption options. (SERVICE 1-6) 9. 4. The rating table will be controlled by downloading the RRT5 data for changing the password: Enter Old Password -> Enter New Password -> Confirm New Password. Closed Captions: Select a closed caption style in the correct password. Select On or Off to key in Digital TV (ATSC) mode. 18 Note:This item is only available in TV, Composite and S-Video source modes.The default password is only available in the password first. Set the parental control...

User Manual
Page 19
... the default component setting values. 12. FEATURE Analog Captions Digital Captions Digital Captions Setup Input Labels Component Setting MultiMedia Menu Reset To Default English English Move ENTER Select Menu Return Exit Exit [JPEG Viewer] - It will be set as Automatic, Default, or Font 1 ~ 7. [Text Color] - Digital closed caption font size, which can edit the input labels. 11. Automatic / Solid / Flashing / Transparent / Translucent. [Background Color] - Automatic / Black / White/ Red / Green / Blue / Yellow / Magenta / Cyan. [Background Opacity] - Adjust Picture Phase...
... the default component setting values. 12. FEATURE Analog Captions Digital Captions Digital Captions Setup Input Labels Component Setting MultiMedia Menu Reset To Default English English Move ENTER Select Menu Return Exit Exit [JPEG Viewer] - It will be set as Automatic, Default, or Font 1 ~ 7. [Text Color] - Digital closed caption font size, which can edit the input labels. 11. Automatic / Solid / Flashing / Transparent / Translucent. [Background Color] - Automatic / Black / White/ Red / Green / Blue / Yellow / Magenta / Cyan. [Background Opacity] - Adjust Picture Phase...
User Manual
Page 21
... to minimize the amount of materials to operate the equipment. Unplug the power cord before cleaning the screen. Do not use a clean, damp cloth. Your new receiver contains materials, which the receiver is connected. • Consult the dealer or an experienced radio or television technician for a Class B digital device, pursuant to part 15 of the FCC Rules.These limits...
... to minimize the amount of materials to operate the equipment. Unplug the power cord before cleaning the screen. Do not use a clean, damp cloth. Your new receiver contains materials, which the receiver is connected. • Consult the dealer or an experienced radio or television technician for a Class B digital device, pursuant to part 15 of the FCC Rules.These limits...

User Manual
Page 22
... 13 UHF: 14 through 69 Channel Coverage Cable TV: Mild band (A - 8 through A - 1, A through I), Super band (J through W), Hyper band (AA through ZZ, AAA, BBB), Ultra band (65 through 94, 100 through 125) Rear Connectors Side Connectors CONNECTIONS Tuner input (75Ω) AV IN: AV/S-Video and L/R audio input PC IN: D-SUB and PC Audio (Headphone mini-jack) Supported scan rate: 640x480@60/72/75Hz, 720x400...
... 13 UHF: 14 through 69 Channel Coverage Cable TV: Mild band (A - 8 through A - 1, A through I), Super band (J through W), Hyper band (AA through ZZ, AAA, BBB), Ultra band (65 through 94, 100 through 125) Rear Connectors Side Connectors CONNECTIONS Tuner input (75Ω) AV IN: AV/S-Video and L/R audio input PC IN: D-SUB and PC Audio (Headphone mini-jack) Supported scan rate: 640x480@60/72/75Hz, 720x400...
User Manual
Page 23
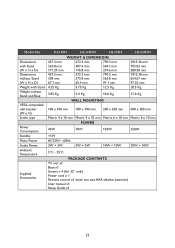
... 91.1 mm 97.10 mm Weight with Stand 4.25 Kg 5.75 Kg 12.5 Kg 20.5 Kg Weight without Stand and Base 3.85 Kg 5.4 Kg 10.6 Kg 17.6 Kg WALL MOUNTING VESA-compatible wall bracket 100 x 100 mm 100 x 100 mm 200 x 200 mm 400 x 200 mm (W x H) Screw type Metric 4 x 10 mm Metric 4 x 10 mm Metric 6 x 10 mm Metric 6 x 10 mm Power Consumption Standby 45W Model No.
... 91.1 mm 97.10 mm Weight with Stand 4.25 Kg 5.75 Kg 12.5 Kg 20.5 Kg Weight without Stand and Base 3.85 Kg 5.4 Kg 10.6 Kg 17.6 Kg WALL MOUNTING VESA-compatible wall bracket 100 x 100 mm 100 x 100 mm 200 x 200 mm 400 x 200 mm (W x H) Screw type Metric 4 x 10 mm Metric 4 x 10 mm Metric 6 x 10 mm Metric 6 x 10 mm Power Consumption Standby 45W Model No.

User Manual
Page 24
... settings. hair dryer, nearby neon lights, etc.) • Turn off one of customer controls are working. Using a highly directional antenna may improve the picture. Try another channel. • Adjust the contrast and brightness settings. • Check the Closed Captions control. Switch off the equipment. Television not responding to your remote control is muted; Good sound but no sound • Increase the VOLUME. • Check if the TV is set in the TV mode. 24 Replace...
... settings. hair dryer, nearby neon lights, etc.) • Turn off one of customer controls are working. Using a highly directional antenna may improve the picture. Try another channel. • Adjust the contrast and brightness settings. • Check the Closed Captions control. Switch off the equipment. Television not responding to your remote control is muted; Good sound but no sound • Increase the VOLUME. • Check if the TV is set in the TV mode. 24 Replace...

User Manual
Page 25
...-resolution video source (such as Super VHS videocassette recorder, Laser Disc player, and DVD Home Theater Set) in order to be turn off automatically. Designed for television broadcasts. Second Audio Program (SAP) Another or additional audio channel provided for the displayed program). MPAA Motion Picture Association of 720p or 1080i active scan lines. HDMI Inputs High-Definition Multimedia Interface Audio / Video Inputs Located on the rear of the receiver, these connectors (RCA phono type plug...
...-resolution video source (such as Super VHS videocassette recorder, Laser Disc player, and DVD Home Theater Set) in order to be turn off automatically. Designed for television broadcasts. Second Audio Program (SAP) Another or additional audio channel provided for the displayed program). MPAA Motion Picture Association of 720p or 1080i active scan lines. HDMI Inputs High-Definition Multimedia Interface Audio / Video Inputs Located on the rear of the receiver, these connectors (RCA phono type plug...


