User Manual
Page 2
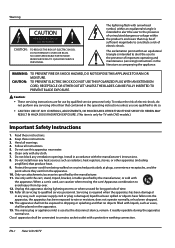
... alert the user to qualified service personnel. Install in the operating instructions unless you are for use . Do not install near water. 6. EN-1 Haier LCD HDTV NO USER SERVICEABLE PARTS INSIDE. Heed all servicing to the presence of time. 13. Servicing is only for long periods of important operating and maintenance (servicing) instructions in any ventilation openings. The exclamation point within the product's enclosure that may be connected to rain...
... alert the user to qualified service personnel. Install in the operating instructions unless you are for use . Do not install near water. 6. EN-1 Haier LCD HDTV NO USER SERVICEABLE PARTS INSIDE. Heed all servicing to the presence of time. 13. Servicing is only for long periods of important operating and maintenance (servicing) instructions in any ventilation openings. The exclamation point within the product's enclosure that may be connected to rain...
User Manual
Page 4
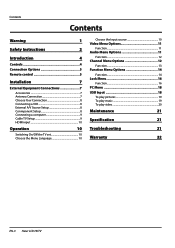
... 5 Remote control 5 Installation 7 External Equipment Connections 7 Accessories 7 Antenna Connection 7 Choose Your Connection 8 Connecting a VCR 8 External A/V Source Setup 8 Conmponent Setup 8 Connecting a computer 9 Cable TV Setup 9 HDMI input 10 Operation 10 Switching On/Off the TV set 10 Choose the Menu Language 10 Choose the Input source 10 Video Menu Options 11 Function 11 Audio Menu Options 11 Function 12 Channel Menu Options 12 Function 13 Function Menu Options 14 Function 14 Lock Menu 16 Function 16 PC Menu 18 USB Input 18 To play pictures 19 To play...
... 5 Remote control 5 Installation 7 External Equipment Connections 7 Accessories 7 Antenna Connection 7 Choose Your Connection 8 Connecting a VCR 8 External A/V Source Setup 8 Conmponent Setup 8 Connecting a computer 9 Cable TV Setup 9 HDMI input 10 Operation 10 Switching On/Off the TV set 10 Choose the Menu Language 10 Choose the Input source 10 Video Menu Options 11 Function 11 Audio Menu Options 11 Function 12 Channel Menu Options 12 Function 13 Function Menu Options 14 Function 14 Lock Menu 16 Function 16 PC Menu 18 USB Input 18 To play pictures 19 To play...
User Manual
Page 5
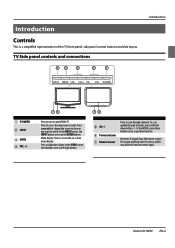
... adjust the volume. In the MENU screen these buttons serve as up/down either+/-. Press to turn on -screen menu display. Receivers IR signals from the remote control. Do not put anything near the sensor, which may block the remote control signal. VOL+ CH- Menu display. In the MENU screen, these buttons serve as left/right buttons. 5 CH+/6 Power indicator 7 Remote Sensor Press to access the input source mode. Press to scan through channels, press and hold down buttons. Haier LCD HDTV...
... adjust the volume. In the MENU screen these buttons serve as up/down either+/-. Press to turn on -screen menu display. Receivers IR signals from the remote control. Do not put anything near the sensor, which may block the remote control signal. VOL+ CH- Menu display. In the MENU screen, these buttons serve as left/right buttons. 5 CH+/6 Power indicator 7 Remote Sensor Press to access the input source mode. Press to scan through channels, press and hold down buttons. Haier LCD HDTV...
User Manual
Page 6
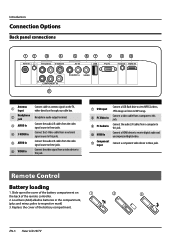
... battery compartment on the back of the battery compartment. Replace the cover of the remote controller. 2. Remote Control Battery loading 1. Headphone audio output terminal. EN-5 Haier LCD HDTV Connect the S-Video cable from a computer to receive digital audio and uncompressed digital video. Introduction Connection Options Back panel connections ATN IN R-AUDIO-L S-VIDEO IN AV IN USB PC IN PC AUDIO IN HDMI IN Pr Pb Y COMPONENT IN R-AUDIO -L VIDEO 1 Antenna Input 2 Headphone jack 3 AUDIO In 4 S-VIDEO In 5 AUDIO In 6 VIDEO In Connect cable or antenna signals to this...
... battery compartment on the back of the battery compartment. Replace the cover of the remote controller. 2. Remote Control Battery loading 1. Headphone audio output terminal. EN-5 Haier LCD HDTV Connect the S-Video cable from a computer to receive digital audio and uncompressed digital video. Introduction Connection Options Back panel connections ATN IN R-AUDIO-L S-VIDEO IN AV IN USB PC IN PC AUDIO IN HDMI IN Pr Pb Y COMPONENT IN R-AUDIO -L VIDEO 1 Antenna Input 2 Headphone jack 3 AUDIO In 4 S-VIDEO In 5 AUDIO In 6 VIDEO In Connect cable or antenna signals to this...
User Manual
Page 7
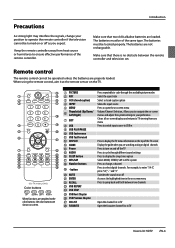
... to cycle through the available picture modes Select the aspect ratio Select a closed caption) 4 INPUT 5 MENU 6 Thumbstick (Up/Down/ Left/Right) 7 EXIT 8 USB 9 USB PLAY/PAUSE 0 USB fast reverse A USB fast forward B DISPLAY C GUIDE D Power E AUDIO F SLEEP button G MTS/SAP H Number buttons I • button J MUTE K ENTER L RECALL M USB REPEAT N USB STOP O USB Next Chapter P USB Previous Chapter Q CH.LIST R FAVORITE Press repeatedly to cycle through different sound settings Press to display the sleep timer option Select MONO, STEREO, SAP in TV Haier LCD HDTV EN-6 The batteries must...
... to cycle through the available picture modes Select the aspect ratio Select a closed caption) 4 INPUT 5 MENU 6 Thumbstick (Up/Down/ Left/Right) 7 EXIT 8 USB 9 USB PLAY/PAUSE 0 USB fast reverse A USB fast forward B DISPLAY C GUIDE D Power E AUDIO F SLEEP button G MTS/SAP H Number buttons I • button J MUTE K ENTER L RECALL M USB REPEAT N USB STOP O USB Next Chapter P USB Previous Chapter Q CH.LIST R FAVORITE Press repeatedly to cycle through different sound settings Press to display the sleep timer option Select MONO, STEREO, SAP in TV Haier LCD HDTV EN-6 The batteries must...
User Manual
Page 8
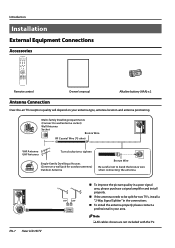
... the antenna needs to bend the bronze wire when connecting the antenna. ANT IN ANT IN EN-7 Haier LCD HDTV „„ To improve the picture quality in your antenna type, antenna location and antenna positioning. Introduction Installation External Equipment Connections Accessories TV DVD STB CABLE VCR AUD PICTURE AUDIO PC HDMI INPUT MUTE RECALL VOL MENU CH EXIT ENTER SLEEP DISPLAY USB PLAY/PAUSE STOP REC REV PREV NEXT REPEAT MTS/SAP FREEZE CH.LIST GUIDE CCD ARC FAVORITE Remote control Owner's manual Alkaline...
... the antenna needs to bend the bronze wire when connecting the antenna. ANT IN ANT IN EN-7 Haier LCD HDTV „„ To improve the picture quality in your antenna type, antenna location and antenna positioning. Introduction Installation External Equipment Connections Accessories TV DVD STB CABLE VCR AUD PICTURE AUDIO PC HDMI INPUT MUTE RECALL VOL MENU CH EXIT ENTER SLEEP DISPLAY USB PLAY/PAUSE STOP REC REV PREV NEXT REPEAT MTS/SAP FREEZE CH.LIST GUIDE CCD ARC FAVORITE Remote control Owner's manual Alkaline...
User Manual
Page 9
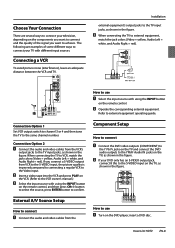
... R-AUDIO-L VIDEO Installation external equipment's output jacks to the TV input jacks, as shown in the figure. B When connecting the TV to the same channel number. button to select the source, press ENTER button to confirm. &20321(17 ,1 < 3E 3U Component Setup How to connect A Connect the DVD video outputs (COMPONENT) to the Y Pb Pr jacks on the TV and connect the DVD audio outputs to the YPbPr Audio IN jacks on the DVD player, insert a DVD disc. Haier LCD HDTV EN-8 Connection Option 1 Set VCR output switch to channel 3 or...
... R-AUDIO-L VIDEO Installation external equipment's output jacks to the TV input jacks, as shown in the figure. B When connecting the TV to the same channel number. button to select the source, press ENTER button to confirm. &20321(17 ,1 < 3E 3U Component Setup How to connect A Connect the DVD video outputs (COMPONENT) to the Y Pb Pr jacks on the TV and connect the DVD audio outputs to the YPbPr Audio IN jacks on the DVD player, insert a DVD disc. Haier LCD HDTV EN-8 Connection Option 1 Set VCR output switch to channel 3 or...
User Manual
Page 10
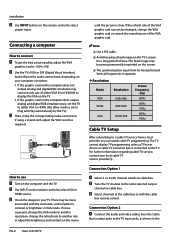
... audio and video cables from a local provider you can not be noise associated with the cable box remote control. If using a sound card, adjust the VGA sound as shown in VGA mode. C Check the image on the TV's screen for Horizontal and Vertical frequencies is connected to 1024×768. The fixed image may be changed, change the refresh rate to the TV input jacks, as required. How to use A Turn on the remote control to select proper input. C Select channels...
... audio and video cables from a local provider you can not be noise associated with the cable box remote control. If using a sound card, adjust the VGA sound as shown in VGA mode. C Check the image on the TV's screen for Horizontal and Vertical frequencies is connected to 1024×768. The fixed image may be changed, change the refresh rate to the TV input jacks, as required. How to use A Turn on the remote control to select proper input. C Select channels...

User Manual
Page 11
... will display on the TV. B Select the input source by using the TV, press POWER button on the TV. Choose the Menu Language When you start using INPUT button on the remote control or on the remote control. B Press CH+/- Refer to select Language. B Operate the corresponding external equipment. button to a Cable Box, match the jack colors (Video = yellow, Audio Left = white, and Audio Right = red). figure.When connecting the TV to select language. ( English, Spanish or French) Haier LCD HDTV EN...
... will display on the TV. B Select the input source by using the TV, press POWER button on the TV. Choose the Menu Language When you start using INPUT button on the remote control or on the remote control. B Press CH+/- Refer to select Language. B Operate the corresponding external equipment. button to a Cable Box, match the jack colors (Video = yellow, Audio Left = white, and Audio Right = red). figure.When connecting the TV to select language. ( English, Spanish or French) Haier LCD HDTV EN...
User Manual
Page 12
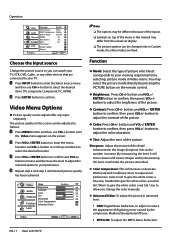
... 2 and step 3 until the Video menu appears on the remote control. button to enter the Select Source menu and then use CH+/- YY Advanced Video: To adjust the picture in Custom mode, the other devices that are fixed. Operation Video Audio Channel Function Lock Language OSD Timeout OSD Transparency Screen Mode DPMS Blue Screen DCR Time Setup Closed Caption English Short Middle Normal On On On Default Function CH+/VOL+/- A Press INPUT button to adjust the color saturation. B Press VOL+/ ENTER...
... 2 and step 3 until the Video menu appears on the remote control. button to enter the Select Source menu and then use CH+/- YY Advanced Video: To adjust the picture in Custom mode, the other devices that are fixed. Operation Video Audio Channel Function Lock Language OSD Timeout OSD Transparency Screen Mode DPMS Blue Screen DCR Time Setup Closed Caption English Short Middle Normal On On On Default Function CH+/VOL+/- A Press INPUT button to adjust the color saturation. B Press VOL+/ ENTER...
User Manual
Page 13
... the differences in a Analog channel. if the station transmits an additional sound signal as well as follows: A Press MENU button and then CH+/- Audio Menu Options Sound can be adjusted for any input as the original one. button until desired audio quality has been achieved. C Press VOL+/ ENTER button to adjust the audio output between left and right speakers. YY Speaker: To adjust the speaker on the screen. A Use the SAP button to increase or...
... the differences in a Analog channel. if the station transmits an additional sound signal as well as follows: A Press MENU button and then CH+/- Audio Menu Options Sound can be adjusted for any input as the original one. button until desired audio quality has been achieved. C Press VOL+/ ENTER button to adjust the audio output between left and right speakers. YY Speaker: To adjust the speaker on the screen. A Use the SAP button to increase or...
User Manual
Page 14
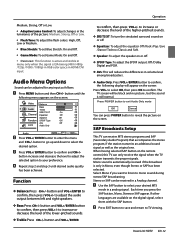
.... Video Audio Channel Tuner Mode Channel Scan Channel Skip Channel Labels Time Shifting Mode Antenna On Function Lock Channel CH+/VOL+/- button to go up and down to confirm and VOL+/- YYChannel Scan: Press VOL+/ENTER button to start to scan, press EXIT to select Antenna or Cable. EN-13 Haier LCD HDTV Operation Channel Menu Options Channel menu will be skipped next time you want to resume the channel, press ENTER button again. button increase and decrease the level to adjust the selected option...
.... Video Audio Channel Tuner Mode Channel Scan Channel Skip Channel Labels Time Shifting Mode Antenna On Function Lock Channel CH+/VOL+/- button to go up and down to confirm and VOL+/- YYChannel Scan: Press VOL+/ENTER button to start to scan, press EXIT to select Antenna or Cable. EN-13 Haier LCD HDTV Operation Channel Menu Options Channel menu will be skipped next time you want to resume the channel, press ENTER button again. button increase and decrease the level to adjust the selected option...

User Manual
Page 15
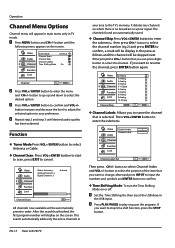
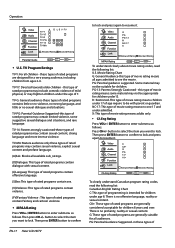
... tuner and QAM cable tuner. button to the Antenna input on the screen. button to select among Low/High and Middle to select On, the screen will store the fact of the OSD. button to change the transparency of no signal received for 2 minutes. The Time Shift feature is no signal. Video Audio Channel Function Lock Language OSD Timeout OSD Transparency Screen Mode DPMS Blue Screen DCR Time Setup Closed Caption English Short Middle Normal On On On Default...
... tuner and QAM cable tuner. button to the Antenna input on the screen. button to select among Low/High and Middle to select On, the screen will store the fact of the OSD. button to change the transparency of no signal received for 2 minutes. The Time Shift feature is no signal. Video Audio Channel Function Lock Language OSD Timeout OSD Transparency Screen Mode DPMS Blue Screen DCR Time Setup Closed Caption English Short Middle Normal On On On Default...

User Manual
Page 16
...: For program guide and other modes of information displayed by broadcasters. (This blocks a large portion of the primary language such as helping children learn how to select On or Off. button to read. Video Time Zone Date/Time Audio Sleep Timer Off Channel Function Lock Time Setup CH+/VOL+/- EN-15 Haier LCD HDTV Video Audio Analog Caption Off Digital Closed Caption Off Digital Caption Style Channel Function Lock Closed Caption CH+/- Caption Style: To display the digital closed captioning might not always be adjusted. Time:Press VOL+/- Select CC2 for...
...: For program guide and other modes of information displayed by broadcasters. (This blocks a large portion of the primary language such as helping children learn how to select On or Off. button to read. Video Time Zone Date/Time Audio Sleep Timer Off Channel Function Lock Time Setup CH+/VOL+/- EN-15 Haier LCD HDTV Video Audio Analog Caption Off Digital Closed Caption Off Digital Caption Style Channel Function Lock Closed Caption CH+/- Caption Style: To display the digital closed captioning might not always be adjusted. Time:Press VOL+/- Select CC2 for...
User Manual
Page 17
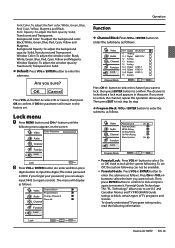
... Color: To adjust the background color: Black, White, Green, Blue, Red, Cyan, Yellow and Magenta. If OK the parameter will display as follows. Video Enter Password Audio Channel Function Lock Lock EXIT Back B Press VOL+/ ENTER button ato enter and then press digits button to the factory set Off, the system following . Then press ENTER button to confirm to lock and press again to regain control) . Parental Guide Technology: The "P.L. Font Color: To adjust...
... Color: To adjust the background color: Black, White, Green, Blue, Red, Cyan, Yellow and Magenta. If OK the parameter will display as follows. Video Enter Password Audio Channel Function Lock Lock EXIT Back B Press VOL+/ ENTER button ato enter and then press digits button to the factory set Off, the system following . Then press ENTER button to confirm to lock and press again to regain control) . Parental Guide Technology: The "P.L. Font Color: To adjust...
User Manual
Page 18
... clearly about movie rating codes, read the following list: U.S. Then press ENTER button to confirm to lock and press again to see the movie. G: These type of programming is no offensive language, nudity or sexual content. Operation Video Audio Channel Function Lock A TV-Y TV-Y7 TV-G TV-PG TV-14 TV-MA D L S V FV Allowed Rating Blocked Rating Parental Guide ENTER Set CH+/VOL+/- Movie...
... clearly about movie rating codes, read the following list: U.S. Then press ENTER button to confirm to lock and press again to see the movie. G: These type of programming is no offensive language, nudity or sexual content. Operation Video Audio Channel Function Lock A TV-Y TV-Y7 TV-G TV-PG TV-14 TV-MA D L S V FV Allowed Rating Blocked Rating Parental Guide ENTER Set CH+/VOL+/- Movie...
User Manual
Page 19
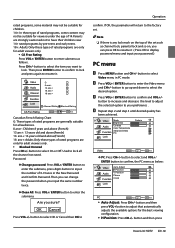
... can change the password when you sure? button to Operation confirm. OK Cancel Press VOL+/- Video Mode Brightness Custom 50 Audio Contrast Color Temperature 50 Function Advanced Video PC Lock Video ENTER Adjust CH+/VOL+/- YYClean All: Press VOL+/ ENTER button to lock. button to select the item you want to enter the submenu: Are you input the same number twice. B Press VOL+/ ENTER button to your password.) PC menu A Press MENU button...
... can change the password when you sure? button to Operation confirm. OK Cancel Press VOL+/- Video Mode Brightness Custom 50 Audio Contrast Color Temperature 50 Function Advanced Video PC Lock Video ENTER Adjust CH+/VOL+/- YYClean All: Press VOL+/ ENTER button to lock. button to select the item you want to enter the submenu: Are you input the same number twice. B Press VOL+/ ENTER button to your password.) PC menu A Press MENU button...
User Manual
Page 20
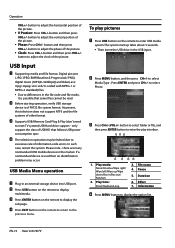
... adjust the phase of the picture. To play interface. 1. Play time: Short/Medium/Long 3. EN-19 Haier LCD HDTV button and then press VOL+/button to display multimedia. C Supports USB/Memory Card Plug & Play (don't need to select Media Type , Press ENTER and press CH+/- D The television operation may occur. In such case, restart the system. D Press EXIT button on the remote to adjust the clock of the picture. •• Clock: Press CH+/- Play mode...
... adjust the phase of the picture. To play interface. 1. Play time: Short/Medium/Long 3. EN-19 Haier LCD HDTV button and then press VOL+/button to display multimedia. C Supports USB/Memory Card Plug & Play (don't need to select Media Type , Press ENTER and press CH+/- D The television operation may occur. In such case, restart the system. D Press EXIT button on the remote to adjust the clock of the picture. •• Clock: Press CH+/- Play mode...
User Manual
Page 22
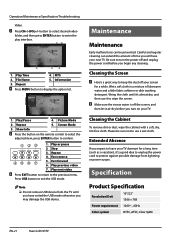
.../Specification/Troubleshooting Video. Repeat 5. Repeat 4. Play next video F Press EXIT button to return to display the option list. 1. Wet a soft cloth in a mixture of time you will have exited the USB mode otherwise you turn the power off and unplug the power cord before you may damage the USB device. Cleaning the Cabinet To remove dirt or dust, wipe the cabinet with a soft, dry, lint-free cloth. Specification Product Specification Resolution...
.../Specification/Troubleshooting Video. Repeat 5. Repeat 4. Play next video F Press EXIT button to return to display the option list. 1. Wet a soft cloth in a mixture of time you will have exited the USB mode otherwise you turn the power off and unplug the power cord before you may damage the USB device. Cleaning the Cabinet To remove dirt or dust, wipe the cabinet with a soft, dry, lint-free cloth. Specification Product Specification Resolution...
User Manual
Page 23
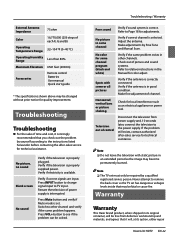
... its original container, will be free from power supply and, 10 seconds later, connect the television to relative instructions in the Manual for technical assistance. No picture, no sound Blank screen No sound Verify if the television is in other channel and verify if the same problem happens. Press INPUT button to change signal input to the instructions listed hereunder before contacting the after -sales service for some channel program (black and white) Verify if...
... its original container, will be free from power supply and, 10 seconds later, connect the television to relative instructions in the Manual for technical assistance. No picture, no sound Blank screen No sound Verify if the television is in other channel and verify if the same problem happens. Press INPUT button to change signal input to the instructions listed hereunder before contacting the after -sales service for some channel program (black and white) Verify if...


