User Manual
Page 1
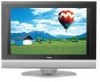
HL15B/HL15E/HL19E/HL19W/HL22E LCD TV USER MANUAL Please read this manual carefully before using this TV set and keep it for future reference.
HL15B/HL15E/HL19E/HL19W/HL22E LCD TV USER MANUAL Please read this manual carefully before using this TV set and keep it for future reference.
User Manual
Page 2
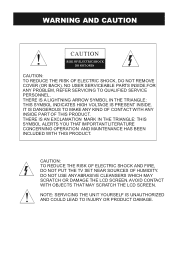
... SYMBOL IN THE TRIANGLE: THIS SYMBOL INDICATES HIGH VOLTAGE IS PRESENT INSIDE. DO NOT USE ANY ABRASIVE CLEANSERS WHICH MAY SCRATCH OR DAMAGE THE LCD SCREEN. NO USER SERVICEABLE PARTS INSIDE.FOR ANY PROBLEM, REFER SERVICING TO QUALIFIED SERVICE PERSONNEL. CAUTION: TO REDUCE THE RISK OF ELECTRIC SHOCK... AND FIRE, DO NOT PUT THE TV SET NEAR SOURCES OF HUMIDITY. WARNING AND CAUTION CAUTION ! NOTE: SERVICING THE UNIT YOURSELF IS UNAUTHORIZED AND COULD LEAD TO INJURY OR PRODUCT DAMAGE...
... SYMBOL IN THE TRIANGLE: THIS SYMBOL INDICATES HIGH VOLTAGE IS PRESENT INSIDE. DO NOT USE ANY ABRASIVE CLEANSERS WHICH MAY SCRATCH OR DAMAGE THE LCD SCREEN. NO USER SERVICEABLE PARTS INSIDE.FOR ANY PROBLEM, REFER SERVICING TO QUALIFIED SERVICE PERSONNEL. CAUTION: TO REDUCE THE RISK OF ELECTRIC SHOCK... AND FIRE, DO NOT PUT THE TV SET NEAR SOURCES OF HUMIDITY. WARNING AND CAUTION CAUTION ! NOTE: SERVICING THE UNIT YOURSELF IS UNAUTHORIZED AND COULD LEAD TO INJURY OR PRODUCT DAMAGE...
User Manual
Page 5
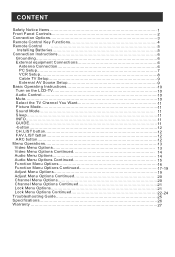
... 6 External equipment Connections 6 Antenna Connection 6 PC Setup 7 VCR Setup 8 Cable TV Setup 9 External AV Source Setup 9 Basic Operating Instructions 10 Turn on the LCD-TV 10 Audio Control 10 Mute...10 Select the TV Channel You Want 11 Picture Mode 11 Sound Mode 11 Sleep...1. 1 INFO...11 GUIDE... Continued 14 Audio Menu Options 14 Audio Menu Options Continued 15 Function Menu Options 16 Function Menu Options Continued 17-19 Adjust Menu Options 19 Adjust Menu Options Continued 20 Channel Menu Options 2. 0 Channel Menu Options Continued 21 Lock Menu Options 21 Lock...
... 6 External equipment Connections 6 Antenna Connection 6 PC Setup 7 VCR Setup 8 Cable TV Setup 9 External AV Source Setup 9 Basic Operating Instructions 10 Turn on the LCD-TV 10 Audio Control 10 Mute...10 Select the TV Channel You Want 11 Picture Mode 11 Sound Mode 11 Sleep...1. 1 INFO...11 GUIDE... Continued 14 Audio Menu Options 14 Audio Menu Options Continued 15 Function Menu Options 16 Function Menu Options Continued 17-19 Adjust Menu Options 19 Adjust Menu Options Continued 20 Channel Menu Options 2. 0 Channel Menu Options Continued 21 Lock Menu Options 21 Lock...
User Manual
Page 6
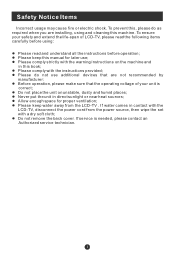
... l Please do as required when you are not recommended by manufacturer: l Before operation, please make sure that the operating voltage of LCD-TV, please read the following items carefully before using and cleaning this manual for proper ventilation; l Do not place the unit on the ... Please read and understand all the instructions before operation; l Do not remove the back cover. l Please comply strictly with the LCD-TV, disconnect the power cord from the LCD-TV . To prevent this, please do not use ; l Please keep water away from the power source, then wipe the set ...
... l Please do as required when you are not recommended by manufacturer: l Before operation, please make sure that the operating voltage of LCD-TV, please read the following items carefully before using and cleaning this manual for proper ventilation; l Do not place the unit on the ... Please read and understand all the instructions before operation; l Do not remove the back cover. l Please comply strictly with the LCD-TV, disconnect the power cord from the LCD-TV . To prevent this, please do not use ; l Please keep water away from the power source, then wipe the set ...
User Manual
Page 12
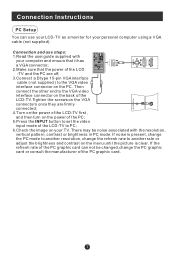
... it has a VGA connector; 2.Make sure that the power of the LCD -TV and the PC are firmly connected; 4.Turn on the power of the LCD-TV first , and then turn on the power of the PC; 5.Press ...the INPUT button to set the video input mode of the LCD-TV to PC; 6.Check the image on your personal computer using a VGA cable (not supplied). There... present, change the PC mode to another resolution, change the PC graphic card or consult the manufacturer of the LCD-TV.Tighten the screws on the VGA connectors once they are off; 3.Connect a D type 15-pin VGAinterface cable ...
... it has a VGA connector; 2.Make sure that the power of the LCD -TV and the PC are firmly connected; 4.Turn on the power of the LCD-TV first , and then turn on the power of the PC; 5.Press ...the INPUT button to set the video input mode of the LCD-TV to PC; 6.Check the image on your personal computer using a VGA cable (not supplied). There... present, change the PC mode to another resolution, change the PC graphic card or consult the manufacturer of the LCD-TV.Tighten the screws on the VGA connectors once they are off; 3.Connect a D type 15-pin VGAinterface cable ...

User Manual
Page 13
... = white,and Audio Right = red). Connect the audio and video cables from V. CR to the TV input jacks, as shown in the figure. Connection Instructions VCR Setup - To avoid picture noise (interference), ... devices and ensure that it has Composite or S-Video connectors; 2.Make sure that the power of the LCD-TV to the same channel number. Insert a video tape into the VCR and press PLAY on the VCR.... INPUT button to set the video 1 input mode of the LCD-TV and the AV device are off; and then turn on the LCD-TV first ; Connection Option 1 Set VCR output switch to 3 or 4 and...
... = white,and Audio Right = red). Connect the audio and video cables from V. CR to the TV input jacks, as shown in the figure. Connection Instructions VCR Setup - To avoid picture noise (interference), ... devices and ensure that it has Composite or S-Video connectors; 2.Make sure that the power of the LCD-TV to the same channel number. Insert a video tape into the VCR and press PLAY on the VCR.... INPUT button to set the video 1 input mode of the LCD-TV and the AV device are off; and then turn on the LCD-TV first ; Connection Option 1 Set VCR output switch to 3 or 4 and...

User Manual
Page 15
... appear on screen indicating the volume level. A mute icon appears on screen indicating the volume level. 2.Press the VOL- When the LCD-TV is turned on, the indicator light on the LCD-TV MUTE Q.VIEW INPUT INFO EXIT SAP OK P.MODE CH+ VOL - Audio Control 1.Press the VOL+ button to decrease the volume. A... red(or turns dark). CC SLEEP S.MODE GUIDE ARC CH.LIST FAV.LIST When the POWER button is pressed and the LCD-TV is turned off using the power button, the LCD-TV will appear on the screen. 2.Press the MUTE button or VOL+ again to restore the sound. The mute icon disappears....
... appear on screen indicating the volume level. A mute icon appears on screen indicating the volume level. 2.Press the VOL- When the LCD-TV is turned on, the indicator light on the LCD-TV MUTE Q.VIEW INPUT INFO EXIT SAP OK P.MODE CH+ VOL - Audio Control 1.Press the VOL+ button to decrease the volume. A... red(or turns dark). CC SLEEP S.MODE GUIDE ARC CH.LIST FAV.LIST When the POWER button is pressed and the LCD-TV is turned off using the power button, the LCD-TV will appear on the screen. 2.Press the MUTE button or VOL+ again to restore the sound. The mute icon disappears....
User Manual
Page 25
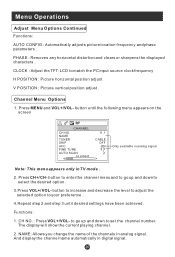
... clock frequency H POSITION : Picture horizontal position adjust V POSITION : Picture vertical position adjust . And display the channel name automatically in TV mode . 2. Press MENU and VOL+/VOL- Menu Operations Adjust Menu Options Continued Functions: AUTO CONFIG : Automatically adjusts picture location frequency... distortion and clears or sharpens the displayed characters . button until desired settings have been achieved . CLOCK : Adjust the TFT-LCD to your preference . 4.Repeat step 2 and step 3 until the following menu appears on the screen CHANNEL CH NO. CH NO....
... clock frequency H POSITION : Picture horizontal position adjust V POSITION : Picture vertical position adjust . And display the channel name automatically in TV mode . 2. Press MENU and VOL+/VOL- Menu Operations Adjust Menu Options Continued Functions: AUTO CONFIG : Automatically adjusts picture location frequency... distortion and clears or sharpens the displayed characters . button until desired settings have been achieved . CLOCK : Adjust the TFT-LCD to your preference . 4.Repeat step 2 and step 3 until the following menu appears on the screen CHANNEL CH NO. CH NO....


