User Manual
Page 1
HL15B/HL15E/HL19E/HL19W/HL22E LCD TV USER MANUAL Please read this manual carefully before using this TV set and keep it for future reference.
HL15B/HL15E/HL19E/HL19W/HL22E LCD TV USER MANUAL Please read this manual carefully before using this TV set and keep it for future reference.
User Manual
Page 2
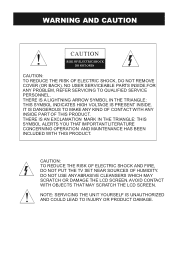
DO NOT USE ANY ABRASIVE CLEANSERS WHICH MAY SCRATCH OR DAMAGE THE LCD SCREEN. NO USER SERVICEABLE PARTS INSIDE.FOR ANY PROBLEM, REFER SERVICING TO ...REDUCE THE RISK OF ELECTRIC SHOCK, DO NOT REMOVE COVER (OR BACK). AVOID CONTACT WITH OBJECTS THAT MAY SCRATCH THE LCD SCREEN. ! WARNING AND CAUTION CAUTION ! THERE IS A LIGHTNING ARROW SYMBOL IN THE TRIANGLE: THIS SYMBOL INDICATES HIGH VOLTAGE...CAUTION: TO REDUCE THE RISK OF ELECTRIC SHOCK AND FIRE, DO NOT PUT THE TV SET NEAR SOURCES OF HUMIDITY. NOTE: SERVICING THE UNIT YOURSELF IS UNAUTHORIZED AND COULD LEAD TO INJURY OR PRODUCT ...
DO NOT USE ANY ABRASIVE CLEANSERS WHICH MAY SCRATCH OR DAMAGE THE LCD SCREEN. NO USER SERVICEABLE PARTS INSIDE.FOR ANY PROBLEM, REFER SERVICING TO ...REDUCE THE RISK OF ELECTRIC SHOCK, DO NOT REMOVE COVER (OR BACK). AVOID CONTACT WITH OBJECTS THAT MAY SCRATCH THE LCD SCREEN. ! WARNING AND CAUTION CAUTION ! THERE IS A LIGHTNING ARROW SYMBOL IN THE TRIANGLE: THIS SYMBOL INDICATES HIGH VOLTAGE...CAUTION: TO REDUCE THE RISK OF ELECTRIC SHOCK AND FIRE, DO NOT PUT THE TV SET NEAR SOURCES OF HUMIDITY. NOTE: SERVICING THE UNIT YOURSELF IS UNAUTHORIZED AND COULD LEAD TO INJURY OR PRODUCT ...
User Manual
Page 3
IMPORTANT SAFETY INSTRUCTIONS 1) Read these instructions. 2) Keep these instructions. 3) Heed all warnings. 4) Follow all instructions. 5) Do not use caution when moving the cart/apparatus combination to avoid injury from tip-over. 13) Unplug this apparatus near any way, such as radiators, heat registers, stoves, or other . When a cart is used, use this apparatus during lightning storms or when unused for replacement of time. 14) Refer all servicing to dripping or splashing and no objects filled with liquids, such as vases, shall be placed on or pinched particularly at plugs, ...
IMPORTANT SAFETY INSTRUCTIONS 1) Read these instructions. 2) Keep these instructions. 3) Heed all warnings. 4) Follow all instructions. 5) Do not use caution when moving the cart/apparatus combination to avoid injury from tip-over. 13) Unplug this apparatus near any way, such as radiators, heat registers, stoves, or other . When a cart is used, use this apparatus during lightning storms or when unused for replacement of time. 14) Refer all servicing to dripping or splashing and no objects filled with liquids, such as vases, shall be placed on or pinched particularly at plugs, ...
User Manual
Page 4
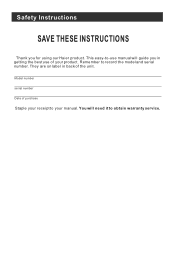
This easy-to-use of purchase Staple your receipt to record the model and serial number. You will guide you for using our Haier product. Model number serial number Date of your manual. They are on label in getting the best use manual will need it to obtain warranty service. Safety Instructions SAVE THESE INSTRUCTIONS Thank you in back of the unit. Remember to your product.
This easy-to-use of purchase Staple your receipt to record the model and serial number. You will guide you for using our Haier product. Model number serial number Date of your manual. They are on label in getting the best use manual will need it to obtain warranty service. Safety Instructions SAVE THESE INSTRUCTIONS Thank you in back of the unit. Remember to your product.
User Manual
Page 5
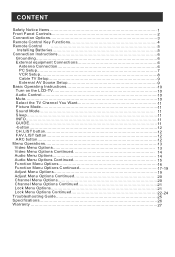
... 6 External equipment Connections 6 Antenna Connection 6 PC Setup 7 VCR Setup 8 Cable TV Setup 9 External AV Source Setup 9 Basic Operating Instructions 10 Turn on the LCD-TV 10 Audio Control 10 Mute...10 Select the TV Channel You Want 11 Picture Mode 11 Sound Mode 11 Sleep...1. 1 INFO...11 GUIDE... Continued 14 Audio Menu Options 14 Audio Menu Options Continued 15 Function Menu Options 16 Function Menu Options Continued 17-19 Adjust Menu Options 19 Adjust Menu Options Continued 20 Channel Menu Options 2. 0 Channel Menu Options Continued 21 Lock Menu Options 21 Lock...
... 6 External equipment Connections 6 Antenna Connection 6 PC Setup 7 VCR Setup 8 Cable TV Setup 9 External AV Source Setup 9 Basic Operating Instructions 10 Turn on the LCD-TV 10 Audio Control 10 Mute...10 Select the TV Channel You Want 11 Picture Mode 11 Sound Mode 11 Sleep...1. 1 INFO...11 GUIDE... Continued 14 Audio Menu Options 14 Audio Menu Options Continued 15 Function Menu Options 16 Function Menu Options Continued 17-19 Adjust Menu Options 19 Adjust Menu Options Continued 20 Channel Menu Options 2. 0 Channel Menu Options Continued 21 Lock Menu Options 21 Lock...
User Manual
Page 6
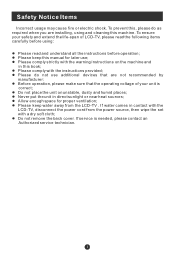
To ensure your unit is needed, please contact an Authorized service technician. l Never put the unit in contact with the LCD-TV, disconnect the power cord from the LCD-TV . l Allow enough space for later use additional devices that are installing, using : l Please read and understand all the instructions before using and cleaning this , please... when you are not recommended by manufacturer: l Before operation, please make sure that the operating voltage of your safety and extend the life-span of LCD-TV, please read the following items carefully before operation;
To ensure your unit is needed, please contact an Authorized service technician. l Never put the unit in contact with the LCD-TV, disconnect the power cord from the LCD-TV . l Allow enough space for later use additional devices that are installing, using : l Please read and understand all the instructions before using and cleaning this , please... when you are not recommended by manufacturer: l Before operation, please make sure that the operating voltage of your safety and extend the life-span of LCD-TV, please read the following items carefully before operation;
User Manual
Page 7
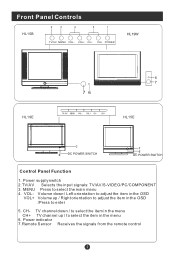
TV channel down / Left orientation to adjust the item in the OSD VOL+ Volume up / to select the item in the OSD /Press to enter 5. VOL+ CH- CH+ POWER HL19W HL19E 76 6 7 HL15E DC POWER SWITCH DC POWER SWITCH Control Panel Function 1. Power indicator 7.Remote Sensor Receives the ...signals from the remote control Volume down / to select the item in the menu CH+ TV channel up / Right orientation to select the ...
TV channel down / Left orientation to adjust the item in the OSD VOL+ Volume up / to select the item in the OSD /Press to enter 5. VOL+ CH- CH+ POWER HL19W HL19E 76 6 7 HL15E DC POWER SWITCH DC POWER SWITCH Control Panel Function 1. Power indicator 7.Remote Sensor Receives the ...signals from the remote control Volume down / to select the item in the menu CH+ TV channel up / Right orientation to select the ...

User Manual
Page 8
... Y VGA IN The above figure is for reference only, connections may differ depending upon the models Antenna Input Connect cable or antenna signals to the TV, either directly or through your cable box.
... Y VGA IN The above figure is for reference only, connections may differ depending upon the models Antenna Input Connect cable or antenna signals to the TV, either directly or through your cable box.
User Manual
Page 9
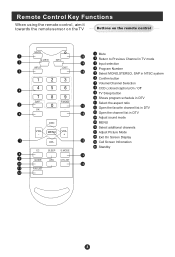
... Input selection Program Number Select MONO,STEREO, SAP in NTSC system Confirm button Volume/Channel Selection CCD ( closed caption) On / Off TV Sleep button Shows program schedule in DTV Select the aspect ratio Open the favorite channel list in DTV Open the channel list in DTV Adjust ... Exit On Screen Display Call Screen Infromation Standby Remote Control Key Functions When using the remote control, aim it towards the remote sensor on the TV Buttons on the remote control MUTE Q.VIEW INPUT INFO EXIT SAP OK P.MODE CH+ VOL -
... Input selection Program Number Select MONO,STEREO, SAP in NTSC system Confirm button Volume/Channel Selection CCD ( closed caption) On / Off TV Sleep button Shows program schedule in DTV Select the aspect ratio Open the favorite channel list in DTV Open the channel list in DTV Adjust ... Exit On Screen Display Call Screen Infromation Standby Remote Control Key Functions When using the remote control, aim it towards the remote sensor on the TV Buttons on the remote control MUTE Q.VIEW INPUT INFO EXIT SAP OK P.MODE CH+ VOL -
User Manual
Page 10
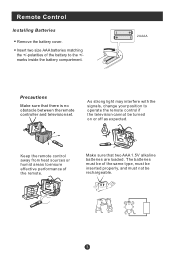
Keep the remote control away from heat sources or humid areas to ensure effective performance of the battery to operate the remote control if the television cannot be rechargeable. As strong light may interfere with the signals, change your position to the +/marks inside the battery compartment. 2XAAA Precautions Make sure that two AAA 1.5V alkaline batteries are loaded. Make sure that there is no obstacle between the remote controller and television set. Remote Control Installing Batteries ! Insert two size AAA batteries matching the +/-polarities of the remote. Remove...
Keep the remote control away from heat sources or humid areas to ensure effective performance of the battery to operate the remote control if the television cannot be rechargeable. As strong light may interfere with the signals, change your position to the +/marks inside the battery compartment. 2XAAA Precautions Make sure that two AAA 1.5V alkaline batteries are loaded. Make sure that there is no obstacle between the remote controller and television set. Remote Control Installing Batteries ! Insert two size AAA batteries matching the +/-polarities of the remote. Remove...

User Manual
Page 11
...not try to ground the unit by connecting it to prevent possible electric shock. Antenna or Cable Service with the TV To improve picture quality in the connections. Connection Instructions Grounding Ensure that you connect the grounding / earth wire to ...shown are not possible, have a qualified electrician install a separate circuit breaker. If the antenna is not installed properly, contact your dealer for two Tvs, install a 2-Way Signal Splitter in a poor signal area, purchase and install a signal amplifier. External Equipment Connections Antenna Connection - Multi-family Dwellings...
...not try to ground the unit by connecting it to prevent possible electric shock. Antenna or Cable Service with the TV To improve picture quality in the connections. Connection Instructions Grounding Ensure that you connect the grounding / earth wire to ...shown are not possible, have a qualified electrician install a separate circuit breaker. If the antenna is not installed properly, contact your dealer for two Tvs, install a 2-Way Signal Splitter in a poor signal area, purchase and install a signal amplifier. External Equipment Connections Antenna Connection - Multi-family Dwellings...
User Manual
Page 12
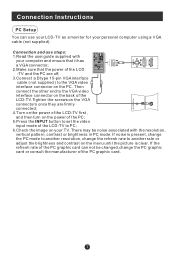
... PC Setup You can not be noise associated with your computer and ensure that it has a VGA connector; 2.Make sure that the power of the LCD-TV to PC; 6.Check the image on your personal computer using a VGA cable (not supplied). Then connect the other end to the VGA video interface connector... , and then turn on the power of the PC; 5.Press the INPUT button to set the video input mode of the LCD -TV and the PC are off; 3.Connect a D type 15-pin VGAinterface cable ( not supplied ) to another rate or adjust the brightness and contrast on the PC. ...
... PC Setup You can not be noise associated with your computer and ensure that it has a VGA connector; 2.Make sure that the power of the LCD-TV to PC; 6.Check the image on your personal computer using a VGA cable (not supplied). Then connect the other end to the VGA video interface connector... , and then turn on the power of the PC; 5.Press the INPUT button to set the video input mode of the LCD -TV and the PC are off; 3.Connect a D type 15-pin VGAinterface cable ( not supplied ) to another rate or adjust the brightness and contrast on the PC. ...

User Manual
Page 13
...VCR Setup - Connection Option 2 1. CR to the VCR owner s manual.) 3.Turn on the LCD-TV first ; and then turn on the VCR. (Refer to the S-VIDEO input, the picture quality ... AV devices and ensure that it has Composite or S-Video connectors; 2.Make sure that the power of the LCD-TV to the TV input jacks, as shown in the figure. Insert a video tape into the VCR and press PLAY on the...; 4.Press the INPUT button to set the video 1 input mode of the LCD-TV and the AV device are off; compared to the Video input. 2. cting a regular VCR to conne- When connecting ...
...VCR Setup - Connection Option 2 1. CR to the VCR owner s manual.) 3.Turn on the LCD-TV first ; and then turn on the VCR. (Refer to the S-VIDEO input, the picture quality ... AV devices and ensure that it has Composite or S-Video connectors; 2.Make sure that the power of the LCD-TV to the TV input jacks, as shown in the figure. Insert a video tape into the VCR and press PLAY on the...; 4.Press the INPUT button to set the video 1 input mode of the LCD-TV and the AV device are off; compared to the Video input. 2. cting a regular VCR to conne- When connecting ...
User Manual
Page 14
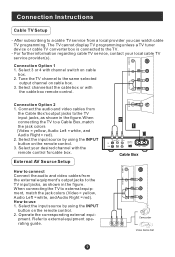
... switch on cable box. 3. Select the input source by using the INPUT button on the remote control. 2. Connection Instructions Cable TV Setup - After subscribing to a cable TV service from the external equipment's output jacks to a Cable Box, match the jack colors (Video = yellow, Audio Left = ...white, and Audio Right = red). 2. The TV cannot display TV programming unless a TV tuner device or cable TV converter box is connected to use 1. Tune the TV channel to connect Connect the audio and video cables from a local provider you can watch cable...
... switch on cable box. 3. Select the input source by using the INPUT button on the remote control. 2. Connection Instructions Cable TV Setup - After subscribing to a cable TV service from the external equipment's output jacks to a Cable Box, match the jack colors (Video = yellow, Audio Left = ...white, and Audio Right = red). 2. The TV cannot display TV programming unless a TV tuner device or cable TV converter box is connected to use 1. Tune the TV channel to connect Connect the audio and video cables from a local provider you can watch cable...

User Manual
Page 15
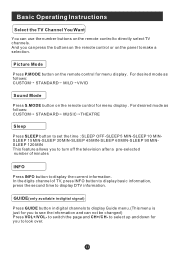
... disappears. CC SLEEP S.MODE GUIDE ARC CH.LIST FAV.LIST When the POWER button is pressed and the LCD-TV is turned off using the power button, the LCD-TV will appear on the front of the LCD-TV changes from red to green(or from dark to light). Audio Control 1.Press the VOL+ button to... increase the volume. When the LCD-TV is turned on, the indicator light on screen indicating the volume level. MENU VOL + CH- A number will appear on screen indicating the volume level. 2.Press ...
... disappears. CC SLEEP S.MODE GUIDE ARC CH.LIST FAV.LIST When the POWER button is pressed and the LCD-TV is turned off using the power button, the LCD-TV will appear on the front of the LCD-TV changes from red to green(or from dark to light). Audio Control 1.Press the VOL+ button to... increase the volume. When the LCD-TV is turned on, the indicator light on screen indicating the volume level. MENU VOL + CH- A number will appear on screen indicating the volume level. 2.Press ...
User Manual
Page 16
... on the remote control for you to see the information and can use the number buttons on the remote control for you to directly select TV channels. GUIDE(only available in digital signal) Press GUIDE button in digital channels to display Guide menu.(This menu is just for menu display . For... remote control to look over. to select up and down for menu display . And you to turn off the television after a pre-selected number of TV, press INFO button to display basic information, press the second time to switch the page and CH+/CH- Basic Operating Instructions Select the...
... on the remote control for you to see the information and can use the number buttons on the remote control for you to directly select TV channels. GUIDE(only available in digital signal) Press GUIDE button in digital channels to display Guide menu.(This menu is just for menu display . For... remote control to look over. to select up and down for menu display . And you to turn off the television after a pre-selected number of TV, press INFO button to display basic information, press the second time to switch the page and CH+/CH- Basic Operating Instructions Select the...
User Manual
Page 17
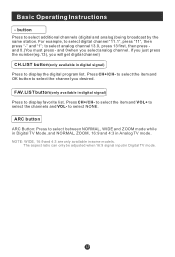
... broadcast by the same station. If you just press the number(eg.13), you will get digital channel) CH.LIST button(only available in Analog TV mode. to select the item and OK button to select digital channel "11.1", press "11", then press "-" and "1"; Basic Operating Instructions - For ...example, to select the channel you select analog channel. ARC button ARC Button: Press to select between NORMAL, WIDE and ZOOM mode while in Digital TV Mode, and NORMAL, ZOOM, 16:9 and 4:3 in digital signal) Press to display favorite list. Press CH+/CH- to select analog channel 13.0,...
... broadcast by the same station. If you just press the number(eg.13), you will get digital channel) CH.LIST button(only available in Analog TV mode. to select the item and OK button to select digital channel "11.1", press "11", then press "-" and "1"; Basic Operating Instructions - For ...example, to select the channel you select analog channel. ARC button ARC Button: Press to select between NORMAL, WIDE and ZOOM mode while in Digital TV Mode, and NORMAL, ZOOM, 16:9 and 4:3 in digital signal) Press to display favorite list. Press CH+/CH- to select analog channel 13.0,...
User Manual
Page 18
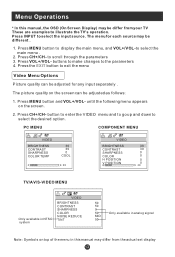
... BRIGHTNESS CONTRAST SHARPNESS COLOR TEMP 30 30 0 COOL 30 VIDEO BRIGHTNESS CONTRAST SHARPNESS COLOR H POSITION V POSITION 30 30 0 0 0 0 30 TV/AV/S-VIDEO MENU Only available in NTSC system VIDEO BRIGHTNESS CONTRAST SHARPNESS COLOR NOISE REDUCE TINT 50 50 0 50 Only available in analog signal MID... 50 Note: Symbols on the screen. 2. Menu Operations * In this manual may differ from your TV These are examples to illustrate the TV's operation. Press INPUT to select the desired option . Press the EXIT button to select the main menu . 2. Press VOL...
... BRIGHTNESS CONTRAST SHARPNESS COLOR TEMP 30 30 0 COOL 30 VIDEO BRIGHTNESS CONTRAST SHARPNESS COLOR H POSITION V POSITION 30 30 0 0 0 0 30 TV/AV/S-VIDEO MENU Only available in NTSC system VIDEO BRIGHTNESS CONTRAST SHARPNESS COLOR NOISE REDUCE TINT 50 50 0 50 Only available in analog signal MID... 50 Note: Symbols on the screen. 2. Menu Operations * In this manual may differ from your TV These are examples to illustrate the TV's operation. Press INPUT to select the desired option . Press the EXIT button to select the main menu . 2. Press VOL...
User Manual
Page 19
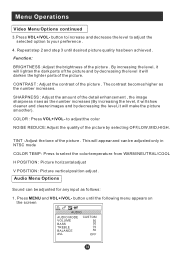
The contrast becomes higher as the number increases (By increasing the level, it will show cleaner and clearer images and by decreasing the level, it will appear and can be adjusted only in NTSC mode COLOR TEMP : Press to select the color temperature from WARM/NEUTRAL/COOL H POSITION : Picture horizontal adjust V POSITION : Picture vertical position adjust . Repeat step 2 and step 3 until the following menu appears on the screen AUDIO AUDIO MODE VOLUME BASS TREBLE BALANCE AVL CUSTOM 50 30 70 50 OFF COLOR : Press VOL+/VOL- This will make the picture smoother). SHARPNESS : ...
The contrast becomes higher as the number increases (By increasing the level, it will show cleaner and clearer images and by decreasing the level, it will appear and can be adjusted only in NTSC mode COLOR TEMP : Press to select the color temperature from WARM/NEUTRAL/COOL H POSITION : Picture horizontal adjust V POSITION : Picture vertical position adjust . Repeat step 2 and step 3 until the following menu appears on the screen AUDIO AUDIO MODE VOLUME BASS TREBLE BALANCE AVL CUSTOM 50 30 70 50 OFF COLOR : Press VOL+/VOL- This will make the picture smoother). SHARPNESS : ...
User Manual
Page 20
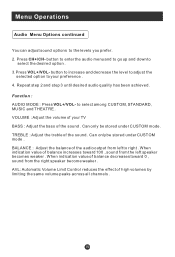
Menu Operations Audio Menu Options continued You can adjust sound options to your TV BASS : Adjust the bass of balance increases toward 0 , sound from left speaker becomes weaker . VOLUME : Adjust the volume of your preference . 4. Can only be stored ...
Menu Operations Audio Menu Options continued You can adjust sound options to your TV BASS : Adjust the bass of balance increases toward 0 , sound from left speaker becomes weaker . VOLUME : Adjust the volume of your preference . 4. Can only be stored ...