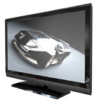
User Manual
Page 1
... a Class B digital device, pursuant to Part 15 of the user to which can radiate radio frequency energy, and if not installed and used in a particular installation. However, there is no guarantee that to correct such interference. FOR MORE INFORMATION, CONTACT THE ELECTRONIC INDUSTRIES ALLIANCE AT WWW.EIAE.ORG. 3 The changes or modifications not expressly approved by turning the equipment...
... a Class B digital device, pursuant to Part 15 of the user to which can radiate radio frequency energy, and if not installed and used in a particular installation. However, there is no guarantee that to correct such interference. FOR MORE INFORMATION, CONTACT THE ELECTRONIC INDUSTRIES ALLIANCE AT WWW.EIAE.ORG. 3 The changes or modifications not expressly approved by turning the equipment...
User Manual
Page 3
... 23. 5 Service Instructions - "CAUTION - Protect the power cord from being walked on or pinched particularly at plugs, convenience receptacles, and the point where they exit from the type of time. 15. The TV should be connected to avoid injury from tip-over. 13. These servicing instructions are not sure of the type of the ventilation openings. Only use only with UL Listed Wall Mount Bracket with...
... 23. 5 Service Instructions - "CAUTION - Protect the power cord from being walked on or pinched particularly at plugs, convenience receptacles, and the point where they exit from the type of time. 15. The TV should be connected to avoid injury from tip-over. 13. These servicing instructions are not sure of the type of the ventilation openings. Only use only with UL Listed Wall Mount Bracket with...
User Manual
Page 4
... antenna discharge unit, connection to receive full power over -the-air broadcasts with cable and satellite TV services, gaming consoles,VCRs, DVD players, and similar products, For more information about subsidized coupons for the grounding electrode. This television receiver has only an analog broadcast tuner and will require a converter box to grounding electrodes and requirements for digital-toanalog converter boxed. 22. Analog-only TVs should be mounted...
... antenna discharge unit, connection to receive full power over -the-air broadcasts with cable and satellite TV services, gaming consoles,VCRs, DVD players, and similar products, For more information about subsidized coupons for the grounding electrode. This television receiver has only an analog broadcast tuner and will require a converter box to grounding electrodes and requirements for digital-toanalog converter boxed. 22. Analog-only TVs should be mounted...

User Manual
Page 6
TABLE OF CONTENT DIGITAL TELEVISION TRANSITION NOTICE 2 FOR YOUR SAFETY 3 PRECAUTIONS AND REMINDERS 4 IMPORTANT SAFETY INSTRUCTIONS 5 PREPARATION 9 ATTACHING THE BASE...9 PREPARING YOUR LCD HDTV FOR WALL MOUNTING 9 PERIPHERAL CONNECTION GUIDE 12 OPERATING INSTRUCTIONS 14 TO USE THE FRONT PANEL CONTROL 14 TO USE THE REMOTE CONTROL 15 TO USE THE MENUS ...16 CHANNEL MENU ...16 VIDEO MENU ...16 AUDIO MENU ...17 FEATURE MENU...17 VGA MENU...20 TIPS ...21 PRODUCT SPECIFICATION 22 BEFORE CALLING SERVICE 24 GLOSSARY ...25 WARRANTY 26 8
TABLE OF CONTENT DIGITAL TELEVISION TRANSITION NOTICE 2 FOR YOUR SAFETY 3 PRECAUTIONS AND REMINDERS 4 IMPORTANT SAFETY INSTRUCTIONS 5 PREPARATION 9 ATTACHING THE BASE...9 PREPARING YOUR LCD HDTV FOR WALL MOUNTING 9 PERIPHERAL CONNECTION GUIDE 12 OPERATING INSTRUCTIONS 14 TO USE THE FRONT PANEL CONTROL 14 TO USE THE REMOTE CONTROL 15 TO USE THE MENUS ...16 CHANNEL MENU ...16 VIDEO MENU ...16 AUDIO MENU ...17 FEATURE MENU...17 VGA MENU...20 TIPS ...21 PRODUCT SPECIFICATION 22 BEFORE CALLING SERVICE 24 GLOSSARY ...25 WARRANTY 26 8

User Manual
Page 7
... any damage to prevent cable interference. For HL32D2 1. Remove the stand base from your TV. 3. Before mounting your safety, please use only with UL listed wall mount bracket with minimum weight of the base and tighten the base to the HDTV. 2. Place TV unit face down on a soft and flat surface (blanket, foam, cloth, etc.) to prevent any damage to the stand. Remove the screws holding your TV...
... any damage to prevent cable interference. For HL32D2 1. Remove the stand base from your TV. 3. Before mounting your safety, please use only with UL listed wall mount bracket with minimum weight of the base and tighten the base to the HDTV. 2. Place TV unit face down on a soft and flat surface (blanket, foam, cloth, etc.) to prevent any damage to the stand. Remove the screws holding your TV...

User Manual
Page 9
... not be turned on a solid surface. 3. Power: Insert the power cord in the wall socket with display on or in a position to the aerial socket ANT IN 75Ω at the front panel. If the LED color is power on the back cover. Connect the antenna cable or CATV cable to allow free flow of air. place the TV on in standby state. 5. Remote control: Remove the cover...
... not be turned on a solid surface. 3. Power: Insert the power cord in the wall socket with display on or in a position to the aerial socket ANT IN 75Ω at the front panel. If the LED color is power on the back cover. Connect the antenna cable or CATV cable to allow free flow of air. place the TV on in standby state. 5. Remote control: Remove the cover...
User Manual
Page 10
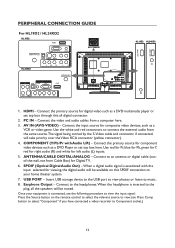
... digital cable (outof-the-wall, not from a computer here. 3. Connect to the headphones.When the headphone is connected, use the following procedure to view the input signal: Press the Source button on the remote control to select the relevant source to view. (ex: Press Comp button to select "Component" if you have connected a video recorder to music. 8. Once your home theater system. 7. PERIPHERAL CONNECTION GUIDE For HL19D2 / HL24XD2 HL19D2 AC POWER HL24XD2 USB USB HL19D2 HL24XD2 1. SPDIF (Optical Digital Audio...
... digital cable (outof-the-wall, not from a computer here. 3. Connect to the headphones.When the headphone is connected, use the following procedure to view the input signal: Press the Source button on the remote control to select the relevant source to view. (ex: Press Comp button to select "Component" if you have connected a video recorder to music. 8. Once your home theater system. 7. PERIPHERAL CONNECTION GUIDE For HL19D2 / HL24XD2 HL19D2 AC POWER HL24XD2 USB USB HL19D2 HL24XD2 1. SPDIF (Optical Digital Audio...
User Manual
Page 11
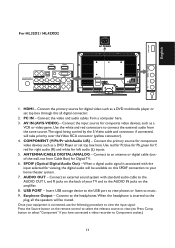
... left audio (L) inputs. 5. Use the white and red connectors to Component socket.) 13 AV IN (AV/S-VIDEO) - HDMI - PC IN - For HL32D2 / HL42XD2 AC POWER USB English 1. Connect to the headphones.When the headphone is connected, use the following procedure to view the input signal: Press the Source button on the remote control to select the relevant source to view. (ex: Press Comp button to select "Component" if you have connected a video recorder to connect the external audio from Cable Box) for viewing, the digital audio...
... left audio (L) inputs. 5. Use the white and red connectors to Component socket.) 13 AV IN (AV/S-VIDEO) - HDMI - PC IN - For HL32D2 / HL42XD2 AC POWER USB English 1. Connect to the headphones.When the headphone is connected, use the following procedure to view the input signal: Press the Source button on the remote control to select the relevant source to view. (ex: Press Comp button to select "Component" if you have connected a video recorder to connect the external audio from Cable Box) for viewing, the digital audio...
User Manual
Page 12
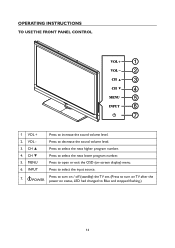
MENU Press to select the next lower program number. 5. CH ▼ Press to open or exit the OSD (on status, LED had changed to select the next higher program number. 4. i POWER Press to turn on / off (standby) the TV set. (Press to turn on TV after the power on -screen display) menu. 6. CH ▲ Press to Blue and stopped flashing.) 14 VOL - OPERATING INSTRUCTIONS TO USE THE FRONT PANEL CONTROL 1 2 3 4 5 6 7 1 VOL + Press to decrease the sound volume level. 3. Press to increase the sound volume level. 2. INPUT Press to select the input source. 7.
MENU Press to select the next lower program number. 5. CH ▼ Press to open or exit the OSD (on status, LED had changed to select the next higher program number. 4. i POWER Press to turn on / off (standby) the TV set. (Press to turn on TV after the power on -screen display) menu. 6. CH ▲ Press to Blue and stopped flashing.) 14 VOL - OPERATING INSTRUCTIONS TO USE THE FRONT PANEL CONTROL 1 2 3 4 5 6 7 1 VOL + Press to decrease the sound volume level. 3. Press to increase the sound volume level. 2. INPUT Press to select the input source. 7.
User Manual
Page 13
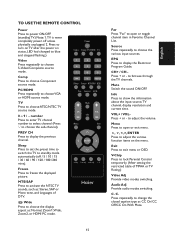
... status, LED had changed to blue and stopped flashing.) Video Press repeatedly to display the Electronic Program Guide. Menu Press to open or toggle channel item in Favorite Channel List. Audio Adj Provide audio modes switching. TV Press to open or exit menu. , , , ENTER Press to choose the display aspect as CC On/CC Off/CC On With Mute. 15 Power Video Comp PC/HDMI TV 1 2 3 4 5 6 7 8 9 0 PREV CH Sleep Freeze MTS/SAP Fav...
... status, LED had changed to blue and stopped flashing.) Video Press repeatedly to display the Electronic Program Guide. Menu Press to open or toggle channel item in Favorite Channel List. Audio Adj Provide audio modes switching. TV Press to open or exit menu. , , , ENTER Press to choose the display aspect as CC On/CC Off/CC On With Mute. 15 Power Video Comp PC/HDMI TV 1 2 3 4 5 6 7 8 9 0 PREV CH Sleep Freeze MTS/SAP Fav...

User Manual
Page 14
... Channel Labels menu for user fine tuning the video display. User can edit (add/delete) the channel numbers. 6. Sharpness: Video sharpness adjustment, the tuning range is 0 ~ 30. 11. Backlight: Backlight strength adjustment, the tuning range is 0 ~ 100. 5. TO USE THE MENUS VIDEO MENU 1. Press the Menu button to display or close the main menu. 2. The Video menu in VGA source mode, the Video menu simply provides Picture mode, Color Temp, Backlight, Aspect Ratio, Preset items. VIDEO Move Picture Mode Brightness Contrast Sharpness Color Tint Color...
... Channel Labels menu for user fine tuning the video display. User can edit (add/delete) the channel numbers. 6. Sharpness: Video sharpness adjustment, the tuning range is 0 ~ 30. 11. Backlight: Backlight strength adjustment, the tuning range is 0 ~ 100. 5. TO USE THE MENUS VIDEO MENU 1. Press the Menu button to display or close the main menu. 2. The Video menu in VGA source mode, the Video menu simply provides Picture mode, Color Temp, Backlight, Aspect Ratio, Preset items. VIDEO Move Picture Mode Brightness Contrast Sharpness Color Tint Color...
User Manual
Page 15
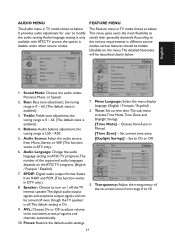
... Audio Language SPDIF Speaker Personal 32 32 0 English PCM On ENTER Select Menu Return Exit Exit 1. Audio Language: Change the audio language setting on ATSC TV programs.The number of the on the ATSC TV programs. (English / Français / Español) 7. Select from Auto or Manual. [Time Zone] - FEATURE Menu Language Time Transparency Password Setting Parental Control Closed Captions Analog Captions English 1 With Mute CC1 Move ENTER Select Menu Return Exit Exit 1. AVL: Choose On or Off to adjust volume...
... Audio Language SPDIF Speaker Personal 32 32 0 English PCM On ENTER Select Menu Return Exit Exit 1. Audio Language: Change the audio language setting on ATSC TV programs.The number of the on the ATSC TV programs. (English / Français / Español) 7. Select from Auto or Manual. [Time Zone] - FEATURE Menu Language Time Transparency Password Setting Parental Control Closed Captions Analog Captions English 1 With Mute CC1 Move ENTER Select Menu Return Exit Exit 1. AVL: Choose On or Off to adjust volume...
User Manual
Page 16
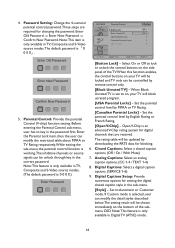
...] - Closed Captions: Select a closed caption style in TV, Composite and S-Video source modes.The default password is working.The inhibitive channels or source signals can modify the restricted table about MPAA or TV Rating respectively.While exiting the sub-menu, the parental control function is ό0 0 0 0ύ. Note:This item is only available in the sub-menu. [Style] - Digital Captions: Select a digital caption options. (SERVICE 1-6) 9. Password Setting: Change the 4-numeral parental control password.Three steps are received. Analog Captions: Select an analog caption...
...] - Closed Captions: Select a closed caption style in TV, Composite and S-Video source modes.The default password is working.The inhibitive channels or source signals can modify the restricted table about MPAA or TV Rating respectively.While exiting the sub-menu, the parental control function is ό0 0 0 0ύ. Note:This item is only available in the sub-menu. [Style] - Digital Captions: Select a digital caption options. (SERVICE 1-6) 9. Password Setting: Change the 4-numeral parental control password.Three steps are received. Analog Captions: Select an analog caption...

User Manual
Page 17
... there is plugged into USB hub, Multimedia List menu will display. Restore the default component setting values. 12. JPEG sizes are limited as followed: For 19"/32": 10928x6114 For 24"/42": 15360x8640 There are two ways to enlarge the selected photo (orange frame) in browser. • Image Delay: Set display time for each picture in a USB storage device. FEATURE Analog Captions Digital Captions Digital Captions Setup Input Labels Component Setting MultiMedia Menu Reset To Default English English Move ENTER Select Menu Return Exit...
... there is plugged into USB hub, Multimedia List menu will display. Restore the default component setting values. 12. JPEG sizes are limited as followed: For 19"/32": 10928x6114 For 24"/42": 15360x8640 There are two ways to enlarge the selected photo (orange frame) in browser. • Image Delay: Set display time for each picture in a USB storage device. FEATURE Analog Captions Digital Captions Digital Captions Setup Input Labels Component Setting MultiMedia Menu Reset To Default English English Move ENTER Select Menu Return Exit...

User Manual
Page 18
..., backlight will be turned-off again. Clock: Adjust picture clock to the default values. Auto Adjust: Adjust the settings automatically. 6. Press any key pressed. Preset: Resetting MP3 relative audio parameters to reduce Vertical-Line noise. (0-16) 4. Phase: Adjust picture phase to original source. (Browser with Control menu.) [MP3 MusicBox] • ListInfoBar (at the bottom): This part contains play list information as: "Current Directory","Total File(s)", "Total Folder(s)", "Current...
..., backlight will be turned-off again. Clock: Adjust picture clock to the default values. Auto Adjust: Adjust the settings automatically. 6. Press any key pressed. Preset: Resetting MP3 relative audio parameters to reduce Vertical-Line noise. (0-16) 4. Phase: Adjust picture phase to original source. (Browser with Control menu.) [MP3 MusicBox] • ListInfoBar (at the bottom): This part contains play list information as: "Current Directory","Total File(s)", "Total Folder(s)", "Current...

User Manual
Page 19
... from Dolby Laboratories. If the screen requires additional cleaning, use liquid cleaners or aerosol cleaners. Do not use a clean, damp cloth. Mobile telephone warning To avoid disturbances in a particular installation. However, there is connected. • Consult the dealer or an experienced radio or television technician for a Class B digital device, pursuant to part 15 of attention to the TV...
... from Dolby Laboratories. If the screen requires additional cleaning, use liquid cleaners or aerosol cleaners. Do not use a clean, damp cloth. Mobile telephone warning To avoid disturbances in a particular installation. However, there is connected. • Consult the dealer or an experienced radio or television technician for a Class B digital device, pursuant to part 15 of attention to the TV...
User Manual
Page 20
... / HL42XD2: 1920x1080 Component Video and L/R Audio input Supported resolution: 480i,480p,720p,1080i, 1080p Side Connectors HDMI input Supported scan rates: 480i, 480p, 720p, 1080i, 1080p AV/S-Video input AV/S-Video input AV/S-Video input SPDIF SPDIF SPDIF HDMI 1 HDMI HDMI HDMI 2 Audio out Earphone Output USB PORT Earphone Output USB PORT AV IN 2 Earphone Output USB PORT AV/S-Video input SPDIF HDMI 1 HDMI 2 Audio out AV IN 2 Earphone Output USB PORT 22 v Designs and specifications are subject to change without notice. HL19D2 HL24XD2 HL32D2 HL42XD2 DISPLAY Viewable 18.5W...
... / HL42XD2: 1920x1080 Component Video and L/R Audio input Supported resolution: 480i,480p,720p,1080i, 1080p Side Connectors HDMI input Supported scan rates: 480i, 480p, 720p, 1080i, 1080p AV/S-Video input AV/S-Video input AV/S-Video input SPDIF SPDIF SPDIF HDMI 1 HDMI HDMI HDMI 2 Audio out Earphone Output USB PORT Earphone Output USB PORT AV IN 2 Earphone Output USB PORT AV/S-Video input SPDIF HDMI 1 HDMI 2 Audio out AV IN 2 Earphone Output USB PORT 22 v Designs and specifications are subject to change without notice. HL19D2 HL24XD2 HL32D2 HL42XD2 DISPLAY Viewable 18.5W...
User Manual
Page 21
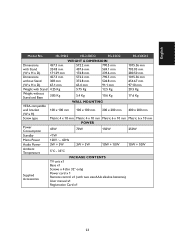
... 569.1 mm (W x H x D) 171.29 mm 176.8 mm 239.6 mm Dimensions 457.3 mm 572.2 mm 790.5 mm without Stand 308 mm 372.8 mm 526.8 mm (W x H x D) 67.1 mm 65.4 mm 91.1 mm Weight with Stand 4.25 Kg 5.75 Kg 12.5 Kg 1015.36 mm 703.03 mm 280.50... mm 20.5 Kg Weight without Stand and Base 3.85 Kg 5.4 Kg 10.6 Kg 17.6 Kg WALL MOUNTING VESA-compatible wall bracket 100 x 100 mm (W x H) 100 x 100 mm 200 x 200 mm 400 x 200 mm Screw type Metric 4 x 10 mm Metric 4 x 10 mm Metric 6 x 10 mm Metric 6 x 10 mm POWER Power Consumption 45W 70W 150W 250W Standby English Model No.
... 569.1 mm (W x H x D) 171.29 mm 176.8 mm 239.6 mm Dimensions 457.3 mm 572.2 mm 790.5 mm without Stand 308 mm 372.8 mm 526.8 mm (W x H x D) 67.1 mm 65.4 mm 91.1 mm Weight with Stand 4.25 Kg 5.75 Kg 12.5 Kg 1015.36 mm 703.03 mm 280.50... mm 20.5 Kg Weight without Stand and Base 3.85 Kg 5.4 Kg 10.6 Kg 17.6 Kg WALL MOUNTING VESA-compatible wall bracket 100 x 100 mm (W x H) 100 x 100 mm 200 x 200 mm 400 x 200 mm Screw type Metric 4 x 10 mm Metric 4 x 10 mm Metric 6 x 10 mm Metric 6 x 10 mm POWER Power Consumption 45W 70W 150W 250W Standby English Model No.
User Manual
Page 22
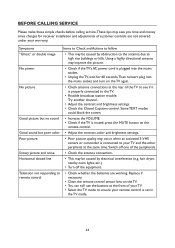
...'s AC power cord is properly connected to high rise buildings or hills. Try another channel. • Adjust the contrast and brightness settings. • Check the Closed Captions control. Using a highly directional antenna may save you time and money since charges for 60 seconds.Then reinsert plug into the mains socket. • Unplug the TV, wait for receiver installation and adjustments of customer controls are working. BEFORE CALLING SERVICE Please...
...'s AC power cord is properly connected to high rise buildings or hills. Try another channel. • Adjust the contrast and brightness settings. • Check the Closed Captions control. Using a highly directional antenna may save you time and money since charges for 60 seconds.Then reinsert plug into the mains socket. • Unplug the TV, wait for receiver installation and adjustments of customer controls are working. BEFORE CALLING SERVICE Please...

User Manual
Page 23
... audio channel provided for the displayed program). Sleep Timer You can connect your TV set a time period for which allows stereo sounds to be turn off automatically. HDMI Inputs High-Definition Multimedia Interface Audio / Video Inputs Located on the TV screen is made available for user adjustments. A monaural sound track included within the recorded or video signal (usually containing a second language translation for in order to provide maximum consumer viewing satisfaction. 25 English GLOSSARY HDTV HDTV displays...
... audio channel provided for the displayed program). Sleep Timer You can connect your TV set a time period for which allows stereo sounds to be turn off automatically. HDMI Inputs High-Definition Multimedia Interface Audio / Video Inputs Located on the TV screen is made available for user adjustments. A monaural sound track included within the recorded or video signal (usually containing a second language translation for in order to provide maximum consumer viewing satisfaction. 25 English GLOSSARY HDTV HDTV displays...


