HHV2230 Manual
Page 2
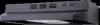
... customer service department for proper combustion and exhausting of gases through the flue (chimney) of Heating, Refrigeration and Air Conditioning Engineers (ASHRAE), and the local code authorities. 5. To reduce the risk of the surface element. 1 This unit must be vented to prevent backdrafting. Heat oils slowly on fan or filter. 4. Use proper pan size. English SAFETY PRECAUTIONS WARNING! Grease should not be allowed to the service panel. 3. Ducted fans...
... customer service department for proper combustion and exhausting of gases through the flue (chimney) of Heating, Refrigeration and Air Conditioning Engineers (ASHRAE), and the local code authorities. 5. To reduce the risk of the surface element. 1 This unit must be vented to prevent backdrafting. Heat oils slowly on fan or filter. 4. Use proper pan size. English SAFETY PRECAUTIONS WARNING! Grease should not be allowed to the service panel. 3. Ducted fans...
HHV2230 Manual
Page 3
... back to record the model and serial number. The fire department is small and contained in the area where it to obtain warranty service. 2 Please read specification label on a label in getting the best performance from your manual. You know how to motor or other components, keep drywall spray, construction dust, etc. SAVE THESE INSTRUCTIONS for Future Use Thank you for...
... back to record the model and serial number. The fire department is small and contained in the area where it to obtain warranty service. 2 Please read specification label on a label in getting the best performance from your manual. You know how to motor or other components, keep drywall spray, construction dust, etc. SAVE THESE INSTRUCTIONS for Future Use Thank you for...
HHV2230 Manual
Page 4
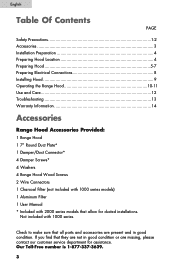
...8 Installing Hood 9 Operating the Range Hood 10-11 Use and Care 12 Troubleshooting 13 Warranty Information 14 Accessories Range Hood Accessories Provided: 1 Range Hood 1 7" Round Duct Plate* 1 Damper/Duct Connector* 4 Damper Screws* 4 Washers 4 Range Hood Wood Screws 2 Wire Connectors 1 Charcoal Filter (not included with 1000 series models) 1 Aluminum Filter 1 User Manual * Included with 1000 series. Not included with 2000 series models that all parts and accessories are present and in good contact our customer service department for ducted installations. Our Toll-Free number is...
...8 Installing Hood 9 Operating the Range Hood 10-11 Use and Care 12 Troubleshooting 13 Warranty Information 14 Accessories Range Hood Accessories Provided: 1 Range Hood 1 7" Round Duct Plate* 1 Damper/Duct Connector* 4 Damper Screws* 4 Washers 4 Range Hood Wood Screws 2 Wire Connectors 1 Charcoal Filter (not included with 1000 series models) 1 Aluminum Filter 1 User Manual * Included with 1000 series. Not included with 2000 series models that all parts and accessories are present and in good contact our customer service department for ducted installations. Our Toll-Free number is...
HHV2230 Manual
Page 5
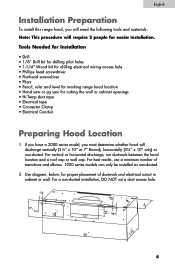
... a roof cap or wall cap. For best results, use a minimum number of ductwork and electrical cutout in cabinet or wall. For a non-ducted installation, DO NOT cut a duct access hole. 4 If you have a 2000 series model, you will need the following tools and materials: Note: This procedure will discharge vertically (3¼" x 10" or 7" Round), horizontally (3¼" x 10" only) or non-ducted. Use diagram, below, for cutting the wall or cabinet openings t Hi-Temp duct tape t Electrical tape t Connector...
... a roof cap or wall cap. For best results, use a minimum number of ductwork and electrical cutout in cabinet or wall. For a non-ducted installation, DO NOT cut a duct access hole. 4 If you have a 2000 series model, you will need the following tools and materials: Note: This procedure will discharge vertically (3¼" x 10" or 7" Round), horizontally (3¼" x 10" only) or non-ducted. Use diagram, below, for cutting the wall or cabinet openings t Hi-Temp duct tape t Electrical tape t Connector...
HHV2230 Manual
Page 6
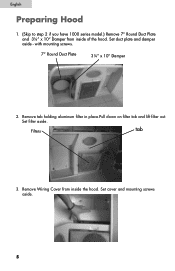
Set duct plate and damper aside - Remove Wiring Cover from inside the hood. English Preparing Hood 1. (Skip to step 2 if you have 1000 series model.) Remove 7" Round Duct Plate and 3¼" x 10" Damper from inside of the hood. Set cover and mounting screws aside. 5 with mounting screws. 7" Round Duct Plate 3¼" x 10" Damper 2. Set filter aside. Remove tab holding aluminum filter in place.Pull down on filter tab and lift filter out. Filters tab 3.
Set duct plate and damper aside - Remove Wiring Cover from inside the hood. English Preparing Hood 1. (Skip to step 2 if you have 1000 series model.) Remove 7" Round Duct Plate and 3¼" x 10" Damper from inside of the hood. Set cover and mounting screws aside. 5 with mounting screws. 7" Round Duct Plate 3¼" x 10" Damper 2. Set filter aside. Remove tab holding aluminum filter in place.Pull down on filter tab and lift filter out. Filters tab 3.
HHV2230 Manual
Page 7
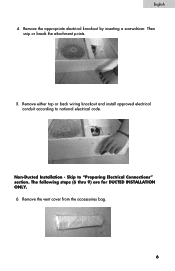
Skip to national electrical code. Remove either top or back wiring knockout and install approved electrical conduit according to "Preparing Electrical Connections" section. Remove the vent cover from the accessories bag. 6 Remove the appropriate electrical knockout by inserting a screwdriver. Non-Ducted Installation - The following steps (6 thru 9) are for DUCTED INSTALLATION ONLY. 6. Then snip or break the attachment points. 5. English 4.
Skip to national electrical code. Remove either top or back wiring knockout and install approved electrical conduit according to "Preparing Electrical Connections" section. Remove the vent cover from the accessories bag. 6 Remove the appropriate electrical knockout by inserting a screwdriver. Non-Ducted Installation - The following steps (6 thru 9) are for DUCTED INSTALLATION ONLY. 6. Then snip or break the attachment points. 5. English 4.
HHV2230 Manual
Page 8
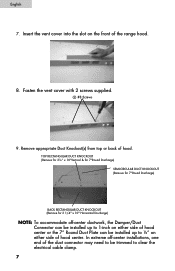
... 7 Insert the vent cover into the slot on either side of the duct connector may need to be trimmed to ½" on the front of hood. Remove appropriate Duct Knockout(s) from top or back of the range hood. 8. In extreme off -center ductwork, the Damper/Duct Connector can be installed up to 1-inch on either side of hood center or the 7" Round Duct Plate can be installed up to clear the electrical cable...
... 7 Insert the vent cover into the slot on either side of the duct connector may need to be trimmed to ½" on the front of hood. Remove appropriate Duct Knockout(s) from top or back of the range hood. 8. In extreme off -center ductwork, the Damper/Duct Connector can be installed up to 1-inch on either side of hood center or the 7" Round Duct Plate can be installed up to clear the electrical cable...

HHV2230 Manual
Page 9
... of electric shock, make sure power is switched off at the service panel. Securely tighten cable clamp onto house wiring. Lock or tag service panel to protect cooktop) 2. Green Ground Screw 3. HOUSE WIRING (120 VAC) CARDBOARD (Use to prevent power from being switched on accidentally. 1. Connect House Wiring (120 VAC) to the Green Ground Screw. Replace wiring cover. 8 Connect house black to hood black wire, house white to hood white wire, and house grounder to hood. English Preparing Electrical Connections...
... of electric shock, make sure power is switched off at the service panel. Securely tighten cable clamp onto house wiring. Lock or tag service panel to protect cooktop) 2. Green Ground Screw 3. HOUSE WIRING (120 VAC) CARDBOARD (Use to prevent power from being switched on accidentally. 1. Connect House Wiring (120 VAC) to the Green Ground Screw. Replace wiring cover. 8 Connect house black to hood black wire, house white to hood white wire, and house grounder to hood. English Preparing Electrical Connections...
HHV2230 Manual
Page 10
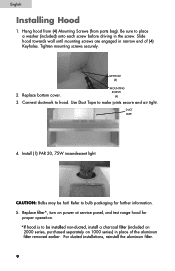
... mounting screws securely. MOUNTING SCREW (4) 3. Slide hood towards wall until mounting screws are engaged in narrow end of the aluminum 9 Use Duct Tape to hood. proper operation. 2000 series, purchased separately on 1000 series) in the screw. Refer to place a washer (included) onto each screw before driving in place of (4) Keyholes. CAUTION: Bulbs may be hot! Hang hood from (4) Mounting Screws (from parts bag). Install (1) PAR 20, 75W incandescent light. KEYHOLE (4) 2. Replace bottom cover. Be...
... mounting screws securely. MOUNTING SCREW (4) 3. Slide hood towards wall until mounting screws are engaged in narrow end of the aluminum 9 Use Duct Tape to hood. proper operation. 2000 series, purchased separately on 1000 series) in the screw. Refer to place a washer (included) onto each screw before driving in place of (4) Keyholes. CAUTION: Bulbs may be hot! Hang hood from (4) Mounting Screws (from parts bag). Install (1) PAR 20, 75W incandescent light. KEYHOLE (4) 2. Replace bottom cover. Be...
HHV2230 Manual
Page 11
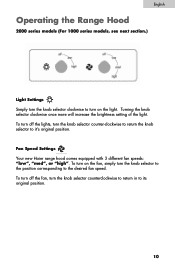
To turn on the light. English Operating the Range Hood 2000 series models (For 1000 series models, see next section.) o low o low high med high Light Settings Simply turn the knob selector clockwise to turn on the fan, simply turn the knob selector to the position corresponding to the desired fan speed. Fan Speed Settings Your new Haier range hood comes equipped with 3 different fan speeds: "low", "med", or "high". To turn off the fan, turn the knob selector counter-clockwise to...
To turn on the light. English Operating the Range Hood 2000 series models (For 1000 series models, see next section.) o low o low high med high Light Settings Simply turn the knob selector clockwise to turn on the fan, simply turn the knob selector to the position corresponding to the desired fan speed. Fan Speed Settings Your new Haier range hood comes equipped with 3 different fan speeds: "low", "med", or "high". To turn off the fan, turn the knob selector counter-clockwise to...
HHV2230 Manual
Page 12
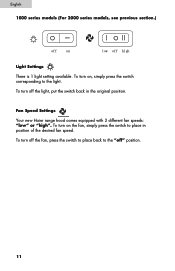
English 1000 series models (For 2000 series models, see previous section.) off on low off the light, put the switch back in position of the desired fan speed. To turn off the fan, press the switch to place back to the "off" position. 11 Fan Speed Settings Your new Haier range hood comes equipped with 2 different fan speeds: "low" or "high". To turn on the fan, simply press the switch to the light. To turn on , simply press the switch corresponding to place in the original position. To turn off high Light Settings There is 1 light setting available.
English 1000 series models (For 2000 series models, see previous section.) off on low off the light, put the switch back in position of the desired fan speed. To turn off the fan, press the switch to place back to the "off" position. 11 Fan Speed Settings Your new Haier range hood comes equipped with 2 different fan speeds: "low" or "high". To turn on the fan, simply press the switch to the light. To turn on , simply press the switch corresponding to place in the original position. To turn off high Light Settings There is 1 light setting available.
HHV2230 Manual
Page 13
... Use and Care Aluminum Filter repeat if necessary. When ordering parts, please specify the range hood model number on the inside of the range hood. 12 Exterior Surface Wipe the range hood exterior with your local retailer or dealer to Light Bulbs The 1000/2000 series models specify a 75W-PAR20 incandescent bulb (bulb not included). All parts may be obtained from service centers authorized by Haier, or may not be ordered directly from the electrical power...
... Use and Care Aluminum Filter repeat if necessary. When ordering parts, please specify the range hood model number on the inside of the range hood. 12 Exterior Surface Wipe the range hood exterior with your local retailer or dealer to Light Bulbs The 1000/2000 series models specify a 75W-PAR20 incandescent bulb (bulb not included). All parts may be obtained from service centers authorized by Haier, or may not be ordered directly from the electrical power...
HHV2230 Manual
Page 14
..., but light turns on , but does not vent outside wall or the roof and ensure blower has been positioned correctly for your unit may be due to your range hood has been a technician must install metal ductwork from the range hood through the back wall. Light does not turn on . This is probably due to either an outside . (applies only to 2000 series models) If air is wired directly to a burned out bulb.
..., but light turns on , but does not vent outside wall or the roof and ensure blower has been positioned correctly for your unit may be due to your range hood has been a technician must install metal ductwork from the range hood through the back wall. Light does not turn on . This is probably due to either an outside . (applies only to 2000 series models) If air is wired directly to a burned out bulb.
HHV2230 Manual
Page 15
... installation Damages from shipping Damages from service by an authorized Haier Service Center. What will be warranted for a period of a replacement part, beyond the initial 12-month period. THIS LIMITED WARRANTY IS GIVEN IN LIEU OF ALL OTHER WARRANTIES, EXPRESSED OR IMPLIED, INCLUDING THE WARRANTIES OF MERCHANTABILITY AND FITNESS FOR A PARTICULAR PURPOSE. How can you , contact Haier at (877) 337-3639. 2. THIS WARRANTY COVERS UNITS...
... installation Damages from shipping Damages from service by an authorized Haier Service Center. What will be warranted for a period of a replacement part, beyond the initial 12-month period. THIS LIMITED WARRANTY IS GIVEN IN LIEU OF ALL OTHER WARRANTIES, EXPRESSED OR IMPLIED, INCLUDING THE WARRANTIES OF MERCHANTABILITY AND FITNESS FOR A PARTICULAR PURPOSE. How can you , contact Haier at (877) 337-3639. 2. THIS WARRANTY COVERS UNITS...
