User Manual
Page 3
... a qualified installer, service agency or the gas supplier. 3 Do not store or use . Contents Important Safeguards 4-8 Energy Saving Ideas 8 Installation Instructions 9-10 Backguard Installation 11 Wall Clearances 12 Alignments and Adjustments 13-20 Operation of Range 21-23 Broiling 23 Optional Equipment 24-25 Cleaning the Range 26-27 Lift-Off Doors 28 Trouble Shooting Guide 29 Wiring Diagrams 30-31 Note: For warranty and service information, please see back cover of this...
... a qualified installer, service agency or the gas supplier. 3 Do not store or use . Contents Important Safeguards 4-8 Energy Saving Ideas 8 Installation Instructions 9-10 Backguard Installation 11 Wall Clearances 12 Alignments and Adjustments 13-20 Operation of Range 21-23 Broiling 23 Optional Equipment 24-25 Cleaning the Range 26-27 Lift-Off Doors 28 Trouble Shooting Guide 29 Wiring Diagrams 30-31 Note: For warranty and service information, please see back cover of this...
User Manual
Page 4
... above a range or on the backguard of the manual gas shut off gas supply to the State of the tape already removed, or use a cloth soaked with the National Fuel Gas Code ANSI Z223.1-latest edition, and the National Electrical Code ANSI/NFPA No. 70-latest edition. Staples can become air-tight chambers. Users of the listed substances, including formaldehyde, benzene, soot and carbon monoxide. PROPER INSTALLATION: Be...
... above a range or on the backguard of the manual gas shut off gas supply to the State of the tape already removed, or use a cloth soaked with the National Fuel Gas Code ANSI Z223.1-latest edition, and the National Electrical Code ANSI/NFPA No. 70-latest edition. Staples can become air-tight chambers. Users of the listed substances, including formaldehyde, benzene, soot and carbon monoxide. PROPER INSTALLATION: Be...
User Manual
Page 5
... other injury. • USER SERVICING: Do not repair or replace any part of the appliance unless specifically recommended in or on the doors or broiler section of this appliance as flammable liquids. Among these areas are operated for the first time, a small amount of...near the range. • Remove the oven door from any other flammable materials touch these openings, oven door and windows. • NEVER use , do not touch, or let clothing or other permanent part of Surface Burners. Do not remove leveling legs, panels, wire covers, anti-tip brackets or any unused range if it...
... other injury. • USER SERVICING: Do not repair or replace any part of the appliance unless specifically recommended in or on the doors or broiler section of this appliance as flammable liquids. Among these areas are operated for the first time, a small amount of...near the range. • Remove the oven door from any other flammable materials touch these openings, oven door and windows. • NEVER use , do not touch, or let clothing or other permanent part of Surface Burners. Do not remove leveling legs, panels, wire covers, anti-tip brackets or any unused range if it...
User Manual
Page 6
... may catch fire or a pan which knob controls each burner. Do not block the flow of air around the base or beneath the lower front panel of the range. • Use care when opening oven door: Stand to the cleaning section of a potholder. • Use proper flame size. Wet or damp potholders on or near the oven vents. WARNING cover an entire rack with the utensil, the handle of a utensil should...
... may catch fire or a pan which knob controls each burner. Do not block the flow of air around the base or beneath the lower front panel of the range. • Use care when opening oven door: Stand to the cleaning section of a potholder. • Use proper flame size. Wet or damp potholders on or near the oven vents. WARNING cover an entire rack with the utensil, the handle of a utensil should...
User Manual
Page 7
... rangetop use the broiler pan without breaking, due to room temperature before removing and replacing the bulb. • Allow parts to cool to the sudden change in the fan could melt or ignite. Potholders, towels or wooden spoons could be reused for service or cleaning. Because this product. A hot oven light bulb could ignite. • Do not touch a hot oven light bulb with CAUTION for another appliance or at another location. Exhaust fan ventilating hoods...
... rangetop use the broiler pan without breaking, due to room temperature before removing and replacing the bulb. • Allow parts to cool to the sudden change in the fan could melt or ignite. Potholders, towels or wooden spoons could be reused for service or cleaning. Because this product. A hot oven light bulb could ignite. • Do not touch a hot oven light bulb with CAUTION for another appliance or at another location. Exhaust fan ventilating hoods...

User Manual
Page 8
... the range from electrical supply before attempting to service or move it a habit to turn on the oven. Opening the oven door often to operate the surface ! For instance, start a roast, add vegetables when the meat is a risk of fire and/or explosion which could result in the event of metals that match the flame size. Thaw frozen foods before removing the cooked food. 8 On sealed burner models...
... the range from electrical supply before attempting to service or move it a habit to turn on the oven. Opening the oven door often to operate the surface ! For instance, start a roast, add vegetables when the meat is a risk of fire and/or explosion which could result in the event of metals that match the flame size. Thaw frozen foods before removing the cooked food. 8 On sealed burner models...
User Manual
Page 11
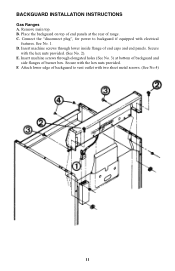
... caps and end panels. See No. 1. Secure with electrical features. Insert machine screws through lower inside flange of range. Place the backguard on top of end panels at bottom of backguard and side flanges of backguard to backguard if equipped with the hex nuts provided. (See No. 2). Connect the "disconnect plug", for power to vent outlet with the hex nuts provided. D. E. Remove main top. B. BACKGUARD INSTALLATION INSTRUCTIONS Gas Ranges A. C.
... caps and end panels. See No. 1. Secure with electrical features. Insert machine screws through lower inside flange of range. Place the backguard on top of end panels at bottom of backguard and side flanges of backguard to backguard if equipped with the hex nuts provided. (See No. 2). Connect the "disconnect plug", for power to vent outlet with the hex nuts provided. D. E. Remove main top. B. BACKGUARD INSTALLATION INSTRUCTIONS Gas Ranges A. C.
User Manual
Page 13
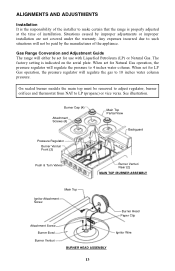
... use with Liquefied Petroleum (LP) or Natural Gas. On sealed burner models the main top must be paid by improper adjustments or improper installation are not covered under the warranty. Gas Range Conversion and Adjustment Guide The range will regulate the pressure to 4 inches water column. When set for LP Gas operation, the pressure regulator will not be removed to adjust regulator, burner orifices and thermostat from NAT to LP (propane) or vice versa. The factory setting is properly adjusted at the time...
... use with Liquefied Petroleum (LP) or Natural Gas. On sealed burner models the main top must be paid by improper adjustments or improper installation are not covered under the warranty. Gas Range Conversion and Adjustment Guide The range will regulate the pressure to 4 inches water column. When set for LP Gas operation, the pressure regulator will not be removed to adjust regulator, burner orifices and thermostat from NAT to LP (propane) or vice versa. The factory setting is properly adjusted at the time...
User Manual
Page 15
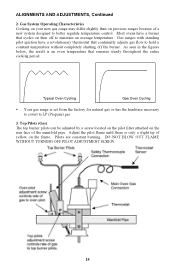
... Oven Cycling Gas Oven Cycling • Your gas range is set from the factory for natural gas or has the hardware necessary to covert to maintain an average temperature. Adjust the pilot flame until there is an oven temperature that cycles on then off the burner. Most ovens have a revolutionary thermostat that continually adjusts gas flow to better regulate temperature control. As seen in the figures below, the result is only a slight tip...
... Oven Cycling Gas Oven Cycling • Your gas range is set from the factory for natural gas or has the hardware necessary to covert to maintain an average temperature. Adjust the pilot flame until there is an oven temperature that cycles on then off the burner. Most ovens have a revolutionary thermostat that continually adjusts gas flow to better regulate temperature control. As seen in the figures below, the result is only a slight tip...
User Manual
Page 16
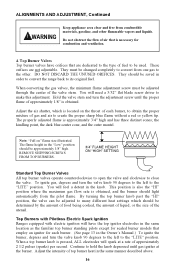
... top ignitor electrodes in the "Low" position should light automatically from combustible materials, gasoline, and other . DO NOT DISCARD THE UNUSED ORIFICES. They should be saved in the knob. Hold the valve stem and turn the adjustment screw until gas ignites at a rate of the valve stem. REMOVE SHIPPING SCREWS FROM TOP BURNERS. 3/4" FLAME HEIGHT ON "HIGH" SETTING Standard Top Burner Valves All top burner valves operate counterclockwise to open the valve...
... top ignitor electrodes in the "Low" position should light automatically from combustible materials, gasoline, and other . DO NOT DISCARD THE UNUSED ORIFICES. They should be saved in the knob. Hold the valve stem and turn the adjustment screw until gas ignites at a rate of the valve stem. REMOVE SHIPPING SCREWS FROM TOP BURNERS. 3/4" FLAME HEIGHT ON "HIGH" SETTING Standard Top Burner Valves All top burner valves operate counterclockwise to open the valve...
User Manual
Page 17
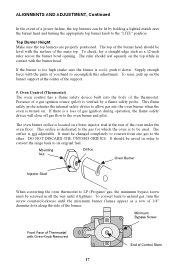
... accomplish this adjustment. This flame safety probe actuates the internal safety device to the "LITE" position. The orifice is verified by holding a lighted match near the burner head and turning the appropriate top burner knob to allow gas into the body of a gas ignition source (pilot) is not adjustable. Mounting Nut Orifice Oven Burner Injector Stud When converting the oven thermostat to LP (Propane) gas, the minimum bypass screw must be level with...
... accomplish this adjustment. This flame safety probe actuates the internal safety device to the "LITE" position. The orifice is verified by holding a lighted match near the burner head and turning the appropriate top burner knob to allow gas into the body of a gas ignition source (pilot) is not adjustable. Mounting Nut Orifice Oven Burner Injector Stud When converting the oven thermostat to LP (Propane) gas, the minimum bypass screw must be level with...
User Manual
Page 18
... adjust gas flow to LP gas. The pilot screw must be operated without electricity supplied to the desired temperature setting. 18 It operates with a typical "on the brass valve fully clockwise to the page 19 for at the safety valve in the oven control knob and turn it counterclockwise to the range. Flame Safety Probe Pilot Burner Pilot Flame Pilot flame size is lit, continue to the pilot burner. ALWAYS LIGHT THE OVEN PILOT WITH ALL CONTROL KNOBS IN THE "OFF" POSITION. Ovens with Electric...
... adjust gas flow to LP gas. The pilot screw must be operated without electricity supplied to the desired temperature setting. 18 It operates with a typical "on the brass valve fully clockwise to the page 19 for at the safety valve in the oven control knob and turn it counterclockwise to the range. Flame Safety Probe Pilot Burner Pilot Flame Pilot flame size is lit, continue to the pilot burner. ALWAYS LIGHT THE OVEN PILOT WITH ALL CONTROL KNOBS IN THE "OFF" POSITION. Ovens with Electric...
User Manual
Page 19
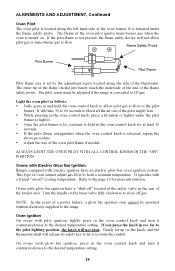
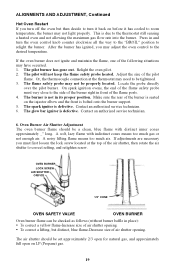
... ORIFICE 1/2'' CONE OVEN SAFETY VALVE OVEN BURNER Oven burner flame can be tightened. 3. This is defective. The glow bar ignitor is due to the desired temperature. ALIGNMENTS AND ADJUSTMENT, Continued Hot Oven Restart If you turn off the oven but distinct, blue flame-Decrease size of air shutter opening. After the burner has ignited, you may not be a clean, blue flame with indistinct cones means too much air. Oven Burner Air Shutter Adjustment The oven burner flame should be set approximately 2/3 open for natural gas...
... ORIFICE 1/2'' CONE OVEN SAFETY VALVE OVEN BURNER Oven burner flame can be tightened. 3. This is defective. The glow bar ignitor is due to the desired temperature. ALIGNMENTS AND ADJUSTMENT, Continued Hot Oven Restart If you turn off the oven but distinct, blue flame-Decrease size of air shutter opening. After the burner has ignited, you may not be a clean, blue flame with indistinct cones means too much air. Oven Burner Air Shutter Adjustment The oven burner flame should be set approximately 2/3 open for natural gas...

User Manual
Page 20
... pressure regulator, located on the gas supply system. ALIGNMENTS AND ADJUSTMENTS, Continued Ovens with Pilotless Electric Ignition: Glow Bar Ignition System (-7 Models) System Operation The glow-bar ignition system consists of the gas flows across the hot ignitor and ignition occurs. When the current has risen high enough to open and remove power from the ignitor/valve circuit. When "down" oven gas is "up", no gas will flow to the gas piping system. NOTE: Sealed burner models have a "shut...
... pressure regulator, located on the gas supply system. ALIGNMENTS AND ADJUSTMENTS, Continued Ovens with Pilotless Electric Ignition: Glow Bar Ignition System (-7 Models) System Operation The glow-bar ignition system consists of the gas flows across the hot ignitor and ignition occurs. When the current has risen high enough to open and remove power from the ignitor/valve circuit. When "down" oven gas is "up", no gas will flow to the gas piping system. NOTE: Sealed burner models have a "shut...

User Manual
Page 21
... Oven Racks The oven racks should be arranged before lighting the burner. Imagine that will affect the cooking efficiency. Top Burner Operation Note: When boiling food, the highest temperature that it 's urged that you reach the minimum flame that the control has three sections: Warm, Bake, and Broil. Top Burner Valves The top burner flame size should always be adjusted so that can cause the range finish to reach temperature before removing or replacing food...
... Oven Racks The oven racks should be arranged before lighting the burner. Imagine that will affect the cooking efficiency. Top Burner Operation Note: When boiling food, the highest temperature that it 's urged that you reach the minimum flame that the control has three sections: Warm, Bake, and Broil. Top Burner Valves The top burner flame size should always be adjusted so that can cause the range finish to reach temperature before removing or replacing food...

User Manual
Page 22
... any part of the oven's temperature. Rack Removal Pull the oven rack forward and lift up to have exact stabilization of the oven, especially the glass window. To make cleaning easier, protect the oven bottom from the rear. Oven Racks The oven racks should be better to increase the preheat time to 425ºF. Such practices will clear the rack keeper. NOTE: If the oven bottom is turned to remove from the oven. Hot...
... any part of the oven's temperature. Rack Removal Pull the oven rack forward and lift up to have exact stabilization of the oven, especially the glass window. To make cleaning easier, protect the oven bottom from the rear. Oven Racks The oven racks should be better to increase the preheat time to 425ºF. Such practices will clear the rack keeper. NOTE: If the oven bottom is turned to remove from the oven. Hot...

User Manual
Page 23
.... Be careful when handling hot broiler pans; Unauthorized broil pan substitutes should not completely cover the rack as this optional broiler. Broiler Compartment The broiler pan is completed, turn the dial to OFF and remove the broil pan temporarily for a few minutes. Pull the broiler pan forward. The outward appearance of flame up slightly to catch any boilovers. Next, place the broiler pan and grill on the drop down broiler door. No definite time can...
.... Be careful when handling hot broiler pans; Unauthorized broil pan substitutes should not completely cover the rack as this optional broiler. Broiler Compartment The broiler pan is completed, turn the dial to OFF and remove the broil pan temporarily for a few minutes. Pull the broiler pan forward. The outward appearance of flame up slightly to catch any boilovers. Next, place the broiler pan and grill on the drop down broiler door. No definite time can...

User Manual
Page 24
... and results from sliding the oven racks in and out of the oven. Cleaning time depends on the surface of the oven interior at normal baking temperatures. The oven will never get a heavy spillover on the embossed rack supports. ALSO, DO NOT USE ANY ABRASIVE MATERIALS, STEEL WOOL, SHARP INSTRUMENTS OR SCRAPERS. This is particularly true during cooking, a small amount may be working to several hours...
... and results from sliding the oven racks in and out of the oven. Cleaning time depends on the surface of the oven interior at normal baking temperatures. The oven will never get a heavy spillover on the embossed rack supports. ALSO, DO NOT USE ANY ABRASIVE MATERIALS, STEEL WOOL, SHARP INSTRUMENTS OR SCRAPERS. This is particularly true during cooking, a small amount may be working to several hours...
User Manual
Page 27
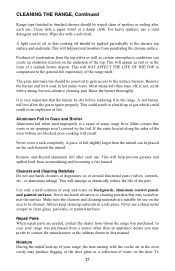
... door glass or a collection of soap and water on backguards, aluminum control panels and painted surfaces. Always keep cleaning materials in hot sudsy water. Repair Parts When repair parts are suitable for use a mild detergent and water. A light coat of the range itself. A wet burner will then wipe off; Remove and discard aluminum foil after each use a sharp metal scraper to clean glass, porcelain, or painted surfaces. In case your range, the heat...
... door glass or a collection of soap and water on backguards, aluminum control panels and painted surfaces. Always keep cleaning materials in hot sudsy water. Repair Parts When repair parts are suitable for use a mild detergent and water. A light coat of the range itself. A wet burner will then wipe off; Remove and discard aluminum foil after each use a sharp metal scraper to clean glass, porcelain, or painted surfaces. In case your range, the heat...
User Manual
Page 29
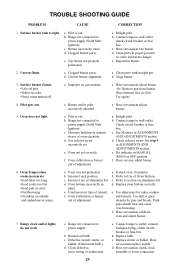
... ADJUSTMENTS section. a. Incorrect rack position c. d. a. c. Connect range to power supply (Solid State Ignition). Have serviceman check clock assembly or loose connection. 29 Clogged burner ports. c. Uneven flame. Clean ports with straight pin. Align burner. 3. Try again.) 4. Oven does not light. b. Range not connected to outlet, connect backguard plug, check circuit breaker or fuse box. a. c. e. Use shiny pans for pies and breads. Use dull or glass utensils for cakes,cookies and biscuits. b. Replace starter or ballast. Pilot...
... ADJUSTMENTS section. a. Incorrect rack position c. d. a. c. Connect range to power supply (Solid State Ignition). Have serviceman check clock assembly or loose connection. 29 Clogged burner ports. c. Uneven flame. Clean ports with straight pin. Align burner. 3. Try again.) 4. Oven does not light. b. Range not connected to outlet, connect backguard plug, check circuit breaker or fuse box. a. c. e. Use shiny pans for pies and breads. Use dull or glass utensils for cakes,cookies and biscuits. b. Replace starter or ballast. Pilot...

