User Guide
Page 13
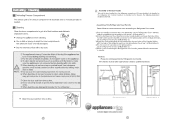
If the handle must be taken apart please contact a qualified technician. 29 Assembly of the Door Handle Please follow the instructions Attention: Please do not disassemble the Refrigerator door handle. removing please follow the instructions below when assembling the Refrigerator Door Handle: in reverse.
If the handle must be taken apart please contact a qualified technician. 29 Assembly of the Door Handle Please follow the instructions Attention: Please do not disassemble the Refrigerator door handle. removing please follow the instructions below when assembling the Refrigerator Door Handle: in reverse.

User Guide
Page 15
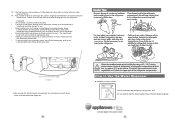
...adequate disinfection before or after the system. • WARNING - If the PRV is not fitted to the connection line your Ice & Water refrigerator features may not function in some circumstances. • It is recommended that an authorised plumber in such a position so that is microbiologically ... install the water connection. • The new tubings supplied with water that it will not flow back into the mains from the refrigerator water system. The plastic tubing supplied should not be used. Installation precautions/warning • DO NOT use copper tubing. Removing and ...
...adequate disinfection before or after the system. • WARNING - If the PRV is not fitted to the connection line your Ice & Water refrigerator features may not function in some circumstances. • It is recommended that an authorised plumber in such a position so that is microbiologically ... install the water connection. • The new tubings supplied with water that it will not flow back into the mains from the refrigerator water system. The plastic tubing supplied should not be used. Installation precautions/warning • DO NOT use copper tubing. Removing and ...
User Guide
Page 16
... pull tubing at any point, re-cut the end and re-insert. Failure to Use the Water Dispenser Available on the first use of the refrigerator unit compartment and not in 20 mm (¾") before reaching the stop water flow), clear of the ice maker and water dispenser. Important! • All...
... pull tubing at any point, re-cut the end and re-insert. Failure to Use the Water Dispenser Available on the first use of the refrigerator unit compartment and not in 20 mm (¾") before reaching the stop water flow), clear of the ice maker and water dispenser. Important! • All...
User Guide
Page 17
It is not unusual for a few drops of water to pull out the refrigerator for service. 13. Remove double sided foam backing and attach filter to the desired position as located in step 10 (refer to the left when ... 2. - Coil water line tubing behind the fridge. First Use gWhen preessing the water dispenser tab the first time you like Diagram 9 on head. - Push your refrigerator into the water dispenser or ice storage box. Remove protective cap on spigot on page 15. Push the cartridge up towards filter head while rotating...
It is not unusual for a few drops of water to pull out the refrigerator for service. 13. Remove double sided foam backing and attach filter to the desired position as located in step 10 (refer to the left when ... 2. - Coil water line tubing behind the fridge. First Use gWhen preessing the water dispenser tab the first time you like Diagram 9 on head. - Push your refrigerator into the water dispenser or ice storage box. Remove protective cap on spigot on page 15. Push the cartridge up towards filter head while rotating...
User Guide
Page 18
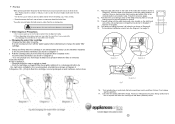
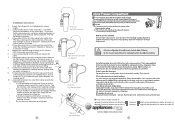
... minimise water leakage when replacing cartridge. • Ensure the filter is locked. 4. To flush the water filter and check for replacement. Ensure that refrigerator is locked. 5. cold water feed only (dishwasher or sink mixer taps) - Connect one locking key to the ( ) screen,( ) screen,( ...to scroll to each side of the tubing into a power supply. 2. Diagram 1 Fig.2 PRV connection Diagram 2 Fig.3 Waterline connection to refrigerator INLET Diagram 3 Fig.4 Tap connection Diagram 4 Fig.5 Locking key have an To turn isolating tap on and off then press(ok),ice maker...
... minimise water leakage when replacing cartridge. • Ensure the filter is locked. 4. To flush the water filter and check for replacement. Ensure that refrigerator is locked. 5. cold water feed only (dishwasher or sink mixer taps) - Connect one locking key to the ( ) screen,( ) screen,( ...to scroll to each side of the tubing into a power supply. 2. Diagram 1 Fig.2 PRV connection Diagram 2 Fig.3 Waterline connection to refrigerator INLET Diagram 3 Fig.4 Tap connection Diagram 4 Fig.5 Locking key have an To turn isolating tap on and off then press(ok),ice maker...


