
User Guide
Page 2
If you have any questions please contact Ithe Customer Care Department as indicated on the warranty card
If you have any questions please contact Ithe Customer Care Department as indicated on the warranty card

User Guide
Page 6
water filter 36
water filter 36
User Guide
Page 13
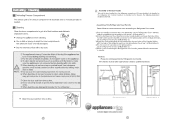
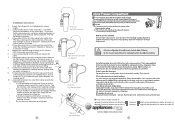
Assembly of the Door Handle Please follow the instructions Attention: Please do not disassemble the Refrigerator door handle. removing please follow the instructions below when assembling the Refrigerator Door Handle: in reverse. If the handle must be taken apart please contact a qualified technician. 29
Assembly of the Door Handle Please follow the instructions Attention: Please do not disassemble the Refrigerator door handle. removing please follow the instructions below when assembling the Refrigerator Door Handle: in reverse. If the handle must be taken apart please contact a qualified technician. 29
User Guide
Page 14
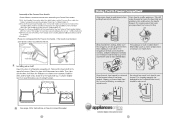
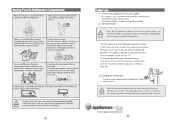
If the handle must be taken apart please contact a qualified technician. ԡ See page 12 for instructions on how to connect the water. 28 Please follow the instructions below when assembling the Freezer Door Handle: Please do not disassemble the Freezer door handle.
If the handle must be taken apart please contact a qualified technician. ԡ See page 12 for instructions on how to connect the water. 28 Please follow the instructions below when assembling the Freezer Door Handle: Please do not disassemble the Freezer door handle.

User Guide
Page 15
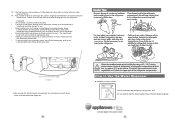
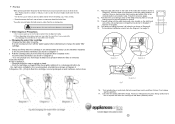
... and ice bin Removing and Replacing FreezerDrawer filter Assembling the water connection For water dispenser product only Contents of filter kit 1 4 m (13 ft) white 6 mm ( ") tubing 2 1 x 200 mm (8") blue tubing 3 1 x pressure reducing valve (PRV) 4 1 x double sided foam 5 2 x locking keys 6 1 x water filter cartridge and head 7 1 x tap connection - 15 mm ( ") BSP Freezer Drawer 27 1 2 3 4 5 6 7 Fig.1 Water connection kit Important! • It is imperative the pressure reducing valve (PRV) is used to install the water connection. • The new tubings supplied with water...
... and ice bin Removing and Replacing FreezerDrawer filter Assembling the water connection For water dispenser product only Contents of filter kit 1 4 m (13 ft) white 6 mm ( ") tubing 2 1 x 200 mm (8") blue tubing 3 1 x pressure reducing valve (PRV) 4 1 x double sided foam 5 2 x locking keys 6 1 x water filter cartridge and head 7 1 x tap connection - 15 mm ( ") BSP Freezer Drawer 27 1 2 3 4 5 6 7 Fig.1 Water connection kit Important! • It is imperative the pressure reducing valve (PRV) is used to install the water connection. • The new tubings supplied with water...
User Guide
Page 16
... flow of the ice maker and water dispenser. vegetables Fig.8 Connection to water supply Diagram 9 Refer to ensure the reservoir is removed at the same time. How to Use the Water Dispenser Available on the first use of water,release from your local plumber to do this will stop water flow), clear of the refrigerator unit compartment and not in the collet and gently pull tubing at any...
... flow of the ice maker and water dispenser. vegetables Fig.8 Connection to water supply Diagram 9 Refer to ensure the reservoir is removed at the same time. How to Use the Water Dispenser Available on the first use of water,release from your local plumber to do this will stop water flow), clear of the refrigerator unit compartment and not in the collet and gently pull tubing at any...
User Guide
Page 17
... necessary to turn off the water supply before attempting to change the water filter cartridge. 1 Grasp and firmly twist the cartridge in Diagram 1. 2 Pull the cartridge away from the ice storage box. First Use gWhen preessing the water dispenser tab the first time you like Diagram 9 on page 15. It is removed. 3 Discard old filter. 4 Filter installation: - Write the date to kink or squash the water line running into place being careful not...
... necessary to turn off the water supply before attempting to change the water filter cartridge. 1 Grasp and firmly twist the cartridge in Diagram 1. 2 Pull the cartridge away from the ice storage box. First Use gWhen preessing the water dispenser tab the first time you like Diagram 9 on page 15. It is removed. 3 Discard old filter. 4 Filter installation: - Write the date to kink or squash the water line running into place being careful not...
User Guide
Page 18
...(ok),ice maker is turned on. )light off . 10. Please note that refrigerator is locked. 5. Once complete, turn the ice maker on and off press (Function) button to scroll to the ( press (Function) button to scroll to ensure it is turned off. 26 Locate isolation tap for replacement. Connect the 200 mm (8") blue tubing to each side of the water filter cartridge as shown in Diagram 4. 9. Cut the tubing making sure...
...(ok),ice maker is turned on. )light off . 10. Please note that refrigerator is locked. 5. Once complete, turn the ice maker on and off press (Function) button to scroll to the ( press (Function) button to scroll to ensure it is turned off. 26 Locate isolation tap for replacement. Connect the 200 mm (8") blue tubing to each side of the water filter cartridge as shown in Diagram 4. 9. Cut the tubing making sure...
User Guide
Page 19
9 7 Adjustment 9 To ensure normal operation,allow the appliance to stand still for 6 hours.
9 7 Adjustment 9 To ensure normal operation,allow the appliance to stand still for 6 hours.


