user manual
Page 1
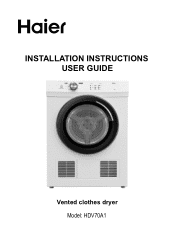
INSTALLATION INSTRUCTIONS USER GUIDE Suitable for Cotton Synthetic Mix Prohibited for Jeans Sports Shirt Downy Wool Silk 7kg Vented clothes dryer Model: HDV70A1
INSTALLATION INSTRUCTIONS USER GUIDE Suitable for Cotton Synthetic Mix Prohibited for Jeans Sports Shirt Downy Wool Silk 7kg Vented clothes dryer Model: HDV70A1

user manual
Page 3
The instructions contain important information which will help you get the best out of the device and ensure safe and proper installation, use and maintenance. 1 CONTENTS SAFETY AND WARNINGS 2 INSTALLATION INSTRUCTIONS 6 CONTROL PANEL 11 USING YOUR DRYER 12 CLEANING YOUR DRYER 14 TROUBLESHOOTING 15 IMPORTANT! SAVE THESE INSTRUCTIONS Please read these instructions carefully before using your tumble dryer.
The instructions contain important information which will help you get the best out of the device and ensure safe and proper installation, use and maintenance. 1 CONTENTS SAFETY AND WARNINGS 2 INSTALLATION INSTRUCTIONS 6 CONTROL PANEL 11 USING YOUR DRYER 12 CLEANING YOUR DRYER 14 TROUBLESHOOTING 15 IMPORTANT! SAVE THESE INSTRUCTIONS Please read these instructions carefully before using your tumble dryer.
user manual
Page 4
... 'Air Dry'. ■ Do not stop a tumble clothes dryer before the cycle has finished, dry clothes should go through an external switching device, such as massage/beauty clinics where there may be placed in these user instructions can cause a fire hazard. ■ Failure to dry these instructions can result if the wire come off by a utility. If for commercial applications, such as a timer, or connected to a circuit...
... 'Air Dry'. ■ Do not stop a tumble clothes dryer before the cycle has finished, dry clothes should go through an external switching device, such as massage/beauty clinics where there may be placed in these user instructions can cause a fire hazard. ■ Failure to dry these instructions can result if the wire come off by a utility. If for commercial applications, such as a timer, or connected to a circuit...
user manual
Page 5
... 'Start / Pause'. ■ Never attempt to repair the dryer yourself. ■ The only user-removable parts of the dryer are designed to be removed by anyone other parts are the lint filter. IMPORTANT! Lint ■ Accumulated lint in or around the dryer is clear of lint. ■ At regular intervals have the interior of the dryer cleaned of any accumulated lint. SAFETY AND WARNINGS ■ Do not operate this User Guide, turn...
... 'Start / Pause'. ■ Never attempt to repair the dryer yourself. ■ The only user-removable parts of the dryer are designed to be removed by anyone other parts are the lint filter. IMPORTANT! Lint ■ Accumulated lint in or around the dryer is clear of lint. ■ At regular intervals have the interior of the dryer cleaned of any accumulated lint. SAFETY AND WARNINGS ■ Do not operate this User Guide, turn...
user manual
Page 6
... door is specifically recommended by hair care products be placed in a tumble dryer, they should not be used for cleaning. ■ Fabric Softeners or similar products should not be opened fully. 4 The appliance must be removed from escaping creating a fire hazard. ■ If it is repaired, as there is risk of electric shock. ■ Do not install the dryer behind a lockable door, sliding door...
... door is specifically recommended by hair care products be placed in a tumble dryer, they should not be used for cleaning. ■ Fabric Softeners or similar products should not be opened fully. 4 The appliance must be removed from escaping creating a fire hazard. ■ If it is repaired, as there is risk of electric shock. ■ Do not install the dryer behind a lockable door, sliding door...
user manual
Page 7
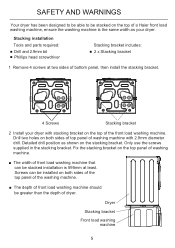
... width as shown on the stacking bracket. Only use the screws supplied in the stacking bracket. Fix the stacking bracket on the top panel of washing machine. ■ The width of a Haier front load washing machine, ensure the washing machine is 595mm at two sides of bottom panel, then install the stacking bracket. 4 Screws Stacking bracket 2 Install your dryer. Drill two holes on the...
... width as shown on the stacking bracket. Only use the screws supplied in the stacking bracket. Fix the stacking bracket on the top panel of washing machine. ■ The width of a Haier front load washing machine, ensure the washing machine is 595mm at two sides of bottom panel, then install the stacking bracket. 4 Screws Stacking bracket 2 Install your dryer. Drill two holes on the...

user manual
Page 8
... you remove protective covers from around the dryer in direct sunlight or close to a source of heat. ■ Do not place your dryer. Unpacking 1 Remove all the packaging. 2 Tilt the dryer backwards and 'walk' it off the base one foot at a time. 3 Remove all packaging and accessories inside the drum: ■ 1 x Installation instructions and user guide ■ 2 x Stacking bracket ■ 1 x Hose connector ■ 1 x Flexible hose ■ 1 x Flexible hose clip ■ 1 x Warranty...
... you remove protective covers from around the dryer in direct sunlight or close to a source of heat. ■ Do not place your dryer. Unpacking 1 Remove all the packaging. 2 Tilt the dryer backwards and 'walk' it off the base one foot at a time. 3 Remove all packaging and accessories inside the drum: ■ 1 x Installation instructions and user guide ■ 2 x Stacking bracket ■ 1 x Hose connector ■ 1 x Flexible hose ■ 1 x Flexible hose clip ■ 1 x Warranty...

user manual
Page 9
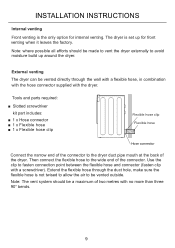
... open fires, when operating the dryer. The external venting system should be: ■ Made from 100mm diameter flexible plastic pipe where the vent system goes through the wall. ■ Exhaust air outside to avoid the back flow of...venting The dryer is set up of moisture in the factory for front venting. If front venting is used for all dryers to avoid the build up in the room, which is used there must comply with no more than three 90° bends. INSTALLATION INSTRUCTIONS Venting Correct installation is very important for exhausting fumes from appliances burning gas...
... open fires, when operating the dryer. The external venting system should be: ■ Made from 100mm diameter flexible plastic pipe where the vent system goes through the wall. ■ Exhaust air outside to avoid the back flow of...venting The dryer is set up of moisture in the factory for front venting. If front venting is used for all dryers to avoid the build up in the room, which is used there must comply with no more than three 90° bends. INSTALLATION INSTRUCTIONS Venting Correct installation is very important for exhausting fumes from appliances burning gas...
user manual
Page 10
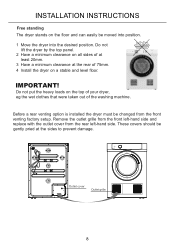
... desired position. Before a rear venting option is installed the dryer must be gently pried at the rear of 75mm. 4 Install the dryer on a stable and level floor. INSTALLATION INSTRUCTIONS Free standing The dryer stands on the top of your dryer, eg the wet clothes that were taken out of the washing machine. Outlet cover Outlet grille 8 Do not lift the dryer by the top panel. 2 Have a minimum clearance...
... desired position. Before a rear venting option is installed the dryer must be gently pried at the rear of 75mm. 4 Install the dryer on a stable and level floor. INSTALLATION INSTRUCTIONS Free standing The dryer stands on the top of your dryer, eg the wet clothes that were taken out of the washing machine. Outlet cover Outlet grille 8 Do not lift the dryer by the top panel. 2 Have a minimum clearance...
user manual
Page 11
... to allow the air to the dryer duct pipe mouth at the back of the connector. Tools and parts required: ■ Slotted screwdriver kit part includes: ■ 1 x Hose connector ■ 1 x Flexible hose ■ 1 x Flexible hose clip Flexible hose clip Flexible hose Hose connector Connect the narrow end of the connector to be a maximum of two metres with no more than three 90° bends. 9 INSTALLATION INSTRUCTIONS Internal venting Front venting is the...
... to allow the air to the dryer duct pipe mouth at the back of the connector. Tools and parts required: ■ Slotted screwdriver kit part includes: ■ 1 x Hose connector ■ 1 x Flexible hose ■ 1 x Flexible hose clip Flexible hose clip Flexible hose Hose connector Connect the narrow end of the connector to be a maximum of two metres with no more than three 90° bends. 9 INSTALLATION INSTRUCTIONS Internal venting Front venting is the...
user manual
Page 12
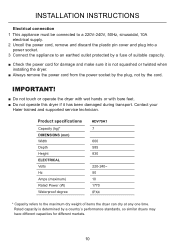
... installing the dryer. ■ Always remove the power cord from the power socket by the plug, not by a fuse of items the dryer can dry at any one time. Product specifications Capacity (kg)* DIMENSIONS (mm) Width Depth Height ELECTRICAL Volts Hz Amps (maximum) Rated Power (W) Waterproof degree HDV70A1 7 600 585 830 220-240~ 50 10 1770 IPX4 * Capacity refers to an earthed outlet protected by the cord. Contact your Haier trained and supported service...
... installing the dryer. ■ Always remove the power cord from the power socket by the plug, not by a fuse of items the dryer can dry at any one time. Product specifications Capacity (kg)* DIMENSIONS (mm) Width Depth Height ELECTRICAL Volts Hz Amps (maximum) Rated Power (W) Waterproof degree HDV70A1 7 600 585 830 220-240~ 50 10 1770 IPX4 * Capacity refers to an earthed outlet protected by the cord. Contact your Haier trained and supported service...
user manual
Page 13
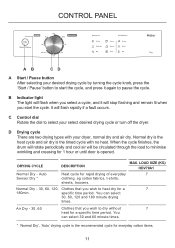
... door is the timed cycle with your dryer, normal dry and air dry. Normal dry is the heat cycle and air dry is opened. When the cycle finishes, the drum will rotate periodically and cool air will flash rapidly if a fault occurs. Auto Heat cycle for rapid drying of everyday 7 Sensor Dry * clothing, eg cotton fabrics, t-shirts, sheets, trousers. Normal Dry - 30, 60, 120, Clothes that you start the cycle, and press it again to pause the cycle. B Indicator light The light...
... door is the timed cycle with your dryer, normal dry and air dry. Normal dry is the heat cycle and air dry is opened. When the cycle finishes, the drum will rotate periodically and cool air will flash rapidly if a fault occurs. Auto Heat cycle for rapid drying of everyday 7 Sensor Dry * clothing, eg cotton fabrics, t-shirts, sheets, trousers. Normal Dry - 30, 60, 120, Clothes that you start the cycle, and press it again to pause the cycle. B Indicator light The light...
user manual
Page 14
... plenty of the dryer as excess water may damage your dryer, as the drying cycle is clean before using your dryer. ■ Sort and load items into the dryer drum, ensuring no items are in the tumble dryer. IMPORTANT! ■ Do not overload your dryer and clothes. ■ Never put dripping wet clothes in the dryer. ■ Close zippers, hooks, fastenings, and remove loose bra wires. To reduce tangling...
... plenty of the dryer as excess water may damage your dryer, as the drying cycle is clean before using your dryer. ■ Sort and load items into the dryer drum, ensuring no items are in the tumble dryer. IMPORTANT! ■ Do not overload your dryer and clothes. ■ Never put dripping wet clothes in the dryer. ■ Close zippers, hooks, fastenings, and remove loose bra wires. To reduce tangling...

user manual
Page 15
... start your dryer. The drum will rotate periodically and cool air will be met. µ Do not dry shoes or other rubber items in you dryer. Turn off the dryer Turn off the dryer. USING YOUR DRYER Selecting program Select you desired drying cycle by turning the cycle knob to "Off" position. When you can open the door and remove the laundry. IMPORTANT! µ If you wish to stop the "wrinkle free" operation...
... start your dryer. The drum will rotate periodically and cool air will be met. µ Do not dry shoes or other rubber items in you dryer. Turn off the dryer Turn off the dryer. USING YOUR DRYER Selecting program Select you desired drying cycle by turning the cycle knob to "Off" position. When you can open the door and remove the laundry. IMPORTANT! µ If you wish to stop the "wrinkle free" operation...
user manual
Page 16
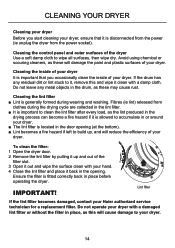
... drum, as these may cause rust. Cleaning the lint filter ■ Lint is disconnected from the power (ie unplug the dryer from clothes during wearing and washing. IMPORTANT! To clean the filter: 1 Open the dryer door. 2 Remove the lint filter by pulling it up , and will reduce the efficiency of your dryer. Cleaning the inside of your Haier authorized service technician for a replacement filter. Lint filter If the lint filter becomes damaged, contact your dryer. Fibres (ie lint...
... drum, as these may cause rust. Cleaning the lint filter ■ Lint is disconnected from the power (ie unplug the dryer from clothes during wearing and washing. IMPORTANT! To clean the filter: 1 Open the dryer door. 2 Remove the lint filter by pulling it up , and will reduce the efficiency of your dryer. Cleaning the inside of your Haier authorized service technician for a replacement filter. Lint filter If the lint filter becomes damaged, contact your dryer. Fibres (ie lint...
user manual
Page 17
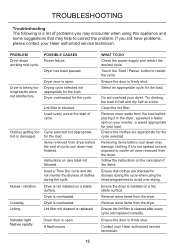
... load. Linting. Dryer door is open . Ensure the dryer is installed on a stable surface. Ensure the door is open . Drying cycle selected not appropriate for your load. Removing items before placing it is not spread out and exposed to cooler air once removed from the dryer. POSSIBLE CAUSES Power failure. Clean the lint filter. TROUBLESHOOTING Troubleshooting The following is a list of problems you still have problems, please contact your Haier authorized service technician. PROBLEM Dryer stops working mid-cycle. Instructions on the care...
... load. Linting. Dryer door is open . Ensure the dryer is installed on a stable surface. Ensure the door is open . Drying cycle selected not appropriate for your load. Removing items before placing it is not spread out and exposed to cooler air once removed from the dryer. POSSIBLE CAUSES Power failure. Clean the lint filter. TROUBLESHOOTING Troubleshooting The following is a list of problems you still have problems, please contact your Haier authorized service technician. PROBLEM Dryer stops working mid-cycle. Instructions on the care...


