
User Manual
Page 2
... a utility. 2 Disconnect the appliance from the socket, cut the mains power cable and destroy this manual in a convenient place so you can take these items from uncontrolled waste disposal, please separate these items for purchasing a Haier Product. Keep this together with the plug. To prevent children shutting themselves in order to have...
... a utility. 2 Disconnect the appliance from the socket, cut the mains power cable and destroy this manual in a convenient place so you can take these items from uncontrolled waste disposal, please separate these items for purchasing a Haier Product. Keep this together with the plug. To prevent children shutting themselves in order to have...
User Manual
Page 9
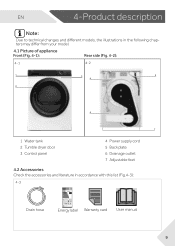
... plate 6 Drainage outlet 7 Adjustable feet 4.2 Accessories Check the accessories and literature in the following chapters may differ from your model. 4.1 Picture of the manual. To deactivate press the button for 3 seconds again until the indicator icon lights up . 4 Signal indicator You can choose signal as you turn the knob... Note: Due to technical changes and different models, the illustrations in accordance with this list (Fig.4-3): 4-3 Drain hose Energy label Warranty card User manual 9
... plate 6 Drainage outlet 7 Adjustable feet 4.2 Accessories Check the accessories and literature in the following chapters may differ from your model. 4.1 Picture of the manual. To deactivate press the button for 3 seconds again until the indicator icon lights up . 4 Signal indicator You can choose signal as you turn the knob... Note: Due to technical changes and different models, the illustrations in accordance with this list (Fig.4-3): 4-3 Drain hose Energy label Warranty card User manual 9
User Manual
Page 11
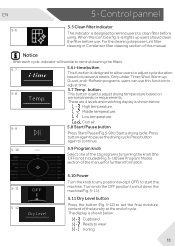
... users can use . Low temperature. EN 5-Control pannel 5.5 Clean filter indicator 5-6 This indicator is not included) ( F ig. 5-10). When this manual. Cool air. 5-9 5.8 Start/Pause button Press Start/Pause (Fig.5-9) to start the machine. There are 4 levels and matching display is shown below : High ...Middle temperature. Press button again to pause the drying cycle.Press button again to continue. 5-10 5.9 Program knob Select one of the manual for further information. 5-11 5-12 Dry Level 5.10 Power Turn the knob to any position (except OFF) to Start a drying ...
... users can use . Low temperature. EN 5-Control pannel 5.5 Clean filter indicator 5-6 This indicator is not included) ( F ig. 5-10). When this manual. Cool air. 5-9 5.8 Start/Pause button Press Start/Pause (Fig.5-9) to start the machine. There are 4 levels and matching display is shown below : High ...Middle temperature. Press button again to pause the drying cycle.Press button again to continue. 5-10 5.9 Program knob Select one of the manual for further information. 5-11 5-12 Dry Level 5.10 Power Turn the knob to any position (except OFF) to Start a drying ...
User Manual
Page 12
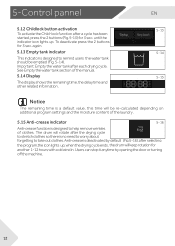
... indicator This indicator is deactivated by opening the door or turning off the machine. 4-18 ee 12 See Empty the water tank section of the manual. 5.14 Display The display shows the remaining time, the delay time and other related information. 5-13 Childlock 5-14 5-15 Notice The remaining time is a default...
... indicator This indicator is deactivated by opening the door or turning off the machine. 4-18 ee 12 See Empty the water tank section of the manual. 5.14 Display The display shows the remaining time, the delay time and other related information. 5-13 Childlock 5-14 5-15 Notice The remaining time is a default...
User Manual
Page 25
After transportation and installation, you have to the desired level(Fig.12-1). 12.4 Installation under worktop The dimensions of this manual. 12.1 Preparation ▶ Remove all packages including the polystyrene base firstly. This oil can be observed. Set the feet to wait 2 hours so that all ...
After transportation and installation, you have to the desired level(Fig.12-1). 12.4 Installation under worktop The dimensions of this manual. 12.1 Preparation ▶ Remove all packages including the polystyrene base firstly. This oil can be observed. Set the feet to wait 2 hours so that all ...

