User Manual
Page 2
... purchased this instruction carefully before using the appliance. charger, ( e.g. WARNING! Household users should contact their working life. Disconnect the appliance from the power supply. The instruction contains important information which will guide you for the safe and proper use and maintenance. Safety notice Warning! - charger, headset, USB cable) should not be powered through an external switching device, such as daily use of the...
... purchased this instruction carefully before using the appliance. charger, ( e.g. WARNING! Household users should contact their working life. Disconnect the appliance from the power supply. The instruction contains important information which will guide you for the safe and proper use and maintenance. Safety notice Warning! - charger, headset, USB cable) should not be powered through an external switching device, such as daily use of the...

User Manual
Page 4
...gas in the tumble dryer. ▶ Do make sure not to the appliance. ▶ Do not place heavy objects or sources of heat or damp on top of the appliance. ▶ Hold the plug, not the cable, when unplugging the appliance. ▶ Do not touch the rear and the drum during operation... around the tumble dryer free of dust and lint. ▶ Do make sure that there is dry and well ventilated. The ambient temperature should be between 5 °C and 35 °C. ▶ Do not cover any ventilation openings in the base by the fabric softener instructions. ▶ Do not use the appliance if you...
...gas in the tumble dryer. ▶ Do make sure not to the appliance. ▶ Do not place heavy objects or sources of heat or damp on top of the appliance. ▶ Hold the plug, not the cable, when unplugging the appliance. ▶ Do not touch the rear and the drum during operation... around the tumble dryer free of dust and lint. ▶ Do make sure that there is dry and well ventilated. The ambient temperature should be between 5 °C and 35 °C. ▶ Do not cover any ventilation openings in the base by the fabric softener instructions. ▶ Do not use the appliance if you...

User Manual
Page 5
...;llings (e.g. If a long absence is finished, Never stop a tumble dryer before undertaking any routine maintenance. 5 EN 1-Safety information WARNING! Daily use ▶ Do not use the appliance without heat (cool down cycle) to ensure remaining garments are supervised if they carry out cleaning and maintenance. ▶ Disconnect the appliance from the electrical supply before the end of the drying cycle unless all...
...;llings (e.g. If a long absence is finished, Never stop a tumble dryer before undertaking any routine maintenance. 5 EN 1-Safety information WARNING! Daily use ▶ Do not use the appliance without heat (cool down cycle) to ensure remaining garments are supervised if they carry out cleaning and maintenance. ▶ Disconnect the appliance from the electrical supply before the end of the drying cycle unless all...
User Manual
Page 6
... the power supply which is easy access to after each programme (see CARE AND CLEANING). ▶ Do not use water spray or steam to clean the appliance. ▶ Do not use industrial chemicals to clean the appliance. ▶ If the supply cord is needed, please contact our customer service. Installation ▶ Ensure put the machine in an area which allows opening of the door. ▶ Install the...
... the power supply which is easy access to after each programme (see CARE AND CLEANING). ▶ Do not use water spray or steam to clean the appliance. ▶ Do not use industrial chemicals to clean the appliance. ▶ If the supply cord is needed, please contact our customer service. Installation ▶ Ensure put the machine in an area which allows opening of the door. ▶ Install the...

User Manual
Page 8
... been washed in the dryer . ▶ Cleaning of the lint filters: Clean the lint filters after each cycle. ▶ Ventilation: Make sure the appliance is properly ventilated (see INSTALLATION). ▶ Condensed water reuse: The collected condensed water can be avoided. Notice The appliance contains the fluorinated greenhouse gas R134a (GWP:1430). Select the right pro- Before that, it...
... been washed in the dryer . ▶ Cleaning of the lint filters: Clean the lint filters after each cycle. ▶ Ventilation: Make sure the appliance is properly ventilated (see INSTALLATION). ▶ Condensed water reuse: The collected condensed water can be avoided. Notice The appliance contains the fluorinated greenhouse gas R134a (GWP:1430). Select the right pro- Before that, it...
User Manual
Page 9
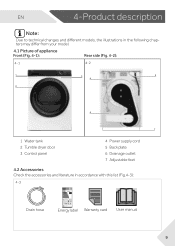
... 7 1 Water tank 2 Tumble dryer door 3 Control panel 4 Power supply cord 5 Back plate 6 Drainage outlet 7 Adjustable feet 4.2 Accessories Check the accessories and literature in , afterwards press to start the delayed operation. To deactivate press the button for 3 sec. EN 4-Product description Note: Due to technical changes and different models, the illustrations in the following chapters may differ from your model. 4.1 Picture of the manual. Dry...
... 7 1 Water tank 2 Tumble dryer door 3 Control panel 4 Power supply cord 5 Back plate 6 Drainage outlet 7 Adjustable feet 4.2 Accessories Check the accessories and literature in , afterwards press to start the delayed operation. To deactivate press the button for 3 sec. EN 4-Product description Note: Due to technical changes and different models, the illustrations in the following chapters may differ from your model. 4.1 Picture of the manual. Dry...
User Manual
Page 11
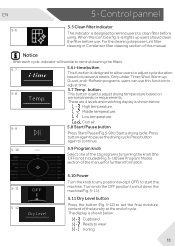
... personal needs or requirements. There are 4 levels and matching display is not included) ( F ig. 5-10). Press button again to pause the drying cycle.Press button again to continue. 5-10 5.9 Program knob Select one of the manual for further information. 5-11 5-12 Dry Level 5.10 Power Turn the knob to any position (except OFF) to adjust drying temperature based on personal needs. Cool air. 5-9 5.8 Start/Pause button Press Start...
... personal needs or requirements. There are 4 levels and matching display is not included) ( F ig. 5-10). Press button again to pause the drying cycle.Press button again to continue. 5-10 5.9 Program knob Select one of the manual for further information. 5-11 5-12 Dry Level 5.10 Power Turn the knob to any position (except OFF) to adjust drying temperature based on personal needs. Cool air. 5-9 5.8 Start/Pause button Press Start...
User Manual
Page 12
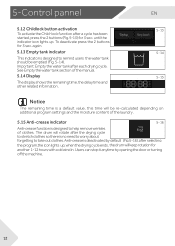
... clothes. Important: Empty the water tank after a cycle has been started, press the 2 buttons (Fig. 5-13) for 3 sec. The drum will keep rotation for 3 sec. 5-Control pannel EN 5.12 Childlock button activation To activate the Child-lock function after each drying cycle. A nti-crease is no need to worry about forgetting to remind users the water tank should be re-calculated depending on additional program settings...
... clothes. Important: Empty the water tank after a cycle has been started, press the 2 buttons (Fig. 5-13) for 3 sec. The drum will keep rotation for 3 sec. 5-Control pannel EN 5.12 Childlock button activation To activate the Child-lock function after each drying cycle. A nti-crease is no need to worry about forgetting to remind users the water tank should be re-calculated depending on additional program settings...
User Manual
Page 13
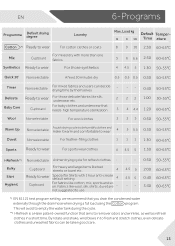
... A fixed 30 minutes dry 0.5 0.5 0.5 0:30 50-55°C Timer Nonselectable F or mixed fabrics and users can be taken good care. 13 EN 6-Programs Programme Default drying degree Laundry Cotton *) Ready to wear F or cotton clothes or coats F or mixed dry with 1 hour anti-crease default setting 4 Cupboard For fabrics like bed sheets or towel etc. 4 Ready to remover odors and wrinkles, as...
... A fixed 30 minutes dry 0.5 0.5 0.5 0:30 50-55°C Timer Nonselectable F or mixed fabrics and users can be taken good care. 13 EN 6-Programs Programme Default drying degree Laundry Cotton *) Ready to wear F or cotton clothes or coats F or mixed dry with 1 hour anti-crease default setting 4 Cupboard For fabrics like bed sheets or towel etc. 4 Ready to remover odors and wrinkles, as...
User Manual
Page 15
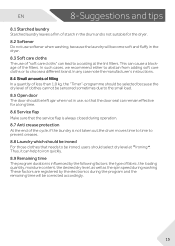
... the electronics during operation. 8.7 Anti crease protection A t the end of the cycle, if the laundry is not taken out,the drum moves time to time to prevent creases. 8.8 Laundry which should be ironed For those clothes that needs to be ironed, users should select dry level at the lint filters. In any case note the manufacturer's instructions. 8.4 Small amounts of...
... the electronics during operation. 8.7 Anti crease protection A t the end of the cycle, if the laundry is not taken out,the drum moves time to time to prevent creases. 8.8 Laundry which should be ironed For those clothes that needs to be ironed, users should select dry level at the lint filters. In any case note the manufacturer's instructions. 8.4 Small amounts of...

User Manual
Page 17
in open air. ▶ Clothes like knitwear can be over -dry easy-care linen. Risk of clothes before putting into dryer such as brooches. 9-6 ▶ Zippers up and make sure the buttons are always recommended to choose. ▶ For pre-dried, multi-layered garments or for final drying the time-programme (TIMER ) should be chosen. 17 Make sure: 9-3 9-4 ▶ the water tank is...
in open air. ▶ Clothes like knitwear can be over -dry easy-care linen. Risk of clothes before putting into dryer such as brooches. 9-6 ▶ Zippers up and make sure the buttons are always recommended to choose. ▶ For pre-dried, multi-layered garments or for final drying the time-programme (TIMER ) should be chosen. 17 Make sure: 9-3 9-4 ▶ the water tank is...

User Manual
Page 18
... to any time: ▶ The cycle will be interrupted if opening the door. The Interior of the drum or the clothes itself may cause malfunctions and damage of burns . ▶ To continue the program, press the "Start/Pause" button after closing the door. WARNING! Never turn the dryer off before the end of the drying cycle unless all items are not pinched. 9.4 Take...
... to any time: ▶ The cycle will be interrupted if opening the door. The Interior of the drum or the clothes itself may cause malfunctions and damage of burns . ▶ To continue the program, press the "Start/Pause" button after closing the door. WARNING! Never turn the dryer off before the end of the drying cycle unless all items are not pinched. 9.4 Take...
User Manual
Page 19
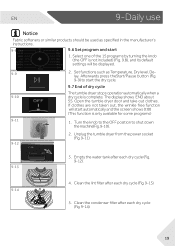
... manufacturer's instructions. 9-8 9.6 Set program and start i-REFRESH Dry Level Delay Childl ock T emp. Empty the water tank after each dry cycle (Fig. 9-13). 5. Afterwards press theStart/Pause button (Fig. 9-9) to shut down the machine(Fig. 9-10). 2. EN 9-Daily use Notice PANEL Fabric softeners or similar products should be displayed. 2. Open the tumble dryer door and take out clothes. Unplug the tumble dryer from the power socket (Fig...
... manufacturer's instructions. 9-8 9.6 Set program and start i-REFRESH Dry Level Delay Childl ock T emp. Empty the water tank after each dry cycle (Fig. 9-13). 5. Afterwards press theStart/Pause button (Fig. 9-9) to shut down the machine(Fig. 9-10). 2. EN 9-Daily use Notice PANEL Fabric softeners or similar products should be displayed. 2. Open the tumble dryer door and take out clothes. Unplug the tumble dryer from the power socket (Fig...

User Manual
Page 22
.... Make sure not to remove it . 22 Pull out the water tank from its housing (Fig. 10-9). 2. Use a damp cloth and some detergent to damage the evaporator while cleaning it . Empty the water tank after each drying cycle. 1. Reinstall the water tank to the tumble dryer (Fig. 10-11). ...inside the drum. Do not use any kind of drinking or food processing. 10.4 Tumble dryer Wipe the outside of the tumble dryer and the control panel with a damp cloth. 10-Care and cleaning 10.3 Empty the water tank During operation, steam is dirty, it can be cleaned by using a vacuum cleaner. Wrinkle Free i-Re...
.... Make sure not to remove it . 22 Pull out the water tank from its housing (Fig. 10-9). 2. Use a damp cloth and some detergent to damage the evaporator while cleaning it . Empty the water tank after each drying cycle. 1. Reinstall the water tank to the tumble dryer (Fig. 10-11). ...inside the drum. Do not use any kind of drinking or food processing. 10.4 Tumble dryer Wipe the outside of the tumble dryer and the control panel with a damp cloth. 10-Care and cleaning 10.3 Empty the water tank During operation, steam is dirty, it can be cleaned by using a vacuum cleaner. Wrinkle Free i-Re...
User Manual
Page 23
... in the drum does not change. Contact the customer service. Communication failure between PCB and display. if the error codes appear again after sales service. Contact the customer service. Temperature is open-circuited or short-circuited. Contact the customer service. The condenser thermal sensor is too low. See CUSTOMER SERVICE. Use the dryer when air temperature is higher...
... in the drum does not change. Contact the customer service. Communication failure between PCB and display. if the error codes appear again after sales service. Contact the customer service. Temperature is open-circuited or short-circuited. Contact the customer service. The condenser thermal sensor is too low. See CUSTOMER SERVICE. Use the dryer when air temperature is higher...
User Manual
Page 24
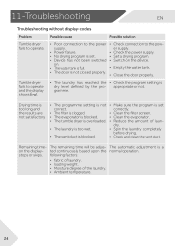
... to the pow- Remaining time- 11-Troubleshooting EN Troubleshooting without display-codes Problem Possible cause Possible solution Tumble dryer fails to operate. • Poor connection to the power • Check connection to operate and the display shows . • The laundry has reached the • Check the program setting is dry level defined by the pro- gramme. correctly. • The fi...
... to the pow- Remaining time- 11-Troubleshooting EN Troubleshooting without display-codes Problem Possible cause Possible solution Tumble dryer fails to operate. • Poor connection to the power • Check connection to operate and the display shows . • The laundry has reached the • Check the program setting is dry level defined by the pro- gramme. correctly. • The fi...
User Manual
Page 25
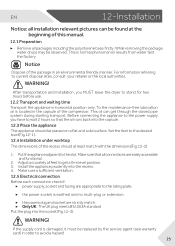
...fficient ventilation. 12.5 Electrical connection Before each connection check if: ▶ power supply, socket and fusing are appropriate to the desired level(Fig.12-1). 12.4 Installation under worktop The dimensions of the recess should be replaced by the service agent (see warranty card) in the capsule of the compressor. Set the feet to the rating plate. ▶ the power socket is damaged, it...
...fficient ventilation. 12.5 Electrical connection Before each connection check if: ▶ power supply, socket and fusing are appropriate to the desired level(Fig.12-1). 12.4 Installation under worktop The dimensions of the recess should be replaced by the service agent (see warranty card) in the capsule of the compressor. Set the feet to the rating plate. ▶ the power socket is damaged, it...
User Manual
Page 28
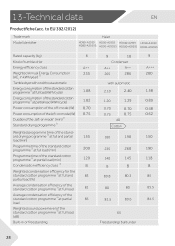
... mark Model identifier Haier HD80-A2939 HD90-A2939 HD100-A2939 HD90-A3939 HD80-A2939S HD90-A2939S HD100-A2939S HD90-A3939S Rated capacity (kg) Kind of tumble drier Energy efficiency class Weighted Annual Energy Consumption (AEc in kWh/year) 1) Tumble dryer with or without automatic Energy consumption of the standard cotton programme 3) at full load (kWh/cycle) Energy consumption of the standard cotton programme 3) at partial load (kWh/cycle) Power consumption...
... mark Model identifier Haier HD80-A2939 HD90-A2939 HD100-A2939 HD90-A3939 HD80-A2939S HD90-A2939S HD100-A2939S HD90-A3939S Rated capacity (kg) Kind of tumble drier Energy efficiency class Weighted Annual Energy Consumption (AEc in kWh/year) 1) Tumble dryer with or without automatic Energy consumption of the standard cotton programme 3) at full load (kWh/cycle) Energy consumption of the standard cotton programme 3) at partial load (kWh/cycle) Power consumption...

User Manual
Page 29
... dryer needs to which the infor- EN 13-Technical data 1) Based on 160 drying cycles of the standard cotton program at least 40mm wider and 20mm deeper than its dimensions. 29 Actual energy consumption per cycle will depend on how the appliance is used. 2) In case there is a power management system. 3) This program used at full and partial load is the standard drying...
... dryer needs to which the infor- EN 13-Technical data 1) Based on 160 drying cycles of the standard cotton program at least 40mm wider and 20mm deeper than its dimensions. 29 Actual energy consumption per cycle will depend on how the appliance is used. 2) In case there is a power management system. 3) This program used at full and partial load is the standard drying...

User Manual
Page 30
Model Serial No Also check the Warranty Card supplied with your local dealer or ▶ the Service & Support area at www.haier.com where you can find telephone numbers and FAQs and where you have the following data...service claim. For general business enquiries please find below our addresses in case of original spare parts. Pleyad 3 93200 Saint Denis FRANCE Belgium-FR Belgium-NL Netherlands Luxembourg Haier Benelux SA Anderlecht Route de Lennik 451 BELGIUM Poland Hungary Greece Romania Russia Haier Poland Sp. To contact our Service, ensure that you have a problem...
Model Serial No Also check the Warranty Card supplied with your local dealer or ▶ the Service & Support area at www.haier.com where you can find telephone numbers and FAQs and where you have the following data...service claim. For general business enquiries please find below our addresses in case of original spare parts. Pleyad 3 93200 Saint Denis FRANCE Belgium-FR Belgium-NL Netherlands Luxembourg Haier Benelux SA Anderlecht Route de Lennik 451 BELGIUM Poland Hungary Greece Romania Russia Haier Poland Sp. To contact our Service, ensure that you have a problem...


