
User Manual
Page 2
... requires service, we recommend that you remove the doors and leave the shelves in the presence of the instructions before making any reason this use and care guide. 2) This beverage center must be recessed or built-in the installation section. 3) Never unplug your beverage center in place. Always grasp the plug firmly and pull straight out from the outlet. 4) Repair or replace immediately...
... requires service, we recommend that you remove the doors and leave the shelves in the presence of the instructions before making any reason this use and care guide. 2) This beverage center must be recessed or built-in the installation section. 3) Never unplug your beverage center in place. Always grasp the plug firmly and pull straight out from the outlet. 4) Repair or replace immediately...
User Manual
Page 3
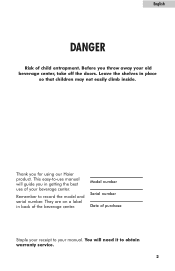
You will guide you in back of the beverage center. English DANGER Risk of your beverage center. This easy-to your old beverage center, take off the doors. Thank you throw away your manual. They are on a label in getting the best use manual will need it to record the model and serial number. Model number Serial number Date of purchase Staple your receipt to -use of child entrapment. Before you for using our Haier product. Leave the shelves in place so that children may not easily climb inside. Remember to obtain warranty service. 2
You will guide you in back of the beverage center. English DANGER Risk of your beverage center. This easy-to your old beverage center, take off the doors. Thank you throw away your manual. They are on a label in getting the best use manual will need it to record the model and serial number. Model number Serial number Date of purchase Staple your receipt to -use of child entrapment. Before you for using our Haier product. Leave the shelves in place so that children may not easily climb inside. Remember to obtain warranty service. 2

User Manual
Page 4
... Your Beverage Center 5 Leveling Your Beverage Center 5 Proper Air Circulation 5 Electrical Requirements 6 Use of Extension Cords 6 Install Limitations 6 Door Alignmentt 7 Door Reversall 8 Beverage Center Features And Use 10 General Features 10 Beverage Center Interior Shelves 10 Light 11 Lock and Key 12 Normal Operating Sounds 12 Proper Beverage Center Care and Cleaning 13 Cleaning and Maintenance 13 Power Interruptions 14 Vacation and Moving Care 14 Troubleshooting 15 Warranty Information 16 3
... Your Beverage Center 5 Leveling Your Beverage Center 5 Proper Air Circulation 5 Electrical Requirements 6 Use of Extension Cords 6 Install Limitations 6 Door Alignmentt 7 Door Reversall 8 Beverage Center Features And Use 10 General Features 10 Beverage Center Interior Shelves 10 Light 11 Lock and Key 12 Normal Operating Sounds 12 Proper Beverage Center Care and Cleaning 13 Cleaning and Maintenance 13 Power Interruptions 14 Vacation and Moving Care 14 Troubleshooting 15 Warranty Information 16 3
User Manual
Page 5
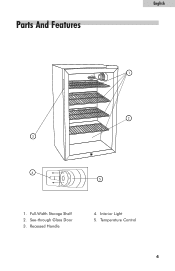
See-through Glass Door 3. Interior Light 5. Temperature Control 4 Recessed Handle 4. Full-Width Storage Shelf 2. English Parts And Features 1 2 3 4 6 5 5 4 1.
See-through Glass Door 3. Interior Light 5. Temperature Control 4 Recessed Handle 4. Full-Width Storage Shelf 2. English Parts And Features 1 2 3 4 6 5 5 4 1.

User Manual
Page 6
... remains of your beverage center. Remove all adhesive tape holding the beverage center accessories inside and outside. 2. Proper Air Circulation • To assure your beverage center works at the maximum efficiency it was designed for the lower door hinge. (see fig.4) After leveling the Beverage Center, adjust the hinge support, up or down as needed until it in its final position...
... remains of your beverage center. Remove all adhesive tape holding the beverage center accessories inside and outside. 2. Proper Air Circulation • To assure your beverage center works at the maximum efficiency it was designed for the lower door hinge. (see fig.4) After leveling the Beverage Center, adjust the hinge support, up or down as needed until it in its final position...

User Manual
Page 7
... or greater than the electrical rating of the appliance. English Electrical Requirement • Make sure there is a suitable power Outlet (115 volts, 15 amps outlet) with the leveling legs located at the bottom. 6 The marked rating of potential safety hazards under certain conditions. Your beverage center was not designed to operate in order to accommodate a two plug outlet. Install Limitations • Do...
... or greater than the electrical rating of the appliance. English Electrical Requirement • Make sure there is a suitable power Outlet (115 volts, 15 amps outlet) with the leveling legs located at the bottom. 6 The marked rating of potential safety hazards under certain conditions. Your beverage center was not designed to operate in order to accommodate a two plug outlet. Install Limitations • Do...

User Manual
Page 8
Loosen the top hinge screws using a Phillips Head Screwdriver. 4. Remove the top hinge cover. 3. fig. # 1 7 Adjust the door or put a spacer in between and then tighten the screws. 5. Replace the top hinge cover. English Door Alignment (see fig. # 1) 1. Remove hinge cover screw. 2.
Loosen the top hinge screws using a Phillips Head Screwdriver. 4. Remove the top hinge cover. 3. fig. # 1 7 Adjust the door or put a spacer in between and then tighten the screws. 5. Replace the top hinge cover. English Door Alignment (see fig. # 1) 1. Remove hinge cover screw. 2.

User Manual
Page 9
... the top hinge in the screw hole openings of the lower hinge by turning counter clockwise. screw hole plugs fig. # 2 8 Remove the top hinge cover screw and then remove the top hinge cover. (see fig. # 4) 8. Adjust up or down as needed until it is just touching the surface on the left side of the door with the pin of the cabinet. English Reversing the Door Hinge 1. Align the...
... the top hinge in the screw hole openings of the lower hinge by turning counter clockwise. screw hole plugs fig. # 2 8 Remove the top hinge cover screw and then remove the top hinge cover. (see fig. # 4) 8. Adjust up or down as needed until it is just touching the surface on the left side of the door with the pin of the cabinet. English Reversing the Door Hinge 1. Align the...

User Manual
Page 10
... needed. Once you are satisfied with top hole on the left side of the top hinge with the door alignment, completely tighten the upper door hinge screws. 11. Replace the hinge cover, insert the screw and tighten completely. (see fig. # 1) 10. Replace the screws in the upper hinge bracket but forms a tight seal. spacet door pin fig. # 3 lower hinge bracket fig. # 4 9 lower hinge lower hinge support...
... needed. Once you are satisfied with top hole on the left side of the top hinge with the door alignment, completely tighten the upper door hinge screws. 11. Replace the hinge cover, insert the screw and tighten completely. (see fig. # 1) 10. Replace the screws in the upper hinge bracket but forms a tight seal. spacet door pin fig. # 3 lower hinge bracket fig. # 4 9 lower hinge lower hinge support...

User Manual
Page 11
... your needs. (Note: If the beverage center has been placed in a horizontal or tilted position for any period of time wait 24 hours before adjusting the temperature to OFF stops cooling in .) 6 5 fig. # 5 4 located on interior of unit on right side Beverage Center Interior Shelves To remove or replace a full-width slide-out shelf: (see fig. # 6) 1. English Beverage Center Features And Use General Features Adjustable temperature...
... your needs. (Note: If the beverage center has been placed in a horizontal or tilted position for any period of time wait 24 hours before adjusting the temperature to OFF stops cooling in .) 6 5 fig. # 5 4 located on interior of unit on right side Beverage Center Interior Shelves To remove or replace a full-width slide-out shelf: (see fig. # 6) 1. English Beverage Center Features And Use General Features Adjustable temperature...

User Manual
Page 12
... for tall bottles. This is designed to the left and remove. Unscrew the bulb and replace it out (see fig. # 8a). English To use bulbs of 15 watts or less). Align the front and push the control knob back in the diagram. fig. # 7 Light • To replace burnt-out bulbs, remove the temperature control knob by pulling it with a new one (use the interior flip shelf: (see fig. # 8b).
... for tall bottles. This is designed to the left and remove. Unscrew the bulb and replace it out (see fig. # 8a). English To use bulbs of 15 watts or less). Align the front and push the control knob back in the diagram. fig. # 7 Light • To replace burnt-out bulbs, remove the temperature control knob by pulling it with a new one (use the interior flip shelf: (see fig. # 8b).
User Manual
Page 13
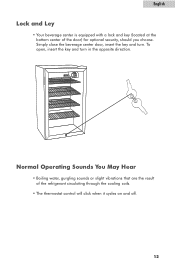
English Lock and Ley • Your beverage center is equipped with a lock and key (located at the bottom center of the refrigerant circulating through the cooling coils. • The thermostat control will click when it cycles on and off. 12 Simply close the beverage center door, insert the key and turn in the opposite direction. Normal Operating Sounds You May Hear • Boiling water, gurgling sounds or slight vibrations that are the result of the door) for optional security, should you choose. To open, insert the key and turn .
English Lock and Ley • Your beverage center is equipped with a lock and key (located at the bottom center of the refrigerant circulating through the cooling coils. • The thermostat control will click when it cycles on and off. 12 Simply close the beverage center door, insert the key and turn in the opposite direction. Normal Operating Sounds You May Hear • Boiling water, gurgling sounds or slight vibrations that are the result of the door) for optional security, should you choose. To open, insert the key and turn .

User Manual
Page 14
... Care and Cleaning Cleaning and Maintenance Warning: To avoid electric shock always unplug your beverage center. • Rinse with clean warm water and dry with warm water. Gaskets must be kept clean and pliable to wipe down your beverage center before cleaning. Rear Condensor Coil: • Every 12 months, using cleaning products, always read and follow manufacturer's instructions and warnings to general instructions. This will keep the gasket...
... Care and Cleaning Cleaning and Maintenance Warning: To avoid electric shock always unplug your beverage center. • Rinse with clean warm water and dry with warm water. Gaskets must be kept clean and pliable to wipe down your beverage center before cleaning. Rear Condensor Coil: • Every 12 months, using cleaning products, always read and follow manufacturer's instructions and warnings to general instructions. This will keep the gasket...

User Manual
Page 15
... when a power outage occurs. Remove the power cord from beverage center, move the temperature DIAL to the OFF position and clean the beverage center and door gaskets according to thunderstorms or other causes. Do not move the beverage center vertically. English Power Interruptions • Occasionally there may be power interruptions due to "General cleaning" section. Prop doors open, so air can circulate inside.When moving...
... when a power outage occurs. Remove the power cord from beverage center, move the temperature DIAL to the OFF position and clean the beverage center and door gaskets according to thunderstorms or other causes. Do not move the beverage center vertically. English Power Interruptions • Occasionally there may be power interruptions due to "General cleaning" section. Prop doors open, so air can circulate inside.When moving...
User Manual
Page 16
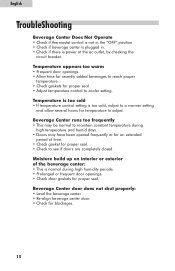
... to adjust. Beverage Center door does not shut properly: • Level the beverage center. • Re-align beverage center door. • Check for proper seal. • Adjust temperature control to cooler setting. Beverage Center runs too frequently • This may be normal to maintain constant temperature during high humidity periods. • Prolonged or frequent door openings. • Check door gaskets for proper seal. English TroubleShooting Beverage...
... to adjust. Beverage Center door does not shut properly: • Level the beverage center. • Re-align beverage center door. • Check for proper seal. • Adjust temperature control to cooler setting. Beverage Center runs too frequently • This may be normal to maintain constant temperature during high humidity periods. • Prolonged or frequent door openings. • Check door gaskets for proper seal. English TroubleShooting Beverage...

User Manual
Page 17
... electrical part that repair is not appropriate or replacement part is unavailable for repair, Haier will exchange the product with a refurbished or new product the same or similar to the original at Haier's discretion. Beyond this period, only the components of the sealed system are rendered. Damages in lieu of 12 months. Damage from service by other than household use. This warranty...
... electrical part that repair is not appropriate or replacement part is unavailable for repair, Haier will exchange the product with a refurbished or new product the same or similar to the original at Haier's discretion. Beyond this period, only the components of the sealed system are rendered. Damages in lieu of 12 months. Damage from service by other than household use. This warranty...


