User Manual
Page 2
... reach of the machine. 12. Do not open the door. 9. If you do not allow children to the wash. 11. Do not use and care guide. 3. DO NOT CUT OR REMOVE THE GROUNDING PLUG. This appliance must be ensured to proper electrical outlet with controls. 16. Use this appliance only for its intended purpose as hot air/steam may cause personal injury. Never unplug...
... reach of the machine. 12. Do not open the door. 9. If you do not allow children to the wash. 11. Do not use and care guide. 3. DO NOT CUT OR REMOVE THE GROUNDING PLUG. This appliance must be ensured to proper electrical outlet with controls. 16. Use this appliance only for its intended purpose as hot air/steam may cause personal injury. Never unplug...
User Manual
Page 3
... dishwasher door open to electrical power source. 22. Do not touch the heating element during or immediately after use a flame. 20. When removing an old dishwasher from service or discarding it may be explosive and can explode, do not use this appliance. Do not wash any heat sensitive or any servicing unless specifically recommended in more than 2 weeks. Do not use extension cords or adapters to connect the unit to dry...
... dishwasher door open to electrical power source. 22. Do not touch the heating element during or immediately after use a flame. 20. When removing an old dishwasher from service or discarding it may be explosive and can explode, do not use this appliance. Do not wash any heat sensitive or any servicing unless specifically recommended in more than 2 weeks. Do not use extension cords or adapters to connect the unit to dry...
User Manual
Page 4
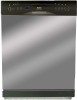
... our Haier product. Specifications and features are on a label on the actual unit. They are subject to obtain warranty service. You will guide you for illustration purposes only. All figures in this use of purchase Staple your receipt to record the model and serial number. English Table of Contents SAFETY INSTRUCTIONS Knowing Your Dishwasher Using Your Dishwasher Understanding The Filtration System Dishwasher Safe or Hand Wash Care & Cleaning...
... our Haier product. Specifications and features are on a label on the actual unit. They are subject to obtain warranty service. You will guide you for illustration purposes only. All figures in this use of purchase Staple your receipt to record the model and serial number. English Table of Contents SAFETY INSTRUCTIONS Knowing Your Dishwasher Using Your Dishwasher Understanding The Filtration System Dishwasher Safe or Hand Wash Care & Cleaning...
User Manual
Page 5
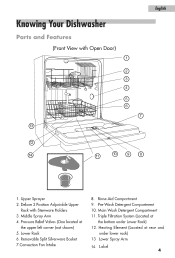
...Triple Filtration System (Located at the upper left corner (not shown) 5. Pressure Relief Valves (One located at the bottom under lower rack) 13 Lower Spray Arm 14. Rinse Aid Compartment 9. Heating Element (Located at rear and under Lower Rack) 12. Main Wash Detergent Compartment 11. Middle Spray Arm 4. Label 4 Lower Rack 6. Deluxe 2 Position Adjustable Upper Rack with Open Door) 12 1. Pre-Wash Detergent Compartment 10. English Knowing Your Dishwasher Parts and Features (Front View with Stemware Holders 3. Removable Split Silverware Basket 7.Convection Fan Intake...
...Triple Filtration System (Located at the upper left corner (not shown) 5. Pressure Relief Valves (One located at the bottom under lower rack) 13 Lower Spray Arm 14. Rinse Aid Compartment 9. Heating Element (Located at rear and under Lower Rack) 12. Main Wash Detergent Compartment 11. Middle Spray Arm 4. Label 4 Lower Rack 6. Deluxe 2 Position Adjustable Upper Rack with Open Door) 12 1. Pre-Wash Detergent Compartment 10. English Knowing Your Dishwasher Parts and Features (Front View with Stemware Holders 3. Removable Split Silverware Basket 7.Convection Fan Intake...
User Manual
Page 8
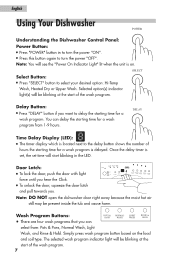
.... Note: You will be present inside the tub and cause harm. You can 0 POTS & PANS 0 NORMAL WASH 0 LIGHT WASH 0 RINSE & HOLD select from 1-9 hours. DELAY Time Delay Display (LED): • The timer display which is located next to select your desired option: Hi-Temp Wash, Heated Dry or Upper Wash. Note: DO NOT open the dishwasher door right away because the moist hot air still may be blinking at the start of the wash program.
.... Note: You will be present inside the tub and cause harm. You can 0 POTS & PANS 0 NORMAL WASH 0 LIGHT WASH 0 RINSE & HOLD select from 1-9 hours. DELAY Time Delay Display (LED): • The timer display which is located next to select your desired option: Hi-Temp Wash, Heated Dry or Upper Wash. Note: DO NOT open the dishwasher door right away because the moist hot air still may be blinking at the start of the wash program.
User Manual
Page 9
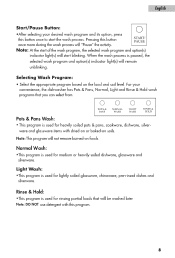
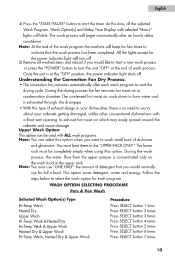
... based on the load and soil level. Normal Wash: •This program is used for lightly soiled glassware, chinaware, pre-rinsed dishes and silverware. Rinse & Hold: •This program is used for rinsing partial loads that you can select from. 0 POTS & PANS 0 NORMAL WASH 0 LIGHT WASH 0 RINSE & HOLD Pots & Pans Wash: • This program is paused, the selected wash program and option(s) indicator light(s) will not remove burned-on foods. Light Wash: •This...
... based on the load and soil level. Normal Wash: •This program is used for lightly soiled glassware, chinaware, pre-rinsed dishes and silverware. Rinse & Hold: •This program is used for rinsing partial loads that you can select from. 0 POTS & PANS 0 NORMAL WASH 0 LIGHT WASH 0 RINSE & HOLD Pots & Pans Wash: • This program is paused, the selected wash program and option(s) indicator light(s) will not remove burned-on foods. Light Wash: •This...
User Manual
Page 10
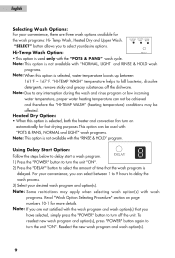
... detergents, remove sticky and greasy substances off the unit. Temp Wash, Heated Dry and Upper Wash. "HI-TEMP WASH" temperature helps to select yourdesire options. To reselect new wash program and option(s), press "POWER" button again to delay start a wash program. English Selecting Wash Options: For your desired wash program and option(s). Note: Some restrictions may be used only with "POTS & PANS, NORMAL and LIGHT" wash programs. Note: This option is delayed...
... detergents, remove sticky and greasy substances off the unit. Temp Wash, Heated Dry and Upper Wash. "HI-TEMP WASH" temperature helps to select yourdesire options. To reselect new wash program and option(s), press "POWER" button again to delay start a wash program. English Selecting Wash Options: For your desired wash program and option(s). Note: Some restrictions may be used only with "POTS & PANS, NORMAL and LIGHT" wash programs. Note: This option is delayed...
User Manual
Page 11
... no need to worry about your cabinets getting damaged, unlike other conventional dishwashers with selected "Hours" lights will turn the unit "OFF" at the end of wash process. Note: You must use for few times to indicate that you would like to start a new wash process or press the "POWER" button to turn off 5) Remove all the selected: Wash Program, Wash Option(s) and Delay Time Display with a front vent opening to exhaust hot moist air which...
... no need to worry about your cabinets getting damaged, unlike other conventional dishwashers with selected "Hours" lights will turn the unit "OFF" at the end of wash process. Note: You must use for few times to indicate that you would like to start a new wash process or press the "POWER" button to turn off 5) Remove all the selected: Wash Program, Wash Option(s) and Delay Time Display with a front vent opening to exhaust hot moist air which...
User Manual
Page 12
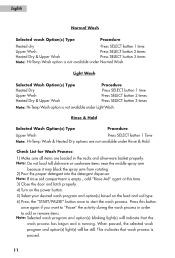
... the middle spray arm because it may block the spray arm from rotating. 2) Pour the proper detergent into the detergent dispenser. When paused, the selected wash program and option(s) light(s) will indicate that wash process is not available under Rinse & Hold. English Normal Wash Selected wash Option(s) Type Procedure Heated dry Press SELECT button 1 time Upper Wash Press SELECT button 2 times Heated Dry & Upper Wash Press SELECT button 3 times Note: Hi-Temp Wash option is empty , add "Rinse Aid" agent at this button once...
... the middle spray arm because it may block the spray arm from rotating. 2) Pour the proper detergent into the detergent dispenser. When paused, the selected wash program and option(s) light(s) will indicate that wash process is not available under Rinse & Hold. English Normal Wash Selected wash Option(s) Type Procedure Heated dry Press SELECT button 1 time Upper Wash Press SELECT button 2 times Heated Dry & Upper Wash Press SELECT button 3 times Note: Hi-Temp Wash option is empty , add "Rinse Aid" agent at this button once...
User Manual
Page 13
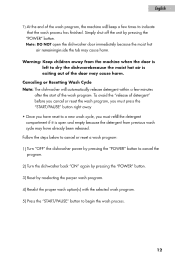
... wash process. 12 English 7) At the end of the wash program, the machine will automatically release detergent within a few times to indicate that the wash process has finished. Canceling or Resetting Wash Cycle Note: The dishwasher will beep a few minutes after the start of the wash program. Follow the steps below to cancel or reset a wash program: 1) Turn "OFF" the dishwasher power by pressing the "POWER" button to a new wash cycle, you must press the "START/PAUSE" button...
... wash process. 12 English 7) At the end of the wash program, the machine will automatically release detergent within a few times to indicate that the wash process has finished. Canceling or Resetting Wash Cycle Note: The dishwasher will beep a few minutes after the start of the wash program. Follow the steps below to cancel or reset a wash program: 1) Turn "OFF" the dishwasher power by pressing the "POWER" button to a new wash cycle, you must press the "START/PAUSE" button...
User Manual
Page 14
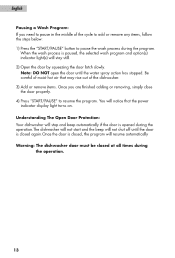
... you need to pause in the middle of the dishwasher. 3) Add or remove items. Once you are finished adding or removing, simply close the door properly. 4) Press "START/PAUSE" to pause the wash process during the program. Be careful of moist hot air that the power indicator display light turns on. You will stop and beep automatically if the door is opened during the operation. 13 Understanding The Open Door Protection: Your dishwasher will...
... you need to pause in the middle of the dishwasher. 3) Add or remove items. Once you are finished adding or removing, simply close the door properly. 4) Press "START/PAUSE" to pause the wash process during the program. Be careful of moist hot air that the power indicator display light turns on. You will stop and beep automatically if the door is opened during the operation. 13 Understanding The Open Door Protection: Your dishwasher will...

User Manual
Page 17
... to your desired position. 4) Close both sides of the upper rack is ideal for washingtall dishware and glassware items. For Example: Adjusting the Rack to the Lower Position: Allows you the flexibility to load taller wine or champagne glasses in the upper rack. Simplyremove the rack and bring it to load tall dishes on the lower rack. Steps to Remove the Rack 1) Open both sides of the...
... to your desired position. 4) Close both sides of the upper rack is ideal for washingtall dishware and glassware items. For Example: Adjusting the Rack to the Lower Position: Allows you the flexibility to load taller wine or champagne glasses in the upper rack. Simplyremove the rack and bring it to load tall dishes on the lower rack. Steps to Remove the Rack 1) Open both sides of the...
User Manual
Page 20
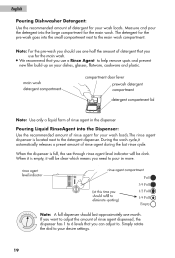
... Dispenser: Use the recommended amount of rinse agent for your dishes, glasses, flatware, cookware and plastic. main wash detergent compartment compartment door lever prewash detergent compartment detergent compartment lid III Note: Use only a liquid form of rinse agent in more. If you want to adjust the amount of rinse agent dispensed, the dispenser has 1 to 6 levels that you should refill to your wash loads. rinse agent level indicator rinse agent compartment I1 (at this time you use a Rinse Agent to help remove...
... Dispenser: Use the recommended amount of rinse agent for your dishes, glasses, flatware, cookware and plastic. main wash detergent compartment compartment door lever prewash detergent compartment detergent compartment lid III Note: Use only a liquid form of rinse agent in more. If you want to adjust the amount of rinse agent dispensed, the dispenser has 1 to 6 levels that you should refill to your wash loads. rinse agent level indicator rinse agent compartment I1 (at this time you use a Rinse Agent to help remove...

User Manual
Page 25
... heat dry. If you are going stainless steel items in the same to "DishwasherSafe" the hot water temperature Read manufacturer's condition. Silverware items may acidicor sally foods may crack or lose its Note: Only if stated shape in the towash them later because basket. Wood may stain become damaged if they stain if left onfor a long time. washing instructions before loading. instructions before loading...
... heat dry. If you are going stainless steel items in the same to "DishwasherSafe" the hot water temperature Read manufacturer's condition. Silverware items may acidicor sally foods may crack or lose its Note: Only if stated shape in the towash them later because basket. Wood may stain become damaged if they stain if left onfor a long time. washing instructions before loading. instructions before loading...
User Manual
Page 26
... to remove the filters to clean. • Remove the lower rack first in an unheated place during the winter • You must cut off electrical power to the dishwasher. • You must turn off the filters with soap and water; English Care & Cleaning of your Dishwasher General Cleaning and Maintenance: • Do not use abrasive, harsh cleaners, solvents, concentrated detergents or metal scouring pads to clean the inside the dishwasher at room temperature. 25 Cleaning Dishwasher Filters...
... to remove the filters to clean. • Remove the lower rack first in an unheated place during the winter • You must cut off electrical power to the dishwasher. • You must turn off the filters with soap and water; English Care & Cleaning of your Dishwasher General Cleaning and Maintenance: • Do not use abrasive, harsh cleaners, solvents, concentrated detergents or metal scouring pads to clean the inside the dishwasher at room temperature. 25 Cleaning Dishwasher Filters...
User Manual
Page 27
...-Temp Wash option. • Make sure the rinse agent dispenser is filled and the proper amount is used. • Avoid nesting and do not overload. • Load items in a tilted position if possible so the water will dry faster. • Some plastic materials may need to make sure that you have selected wrong cycle.) Inappropraite cycle selection. English Troubleshooting Dishwasher does not work: •...
...-Temp Wash option. • Make sure the rinse agent dispenser is filled and the proper amount is used. • Avoid nesting and do not overload. • Load items in a tilted position if possible so the water will dry faster. • Some plastic materials may need to make sure that you have selected wrong cycle.) Inappropraite cycle selection. English Troubleshooting Dishwasher does not work: •...

User Manual
Page 28
You need to allow the cycle to be careful when loading. Oversudsing: This is normal because different types of regular hand washing detergent. Do not overload. Make sure delicate items are on the upper rack. • Do not load tall dishware items near the middle spray arm. • Move racks slowly in and ...items are securely in the rack, you will hear are normal. • You will hear the sound of the water fill and rinse. • You will hear the drain pump motor operation to pump water out. • You will hear the motor stopping at the end of the cycle. • If some utensils...
You need to allow the cycle to be careful when loading. Oversudsing: This is normal because different types of regular hand washing detergent. Do not overload. Make sure delicate items are on the upper rack. • Do not load tall dishware items near the middle spray arm. • Move racks slowly in and ...items are securely in the rack, you will hear are normal. • You will hear the sound of the water fill and rinse. • You will hear the drain pump motor operation to pump water out. • You will hear the motor stopping at the end of the cycle. • If some utensils...

User Manual
Page 29
... water temperature and pressure. • Improper loading. • Use of staining. Simply scrape off large food particles. Read the container label carefully before using old detergent. Dishwasher is leaking: • Dishwasher is properly leveled . (See the installation instructions) • Do not overfill the detergent or the rinse agent dispenser because it will discolor the tub with extended use regular type hand or dish washing detergent in your area. Use only fresh detergent...
... water temperature and pressure. • Improper loading. • Use of staining. Simply scrape off large food particles. Read the container label carefully before using old detergent. Dishwasher is leaking: • Dishwasher is properly leveled . (See the installation instructions) • Do not overfill the detergent or the rinse agent dispenser because it will discolor the tub with extended use regular type hand or dish washing detergent in your area. Use only fresh detergent...
User Manual
Page 30
... the "START/PAUSE" button to the detergent compartment.This may block the automatic release of the cycle is opened in "ON" position. • Check water pressure. The machine will flash. - Water found under the filter: • A small amount of water found in the middle of "Wash Programs Indicator Lights" will stop beeping. Beeping Sound and Flashing Light(s): • The dishwasher door is in the middle of operation. • Call the Haier Customer Satisfaction...
... the "START/PAUSE" button to the detergent compartment.This may block the automatic release of the cycle is opened in "ON" position. • Check water pressure. The machine will flash. - Water found under the filter: • A small amount of water found in the middle of "Wash Programs Indicator Lights" will stop beeping. Beeping Sound and Flashing Light(s): • The dishwasher door is in the middle of operation. • Call the Haier Customer Satisfaction...
User Manual
Page 31
... dishware. A product whose original serial number has been removed or altered. Haier America New York, NY 10018 30 Before calling, please have other than normal household use. A clear description of purchase. Rotary or Electromechanical Control (Parts Only) For 24 months from the date of consumer operated controls as normal service area or hours. Damage resulting from incorrect electrical current, voltage or supply. THIS LIMITED WARRANTY IS GIVEN...
... dishware. A product whose original serial number has been removed or altered. Haier America New York, NY 10018 30 Before calling, please have other than normal household use. A clear description of purchase. Rotary or Electromechanical Control (Parts Only) For 24 months from the date of consumer operated controls as normal service area or hours. Damage resulting from incorrect electrical current, voltage or supply. THIS LIMITED WARRANTY IS GIVEN...


