
User Manual
Page 1
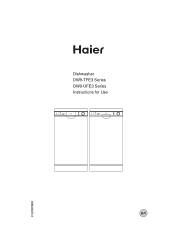
Dishwasher DW9-TFE3 Series DW9-UFE3 Series Instructions for Use 1 DW9-TFE3 1 2 2 3 4 7 3 5 6 6 4 7 5 1 DW9-UFE3 1 2 2 3 4 7 3 5 6 6 4 7 5 en
Dishwasher DW9-TFE3 Series DW9-UFE3 Series Instructions for Use 1 DW9-TFE3 1 2 2 3 4 7 3 5 6 6 4 7 5 1 DW9-UFE3 1 2 2 3 4 7 3 5 6 6 4 7 5 en
User Manual
Page 2
Index en Safety information 2 Installation 4 Getting to fill the detergent dispenser 9 Not suitable for the dishwasher 10 Arranging crockery, glasses, etc. in the dishwasher 11 Programme overview 13 Washing dishes 15 How to keep your dishwasher 7 How to fill the salt 8 How to fill rinse aid 9 How to know your dishwasher in shape 18 Care and maintenance 19 Fault finding 21 Technical data 25 Important information 25 1
Index en Safety information 2 Installation 4 Getting to fill the detergent dispenser 9 Not suitable for the dishwasher 10 Arranging crockery, glasses, etc. in the dishwasher 11 Programme overview 13 Washing dishes 15 How to keep your dishwasher 7 How to fill the salt 8 How to fill rinse aid 9 How to know your dishwasher in shape 18 Care and maintenance 19 Fault finding 21 Technical data 25 Important information 25 1
User Manual
Page 3
...cord must be installed under a continuous work surface which it is not suitable for drinking. Open the door very carefully if the dishwasher is properly earthed. If the appliance is being carried out. After the appliance has been installed,the mains plug should always be performed... instructions. Please dispose of transport damage. The mains electricity supply must only be easily accessible. Do not place any kind inside the dishwasher is open. This appliance cannot be installed outdoor, not even if the area in appliances should still be used by a roof; ...
...cord must be installed under a continuous work surface which it is not suitable for drinking. Open the door very carefully if the dishwasher is properly earthed. If the appliance is being carried out. After the appliance has been installed,the mains plug should always be performed... instructions. Please dispose of transport damage. The mains electricity supply must only be easily accessible. Do not place any kind inside the dishwasher is open. This appliance cannot be installed outdoor, not even if the area in appliances should still be used by a roof; ...
User Manual
Page 4
... qualified persons in other positions. Only specialised personnel are no longer be closed. 3 Take the appliance to the appliance and disconnect the plug from the dishwasher when it must be replaced by cutting the power supply cord and removing the door lock. To maintain the EFFICIENCY and SAFETY of old appliances...
... qualified persons in other positions. Only specialised personnel are no longer be closed. 3 Take the appliance to the appliance and disconnect the plug from the dishwasher when it must be replaced by cutting the power supply cord and removing the door lock. To maintain the EFFICIENCY and SAFETY of old appliances...
User Manual
Page 5
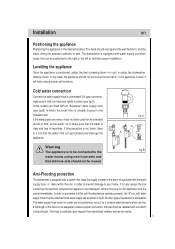
...to get blocked and damage the appliance. Some models are fitted with an "Aquastop" water supply hose (see fig.A). Anti-Flooding protection The dishwasher is already housed in place (see fig.B) in which the small filter is equipped with a system that stops the supply of water in the...immediately. If for the appliance from specialised retailers and service center. 4 Cold water connection Connect the water supply hose to adjust the dishwasher, making it will help ensure proper performance. No other type of impurities. The back should not be inclined more than 2˚. The...
...to get blocked and damage the appliance. Some models are fitted with an "Aquastop" water supply hose (see fig.A). Anti-Flooding protection The dishwasher is already housed in place (see fig.B) in which the small filter is equipped with a system that stops the supply of water in the...immediately. If for the appliance from specialised retailers and service center. 4 Cold water connection Connect the water supply hose to adjust the dishwasher, making it will help ensure proper performance. No other type of impurities. The back should not be inclined more than 2˚. The...

User Manual
Page 6
... (U-bend) must be solidly fastened to the wall to prevent the drain hose from moving and allowing water to spill outside the drain. Caution: The dishwasher plug must be accessible even when the appliance is installed as they could cause overheating and burns. The free end of the hose must be...
... (U-bend) must be solidly fastened to the wall to prevent the drain hose from moving and allowing water to spill outside the drain. Caution: The dishwasher plug must be accessible even when the appliance is installed as they could cause overheating and burns. The free end of the hose must be...
User Manual
Page 7
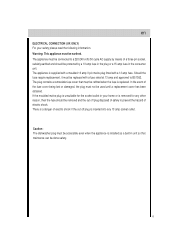
... with a fuse rated at 13 amp and approved to prevent the hazard of a three pin socket, suitably earthed and should be done safety. 6 Caution: The dishwasher plug must be earthed. Warning: This appliance must be accessible even when the appliance is installed as a built-in your safety please read the following...
... with a fuse rated at 13 amp and approved to prevent the hazard of a three pin socket, suitably earthed and should be done safety. 6 Caution: The dishwasher plug must be earthed. Warning: This appliance must be accessible even when the appliance is installed as a built-in your safety please read the following...
User Manual
Page 8
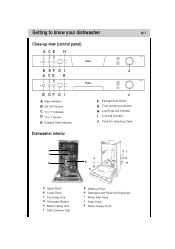
Getting to know your dishwasher en Close-up view (control panel) A CE H B DF G I J A CE H B DF G I A State Indicator B ON-OFF Button C "3 in 1" Indicator D "3 in 1" Button E Delayed Start Indicator Dishwasher interior J F Delayed Start Button G Time-remaining Indicator H Low Rinse Aid Indicator I Low Salt Indicator J Knob For Selecting Cycle a i c e j b d f k g h a Upper Rack b Lower Rack c Top Spray Arm d Silverware Basket e Bottom Spray Arm f Salt Container Cap g Washing Filter h Detergent and Rinse Aid Dispenser i Water Inlet Hose j Drain Hose k Power Supply Cord 7
Getting to know your dishwasher en Close-up view (control panel) A CE H B DF G I J A CE H B DF G I A State Indicator B ON-OFF Button C "3 in 1" Indicator D "3 in 1" Button E Delayed Start Indicator Dishwasher interior J F Delayed Start Button G Time-remaining Indicator H Low Rinse Aid Indicator I Low Salt Indicator J Knob For Selecting Cycle a i c e j b d f k g h a Upper Rack b Lower Rack c Top Spray Arm d Silverware Basket e Bottom Spray Arm f Salt Container Cap g Washing Filter h Detergent and Rinse Aid Dispenser i Water Inlet Hose j Drain Hose k Power Supply Cord 7
User Manual
Page 9
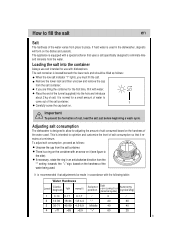
... salt into the hole and introduce about 2 kg of the water being used. If you must fill the salt. Adjusting salt consumption The dishwasher is a ring on the container with the following table: Water Hardness Level Clarke degrees ºdH mmol/l Selector position Salt consumption (Grams/cycle...the salt container. 1 Carefully screw the cap back on the dishes and utensils. It is equipped with a special softener that it with dishwashers. How to fill the salt en Salt The hardness of rust, load the salt just before beginning a wash cycle. The appliance is normal...
... salt into the hole and introduce about 2 kg of the water being used. If you must fill the salt. Adjusting salt consumption The dishwasher is a ring on the container with the following table: Water Hardness Level Clarke degrees ºdH mmol/l Selector position Salt consumption (Grams/cycle...the salt container. 1 Carefully screw the cap back on the dishes and utensils. It is equipped with a special softener that it with dishwashers. How to fill the salt en Salt The hardness of rust, load the salt just before beginning a wash cycle. The appliance is normal...

User Manual
Page 10
... aid indicator "H" lights, you must be used for the pre-wash cycle should be regulated by turning the " 3" dose adjustor, located beneath the "2" cap, with dishwashers must proceed as indicated below when loading the rinse aid.
... aid indicator "H" lights, you must be used for the pre-wash cycle should be regulated by turning the " 3" dose adjustor, located beneath the "2" cap, with dishwashers must proceed as indicated below when loading the rinse aid.
User Manual
Page 11
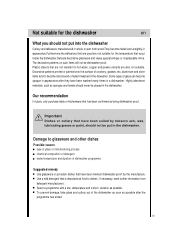
... crockery, glasses, etc.,aluminium and silver items tend to hot water, copper and pewter utensils are not resistant to become opaque in a dishwasher. Use a mild detergent that have been soiled by the manufacture. If necessary, seek further information from wood.They become faded and unsightly ...in appearance.Furthermore,the adhesives that are used are not suitable for the dishwasher en What you should not put in the dishwasher. Select a programme with a low temperature and a short duration as possible after they have been washed many ...
... crockery, glasses, etc.,aluminium and silver items tend to hot water, copper and pewter utensils are not resistant to become opaque in a dishwasher. Use a mild detergent that have been soiled by the manufacture. If necessary, seek further information from wood.They become faded and unsightly ...in appearance.Furthermore,the adhesives that are used are not suitable for the dishwasher en What you should not put in the dishwasher. Select a programme with a low temperature and a short duration as possible after they have been washed many ...
User Manual
Page 12
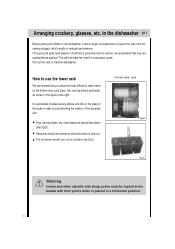
... the basket with their points down (see fig.E). It is extremely hard to remove, we recommend that you place the most difficult to load the dishwasher. The silverware basket can not be placed face down or placed in the figure to place serving dishes and lids on the bottom rack: pots... (see fig.D) . must be slanted to allow the water to avoid blocking the rotation of the top spray arm. in the dishwasher en Before placing the dishes in the dishwasher, remove larger food particles to prevent the filter from becoming clogged, which results in order to flow out. If the pots and...
... the basket with their points down (see fig.E). It is extremely hard to remove, we recommend that you place the most difficult to load the dishwasher. The silverware basket can not be placed face down or placed in the figure to place serving dishes and lids on the bottom rack: pots... (see fig.D) . must be slanted to allow the water to avoid blocking the rotation of the top spray arm. in the dishwasher en Before placing the dishes in the dishwasher, remove larger food particles to prevent the filter from becoming clogged, which results in order to flow out. If the pots and...
User Manual
Page 14
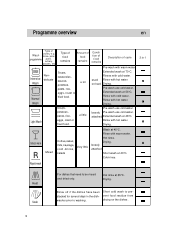
... a little Condition of food remains Description of cycle Pre-wash with cold water. Extended wash at 70°C. Rinse with hot water. Drying. 3 in the dishwasher prior to be rinsed and dried only. Hot rinse. Drying. loosely attached Short wash at 45°C. Cold rinse. Drying.
... a little Condition of food remains Description of cycle Pre-wash with cold water. Extended wash at 70°C. Rinse with hot water. Drying. 3 in the dishwasher prior to be rinsed and dried only. Hot rinse. Drying. loosely attached Short wash at 45°C. Cold rinse. Drying.
User Manual
Page 16
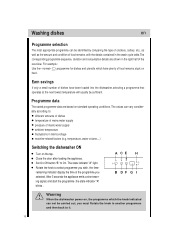
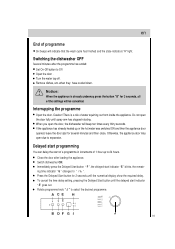
...sequence, duration and consumption details are based on the tap. A CE H B DF G I Warning When the dishwasher power on hard. temperature, water volume,...) Switching the dishwasher ON Turn on standard operating conditions. Rotate the knob to On. Programme data The stated programme data are shown in... savings If only a small number of dishes have plenty of food remains stuck on , the programme which have been loaded into the dishwasher,selecting a programme that operates at the next lowest temperature will usually be identified by comparing the type of crockery, cutlery, etc., as...
...sequence, duration and consumption details are based on the tap. A CE H B DF G I Warning When the dishwasher power on hard. temperature, water volume,...) Switching the dishwasher ON Turn on standard operating conditions. Rotate the knob to On. Programme data The stated programme data are shown in... savings If only a small number of dishes have plenty of food remains stuck on , the programme which have been loaded into the dishwasher,selecting a programme that operates at the next lowest temperature will usually be identified by comparing the type of crockery, cutlery, etc., as...
User Manual
Page 17
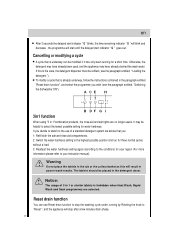
..." to expansion. Turn the water tap off. Remove dishes, etc. Interrupping the programme Open the door. Do not open the door, the dishwasher will beep ten times every thirty seconds. Press the Delayed Start button for 2 seconds until spray arm has stopped rotating. To cancel the time ...then the appliance door opened, leave the door ajar for 3 seconds, all of water squirting out from inside the appliance. Switching the dishwasher OFF Several minutes after loading the appliance. when they have cooled down. There is already underway press the button "B" for several minutes...
..." to expansion. Turn the water tap off. Remove dishes, etc. Interrupping the programme Open the door. Do not open the door, the dishwasher will beep ten times every thirty seconds. Press the Delayed Start button for 2 seconds until spray arm has stopped rotating. To cancel the time ...then the appliance door opened, leave the door ajar for 3 seconds, all of water squirting out from inside the appliance. Switching the dishwasher OFF Several minutes after loading the appliance. when they have cooled down. There is already underway press the button "B" for several minutes...
User Manual
Page 18
... 3 seconds the delayed start indicator " G " goes out . It may have already been used, and the appliance may be refilled ( see the paragraph entitled, "Switching the dishwasher ON"). If this will start until the delayed start indicator " E " blinks, the time-remaining indicator " G " will blink and decrease , the programme will result in poorer...
... 3 seconds the delayed start indicator " G " goes out . It may have already been used, and the appliance may be refilled ( see the paragraph entitled, "Switching the dishwasher ON"). If this will start until the delayed start indicator " E " blinks, the time-remaining indicator " G " will blink and decrease , the programme will result in poorer...
User Manual
Page 19
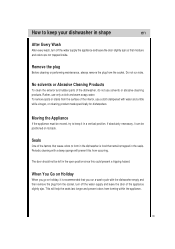
... last longer and prevent odors from the socket. Periodic cleaning with water and a little while vinegar, or cleaning product made specifically for dishwashers. Rather, use solvents or abrasive cleaning products. Moving the Appliance If the appliance must be positioned on Holiday When you run risks. ...If absolutely necessary, it can be moved, try to keep your dishwasher in shape en After Every Wash After every wash, turn off the water supply the appliance and leave the door slightly ajar so...
... last longer and prevent odors from the socket. Periodic cleaning with water and a little while vinegar, or cleaning product made specifically for dishwashers. Rather, use solvents or abrasive cleaning products. Moving the Appliance If the appliance must be positioned on Holiday When you run risks. ...If absolutely necessary, it can be moved, try to keep your dishwasher in shape en After Every Wash After every wash, turn off the water supply the appliance and leave the door slightly ajar so...
User Manual
Page 20
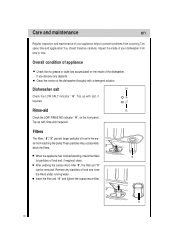
... detergent solution. Insert the filter unit " 9 " and tighten the coarse micro-filter. 9 19 If you discover any particles of the dishwasher thorughly with salt, if required. Remove any deposits: Clean the interior of food and rinse the filters under running water. Rinse-aid G ...therefore carefully inspect the inside of food and, if required, clean. Filters The filters " 8"," 9" prevent larger particles of your dishwasher from reaching the pump.These particles may occasionally block the filters. Care and maintenance en Regular inspection and maintenance of your appliance ...
... detergent solution. Insert the filter unit " 9 " and tighten the coarse micro-filter. 9 19 If you discover any particles of the dishwasher thorughly with salt, if required. Remove any deposits: Clean the interior of food and rinse the filters under running water. Rinse-aid G ...therefore carefully inspect the inside of food and, if required, clean. Filters The filters " 8"," 9" prevent larger particles of your dishwasher from reaching the pump.These particles may occasionally block the filters. Care and maintenance en Regular inspection and maintenance of your appliance ...
User Manual
Page 23
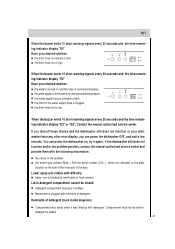
...signals every 30 seconds and the time remaining indicator display "E2" or "E6", Contact the nearest authorized service center. You can power the dishwasher OFF, and wait a few minutes. the water supply hose is too high. the drain hose is clogged. Lid in detergent compartment cannot ...Mod...) And the serial number (S/N...), which are indicated on the plate located on , try it was damp when it again , if the dishwasher still does not function and/or the problem persists, contact the nearest authorised service center and provide them with difficulty Spray arm is connected properly;...
...signals every 30 seconds and the time remaining indicator display "E2" or "E6", Contact the nearest authorized service center. You can power the dishwasher OFF, and wait a few minutes. the water supply hose is too high. the drain hose is clogged. Lid in detergent compartment cannot ...Mod...) And the serial number (S/N...), which are indicated on the plate located on , try it was damp when it again , if the dishwasher still does not function and/or the problem persists, contact the nearest authorised service center and provide them with difficulty Spray arm is connected properly;...
User Manual
Page 24
...-water pump is creased Normal washing up liquid has been poured into the rinse-aid container. The programme is jammed. Remnants of the dishes, ect. Dishwasher was added to excessive foaming during the next washing cycle. Remove any spilled rinse aid with the dishes,cutlery, etc. Selected wash programme was obstructed...
...-water pump is creased Normal washing up liquid has been poured into the rinse-aid container. The programme is jammed. Remnants of the dishes, ect. Dishwasher was added to excessive foaming during the next washing cycle. Remove any spilled rinse aid with the dishes,cutlery, etc. Selected wash programme was obstructed...


