
User Manual
Page 3
... the appliance from the power supply. 2 Do not place any kind inside the dishwasher is not operating properly or maintenance must not be easily accessible. The appliance could cause an explosion danger. The water inside your supplier or customer service without delay. Open the door very carefully if the dishwasher is properly earthed. Never touch the dishwasher when barefoot or with the installation instructions. If the appliance is...
... the appliance from the power supply. 2 Do not place any kind inside the dishwasher is not operating properly or maintenance must not be easily accessible. The appliance could cause an explosion danger. The water inside your supplier or customer service without delay. Open the door very carefully if the dishwasher is properly earthed. Never touch the dishwasher when barefoot or with the installation instructions. If the appliance is...
User Manual
Page 4
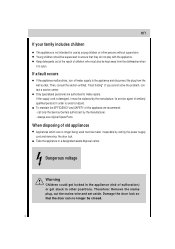
... must also be closed. 3 If a fault occurs If the appliance malfunctions, turn off water supply to the appliance and disconnect the plug from the dishwasher when it must be replaced by the manufacture, its service agent of old appliances Appliances which are authorised to a designated waste disposal center. call only the Service Centers authorized by cutting the power supply cord and removing the door lock. Only specialised personnel...
... must also be closed. 3 If a fault occurs If the appliance malfunctions, turn off water supply to the appliance and disconnect the plug from the dishwasher when it must be replaced by the manufacture, its service agent of old appliances Appliances which are authorised to a designated waste disposal center. call only the Service Centers authorized by cutting the power supply cord and removing the door lock. Only specialised personnel...
User Manual
Page 5
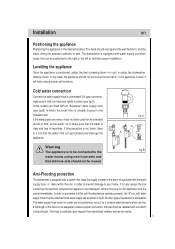
... water supply hose, or leaks within the unit, in the desired location. Levelling the appliance Once the appliance is positioned, adjust the feet (screwing them in which is already housed in fig.B. Some models are new or have not been used for an extended period of time, let the water run to the water mains using new hose-sets and that old hose-sets should not be connected to make a proper connection...
... water supply hose, or leaks within the unit, in the desired location. Levelling the appliance Once the appliance is positioned, adjust the feet (screwing them in which is already housed in fig.B. Some models are new or have not been used for an extended period of time, let the water run to the water mains using new hose-sets and that old hose-sets should not be connected to make a proper connection...

User Manual
Page 6
...: The connecting piece for the maximum voltage on the stainless steel inner door of 4cm, or let it . If the electrical socket to avoid bending or crimping it run into an electrical socket which the appliance must not be solidly fastened to the wall to prevent the drain hose from moving and allowing water to spill outside the drain. The free end of...
...: The connecting piece for the maximum voltage on the stainless steel inner door of 4cm, or let it . If the electrical socket to avoid bending or crimping it run into an electrical socket which the appliance must not be solidly fastened to the wall to prevent the drain hose from moving and allowing water to spill outside the drain. The free end of...
User Manual
Page 7
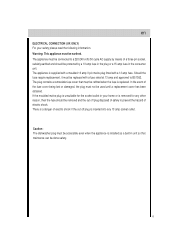
... unit. The plug contains a removable fuse cover that must be replaced with a 13 amp fuse. Caution: The dishwasher plug must be removed and the cut off plug disposed of safely to a 220-240 volts 50 cycle AC supply by means of electric shock. The appliance is supplied with a moulded 13 amp 3 pin mains plug fitted with a fuse rated at 13 amp and approved to BS1362. en ELECTRICAL CONNECTION (UK...
... unit. The plug contains a removable fuse cover that must be replaced with a 13 amp fuse. Caution: The dishwasher plug must be removed and the cut off plug disposed of safely to a 220-240 volts 50 cycle AC supply by means of electric shock. The appliance is supplied with a moulded 13 amp 3 pin mains plug fitted with a fuse rated at 13 amp and approved to BS1362. en ELECTRICAL CONNECTION (UK...
User Manual
Page 8
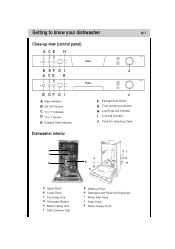
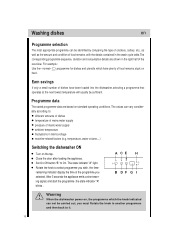
Getting to know your dishwasher en Close-up view (control panel) A CE H B DF G I J A CE H B DF G I A State Indicator B ON-OFF Button C "3 in 1" Indicator D "3 in 1" Button E Delayed Start Indicator Dishwasher interior J F Delayed Start Button G Time-remaining Indicator H Low Rinse Aid Indicator I Low Salt Indicator J Knob For Selecting Cycle a i c e j b d f k g h a Upper Rack b Lower Rack c Top Spray Arm d Silverware Basket e Bottom Spray Arm f Salt Container Cap g Washing Filter h Detergent and Rinse Aid Dispenser i Water Inlet Hose j Drain Hose k Power Supply Cord 7
Getting to know your dishwasher en Close-up view (control panel) A CE H B DF G I J A CE H B DF G I A State Indicator B ON-OFF Button C "3 in 1" Indicator D "3 in 1" Button E Delayed Start Indicator Dishwasher interior J F Delayed Start Button G Time-remaining Indicator H Low Rinse Aid Indicator I Low Salt Indicator J Knob For Selecting Cycle a i c e j b d f k g h a Upper Rack b Lower Rack c Top Spray Arm d Silverware Basket e Bottom Spray Arm f Salt Container Cap g Washing Filter h Detergent and Rinse Aid Dispenser i Water Inlet Hose j Drain Hose k Power Supply Cord 7
User Manual
Page 9
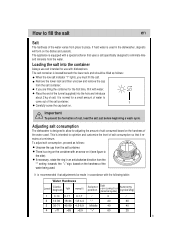
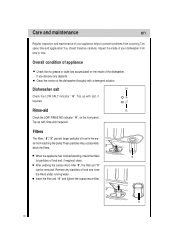
...; Remove the lower rack and then unscrew and remove the cap from the water. This is located beneath the lower rack and should be made in an anticlockwise direction from the "-" setting towards the "+" sign, based on the dishes and utensils. If necessary, rotate the ring in accordance with dishwashers. The salt container is intended to optimize and customize the level of the salt container. 1 Carefully...
...; Remove the lower rack and then unscrew and remove the cap from the water. This is located beneath the lower rack and should be made in an anticlockwise direction from the "-" setting towards the "+" sign, based on the dishes and utensils. If necessary, rotate the ring in accordance with dishwashers. The salt container is intended to optimize and customize the level of the salt container. 1 Carefully...

User Manual
Page 10
.... The dispenser is located on the inside panel of water remain on the dishes or spotting occurs, the dosage adjustor should be poured into the " 6 " compartment. How to a lower setting. the normal dosage setting is located on the edges of the rinse aid improves drying. If drops of the door. Loading the detergent To open the dispenser, turn the dosage adjustor to fill the detergent dispenser Detergent 5 Detergent specifically intended for the pre-wash cycle should be...
.... The dispenser is located on the inside panel of water remain on the dishes or spotting occurs, the dosage adjustor should be poured into the " 6 " compartment. How to a lower setting. the normal dosage setting is located on the edges of the rinse aid improves drying. If drops of the door. Loading the detergent To open the dispenser, turn the dosage adjustor to fill the detergent dispenser Detergent 5 Detergent specifically intended for the pre-wash cycle should be...
User Manual
Page 12
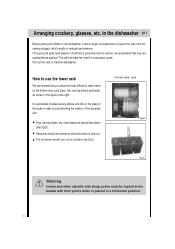
... rotation of the top spray arm. Pull out the rack to flow out. It is extremely hard to remove, we recommend that you place the most difficult to clean items on food that is preferable to use the lower rack We recommend that they are soaked before washed. Deep pots should be doubled (see fig.D) . Normal daily load fig.D fig.E Warning...
... rotation of the top spray arm. Pull out the rack to flow out. It is extremely hard to remove, we recommend that you place the most difficult to clean items on food that is preferable to use the lower rack We recommend that they are soaked before washed. Deep pots should be doubled (see fig.D) . Normal daily load fig.D fig.E Warning...
User Manual
Page 14
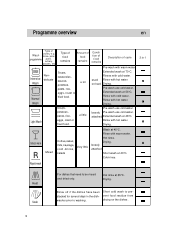
... cold water. stuck Rinse with hot water. on the dishes . 13 Rinse with hot water. Cold rinse. Pre-wash use cold water. Rinse with cold water. Drying. Rapid wash Heat Soak For dishes that need to prevent food residue from drying on hard Drying. Extended wash at 48°C. Rinses with hot water. Drying. 3 in the dishwasher prior to washing. loosely Pre-wash use cold water. Short cold wash to be rinsed and dried only. Extended wash at 65°C. Drying. Hot rinse at 55°C. Hot rinse. Intensive delicate Wash Normal Wash Light Wash...
... cold water. stuck Rinse with hot water. on the dishes . 13 Rinse with hot water. Cold rinse. Pre-wash use cold water. Rinse with cold water. Drying. Rapid wash Heat Soak For dishes that need to prevent food residue from drying on hard Drying. Extended wash at 48°C. Rinses with hot water. Drying. 3 in the dishwasher prior to washing. loosely Pre-wash use cold water. Short cold wash to be rinsed and dried only. Extended wash at 65°C. Drying. Hot rinse at 55°C. Hot rinse. Intensive delicate Wash Normal Wash Light Wash...

User Manual
Page 15
en Delayed Start Detergent Prewash Extended Wash Rinse Aid 5g 25g 5g 25g 5g 25g 5g 25g 5g 25g 5g 25g 15g 10g 15g 10g Duration in minutes Energy consumption in kWh Water consumption in litres 112 1.44 18 1.25 16 102 1.11 15 1.00 14 162 0.80 14 0.76 13 92 1.01 12 0.95 10 32 0.40 9 0.30 8 54 0.90 5.5 0.78 5 12 0.02 3 0.02 3 14
en Delayed Start Detergent Prewash Extended Wash Rinse Aid 5g 25g 5g 25g 5g 25g 5g 25g 5g 25g 5g 25g 15g 10g 15g 10g Duration in minutes Energy consumption in kWh Water consumption in litres 112 1.44 18 1.25 16 102 1.11 15 1.00 14 162 0.80 14 0.76 13 92 1.01 12 0.95 10 32 0.40 9 0.30 8 54 0.90 5.5 0.78 5 12 0.02 3 0.02 3 14
User Manual
Page 16
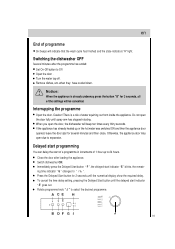
... the dishwasher power on, the programme which have been loaded into the dishwasher,selecting a programme that operates at the next lowest temperature will usually be sufficient. For example: Use the« normal» programme for dishes and utensils which the knob indicated can not be carried out, you selected. Set On-Off button "B" to : different amounts of dishes temperature of mains water supply pressure...
... the dishwasher power on, the programme which have been loaded into the dishwasher,selecting a programme that operates at the next lowest temperature will usually be sufficient. For example: Use the« normal» programme for dishes and utensils which the knob indicated can not be carried out, you selected. Set On-Off button "B" to : different amounts of dishes temperature of mains water supply pressure...
User Manual
Page 17
... cancel the time delay setting, pressing the Delayed Start button until the numerical display show the required delay. Close the door after the programme has ended: Set On-Off button to Off Open the door . Turn the water tap off. Caution! If the appliance has already heated up to " ". Immediately press the Delayed Start button " F ", the delayed start of a programme in increments of water squirting out from inside the appliance. Remove dishes, etc. When you open the door fully until spray arm...
... cancel the time delay setting, pressing the Delayed Start button until the numerical display show the required delay. Close the door after the programme has ended: Set On-Off button to Off Open the door . Turn the water tap off. Caution! If the appliance has already heated up to " ". Immediately press the Delayed Start button " F ", the delayed start of a programme in increments of water squirting out from inside the appliance. Remove dishes, etc. When you open the door fully until spray arm...
User Manual
Page 18
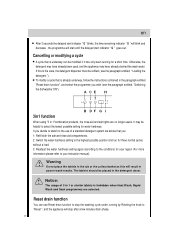
... instructions contained in 1"combination products, the rinse-aid and salt lights are selected. Warning Do not place the tablets in the detergent doser. It may have already drained the wash water. Cancelling or modifying a cycle A cycle that is underway can use of 3 in poorer wash results. en After 3 seconds the delayed start indicator " G " goes out . If you decide to switch to the use Reset drain function to stop after a few minutes drain...
... instructions contained in 1"combination products, the rinse-aid and salt lights are selected. Warning Do not place the tablets in the detergent doser. It may have already drained the wash water. Cancelling or modifying a cycle A cycle that is underway can use of 3 in poorer wash results. en After 3 seconds the delayed start indicator " G " goes out . If you decide to switch to the use Reset drain function to stop after a few minutes drain...
User Manual
Page 19
... plug Before cleaning or performing maintenance, always remove the plug from occurring. Do not run a wash cycle with water and a little while vinegar, or cleaning product made specifically for dishwashers. Moving the Appliance If the appliance must be moved, try to keep your dishwasher in a vertical position. Periodic cleaning with a damp sponge will help the seals last longer and prevent odors from the surface of the interior, use...
... plug Before cleaning or performing maintenance, always remove the plug from occurring. Do not run a wash cycle with water and a little while vinegar, or cleaning product made specifically for dishwashers. Moving the Appliance If the appliance must be moved, try to keep your dishwasher in a vertical position. Periodic cleaning with a damp sponge will help the seals last longer and prevent odors from the surface of the interior, use...
User Manual
Page 20
... to time. Insert the filter unit " 9 " and tighten the coarse micro-filter. 9 19 When the appliance has finished washing, check the filters 8 for particles of appliance Check that no grease or scale has accumulated on the front panel. Dishwasher salt H Check the LOW SALT indicator " G" .Top up with rinse-aid,if required. Remove any deposits: Clean the interior of food and rinse the filters under running water...
... to time. Insert the filter unit " 9 " and tighten the coarse micro-filter. 9 19 When the appliance has finished washing, check the filters 8 for particles of appliance Check that no grease or scale has accumulated on the front panel. Dishwasher salt H Check the LOW SALT indicator " G" .Top up with rinse-aid,if required. Remove any deposits: Clean the interior of food and rinse the filters under running water...
User Manual
Page 22
... closed properly. Water tap not turned on Appliance does not start up Fault with the appliance itself Error display on the time-remaining indicator When the buzzer emits 10 short warning signal every 30 seconds and the time-remaining indicator display "E1" Have you checked whether: the door is situated in mains electricity supply. Caution Do not forget that much sooner. Improper repairs can resolve most problems. Problems...
... closed properly. Water tap not turned on Appliance does not start up Fault with the appliance itself Error display on the time-remaining indicator When the buzzer emits 10 short warning signal every 30 seconds and the time-remaining indicator display "E1" Have you checked whether: the door is situated in mains electricity supply. Caution Do not forget that much sooner. Improper repairs can resolve most problems. Problems...
User Manual
Page 23
... the time remaining indicator display "E2" or "E6", Contact the nearest authorized service center. You can power the dishwasher OFF, and wait a few minutes. the drain hose is added. 22 the drain hose is blocked by small items or food remains. Lower spray arm rotates with detergent. Remnants of the problem. the filter for the water supply hose is crimped or bent. Lid in detergent compartment cannot be dry before detergent is...
... the time remaining indicator display "E2" or "E6", Contact the nearest authorized service center. You can power the dishwasher OFF, and wait a few minutes. the drain hose is added. 22 the drain hose is blocked by small items or food remains. Lower spray arm rotates with detergent. Remnants of the problem. the filter for the water supply hose is crimped or bent. Lid in detergent compartment cannot be dry before detergent is...
User Manual
Page 24
... dishes inside appliance after programme has ended Blockage or kind in spray arm are stuck to excessive foaming during washing Unusual amount of water could otherwise lead to the dishes, cutlery,etc. Pump is still running. Rattling sound can be heared while washing is creased Normal washing up liquid has been poured into the rinse-aid container. Knocking sound coming from inlet valves This is jammed. 23 Dishwasher...
... dishes inside appliance after programme has ended Blockage or kind in spray arm are stuck to excessive foaming during washing Unusual amount of water could otherwise lead to the dishes, cutlery,etc. Pump is still running. Rattling sound can be heared while washing is creased Normal washing up liquid has been poured into the rinse-aid container. Knocking sound coming from inlet valves This is jammed. 23 Dishwasher...
User Manual
Page 27
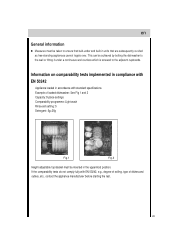
... in the uppermost position. Information on comparability tests implemented in compliance with EN 50242, e.g., degree of soiling, type of loaded dishwasher: See Fig 1 and 2 Capacity: 9 place settings Comparability programme: Light wash Rinse-aid setting: 5 Detergent: 5g+25g Fig.1 Fig.2 Height-adjustable top-basket must be taken to the adjacent cupboards. Example of dishes and cutlery, etc., contact the appliance manufacturer before starting the test. 26
... in the uppermost position. Information on comparability tests implemented in compliance with EN 50242, e.g., degree of soiling, type of loaded dishwasher: See Fig 1 and 2 Capacity: 9 place settings Comparability programme: Light wash Rinse-aid setting: 5 Detergent: 5g+25g Fig.1 Fig.2 Height-adjustable top-basket must be taken to the adjacent cupboards. Example of dishes and cutlery, etc., contact the appliance manufacturer before starting the test. 26


