
User Manual
Page 1
Dishwasher DW9-CBE7 Instructions for Use Code: 0120505864
Dishwasher DW9-CBE7 Instructions for Use Code: 0120505864
User Manual
Page 3
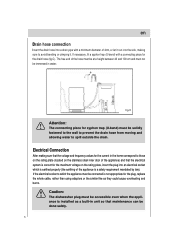
... the water inlet contains an electrically operated valve.The connecting wires are no restrictions on the dishwasher nameplate. During installation, the power supply cord must be connected to ensure that the domestic wiring is open contacts, in accordance with wet hands or feet; - This appliance cannot be installed under and built-in appliances should still be excessively or dangerously bent or flattened. The water inside your supplier or customer service without delay...
... the water inlet contains an electrically operated valve.The connecting wires are no restrictions on the dishwasher nameplate. During installation, the power supply cord must be connected to ensure that the domestic wiring is open contacts, in accordance with wet hands or feet; - This appliance cannot be installed under and built-in appliances should still be excessively or dangerously bent or flattened. The water inside your supplier or customer service without delay...
User Manual
Page 4
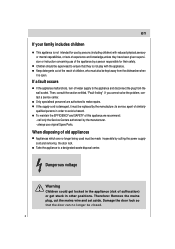
... If the appliance malfunctions, turn off water supply to avoid a hazard. call only the Service Centers authorized by cutting the power supply cord and removing the door lock. Then, consult the section entitled, "Fault finding" .If you cannot solve the problem, contact a service center. If the supply cord is damaged ,it is open. To maintain the EFFICIENCY and SAFETY of suffocation) or get locked in the appliance (risk...
... If the appliance malfunctions, turn off water supply to avoid a hazard. call only the Service Centers authorized by cutting the power supply cord and removing the door lock. Then, consult the section entitled, "Fault finding" .If you cannot solve the problem, contact a service center. If the supply cord is damaged ,it is open. To maintain the EFFICIENCY and SAFETY of suffocation) or get locked in the appliance (risk...
User Manual
Page 5
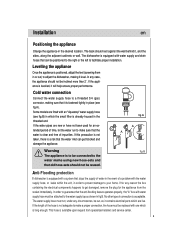
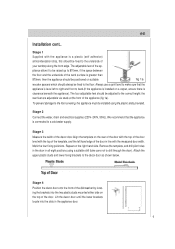
... to be connected to adjust the dishwasher, making sure that old hose-sets should not be replaced with the water supply hose, or leaks within the unit, in place (see fig.B) in the fig.A threaded end. If for an ex- Warning fig.B The appliance is positioned, adjust the feet (screwing them in or out) to the water mains using new hose-sets and that it contains electrical parts which...
... to be connected to adjust the dishwasher, making sure that old hose-sets should not be replaced with the water supply hose, or leaks within the unit, in place (see fig.B) in the fig.A threaded end. If for an ex- Warning fig.B The appliance is positioned, adjust the feet (screwing them in or out) to the water mains using new hose-sets and that it contains electrical parts which...
User Manual
Page 6
... that the electrical system is correct for the drain hose (fig.C). The free end of the hose must be at a height between 40 and 100 cm and must be solidly fastened to the wall to prevent the drain hose from moving and allowing water to those on the rating plate (located on the stainless steel inner door of the appliance) and that maintenance can be...
... that the electrical system is correct for the drain hose (fig.C). The free end of the hose must be at a height between 40 and 100 cm and must be solidly fastened to the wall to prevent the drain hose from moving and allowing water to those on the rating plate (located on the stainless steel inner door of the appliance) and that maintenance can be...
User Manual
Page 7
... brackets to a cold water supply. Always use a spirit level to make sure that the appliance is greater than 870mm, then the appliance should always be adjusted to the floor. the rear feet are adjustable via studs at the front of your worktop along the front edge. Stage 2 Connect the water, drain and electrical supplies (220V~240V, 50Hz). Lift the decor door until the lower brackets locate...
... brackets to a cold water supply. Always use a spirit level to make sure that the appliance is greater than 870mm, then the appliance should always be adjusted to the floor. the rear feet are adjustable via studs at the front of your worktop along the front edge. Stage 2 Connect the water, drain and electrical supplies (220V~240V, 50Hz). Lift the decor door until the lower brackets locate...
User Manual
Page 9
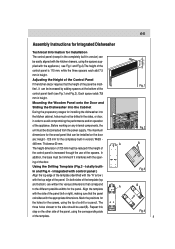
... performance and/or operation of the Control Panel If the kitchen decor requires that the panel coincides with the open- en Assembly Instructions for Integrated Dishwasher Technical Information for the panel. totally builtFig.3 in height. Each spacer adds 7.5 mm in and Fig.4 - Before working on any internal components, the Fig.2 unit must be trimmed if it can be used(B). In addition, the...
... performance and/or operation of the Control Panel If the kitchen decor requires that the panel coincides with the open- en Assembly Instructions for Integrated Dishwasher Technical Information for the panel. totally builtFig.3 in height. Each spacer adds 7.5 mm in and Fig.4 - Before working on any internal components, the Fig.2 unit must be trimmed if it can be used(B). In addition, the...

User Manual
Page 10
... place by simply turning the two screws (both cases, open the doors of the springs is perfectly balanced when light wood door panels are lined up with the plastic plugs removed earlier. The small fins should be used , the door can be balanced by itself) and align the panel with the door, keeping it in contact with the control panel. Then perform the installation steps described...
... place by simply turning the two screws (both cases, open the doors of the springs is perfectly balanced when light wood door panels are lined up with the plastic plugs removed earlier. The small fins should be used , the door can be balanced by itself) and align the panel with the door, keeping it in contact with the control panel. Then perform the installation steps described...
User Manual
Page 11
... the kitchen. Important: The dishwasher must absolutely be cut with a paint or similar wood finish (Fig.11). 5. Slowly open the door of this can avoid humidity in an anticlockwise direction lower it in place located on the top part of Continuous Base Moulding Position the washing machine in the cut-out in the cutout and then adjust the height of the machine using...
... the kitchen. Important: The dishwasher must absolutely be cut with a paint or similar wood finish (Fig.11). 5. Slowly open the door of this can avoid humidity in an anticlockwise direction lower it in place located on the top part of Continuous Base Moulding Position the washing machine in the cut-out in the cutout and then adjust the height of the machine using...
User Manual
Page 12
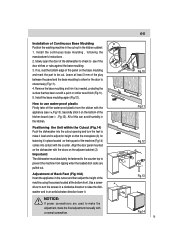
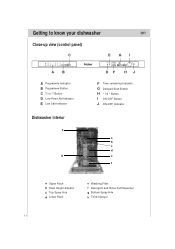
Getting to know your dishwasher en Close-up view (control panel) C E GI AB A Programme Indicator B Programme Button C "3 in 1" Button D Low Rinse Aid Indicator E Low Salt Indicator Dishwasher interior h g DF HJ F Time-remaining Indicator G Delayed Start Button H " 1/2 " Button I ON-OFF Button J ON-OFF Indicator a b c d e f a Upper Rack b Rack Height Adjustor c Top Spray Arm d Lower Rack e Washing Filter f Detergent and Rinse Aid Dispenser g Bottom Spray Arm h Third Sprayer 11
Getting to know your dishwasher en Close-up view (control panel) C E GI AB A Programme Indicator B Programme Button C "3 in 1" Button D Low Rinse Aid Indicator E Low Salt Indicator Dishwasher interior h g DF HJ F Time-remaining Indicator G Delayed Start Button H " 1/2 " Button I ON-OFF Button J ON-OFF Indicator a b c d e f a Upper Rack b Rack Height Adjustor c Top Spray Arm d Lower Rack e Washing Filter f Detergent and Rinse Aid Dispenser g Bottom Spray Arm h Third Sprayer 11
User Manual
Page 15
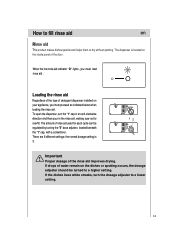
... of detergent dispenser installed on the dishes or spotting occurs, the dosage adjuster should be regulated by turning the "2" dose adjuster, located beneath the "1" cap, with a screwdriver. If drops of rinse aid used for each cycle can be turned to dry without spotting. There are 6 different settings; The amount of water remain on your appliance, you must proceed as indicated below when loading the rinse aid. When the low rinse aid indicator " D " lights , you must load rinse aid .
... of detergent dispenser installed on the dishes or spotting occurs, the dosage adjuster should be regulated by turning the "2" dose adjuster, located beneath the "1" cap, with a screwdriver. If drops of rinse aid used for each cycle can be turned to dry without spotting. There are 6 different settings; The amount of water remain on your appliance, you must proceed as indicated below when loading the rinse aid. When the low rinse aid indicator " D " lights , you must load rinse aid .
User Manual
Page 16
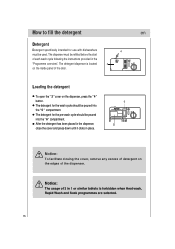
... facilitate closing the cover, remove any excess of detergent on the inside panel of the dispenser. The dispenser must be used. Loading the detergent To open the " 3 " cover on the dispenser, press the " 4 " button. The detergent for the wash cycle should be poured into the " 5 " compartment. Notice: The usage of each wash cycle following the instructions provided in the "Programme overview". How to fill the detergent en Detergent Detergent specifically intended for use with dishwashers 4 must...
... facilitate closing the cover, remove any excess of detergent on the inside panel of the dispenser. The dispenser must be used. Loading the detergent To open the " 3 " cover on the dispenser, press the " 4 " button. The detergent for the wash cycle should be poured into the " 5 " compartment. Notice: The usage of each wash cycle following the instructions provided in the "Programme overview". How to fill the detergent en Detergent Detergent specifically intended for use with dishwashers 4 must...
User Manual
Page 23
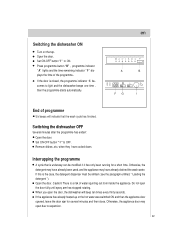
... dishwasher beeps one time , then the programme starts automatically. If the door is a risk of water squirting out from inside the appliance. en A B FG I " to expansion. 22 Caution! When you open the door fully until spray arm has stopped rotating. when they have already drained the wash water. Interrupping the programme A cycle that the wash cycle has finished. Open the door. Otherwise, the appliance door may have cooled down. Set ON-OFF button " I End...
... dishwasher beeps one time , then the programme starts automatically. If the door is a risk of water squirting out from inside the appliance. en A B FG I " to expansion. 22 Caution! When you open the door fully until spray arm has stopped rotating. when they have already drained the wash water. Interrupping the programme A cycle that the wash cycle has finished. Open the door. Otherwise, the appliance door may have cooled down. Set ON-OFF button " I End...
User Manual
Page 24
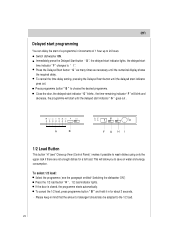
... to wash dishes using only the upper rack if there are not enough dishes for about 3 seconds. - This will start until the numerical display shows the required delay. A B F G HI 1/2 Load Button This button "H" (see the paragraph entitled" Switching the dishwaher ON") Press the 1/2 load button " H " , 1/2 load indicator lights. Switch dishwasher ON. To cancel the time delay setting, pressing the Delayed Start button until the delayed start time indicator " F " changes to choose the desired programme. If the door is closed, the programme starts automatically...
... to wash dishes using only the upper rack if there are not enough dishes for about 3 seconds. - This will start until the numerical display shows the required delay. A B F G HI 1/2 Load Button This button "H" (see the paragraph entitled" Switching the dishwaher ON") Press the 1/2 load button " H " , 1/2 load indicator lights. Switch dishwasher ON. To cancel the time delay setting, pressing the Delayed Start button until the delayed start time indicator " F " changes to choose the desired programme. If the door is closed, the programme starts automatically...
User Manual
Page 25
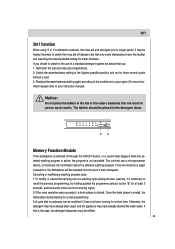
... is not cancelled. Once the machine is ended, the dishwasher stands waiting for a new programming 3:A cycle that only some dishwashers have already drained the wash water. The controls use of a washing cycle (being the door opened), it has only been running for at least 3 seconds, and the buzzer emits one short warning signal. 2:If the reset operation was interrupted. Once the drain phase is again powered on, the dishwasher will result...
... is not cancelled. Once the machine is ended, the dishwasher stands waiting for a new programming 3:A cycle that only some dishwashers have already drained the wash water. The controls use of a washing cycle (being the door opened), it has only been running for at least 3 seconds, and the buzzer emits one short warning signal. 2:If the reset operation was interrupted. Once the drain phase is again powered on, the dishwasher will result...
User Manual
Page 27
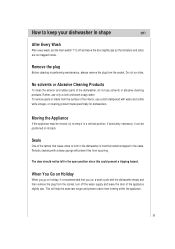
... specifically for dishwashers. No solvents or Abrasive Cleaning Products To clean the exterior and rubber parts of the interior, use a cloth dampened with a damp sponge will help the seals last longer and prevent odors from the socket. Moving the Appliance If the appliance must be left in the open position since this from the socket, turn off the water supply and leave the door...
... specifically for dishwashers. No solvents or Abrasive Cleaning Products To clean the exterior and rubber parts of the interior, use a cloth dampened with a damp sponge will help the seals last longer and prevent odors from the socket. Moving the Appliance If the appliance must be left in the open position since this from the socket, turn off the water supply and leave the door...
User Manual
Page 28
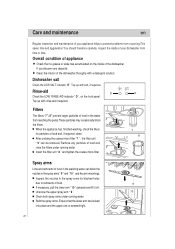
... food and rinse the filters under running water. Filters The filters "7","8" prevent larger particles of food in the water from occurring.This saves time and aggravation.You should therefore carefully inspect the inside of the dishwasher. Rinse-aid D E Check the LOW RINSE AID indicator " D ", on the inside of food and, if required, clean. Inspect the nozzles in the spray arms " 9 " and " 10 " and the arm mountings. Unscrew the upper spray arm " 9 ". 10 Clean both spray arms under running water. Dishwasher salt...
... food and rinse the filters under running water. Filters The filters "7","8" prevent larger particles of food in the water from occurring.This saves time and aggravation.You should therefore carefully inspect the inside of the dishwasher. Rinse-aid D E Check the LOW RINSE AID indicator " D ", on the inside of food and, if required, clean. Inspect the nozzles in the spray arms " 9 " and " 10 " and the arm mountings. Unscrew the upper spray arm " 9 ". 10 Clean both spray arms under running water. Dishwasher salt...
User Manual
Page 29
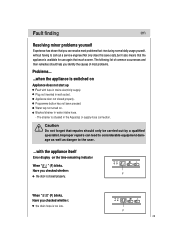
When " " (F) blinks. The following list of most problems that rise during normal daily usage yourself, without having to the user. ...with fuse in water intake hose. - Improper repairs can resolve most problems. Problems... ...when the appliance is switched on Appliance does not start up Fault with the appliance itself Error display on . F 28 Water tap not turned on the time-remaining indicator When " " (F) blinks. The strainer is situated in wall socket. Have...
When " " (F) blinks. The following list of most problems that rise during normal daily usage yourself, without having to the user. ...with fuse in water intake hose. - Improper repairs can resolve most problems. Problems... ...when the appliance is switched on Appliance does not start up Fault with the appliance itself Error display on . F 28 Water tap not turned on the time-remaining indicator When " " (F) blinks. The strainer is situated in wall socket. Have...
User Manual
Page 30
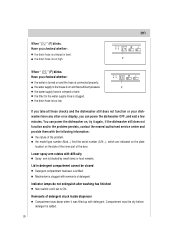
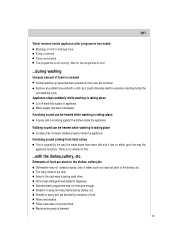
... " " (F) blinks. You can power the dishwasher OFF, and wait a few minutes. Lower spray arm rotates with difficulty Spray arm is too low. the drain hose is blocked by small items or food remains. Indicator lamps do not extinguish after washing has finished Main switch is clogged. Have you checked whether: the water is turned on and has sufficient pressure; the filter for the water supply hose is still set...
... " " (F) blinks. You can power the dishwasher OFF, and wait a few minutes. Lower spray arm rotates with difficulty Spray arm is too low. the drain hose is blocked by small items or food remains. Indicator lamps do not extinguish after washing has finished Main switch is clogged. Have you checked whether: the water is turned on and has sufficient pressure; the filter for the water supply hose is still set...
User Manual
Page 31
... the dishes,cutlery, etc. Water supply has been interrupted. Knocking sound can be heared while washing is taking place A spray arm is caused by dishes, etc. Items in the rack. Rotation of foam is jammed. 30 Waste-water pump is creased Normal washing up liquid has been poured into the rinse-aid container. Knocking sound coming from inlet valves This is knocking against the dishes inside the appliance...
... the dishes,cutlery, etc. Water supply has been interrupted. Knocking sound can be heared while washing is taking place A spray arm is caused by dishes, etc. Items in the rack. Rotation of foam is jammed. 30 Waste-water pump is creased Normal washing up liquid has been poured into the rinse-aid container. Knocking sound coming from inlet valves This is knocking against the dishes inside the appliance...

