Instruction Manual
Page 1
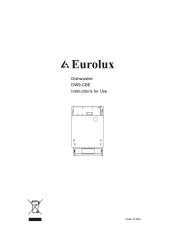
Dishwasher DW9-CBE Instructions for Use Code: 012050
Dishwasher DW9-CBE Instructions for Use Code: 012050
Instruction Manual
Page 3
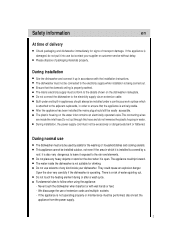
... water inlet contains an electrically operated valve.The connecting wires are inside the inlet hose.Do not cut through this hose and do not put it is covered by adults for the washing of household dishes and cooking utensils. During normal use but contact your dishwasher. During installation, the power supply cord must conform to ensure that the domestic wiring is not suitable for signs of transport damage. During installation Site the dishwasher and connect...
... water inlet contains an electrically operated valve.The connecting wires are inside the inlet hose.Do not cut through this hose and do not put it is covered by adults for the washing of household dishes and cooking utensils. During normal use but contact your dishwasher. During installation, the power supply cord must conform to ensure that the domestic wiring is not suitable for signs of transport damage. During installation Site the dishwasher and connect...
Instruction Manual
Page 4
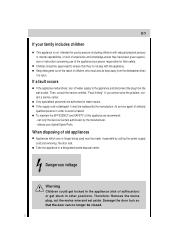
call only the Service Centers authorized by cutting the power supply cord and removing the door lock. always use of the appliance by a person responsible for their safety. Take the appliance to make repairs. To maintain the EFFICIENCY and SAFETY of suffocation) or get locked in the appliance (risk of this appliance,we recommend: - Therefore: Remove the mains plug, cut the mains wire and set aside. en...
call only the Service Centers authorized by cutting the power supply cord and removing the door lock. always use of the appliance by a person responsible for their safety. Take the appliance to make repairs. To maintain the EFFICIENCY and SAFETY of suffocation) or get locked in the appliance (risk of this appliance,we recommend: - Therefore: Remove the mains plug, cut the mains wire and set aside. en...
Instruction Manual
Page 5
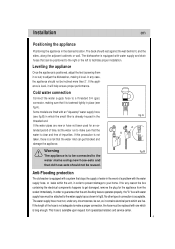
... drain hoses that stops the supply of water in the fig.A threaded end. If the water pipes are fitted with water supply hose must be cut, as shown in or out) to the water supply tap as it level. The back should not be attached to adjust the dishwasher, making sure that the water inlet can be positioned to the right or the left to your home. Cold water connection Connect...
... drain hoses that stops the supply of water in the fig.A threaded end. If the water pipes are fitted with water supply hose must be cut, as shown in or out) to the water supply tap as it level. The back should not be attached to adjust the dishwasher, making sure that the water inlet can be positioned to the right or the left to your home. Cold water connection Connect...

Instruction Manual
Page 6
... the home correspond to those on the rating plate (located on the stainless steel inner door of the appliance) and that maintenance can be done safely. 5 The free end of the appliance is installed as they could cause overheating and burns. Electrical Connection After making sure to which is earthed properly (the earthing of the hose must be at a height between 40...
... the home correspond to those on the rating plate (located on the stainless steel inner door of the appliance) and that maintenance can be done safely. 5 The free end of the appliance is installed as they could cause overheating and burns. Electrical Connection After making sure to which is earthed properly (the earthing of the hose must be at a height between 40...

Instruction Manual
Page 7
Getting to know your dishwasher Close-up view (control panel) A B en CD E A Cycle indicator light B "HALF LOAD" Button C ON-OFF Button D ON-OFF Light Dishwasher interior FG H I E Cycle select button F Low salt indicator light G "HALF LOAD" indicator light H Delay indicator light I Delay select button A B C G D E F A Upper Rack B Rack Height Adjustor C Top Spray Arm D Lower Rack E Washing Filter F Detergent and Rinse Aid Dispenser G Bottom Spray Arm 6
Getting to know your dishwasher Close-up view (control panel) A B en CD E A Cycle indicator light B "HALF LOAD" Button C ON-OFF Button D ON-OFF Light Dishwasher interior FG H I E Cycle select button F Low salt indicator light G "HALF LOAD" indicator light H Delay indicator light I Delay select button A B C G D E F A Upper Rack B Rack Height Adjustor C Top Spray Arm D Lower Rack E Washing Filter F Detergent and Rinse Aid Dispenser G Bottom Spray Arm 6
Instruction Manual
Page 8
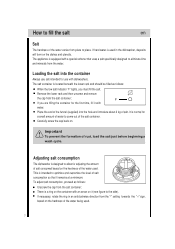
... container is located beneath the lower rack and should be filled as follows: Unscrew the cap from the "-" setting towards the "+" sign, based on the dishes and utensils. Loading the salt into the hole and introduce about 2 kg of salt. Remove the lower rack and then unscrew and remove the cap from the water. Adjusting salt consumption The dishwasher is used . If hard water is designed to...
... container is located beneath the lower rack and should be filled as follows: Unscrew the cap from the "-" setting towards the "+" sign, based on the dishes and utensils. Loading the salt into the hole and introduce about 2 kg of salt. Remove the lower rack and then unscrew and remove the cap from the water. Adjusting salt consumption The dishwasher is used . If hard water is designed to...
Instruction Manual
Page 9
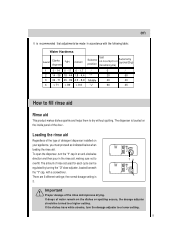
... located on the inside panel of detergent dispenser installed on the dishes or spotting occurs, the dosage adjuster should be turned to a lower setting. 8 There are 6 different settings; Loading the rinse aid Regardless of the type of the door . the normal dosage setting is 3. The amount of the rinse aid improves drying. Important Proper dosage of rinse aid used for each cycle can be regulated by turning the " 2" dose adjuster, located beneath the "1" cap, with the following table: Water Hardness Level...
... located on the inside panel of detergent dispenser installed on the dishes or spotting occurs, the dosage adjuster should be turned to a lower setting. 8 There are 6 different settings; Loading the rinse aid Regardless of the type of the door . the normal dosage setting is 3. The amount of the rinse aid improves drying. Important Proper dosage of rinse aid used for each cycle can be regulated by turning the " 2" dose adjuster, located beneath the "1" cap, with the following table: Water Hardness Level...

Instruction Manual
Page 10
... located 3 on the inside panel of the dispenser. Loading the detergent To open the " 3 " cover on the dispenser, press the " 4 " button. The detergent dispenser is forbidden when Rinse, Rapid Wash and Soak programmes are selected. 9 How to fill the detergent en Detergent Detergent specifically intended for use with dishwashers 4 must be refilled before the start of each wash cycle following the instructions provided in place. 6 5 Notice: To facilitate closing the cover, remove any excess of detergent...
... located 3 on the inside panel of the dispenser. Loading the detergent To open the " 3 " cover on the dispenser, press the " 4 " button. The detergent dispenser is forbidden when Rinse, Rapid Wash and Soak programmes are selected. 9 How to fill the detergent en Detergent Detergent specifically intended for use with dishwashers 4 must be refilled before the start of each wash cycle following the instructions provided in place. 6 5 Notice: To facilitate closing the cover, remove any excess of detergent...

Instruction Manual
Page 12
... the dishes in reduced performance. How to use the lower rack We recommend that you place the most difficult to clean items on the sides of the top spray arm. Warning knives and other utensils with sharp points must always be placed face down or placed in order to load the dishwasher. This will eliminate the need for extra wash cycles. Normal daily load...
... the dishes in reduced performance. How to use the lower rack We recommend that you place the most difficult to clean items on the sides of the top spray arm. Warning knives and other utensils with sharp points must always be placed face down or placed in order to load the dishwasher. This will eliminate the need for extra wash cycles. Normal daily load...

Instruction Manual
Page 16
...: Use the "normal" programme for dishes and utensils which have been loaded into the dishwasher,selecting a programme that operates at the next lowest temperature will usually be identified by up to 1/4 when dishes are washed in the upper basket only.The water consumption values are related to ON. Open the door. Switching the dishwasher ON Turn on hard. Set ON-OFF button "C" to water hardness level 1. If the door is...
...: Use the "normal" programme for dishes and utensils which have been loaded into the dishwasher,selecting a programme that operates at the next lowest temperature will usually be identified by up to 1/4 when dishes are washed in the upper basket only.The water consumption values are related to ON. Open the door. Switching the dishwasher ON Turn on hard. Set ON-OFF button "C" to water hardness level 1. If the door is...
Instruction Manual
Page 17
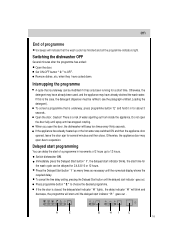
... wash water. To concel a programme that the wash cycle has finished and all the programme indicators light. Do not open the door, the dishwasher will beep ten times every thirty seconds. Immediately press the Delayed Start button " I " as many times as necessary until the delayed start of a programme in for 2,4,6,8,10 or 12 hours. Press programme button " E " to OFF. Open the door. Caution! To cancel the time delay setting, pressing the Delayed Start button until spray arm has stopped rotating. Remove dishes...
... wash water. To concel a programme that the wash cycle has finished and all the programme indicators light. Do not open the door, the dishwasher will beep ten times every thirty seconds. Immediately press the Delayed Start button " I " as many times as necessary until the delayed start of a programme in for 2,4,6,8,10 or 12 hours. Press programme button " E " to OFF. Open the door. Caution! To cancel the time delay setting, pressing the Delayed Start button until spray arm has stopped rotating. Remove dishes...

Instruction Manual
Page 18
... again powered on water and energy consumption. To cancel the 1/2 load Press programme button ìEî and hold it possible to reset the previous programming, by holding pushed the programme selector button "E" for a short time. Once the machine is started. Otherwise, the detergent may have already been used, and the appliance may have already drained the wash water. To select 1/2 load: Select the programme ( see " Close-up View (Control Panel...
... again powered on water and energy consumption. To cancel the 1/2 load Press programme button ìEî and hold it possible to reset the previous programming, by holding pushed the programme selector button "E" for a short time. Once the machine is started. Otherwise, the detergent may have already been used, and the appliance may have already drained the wash water. To select 1/2 load: Select the programme ( see " Close-up View (Control Panel...
Instruction Manual
Page 19
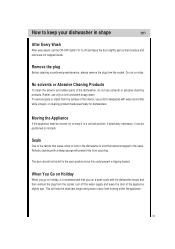
... and rubber parts of the interior, use a cloth dampened with water and a little while vinegar, or cleaning product made specifically for dishwashers. How to keep it in a vertical position. If absolutely necessary, it can be left in the open position since this from occurring. Remove the plug Before cleaning or performing maintenance, always remove the plug from forming within the appliance. 18 Do not run a wash cycle with...
... and rubber parts of the interior, use a cloth dampened with water and a little while vinegar, or cleaning product made specifically for dishwashers. How to keep it in a vertical position. If absolutely necessary, it can be left in the open position since this from occurring. Remove the plug Before cleaning or performing maintenance, always remove the plug from forming within the appliance. 18 Do not run a wash cycle with...
Instruction Manual
Page 20
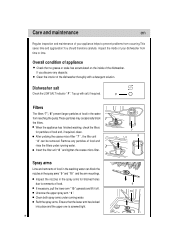
... of food and rinse the filters under running water. Unscrew the upper spray arm " 9 ". 10 Clean both spray arms under running water. Refit the spray arms. Ensure that no grease or scale has accumulated on the inside of your dishwasher from time to time. Top up with a detergent solution. Remove any deposits: Clean the interior of the dishwasher thorughly with salt, if required. Overall condition of appliance Check that the lower arm has locked into place...
... of food and rinse the filters under running water. Unscrew the upper spray arm " 9 ". 10 Clean both spray arms under running water. Refit the spray arms. Ensure that no grease or scale has accumulated on the inside of your dishwasher from time to time. Top up with a detergent solution. Remove any deposits: Clean the interior of the dishwasher thorughly with salt, if required. Overall condition of appliance Check that the lower arm has locked into place...
Instruction Manual
Page 21
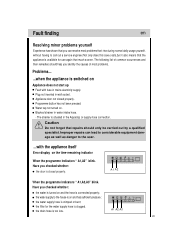
..." blink. the water supply hose is closed properly. the drain hose is on and has sufficient pressure; A1 A2 A3 20 Improper repairs can resolve most problems. Problems... ...when the appliance is switched on Appliance does not start up Fault with the appliance itself Error display on the time-remaining indicator When the programme indicators " A1,A2" blink. the water supply to the house is too low. the filter for use again...
..." blink. the water supply hose is closed properly. the drain hose is on and has sufficient pressure; A1 A2 A3 20 Improper repairs can resolve most problems. Problems... ...when the appliance is switched on Appliance does not start up Fault with the appliance itself Error display on the time-remaining indicator When the programme indicators " A1,A2" blink. the water supply to the house is too low. the filter for use again...
Instruction Manual
Page 22
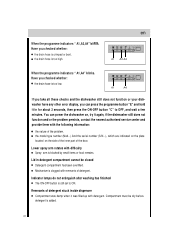
...-OFF button "C" to ON. Indicator lamps do not extinguish after washing has finished The ON-OFF button is blocked by small items or food remains. Lower spray arm rotates with remnants of the door. A1 A4 If you take all these checks and the dishwasher still does not function or your dishwasher have any other error display, you checked whether: the drain hose is...
...-OFF button "C" to ON. Indicator lamps do not extinguish after washing has finished The ON-OFF button is blocked by small items or food remains. Lower spray arm rotates with remnants of the door. A1 A4 If you take all these checks and the dishwasher still does not function or your dishwasher have any other error display, you checked whether: the drain hose is...

Instruction Manual
Page 23
... hose. Waste-water pump is still running. Pump is no effect upon the way the appliance functions. Remove any spilled rinse aid with the dishes,cutlery, etc. Knocking sound can be heared while washing is taking place A spray arm is taking place Crockery has not been stacked properly inside the appliance. Remnants of spray arm was added to dispenser. Items in the rack. Selected wash programme was not loaded...
... hose. Waste-water pump is still running. Pump is no effect upon the way the appliance functions. Remove any spilled rinse aid with the dishes,cutlery, etc. Knocking sound can be heared while washing is taking place A spray arm is taking place Crockery has not been stacked properly inside the appliance. Remnants of spray arm was added to dispenser. Items in the rack. Selected wash programme was not loaded...

Instruction Manual
Page 26
... over. Example of a fitted kitchen. For Switzerland only: There are subsequently re-sited as part of loaded dishwasher: See Fig.1 and 2. Capacity: 9 place settings Comparability programme: Light wash Rinse-aid setting: 5 Detergent: 25g+5g Fig.1 Fig.2 Height-adjustable top-basket must be connected to the adjacent cupboards. If the appliance is screwed to the mains via a separator for all poles within the domestic wiring system.
... over. Example of a fitted kitchen. For Switzerland only: There are subsequently re-sited as part of loaded dishwasher: See Fig.1 and 2. Capacity: 9 place settings Comparability programme: Light wash Rinse-aid setting: 5 Detergent: 25g+5g Fig.1 Fig.2 Height-adjustable top-basket must be connected to the adjacent cupboards. If the appliance is screwed to the mains via a separator for all poles within the domestic wiring system.
Instruction Manual
Page 27
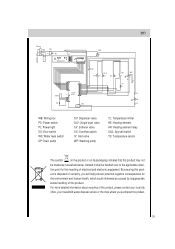
... HE TL WB: Wiring box PS: Power switch PL: Power light DS: Door switch WS: Water level switch DP: Drain pump DV: Dispenser valve SLV: Single layer valve SV: Softener valve OS: Overflow switch IV: Inlet valve WP: Washing pump TL: Temperature limiter HE: Heating element HR: Heating element relay SSS: Spy salt switch TS: Temperature sensor The symbol on the product or on its packaging indicates that this product may not be caused...
... HE TL WB: Wiring box PS: Power switch PL: Power light DS: Door switch WS: Water level switch DP: Drain pump DV: Dispenser valve SLV: Single layer valve SV: Softener valve OS: Overflow switch IV: Inlet valve WP: Washing pump TL: Temperature limiter HE: Heating element HR: Heating element relay SSS: Spy salt switch TS: Temperature sensor The symbol on the product or on its packaging indicates that this product may not be caused...

