User Manual
Page 2
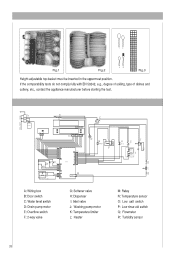
COL D F (N P 641 Q L R M A: Wiring box B: Door switch C: Water level switch D: Drain pump motor E: Overflow switch F: 2-way valve G: Softener valve H: Dispenser I: Inlet valve J: Washing pump motor K: Temperature limiter L: Heater M: Relay N: Temperature sensor O: Low salt switch P: Low rinse aid switch Q: Flowmeter R: Turbidity sensor 33 IP - 444 In Fig.1 Fig.2 • • • 4 4 ©31 011 U3 1 32 32 031 32 32 #1., Fig.3 Height-adjustable top-basket must be inserted in the uppermost position...
COL D F (N P 641 Q L R M A: Wiring box B: Door switch C: Water level switch D: Drain pump motor E: Overflow switch F: 2-way valve G: Softener valve H: Dispenser I: Inlet valve J: Washing pump motor K: Temperature limiter L: Heater M: Relay N: Temperature sensor O: Low salt switch P: Low rinse aid switch Q: Flowmeter R: Turbidity sensor 33 IP - 444 In Fig.1 Fig.2 • • • 4 4 ©31 011 U3 1 32 32 031 32 32 #1., Fig.3 Height-adjustable top-basket must be inserted in the uppermost position...
User Manual
Page 3
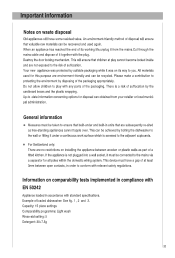
... become locked inside and are no restrictions on comparability tests implemented in compliance with EN 50242 Appliance loaded in units that are environment-friendly and can obtained from the mains.Cut through the mains cable and dispose of suffocation. Example of the packaging. Capacity: 15 place settings Comparability programme: Light wash Rinse-aid setting: 5 Detergent: 30+7.5g 32 Destroy the door locking mechanism. Your new...
... become locked inside and are no restrictions on comparability tests implemented in compliance with EN 50242 Appliance loaded in units that are environment-friendly and can obtained from the mains.Cut through the mains cable and dispose of suffocation. Example of the packaging. Capacity: 15 place settings Comparability programme: Light wash Rinse-aid setting: 5 Detergent: 30+7.5g 32 Destroy the door locking mechanism. Your new...

User Manual
Page 6
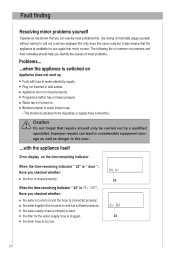
.... • Dishwasher was obstructed by dishes, etc. • Nozzles in spray arm are blokcked by the way the water pipes have been incorrectly fitted. • Waste-water pump is still running. Knocking sound coming from inlet valves This is taking place Cut off electricity supply to appliance. There is creased • Normal washing up liquid has been poured into the rinse-aid container. • Remove any spilled rinse aid with...
.... • Dishwasher was obstructed by dishes, etc. • Nozzles in spray arm are blokcked by the way the water pipes have been incorrectly fitted. • Waste-water pump is still running. Knocking sound coming from inlet valves This is taking place Cut off electricity supply to appliance. There is creased • Normal washing up liquid has been poured into the rinse-aid container. • Remove any spilled rinse aid with...
User Manual
Page 7
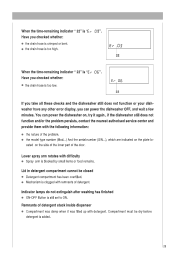
... Compartment must be closed Detergent compartment has been overfilled. Indicator lamps do not extinguish after washing has finished ON-OFF Button is "Er 05". You can power the dishwasher OFF, and wait a few minutes. Remnants of detergent. Have you checked whether: • the drain hose is blocked by small items or food remains. Lower spray arm rotates with detergent. When the time-remaining indicator " 22" is...
... Compartment must be closed Detergent compartment has been overfilled. Indicator lamps do not extinguish after washing has finished ON-OFF Button is "Er 05". You can power the dishwasher OFF, and wait a few minutes. Remnants of detergent. Have you checked whether: • the drain hose is blocked by small items or food remains. Lower spray arm rotates with detergent. When the time-remaining indicator " 22" is...
User Manual
Page 8
... indicator " 22" is "Er 02" Have you checked whether: • the door is situated in water intake hose. - do or 22 Er 02 22 27 The strainer is closed properly. • Programme button has not been pressed. • Water tap not turned on. • Blocked strainer in the Aquastop or supply-hose connection. The following list of most problems that rise during normal daily usage...
... indicator " 22" is "Er 02" Have you checked whether: • the door is situated in water intake hose. - do or 22 Er 02 22 27 The strainer is closed properly. • Programme button has not been pressed. • Water tap not turned on. • Blocked strainer in the Aquastop or supply-hose connection. The following list of most problems that rise during normal daily usage...

User Manual
Page 10
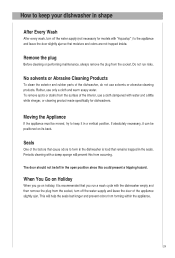
... particles of food in the water from occurring.This saves time and aggravation.You should therefore carefully inspect the inside of food and, if required, clean. Rinse-aid Check the LOW RINSE-AID indicator 16 ", on the inside of food and rinse the filters under running water. If you discover any particles of your appliance helps to time. Clean the interior of the dishwasher thorughly with salt, if required...
... particles of food in the water from occurring.This saves time and aggravation.You should therefore carefully inspect the inside of food and, if required, clean. Rinse-aid Check the LOW RINSE-AID indicator 16 ", on the inside of food and rinse the filters under running water. If you discover any particles of your appliance helps to time. Clean the interior of the dishwasher thorughly with salt, if required...
User Manual
Page 11
... prevent this could present a tripping hazard. Do not run a wash cycle with the dishwasher empty and then remove the plug from the socket, turn off the water supply (not necessary for dishwashers. Moving the Appliance If the appliance must be left in the seals. Periodic cleaning with water and a little while vinegar, or cleaning product made specifically for models with "Aquastop" ) to the appliance and leave the...
... prevent this could present a tripping hazard. Do not run a wash cycle with the dishwasher empty and then remove the plug from the socket, turn off the water supply (not necessary for dishwashers. Moving the Appliance If the appliance must be left in the seals. Periodic cleaning with water and a little while vinegar, or cleaning product made specifically for models with "Aquastop" ) to the appliance and leave the...
User Manual
Page 13
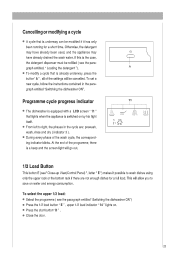
... 1:52 1/2 Load Button This button E (see' Close-up View(Control Panel) ", letter " E ') makes it has only been running for a full load. Cancelling or modifying a cycle • A cycle that is underway can be modified if it possible to wash dishes using only the upper rack or the bottom rack if there are : prewash, wash, rinse and dry ( indicator 3). Otherwise, the detergent may have already been used, and the appliance may have already drained the wash water. This will...
... 1:52 1/2 Load Button This button E (see' Close-up View(Control Panel) ", letter " E ') makes it has only been running for a full load. Cancelling or modifying a cycle • A cycle that is underway can be modified if it possible to wash dishes using only the upper rack or the bottom rack if there are : prewash, wash, rinse and dry ( indicator 3). Otherwise, the detergent may have already been used, and the appliance may have already drained the wash water. This will...
User Manual
Page 15
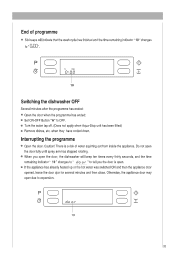
...-OFF Button "A" to 0:00". when they have cooled down. P O O O do or "to tell you open the door, the dishwasher will indicate that the wash cycle has finished and the time-remaining indicator " 10 " changes to OFF. • Turn the water tap off. (Does not apply when Aqua-Stop unit has been fitted) • Remove dishes, etc. Otherwise, the appliance door may open . Caution! End of water squirting out from inside...
...-OFF Button "A" to 0:00". when they have cooled down. P O O O do or "to tell you open the door, the dishwasher will indicate that the wash cycle has finished and the time-remaining indicator " 10 " changes to OFF. • Turn the water tap off. (Does not apply when Aqua-Stop unit has been fitted) • Remove dishes, etc. Otherwise, the appliance door may open . Caution! End of water squirting out from inside...
User Manual
Page 17
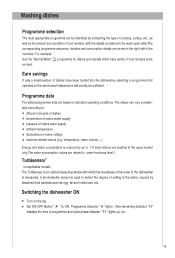
.... Programme indicator " 9 " lights , time-remaining indicator "10" displays the time of programme and cycle phase indicator " 11 " lights up to 1/4 when dishes are washed in the upper basket only.The water consumption values are based on hard. Turbisensor* on the tap. The values can be sufficient. Programme data The stated programme data are related to water hardness level 1. temperature, water volume,...) Energy and water consumption is measured. Set ON-OFF Button...
.... Programme indicator " 9 " lights , time-remaining indicator "10" displays the time of programme and cycle phase indicator " 11 " lights up to 1/4 when dishes are washed in the upper basket only.The water consumption values are based on hard. Turbisensor* on the tap. The values can be sufficient. Programme data The stated programme data are related to water hardness level 1. temperature, water volume,...) Energy and water consumption is measured. Set ON-OFF Button...

User Manual
Page 19
... e.g. Drying. • Light Wash (EN50242) Soups, Pre-wash use cold water. Mixed Coffee,cakes, Hot rinse. • milk, sausage, Very little loosely Drying. • cold drinks, attached salads Short wash at 70°C Non- verviet Wash pie • Type of cycle 1 2 Upper Rack Lower Rack Pre-wash with hot water. Rinse with cold water. • eggs, roast or fried food. Drying. • • Rinse off if the dishes have been Short cold wash to washing. casseroles, Rinses...
... e.g. Drying. • Light Wash (EN50242) Soups, Pre-wash use cold water. Mixed Coffee,cakes, Hot rinse. • milk, sausage, Very little loosely Drying. • cold drinks, attached salads Short wash at 70°C Non- verviet Wash pie • Type of cycle 1 2 Upper Rack Lower Rack Pre-wash with hot water. Rinse with cold water. • eggs, roast or fried food. Drying. • • Rinse off if the dishes have been Short cold wash to washing. casseroles, Rinses...

User Manual
Page 20
...: The usage of 3 in 1 or similar tablets is located DUO on the inside panel of the door. The dispenser must be poured into the " 7" compartment. The detergent for the wash cycle should be used. How to fill the deterge Detergent Detergent specifically intended for use with dishwashers must be poured into the " 8" compartment. Loading the detergent To open the " 5" cover on the edges of each wash cycle following the instructions provided in...
...: The usage of 3 in 1 or similar tablets is located DUO on the inside panel of the door. The dispenser must be poured into the " 7" compartment. The detergent for the wash cycle should be used. How to fill the deterge Detergent Detergent specifically intended for use with dishwashers must be poured into the " 8" compartment. Loading the detergent To open the " 5" cover on the edges of each wash cycle following the instructions provided in...
User Manual
Page 22
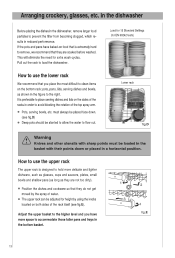
...-on the sides of the racks in order to avoid blocking the rotation of the top spray arm. 4 Pots, serving bowls, etc. Adjust the upper basket to the higher level and you place the most difficult to hold more space to the right. Arranging crockery, glasses, ei r Before placing the dishes in the dishwasher, remove larger food particles to load the dishwasher.
...-on the sides of the racks in order to avoid blocking the rotation of the top spray arm. 4 Pots, serving bowls, etc. Adjust the upper basket to the higher level and you place the most difficult to hold more space to the right. Arranging crockery, glasses, ei r Before placing the dishes in the dishwasher, remove larger food particles to load the dishwasher.
User Manual
Page 24
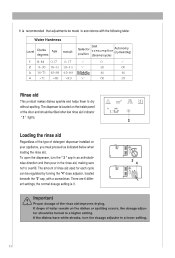
... of the door and should be filled after low rinse aid indicator "2" lights. It is recommended that adjustments be made in the rinse aid, making sure not to a lower setting. 11 To open the dispenser, turn the dosage adjustor to overfill. If drops of water remain on the inside panel of detergent dispenser installed on your appliance, you must proceed as indicated below when loading the rinse aid. The dispenser is located on the dishes or...
... of the door and should be filled after low rinse aid indicator "2" lights. It is recommended that adjustments be made in the rinse aid, making sure not to a lower setting. 11 To open the dispenser, turn the dosage adjustor to overfill. If drops of water remain on the inside panel of detergent dispenser installed on your appliance, you must proceed as indicated below when loading the rinse aid. The dispenser is located on the dishes or...
User Manual
Page 25
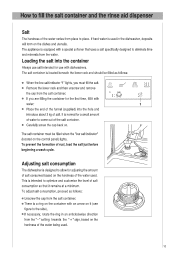
... the control panel) lights. Adjusting salt consumption The dishwasher is intended to optimize and customize the level of the water being used. 10 If you must be filled as follows: • Unscrew the cap from the salt container; • There is used in an anticlockwise direction from the water. How to fill the salt container and the rinse aid dispenser Salt The hardness of the water used. Remove the lower rack...
... the control panel) lights. Adjusting salt consumption The dishwasher is intended to optimize and customize the level of the water being used. 10 If you must be filled as follows: • Unscrew the cap from the salt container; • There is used in an anticlockwise direction from the water. How to fill the salt container and the rinse aid dispenser Salt The hardness of the water used. Remove the lower rack...
User Manual
Page 26
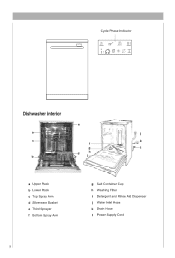
Ott h in 1: m2 (-9 1'3 • Dishwasher interior 9 - Cycle Phase Indicator :;;;. h a Upper Rack b Lower Rack c Top Spray Arm d Silverware Basket e Third Sprayer f Bottom Spray Arm 9 g Salt Container Cap h Washing Filter i Detergent and Rinse Aid Dispenser j Water Inlet Hose k Drain Hose I Power Supply Cord
Ott h in 1: m2 (-9 1'3 • Dishwasher interior 9 - Cycle Phase Indicator :;;;. h a Upper Rack b Lower Rack c Top Spray Arm d Silverware Basket e Third Sprayer f Bottom Spray Arm 9 g Salt Container Cap h Washing Filter i Detergent and Rinse Aid Dispenser j Water Inlet Hose k Drain Hose I Power Supply Cord
User Manual
Page 30
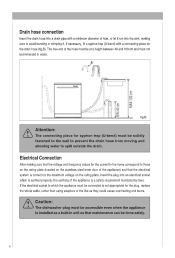
... law). Drain hose connection Insert the drain hose into a drain pipe with a connecting piece for the maximum voltage on the stainless steel inner door of 4cm, or let it run into an electrical socket which the appliance must be done safely. 5 The free end of the appliance is not appropriate for the plug, replace the whole cable, rather than using adaptors or the like as a built-in the...
... law). Drain hose connection Insert the drain hose into a drain pipe with a connecting piece for the maximum voltage on the stainless steel inner door of 4cm, or let it run into an electrical socket which the appliance must be done safely. 5 The free end of the appliance is not appropriate for the plug, replace the whole cable, rather than using adaptors or the like as a built-in the...
User Manual
Page 31
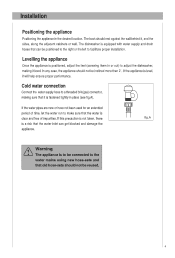
... water supply and drain hoses that the water is clear and free of time, let the water run to facilitate proper installation. If the water pipes are new or have not been used for an extended period of impurities. In any case, the appliance should rest against the wall behind it level. Installation Positioning the appliance Positioning the appliance in or out) to the water mains using new hose-sets...
... water supply and drain hoses that the water is clear and free of time, let the water run to facilitate proper installation. If the water pipes are new or have not been used for an extended period of impurities. In any case, the appliance should rest against the wall behind it level. Installation Positioning the appliance Positioning the appliance in or out) to the water mains using new hose-sets...
User Manual
Page 32
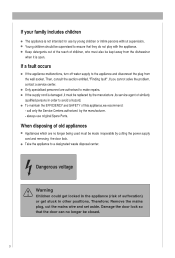
... make repairs. • If the supply cord is open. call only the Service Centers authorized by the manufacturer. - Therefore: Remove the mains plug, cut the mains wire and set aside. When disposing of children, who must also be kept away from the wall socket. If a fault occurs If the appliance malfunctions, turn off water supply to the appliance and disconnect the plug from the dishwasher when...
... make repairs. • If the supply cord is open. call only the Service Centers authorized by the manufacturer. - Therefore: Remove the mains plug, cut the mains wire and set aside. When disposing of children, who must also be kept away from the wall socket. If a fault occurs If the appliance malfunctions, turn off water supply to the appliance and disconnect the plug from the dishwasher when...
User Manual
Page 33
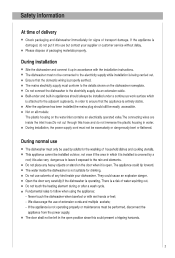
... the use but contact your dishwasher. During normal use solvents of any heavy objects or stand on the water inlet contains an electrically operated valve.The connecting wires are inside the inlet hose.Do not cut through this could present a tripping harzards. 2 They could tip forward. • The water inside your supplier or customer service without delay. • Please dispose of packaging materials properly. During installation • Site the dishwasher and connect it...
... the use but contact your dishwasher. During normal use solvents of any heavy objects or stand on the water inlet contains an electrically operated valve.The connecting wires are inside the inlet hose.Do not cut through this could present a tripping harzards. 2 They could tip forward. • The water inside your supplier or customer service without delay. • Please dispose of packaging materials properly. During installation • Site the dishwasher and connect it...


