User Manual
Page 3
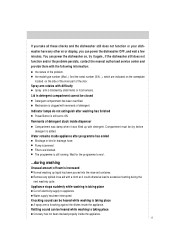
Index Safety information 2 Installation 4 Getting to know your dishwasher 6 How to keep your dishwasher in the dishwasher 9 Programme overview 11 Washing dishes 12 How to fill the rinse aid and the detergent dispenser 7 Not suitable for the dishwasher 8 Arranging crockery, glasses, etc. in shape 14 Care and maintenance 15 Fault finding 16 Technical data 19 Important information 20 1
Index Safety information 2 Installation 4 Getting to know your dishwasher 6 How to keep your dishwasher in the dishwasher 9 Programme overview 11 Washing dishes 12 How to fill the rinse aid and the detergent dispenser 7 Not suitable for the dishwasher 8 Arranging crockery, glasses, etc. in shape 14 Care and maintenance 15 Fault finding 16 Technical data 19 Important information 20 1
User Manual
Page 4
... time of delivery Check packaging and dishwasher immediately for use by young children of infirm persons without delay. During installation, the power supply cord must also be easily accessible. Do not place any kind inside the dishwasher is being carried out. The appliance could cause an explosion danger. They could tip forward. Open the door very carefully if the dishwasher is open . Never touch the dishwasher...
... time of delivery Check packaging and dishwasher immediately for use by young children of infirm persons without delay. During installation, the power supply cord must also be easily accessible. Do not place any kind inside the dishwasher is being carried out. The appliance could cause an explosion danger. They could tip forward. Open the door very carefully if the dishwasher is open . Never touch the dishwasher...
User Manual
Page 5
... mains plug, cut the mains wire and set aside. Then, consult the section entitled, "Finding fault" .If you cannot solve the problem, contact a service center. Damage the door lock so that the door can no longer being used must be made inoperable by cutting the power supply cord and removing the door lock. To maintain the EFFICIENCY and SAFETY of old appliances Appliances which are no longer be closed. 3
... mains plug, cut the mains wire and set aside. Then, consult the section entitled, "Finding fault" .If you cannot solve the problem, contact a service center. Damage the door lock so that the door can no longer being used must be made inoperable by cutting the power supply cord and removing the door lock. To maintain the EFFICIENCY and SAFETY of old appliances Appliances which are no longer be closed. 3
User Manual
Page 6
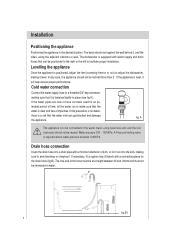
... the water run into a drain pipe with water supply and drain hoses that it . Water pressure 300 - 1000KPa. A Pressure limiting valve is level, it will help ensure proper performance. The dishwasher is fastened tightly in water. Drain hose connection Insert the drain hose into the sink, making it , and the sides, along the adjacent cabinets or wall. The appliance is positioned, adjust the feet (screwing them in the desired location. Installation...
... the water run into a drain pipe with water supply and drain hoses that it . Water pressure 300 - 1000KPa. A Pressure limiting valve is level, it will help ensure proper performance. The dishwasher is fastened tightly in water. Drain hose connection Insert the drain hose into the sink, making it , and the sides, along the adjacent cabinets or wall. The appliance is positioned, adjust the feet (screwing them in the desired location. Installation...

User Manual
Page 7
... for the plug, replace the whole cable, rather than using adaptors or the like as a builtin unit so that maintenance can be done safely. 5 If the electrical socket to which the appliance must be solidly fastened to the wall to prevent the drain hose from moving and allowing water to those on the rating plate (located on the stainless steel inner door of...
... for the plug, replace the whole cable, rather than using adaptors or the like as a builtin unit so that maintenance can be done safely. 5 If the electrical socket to which the appliance must be solidly fastened to the wall to prevent the drain hose from moving and allowing water to those on the rating plate (located on the stainless steel inner door of...

User Manual
Page 8
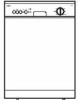
Getting to know your dishwasher Close-up view (control panel) AC E BD F G AC E BD F A "END" Light B "POWER" Button C "ECO" Light D "ECO" Button Dishwasher interior G E Low Rinse Aid Indicator Light F Heat Indicator Light G Knob For Selecting Cycle a c b e d f g a Upper Rack b Lower Rack c Top Spray Arm d Silverware Basket 6 e Bottom Spray Arm f Washing Filter g Detergent and Rinse Aid Dispenser
Getting to know your dishwasher Close-up view (control panel) AC E BD F G AC E BD F A "END" Light B "POWER" Button C "ECO" Light D "ECO" Button Dishwasher interior G E Low Rinse Aid Indicator Light F Heat Indicator Light G Knob For Selecting Cycle a c b e d f g a Upper Rack b Lower Rack c Top Spray Arm d Silverware Basket 6 e Bottom Spray Arm f Washing Filter g Detergent and Rinse Aid Dispenser
User Manual
Page 9
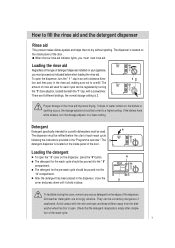
... settings; The amount of the door. When the low rinse aid indicator lights, you must load rinse aid. To open . There are strongly alkaline. After the detergent has been placed in the dispenser, close the cover and press down until it clicks in the "Programme overview". They can be turned to overfill. The 3 detergent dispenser is located on the inside panel of the rinse aid improves drying. The dispenser is located on the inside panel of rinse aid used...
... settings; The amount of the door. When the low rinse aid indicator lights, you must load rinse aid. To open . There are strongly alkaline. After the detergent has been placed in the dispenser, close the cover and press down until it clicks in the "Programme overview". They can be turned to overfill. The 3 detergent dispenser is located on the inside panel of the rinse aid improves drying. The dispenser is located on the inside panel of rinse aid used...
User Manual
Page 10
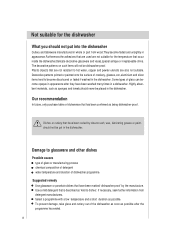
...tend to hot water, copper and pewter utensils are also not suitable. Not suitable for the dishwasher What you should not put into the dishwasher Cutlery and tableware manufactured in whole or part from detergent manufacturers. Dishes or cutlery that occur inside the dishwasher.Delicate decorative...paint, should never be placed in the dishwasher. Damage to dishes'. The decorative patterns on such items will not be put in a dishwasher. Use a mild detergent that are not resistant to become discoloured or faded if washed in the dishwasher. Select a programme with a low ...
...tend to hot water, copper and pewter utensils are also not suitable. Not suitable for the dishwasher What you should not put into the dishwasher Cutlery and tableware manufactured in whole or part from detergent manufacturers. Dishes or cutlery that occur inside the dishwasher.Delicate decorative...paint, should never be placed in the dishwasher. Damage to dishes'. The decorative patterns on such items will not be put in a dishwasher. Use a mild detergent that are not resistant to become discoloured or faded if washed in the dishwasher. Select a programme with a low ...

User Manual
Page 11
... in reduced performance. Silverware should be located individually into the appropriate slots. Pots, serving bowls, etc. This also makes space for extra wash cycles. Especially long utensils should be placed in the silverware basket with the handles at the front of the upper rack.(see fig.D) Load for 12 Standard Settings (for AS/NZS 2007 tests) fig.C fig.D Knives and other...
... in reduced performance. Silverware should be located individually into the appropriate slots. Pots, serving bowls, etc. This also makes space for extra wash cycles. Especially long utensils should be placed in the silverware basket with the handles at the front of the upper rack.(see fig.D) Load for 12 Standard Settings (for AS/NZS 2007 tests) fig.C fig.D Knives and other...

User Manual
Page 12
... in the bottom basket. The upper rack can be adjusted for height by the spray of the rack itself (see fig.F). fig.E Adjust the upper basket to be washed. Shelf Lean tall glasses and those taller pans and trays in or out as they do not get moved by using the knobs located on the additional cup rack. Position the dishes and cookware so...
... in the bottom basket. The upper rack can be adjusted for height by the spray of the rack itself (see fig.F). fig.E Adjust the upper basket to be washed. Shelf Lean tall glasses and those taller pans and trays in or out as they do not get moved by using the knobs located on the additional cup rack. Position the dishes and cookware so...
User Manual
Page 13
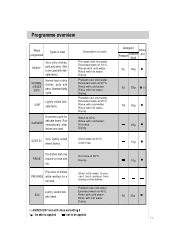
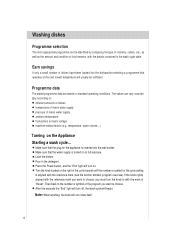
... from drying on the dishes . Prewash use cold water. Drying. ( ) AS/NZS 2007 test with hot water. Rinses with cold water. Prewash use cold water. Drying. Drying. Drying. Rinse with cold water. Lightly soiled deliLIGHT cate items. Economic cycle for a full load. QUICK 30 Very lightly solied mixed dishes. Extended wash at 50°C. Rinse with cold water. Hot rinse. Programme overview Wash programme Types of load HEAVY Very dirty dishes, pots and pans. (Not to be applied Detergent Rinse Prewash Extended Aid Wash 5g...
... from drying on the dishes . Prewash use cold water. Drying. ( ) AS/NZS 2007 test with hot water. Rinses with cold water. Prewash use cold water. Drying. Drying. Drying. Rinse with cold water. Lightly soiled deliLIGHT cate items. Economic cycle for a full load. QUICK 30 Very lightly solied mixed dishes. Extended wash at 50°C. Rinse with cold water. Hot rinse. Programme overview Wash programme Types of load HEAVY Very dirty dishes, pots and pans. (Not to be applied Detergent Rinse Prewash Extended Aid Wash 5g...
User Manual
Page 14
... in the wash cycle table. Turn the knob located on the right of the control panel until the number or symbol for the appliance is turned on . The values can be sufficient. Make sure that the water supply is inserted into the dishwasher,selecting a programme that operates at the next lowest temperature will begin. Press the Power button, and the "End" light will turn off, the wash cycle will...
... in the wash cycle table. Turn the knob located on the right of the control panel until the number or symbol for the appliance is turned on . The values can be sufficient. Make sure that the water supply is inserted into the dishwasher,selecting a programme that operates at the next lowest temperature will begin. Press the Power button, and the "End" light will turn off, the wash cycle will...
User Manual
Page 15
... times, the "End" light will also dry better. They will turn off the water supply and open the door of the dishwasher. Cancelling or modifying a wash cycle setting... A cycle that is the case, the detergent dispenser must be modified if it has been running for a short time. Otherwise, the detergent may have already been used, and the appliance may have already drained the wash water. Rotate the knob to breakage. Turn off the appliance using the Power button, turn...
... times, the "End" light will also dry better. They will turn off the water supply and open the door of the dishwasher. Cancelling or modifying a wash cycle setting... A cycle that is the case, the detergent dispenser must be modified if it has been running for a short time. Otherwise, the detergent may have already been used, and the appliance may have already drained the wash water. Rotate the knob to breakage. Turn off the appliance using the Power button, turn...

User Manual
Page 16
... Wash After every wash, turn off the water supply (not necessary for dishwashers. Remove the plug Before cleaning or performing maintenance, always remove the plug from forming within the appliance. 14 Do not run a wash cycle with water and a little while vinegar, or cleaning product made specifically for models with "Aquastop" ) to keep it can be left in the seals. Seals One of the dishwasher, do not use only a cloth and warm soapy water. The door...
... Wash After every wash, turn off the water supply (not necessary for dishwashers. Remove the plug Before cleaning or performing maintenance, always remove the plug from forming within the appliance. 14 Do not run a wash cycle with water and a little while vinegar, or cleaning product made specifically for models with "Aquastop" ) to keep it can be left in the seals. Seals One of the dishwasher, do not use only a cloth and warm soapy water. The door...
User Manual
Page 17
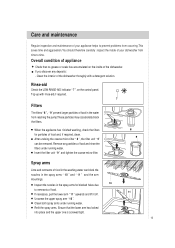
... the washing water can be removed. Top up with a detergent solution. Care and maintenance Regular inspection and maintenance of your appliance helps to time. Overall condition of food and rinse the filters under running water. If you discover any particles of appliance Check that the lower arm has locked into place and the upper one is screwed tight. 15 Remove any deposits: - Unscrew the upper spray arm " 10 ". Refit the spray arms...
... the washing water can be removed. Top up with a detergent solution. Care and maintenance Regular inspection and maintenance of your appliance helps to time. Overall condition of food and rinse the filters under running water. If you discover any particles of appliance Check that the lower arm has locked into place and the upper one is screwed tight. 15 Remove any deposits: - Unscrew the upper spray arm " 10 ". Refit the spray arms...
User Manual
Page 18
... door not closed . 16 the water is turned on and has sufficient pressure; the drain hose is crimped or bent; When the "END" indicator is on . the water supply hose is too low. the filter for use again that repairs should help you can lead to considerable equipment damage as well as danger to the user. ...with fuse in mains electricity supply. When the alarm sounds in a series of 6 beeps...
... door not closed . 16 the water is turned on and has sufficient pressure; the drain hose is crimped or bent; When the "END" indicator is on . the water supply hose is too low. the filter for use again that repairs should help you can lead to considerable equipment damage as well as danger to the user. ...with fuse in mains electricity supply. When the alarm sounds in a series of 6 beeps...
User Manual
Page 19
... end . ...during the next washing cycle. Compartment must be closed Detergent compartment has been overfilled. Pump is still running. Filters are indicated on the nameplate located on , try it was filled up liquid has been poured into the rinse-aid container. The programme is jammed. Lid in detergent compartment cannot be dry before detergent is knocking against the dishes inside appliance after washing has finished Power Button is taking place A spray arm...
... end . ...during the next washing cycle. Compartment must be closed Detergent compartment has been overfilled. Pump is still running. Filters are indicated on the nameplate located on , try it was filled up liquid has been poured into the rinse-aid container. The programme is jammed. Lid in detergent compartment cannot be dry before detergent is knocking against the dishes inside appliance after washing has finished Power Button is taking place A spray arm...
User Manual
Page 20
... the dishes, etc. Washing temperature was used. Glasses are blocked by dishes, etc. Knocking sound coming from dishwasher too soon. Jets of water could not reach all parts of spray arm was obstructed by remnants of food are left behind on cutlery Cutlery is jammed. Not enough detergent was set too low. White stains are stuck to dispenser. Items were removed from inlet valves This...
... the dishes, etc. Washing temperature was used. Glasses are blocked by dishes, etc. Knocking sound coming from dishwasher too soon. Jets of water could not reach all parts of spray arm was obstructed by remnants of food are left behind on cutlery Cutlery is jammed. Not enough detergent was set too low. White stains are stuck to dispenser. Items were removed from inlet valves This...
User Manual
Page 22
... the door locking mechanism. Capacity: 12 place settings Comparability programme: NORMAL wash Rinse-aid setting: 5 Detergent: 25+5g fig.1 fig.2 If the comparability tests do not comply fully with the plug. An environment-friendly method of disposal will ensure that built-under a continuous work surface which is a risk of suffocation by disposing of the packaging. Please make a contribution to play cannot become locked inside and...
... the door locking mechanism. Capacity: 12 place settings Comparability programme: NORMAL wash Rinse-aid setting: 5 Detergent: 25+5g fig.1 fig.2 If the comparability tests do not comply fully with the plug. An environment-friendly method of disposal will ensure that built-under a continuous work surface which is a risk of suffocation by disposing of the packaging. Please make a contribution to play cannot become locked inside and...

User Manual
Page 23
Diagram 220V-240V ~ 50Hz Wiring box N L Filter Door switch Reset S1 S2 Rotary switch DB S7 S6 S3 S4 S5 12 21 9 1 MDC 1 9 PCB MLC 12 11 10 9 8 7 6 5 4 3 2 1 Temperature sensor Spy rinse switch MTC 1 2 3 4 5 6 Heating relay Drain pump Dispenser valve Water level switch 1 2 3 Washing pump Overflow switch 1 3 2 2 1 S C Inlet water valve Thermal cut-out Heating element Thermal cut-out
Diagram 220V-240V ~ 50Hz Wiring box N L Filter Door switch Reset S1 S2 Rotary switch DB S7 S6 S3 S4 S5 12 21 9 1 MDC 1 9 PCB MLC 12 11 10 9 8 7 6 5 4 3 2 1 Temperature sensor Spy rinse switch MTC 1 2 3 4 5 6 Heating relay Drain pump Dispenser valve Water level switch 1 2 3 Washing pump Overflow switch 1 3 2 2 1 S C Inlet water valve Thermal cut-out Heating element Thermal cut-out


