User Manual
Page 2
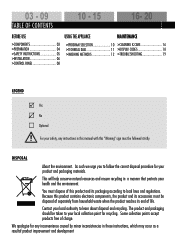
... point for any instructions in these instructions, which may occur as a resultof product improvement and development Some collection points accept products free of life. 03 - 09 TABLE OF CONTENTS 10 - 15 16- 20 BEFORE USE USING THE APPLIANCE MAINTENANCE >COMPONENTS 03 >PREPARATION 04 >SAFETY INSTRUCTIONS 05 >INSTALLATION 06 >CONTROL PANEL 08 >PROGRAM SELECTION 10 >CLEANING & CARE 16 >TECHNICAL DATA 11 >DISPLAY CODES 18 >WASHING METHODS 12 >TROUBLESHOOTING 19 LEGEND...
... point for any instructions in these instructions, which may occur as a resultof product improvement and development Some collection points accept products free of life. 03 - 09 TABLE OF CONTENTS 10 - 15 16- 20 BEFORE USE USING THE APPLIANCE MAINTENANCE >COMPONENTS 03 >PREPARATION 04 >SAFETY INSTRUCTIONS 05 >INSTALLATION 06 >CONTROL PANEL 08 >PROGRAM SELECTION 10 >CLEANING & CARE 16 >TECHNICAL DATA 11 >DISPLAY CODES 18 >WASHING METHODS 12 >TROUBLESHOOTING 19 LEGEND...

User Manual
Page 3
... these instructions carefully before using this list: 1x Inlet hose assembly 1x User manual 1x Bottom Cover 1x Drain hose bracket USER MANUAL AWO5100 AWO6100 Whirlpool 3x Blanking plugs ACCESSORIES Check the accessories and literature in a convenient place so you can always refer to it behind when you move house, make sure you get the best out of the appliance and ensure safe and proper installation, use...
... these instructions carefully before using this list: 1x Inlet hose assembly 1x User manual 1x Bottom Cover 1x Drain hose bracket USER MANUAL AWO5100 AWO6100 Whirlpool 3x Blanking plugs ACCESSORIES Check the accessories and literature in a convenient place so you can always refer to it behind when you move house, make sure you get the best out of the appliance and ensure safe and proper installation, use...
User Manual
Page 4
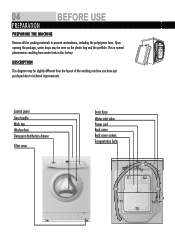
04 PREPARATION BEFORE USE PREPARING THE MACHINE Remove all the packing materials to technical improvements. Upon opening the package, water drops may be seen on the plastic bag and the porthole. DESCRIPTION This diagram may be slightly different from water tests in the factory. Control panel Door handle Work top Washer door Detergent distribution drawer Filter cover Drain hose Water inlet valve Power cord Back cover Back cover screws Transportation bolts T2 S1 S2 T1 T3 S3...
04 PREPARATION BEFORE USE PREPARING THE MACHINE Remove all the packing materials to technical improvements. Upon opening the package, water drops may be seen on the plastic bag and the porthole. DESCRIPTION This diagram may be slightly different from water tests in the factory. Control panel Door handle Work top Washer door Detergent distribution drawer Filter cover Drain hose Water inlet valve Power cord Back cover Back cover screws Transportation bolts T2 S1 S2 T1 T3 S3...
User Manual
Page 5
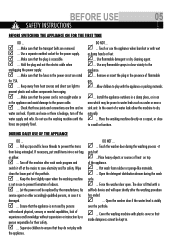
.... Turn off the machine after the washing procedure has ended. ... Ensure that the power cord is damaged. ... Open the detergent distribution drawer during the washing process - The door is not in . Allow children to save electricity and for 15A. ... Wipe clean the lower part of odours. ... BEFORE USE 05 SAFETY INSTRUCTIONS BEFORE SWITCHING THE APPLIANCE ON FOR THE FIRST TIME DO ... ... Make sure that the transport bolts are removed. ... Check...
.... Turn off the machine after the washing procedure has ended. ... Ensure that the power cord is damaged. ... Open the detergent distribution drawer during the washing process - The door is not in . Allow children to save electricity and for 15A. ... Wipe clean the lower part of odours. ... BEFORE USE 05 SAFETY INSTRUCTIONS BEFORE SWITCHING THE APPLIANCE ON FOR THE FIRST TIME DO ... ... Make sure that the transport bolts are removed. ... Check...

User Manual
Page 6
... the top of the washing machine as shown fig.1, the board used for reducing noise and rat proof by the bolts with blanking plugs. 06 BEFORE USE INSTALLATION ADJUSTING THE BOTTOM COVER When open the carton package, you have to insert the back cover from within the machine. 3. Remove the back cover. 2. Note: 1.When you replace the back cover,the convexity must...
... the top of the washing machine as shown fig.1, the board used for reducing noise and rat proof by the bolts with blanking plugs. 06 BEFORE USE INSTALLATION ADJUSTING THE BOTTOM COVER When open the carton package, you have to insert the back cover from within the machine. 3. Remove the back cover. 2. Note: 1.When you replace the back cover,the convexity must...

User Manual
Page 7
...: Use the hose-set supplied with cold, fresh water. and should be capable of less than 15A). ¬ The voltage should meet the requirement. ¬ The power outlet should be submerged in the power circuit should not be securely fixed and leak-free. BEFORE USE 07 INLET HOSE 1. dropping off. 8 0 - 1 0 0mm Note: The drain hose should be rated for no less than 80cm, the washing machine...
...: Use the hose-set supplied with cold, fresh water. and should be capable of less than 15A). ¬ The voltage should meet the requirement. ¬ The power outlet should be submerged in the power circuit should not be securely fixed and leak-free. BEFORE USE 07 INLET HOSE 1. dropping off. 8 0 - 1 0 0mm Note: The drain hose should be rated for no less than 80cm, the washing machine...
User Manual
Page 8
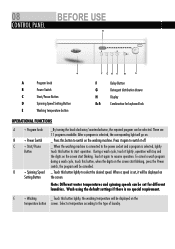
... USE CONTROL PANEL A Program knob B Power Switch C Start/Pause Button D Spinning Speed Setting Button E Washing temperature button F Delay Button G Detergent distribution drawer H Display E+F: Combination for different laundries. B ¬ Power Switch _ Press this button lightly, the washing temperature will be displayed on the screen start blinking, press the Power switch, the program will go on the screen start operation. Touch it again to the type of laundry. Select a temperature according to resume operation. During a wash cycle, touch it again to start...
... USE CONTROL PANEL A Program knob B Power Switch C Start/Pause Button D Spinning Speed Setting Button E Washing temperature button F Delay Button G Detergent distribution drawer H Display E+F: Combination for different laundries. B ¬ Power Switch _ Press this button lightly, the washing temperature will be displayed on the screen start blinking, press the Power switch, the program will go on the screen start operation. Touch it again to the type of laundry. Select a temperature according to resume operation. During a wash cycle, touch it again to start...

User Manual
Page 9
.... As the water pressure and temperature may be longer than the program time;otherwise,the washing machine will start the wash program directly. E+F ¬Combination for E+F: Combination for programs 1 to cancel this function. When the laundry is displayed on the LED alternately. Note: After power is 0.5-24 hours; Before use 09 F ¬Delay Button Touch this button lightly, the washing machine will start operation after a period of time and the...
.... As the water pressure and temperature may be longer than the program time;otherwise,the washing machine will start the wash program directly. E+F ¬Combination for E+F: Combination for programs 1 to cancel this function. When the laundry is displayed on the LED alternately. Note: After power is 0.5-24 hours; Before use 09 F ¬Delay Button Touch this button lightly, the washing machine will start operation after a period of time and the...
User Manual
Page 10
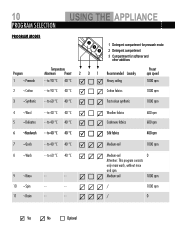
... °C Recommended Laundry Heavy soiling Preset spin speed 1000 rpm 2 ¬ Cotton - - Medium-soil 0 1000 rpm / 1000 rpm / 0 Yes No Optional 10 USING THE APPLIANCE PROGRAM SELECTION PROGRAM MODES 2 3 1 1 Detergent compartment for prewash mode 2 Detergent compartment 3 Compartment for softener and other additives Program 1 ¬ Prewash Temperature Maximum Preset 2 3 1 - - to 40 °C 40 °C Silk fabrics 400 rpm 7 ¬ Quick - - to 60...
... °C Recommended Laundry Heavy soiling Preset spin speed 1000 rpm 2 ¬ Cotton - - Medium-soil 0 1000 rpm / 1000 rpm / 0 Yes No Optional 10 USING THE APPLIANCE PROGRAM SELECTION PROGRAM MODES 2 3 1 1 Detergent compartment for prewash mode 2 Detergent compartment 3 Compartment for softener and other additives Program 1 ¬ Prewash Temperature Maximum Preset 2 3 1 - - to 40 °C 40 °C Silk fabrics 400 rpm 7 ¬ Quick - - to 60...

User Manual
Page 11
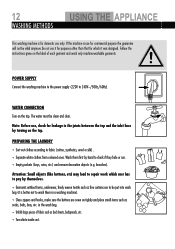
...;C 1:02 h ¬ Quick 0.33 kWh 40°C 0:34 h ¬ Wash 0.30 kWh 40°C 0:53 h *) EN 60456 test program / Energy label program with Cotton 60°C and max. spin speed. TECHNICAL DATA Power source Max. USING THE APPLIANCE 11 CONSUMPTION AND TECHNICAL DATA CONSUMPTION TABLE The wash cycle times are intended as a guide only. working current (A) Water pressure (MPa) Spinning speed (r/min) Washing programs Max power (W) Dimensions (HxDxW mm...
...;C 1:02 h ¬ Quick 0.33 kWh 40°C 0:34 h ¬ Wash 0.30 kWh 40°C 0:53 h *) EN 60456 test program / Energy label program with Cotton 60°C and max. spin speed. TECHNICAL DATA Power source Max. USING THE APPLIANCE 11 CONSUMPTION AND TECHNICAL DATA CONSUMPTION TABLE The wash cycle times are intended as a guide only. working current (A) Water pressure (MPa) Spinning speed (r/min) Washing programs Max power (W) Dimensions (HxDxW mm...
User Manual
Page 12
... instructions given on the label of fabric such as bed sheets, bedspreads, etc. ¬ Turn shirts inside out. PREPARING THE LAUNDRY ¬ Sort out clothes according to 240V~/50Hz/60Hz). 12 USING THE APPLIANCE WASHING METHODS PLEASE NOTE This washing machine is better not to wash them first by turning on the tap. Attention: Small objects (like buttons, etc) may lead to repair work...
... instructions given on the label of fabric such as bed sheets, bedspreads, etc. ¬ Turn shirts inside out. PREPARING THE LAUNDRY ¬ Sort out clothes according to 240V~/50Hz/60Hz). 12 USING THE APPLIANCE WASHING METHODS PLEASE NOTE This washing machine is better not to wash them first by turning on the tap. Attention: Small objects (like buttons, etc) may lead to repair work...
User Manual
Page 13
... "Control panel" pages 08 and 09) Please follow the dosage recommendation on the drawer) Caution: 2 3 1 ¬ For prewashing program, detergent should be added to the laundry type. Do not use dry cleaning agents such as trichloroethylene and similar products. SELECTING OPTIONS Select the required options. (Refer to select the right program. USING THE APPLIANCE 13 LOADING THE MACHINE Open the washer door, put the required detergent...
... "Control panel" pages 08 and 09) Please follow the dosage recommendation on the drawer) Caution: 2 3 1 ¬ For prewashing program, detergent should be added to the laundry type. Do not use dry cleaning agents such as trichloroethylene and similar products. SELECTING OPTIONS Select the required options. (Refer to select the right program. USING THE APPLIANCE 13 LOADING THE MACHINE Open the washer door, put the required detergent...
User Manual
Page 14
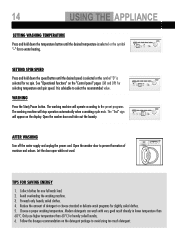
... choose standard or delicate wash programs for slightly soiled clothes. 5. Open the washer door to the preset programs. The washing machine will appear on the display. SETTING SPIN SPEED Press and hold down the speed button until the desired temperature is selected or the symbol "--" for no spin. AFTER WASHING Turn off the water supply and unplug the power cord. Choose a proper washing temperature. Modern detergents can wash with very good result...
... choose standard or delicate wash programs for slightly soiled clothes. 5. Open the washer door to the preset programs. The washing machine will appear on the display. SETTING SPIN SPEED Press and hold down the speed button until the desired temperature is selected or the symbol "--" for no spin. AFTER WASHING Turn off the water supply and unplug the power cord. Choose a proper washing temperature. Modern detergents can wash with very good result...

User Manual
Page 15
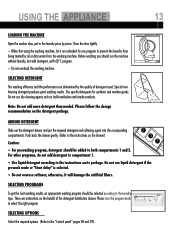
using the APPLIANCE Care chart Resistant material Delicate fabric Washable at 95 °C Washable at 60 °C Washable at 40 °C Washable at 30 °C Hand wash Dry clean only Wool Seal Bleachable in cold water Do not bleach Iron at 200 °C Iron at 150 °C Iron at 100 °C Don't iron Dry cleaning with any solvent Dry cleaning with pericloride...
using the APPLIANCE Care chart Resistant material Delicate fabric Washable at 95 °C Washable at 60 °C Washable at 40 °C Washable at 30 °C Hand wash Dry clean only Wool Seal Bleachable in cold water Do not bleach Iron at 200 °C Iron at 150 °C Iron at 100 °C Don't iron Dry cleaning with any solvent Dry cleaning with pericloride...
User Manual
Page 16
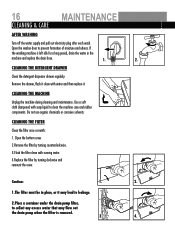
... clean with soap liquid to collect any excess water that may lead to leakage. 2.Place a container under the drain pump filter, to clean the machine case and rubber components. If the washing machine is removed. 3. 4. 16 MAINTENANCE CLEANING & CARE AFTER WASHING Turn off the water supply and pull out electricity plug after each wash. CLEANING THE FILTER Clean the filter once a month: 1. Caution: 1. 2. 1.The filter must be in the machine and replace the drain hose. 1. 2. Open...
... clean with soap liquid to collect any excess water that may lead to leakage. 2.Place a container under the drain pump filter, to clean the machine case and rubber components. If the washing machine is removed. 3. 4. 16 MAINTENANCE CLEANING & CARE AFTER WASHING Turn off the water supply and pull out electricity plug after each wash. CLEANING THE FILTER Clean the filter once a month: 1. Caution: 1. 2. 1.The filter must be in the machine and replace the drain hose. 1. 2. Open...

User Manual
Page 17
... stabilisers and the transportation bolts. 4. Remove the back cover 1 . 2 . 3. Tighten the bolts with a spanner. 5. Let the door open while not used. Remove the blanking plugs. 2. LONG PERIODS OF DISUSE If the washing machine is to be moved to a distant location, replace the transportation bolts to the water supply by foreign substances, clean the water inlet valve and inlet valve filter regularly. Replace the back cover. 3 . 4 . 5 . MAINTENANCE 17 WATER INLET VALVE AND INLET VALVE FILTER To prevent blockage to...
... stabilisers and the transportation bolts. 4. Remove the back cover 1 . 2 . 3. Tighten the bolts with a spanner. 5. Let the door open while not used. Remove the blanking plugs. 2. LONG PERIODS OF DISUSE If the washing machine is to be moved to a distant location, replace the transportation bolts to the water supply by foreign substances, clean the water inlet valve and inlet valve filter regularly. Replace the back cover. 3 . 4 . 5 . MAINTENANCE 17 WATER INLET VALVE AND INLET VALVE FILTER To prevent blockage to...

User Manual
Page 18
... water. Turn the program selector again to cut off memory function: In case of wash cycle. 1:25 ¬The remaining time is in water. _ Install drain hose within 4 _ Clean the filter and check the drain hose for 3 seconds. ¬ Power-off the power during a program cycle, the present settings will be changed by operating buttons or knobs. damaged. Err2 ¬ Drainage error, water not emptied within 80-100 cm of a cycle). _ Reduce load and then start washing...
... water. Turn the program selector again to cut off memory function: In case of wash cycle. 1:25 ¬The remaining time is in water. _ Install drain hose within 4 _ Clean the filter and check the drain hose for 3 seconds. ¬ Power-off the power during a program cycle, the present settings will be changed by operating buttons or knobs. damaged. Err2 ¬ Drainage error, water not emptied within 80-100 cm of a cycle). _ Reduce load and then start washing...
User Manual
Page 19
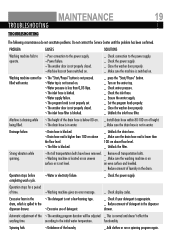
... properly. _ Close the washer door properly. _ Unblock the inlet hose filter. MAINTENANCE 19 TROUBLESHOOTING TROUBLESHOOTING The following circumstances do not constitute problems. Do not contact the Service Center until the problem has been confirmed. an even surface and levelled. _ Reduce amount of height. Spinning fails ¬ Unbalance of time. ¬ Washing machine gives an error message. _ Check display codes. drum, which is below 80 cm. _ Install drain hose within 80-100...
... properly. _ Close the washer door properly. _ Unblock the inlet hose filter. MAINTENANCE 19 TROUBLESHOOTING TROUBLESHOOTING The following circumstances do not constitute problems. Do not contact the Service Center until the problem has been confirmed. an even surface and levelled. _ Reduce amount of height. Spinning fails ¬ Unbalance of time. ¬ Washing machine gives an error message. _ Check display codes. drum, which is below 80 cm. _ Install drain hose within 80-100...

User Manual
Page 20
... service agent or similarly qualified person. tDLo DaRvoEiAdNePnPtWraLpHmIAeEnNtNoCf PcEhLi,ldArDeYnIwISNhAenGBp.lLayEingTaHndEcuDt oOff tOheRmaLinsOcoCrdK close to the water main using new hose sets, old hose sets should be disposed of electric shock if the cut off plug is supplied with a standard 13 amp 3-pin plug fitted with the following code: Green and Yellow - Should the fuse require replacement, it must be replaced...
... service agent or similarly qualified person. tDLo DaRvoEiAdNePnPtWraLpHmIAeEnNtNoCf PcEhLi,ldArDeYnIwISNhAenGBp.lLayEingTaHndEcuDt oOff tOheRmaLinsOcoCrdK close to the water main using new hose sets, old hose sets should be disposed of electric shock if the cut off plug is supplied with a standard 13 amp 3-pin plug fitted with the following code: Green and Yellow - Should the fuse require replacement, it must be replaced...


