
User Manual
Page 1
29F8A-T COLOUR TV RECEIVER OWNER'S MANUAL MAIN FUNCTIONS Multiple picture & audio modes Child lock Sleep timer Surround stereo, treble and bass boost Program scan & program swap Noise reduce Black stretch Please read this manual carefully before using this TV set and keep it for future reference.
29F8A-T COLOUR TV RECEIVER OWNER'S MANUAL MAIN FUNCTIONS Multiple picture & audio modes Child lock Sleep timer Surround stereo, treble and bass boost Program scan & program swap Noise reduce Black stretch Please read this manual carefully before using this TV set and keep it for future reference.
User Manual
Page 3
CONTENTS Before Operation Warning and cautions 2 Installation 3 Antenna connection 3 Preparation of the remote control unit 3 Function buttons and external sockets 4 Front panel of the TV set 4 Rear panel of this TV set 6 Watching TV program 7 Watching TV program 7 Program swap and auto scan functions 8 Searching channel 9 Full automatic search mode 9 Semi-automatic search 10 Manual fine tune 11 Program skip 12 Convenient picture and sound control functions 13 Multiple picture modes 13 Black stretch and noise reduce 14 Multiple audio modes 15 Surround and mute functions ...
CONTENTS Before Operation Warning and cautions 2 Installation 3 Antenna connection 3 Preparation of the remote control unit 3 Function buttons and external sockets 4 Front panel of the TV set 4 Rear panel of this TV set 6 Watching TV program 7 Watching TV program 7 Program swap and auto scan functions 8 Searching channel 9 Full automatic search mode 9 Semi-automatic search 10 Manual fine tune 11 Program skip 12 Convenient picture and sound control functions 13 Multiple picture modes 13 Black stretch and noise reduce 14 Multiple audio modes 15 Surround and mute functions ...

User Manual
Page 4
To prevent the TV set from firing and electric shock, don't Make the TV set , please pull out the power plug from the cover of 5. However, necessary, it is in thunder and lightening, please pull out the plug from AC outlet and the antenna plug from AC outlet. Explanation on a it is not needed to clean the tube surface. When you . 3. When the TV set , please place it on the display tube In general, it 's surface can be cleaned with benzene, petrol and other chemicals. 4. If using hard cloth, the tube surface will be used for long time or it is possible to prolong the...
To prevent the TV set from firing and electric shock, don't Make the TV set , please pull out the power plug from the cover of 5. However, necessary, it is in thunder and lightening, please pull out the plug from AC outlet and the antenna plug from AC outlet. Explanation on a it is not needed to clean the tube surface. When you . 3. When the TV set , please place it on the display tube In general, it 's surface can be cleaned with benzene, petrol and other chemicals. 4. If using hard cloth, the tube surface will be used for long time or it is possible to prolong the...

User Manual
Page 5
Place two AA batteries, make sure that you don't intend to use the unit for the remote control unit Under normal conditions, the life time of batteries is used up, remove the batteries to remove the disturbance caused by airwave. * Don't bind antenna cable and power wire together. Operation notes for a long period or the electricity of the batteries is one year. Don't throw your batteries with the +/- mark inside the battery compartment. Avoid the falling and the wetting of the remote control unit Battery installation Take off the battery compartment cover. Preparation of the ...
Place two AA batteries, make sure that you don't intend to use the unit for the remote control unit Under normal conditions, the life time of batteries is used up, remove the batteries to remove the disturbance caused by airwave. * Don't bind antenna cable and power wire together. Operation notes for a long period or the electricity of the batteries is one year. Don't throw your batteries with the +/- mark inside the battery compartment. Avoid the falling and the wetting of the remote control unit Battery installation Take off the battery compartment cover. Preparation of the ...
User Manual
Page 6
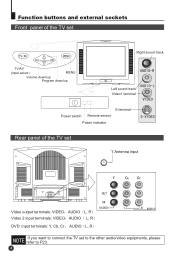
Function buttons and external sockets Front panel of the TV set Right sound track TV/AV (input select MENU Volume down/up Program down/up Left sound track Video1 terminal S terminal Power switch Remote sensor Power indicator Rear panel of the TV set Antenna input Video output terminals: VIDEO AUDIO L, R Video 2 input terminals: VIDEO AUDIO L, R DVD input terminals: Y, Cb, Cr AUDIO L, R If you want to connect the TV set to the other audio/video equipments, please refer to P23.
Function buttons and external sockets Front panel of the TV set Right sound track TV/AV (input select MENU Volume down/up Program down/up Left sound track Video1 terminal S terminal Power switch Remote sensor Power indicator Rear panel of the TV set Antenna input Video output terminals: VIDEO AUDIO L, R Video 2 input terminals: VIDEO AUDIO L, R DVD input terminals: Y, Cb, Cr AUDIO L, R If you want to connect the TV set to the other audio/video equipments, please refer to P23.
User Manual
Page 7
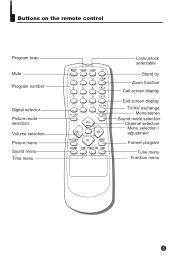
Buttons on the remote control Program scan Mute Program number Digital selector Picture mode selection Volume selection Picture menu Sound menu Time menu Lock/unlock selectable Stand by Zoom function Call screen display Exit screen display TV/AV exchange Mono/stereo Sound mode selection Channel selection Menu selection / adjustment Former program Tune menu Function menu
Buttons on the remote control Program scan Mute Program number Digital selector Picture mode selection Volume selection Picture menu Sound menu Time menu Lock/unlock selectable Stand by Zoom function Call screen display Exit screen display TV/AV exchange Mono/stereo Sound mode selection Channel selection Menu selection / adjustment Former program Tune menu Function menu
User Manual
Page 8
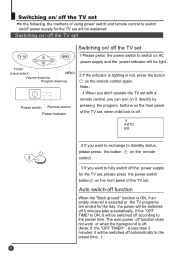
Auto switch-off function When the "Back ground" function is ON, if an empty channel is less than 5 minutes, it will be switched off according to the preset time. The auto power off function does not work or when the background is off. (Note: If the "OFF TIMER" is selected or the TV programs are ended for the TV set, please press the power switch button on the front panel of the TV set. If the "OFF TIME" is ON, it directly by Power switch Remote sensor Power indicator pressing the program buttons on the front panel of the TV set, when child lock is lighting in red, press the ...
Auto switch-off function When the "Back ground" function is ON, if an empty channel is less than 5 minutes, it will be switched off according to the preset time. The auto power off function does not work or when the background is off. (Note: If the "OFF TIMER" is selected or the TV programs are ended for the TV set, please press the power switch button on the front panel of the TV set. If the "OFF TIME" is ON, it directly by Power switch Remote sensor Power indicator pressing the program buttons on the front panel of the TV set, when child lock is lighting in red, press the ...
User Manual
Page 9
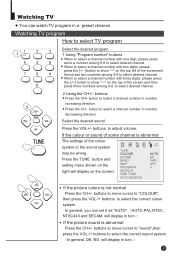
When to select a channel number with three digits, please press the [-/--] button to show "--" on the top left of some a number among 0-9 to select a channel number in number decreasing direction. buttons Press the CH+ button to select desired channel. 2 Using the CH+/- AUTO,PAL,NTSC , NTSC443 and SECAM will display in turn . Select the desired sound Press the VOL+/- If the colour or sound of the screenand then press two numbers among 0-9 to select the correct sound system. Press the TUNE button and setting menu shown on the right will display in a preset channel. ...
When to select a channel number with three digits, please press the [-/--] button to show "--" on the top left of some a number among 0-9 to select a channel number in number decreasing direction. buttons Press the CH+ button to select desired channel. 2 Using the CH+/- AUTO,PAL,NTSC , NTSC443 and SECAM will display in turn . Select the desired sound Press the VOL+/- If the colour or sound of the screenand then press two numbers among 0-9 to select the correct sound system. Press the TUNE button and setting menu shown on the right will display in a preset channel. ...
User Manual
Page 10
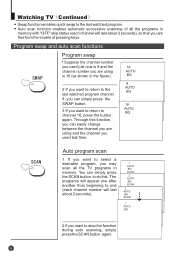
You can simply press the SCAN button to do this function, you can simply press the SWAP button. 3 If you want to return to the last watched program channel 8, you can easily change between the channel you are using and the channel you used just now is 18 (as shown in memory. Auto scan function enables automatic successive scanning of pressing keys. The programs will last about 2 seconds). 1 AUTO BG SCAN 2 AUTO BG SCAN 3 AUTO BG SCAN 1 AUTO BG 2 If you are using is 8 and the channel number you are free from beginning to end (each channel will last about 2 seconds), so that ...
You can simply press the SCAN button to do this function, you can simply press the SWAP button. 3 If you want to return to the last watched program channel 8, you can easily change between the channel you are using and the channel you used just now is 18 (as shown in memory. Auto scan function enables automatic successive scanning of pressing keys. The programs will last about 2 seconds). 1 AUTO BG SCAN 2 AUTO BG SCAN 3 AUTO BG SCAN 1 AUTO BG 2 If you are using is 8 and the channel number you are free from beginning to end (each channel will last about 2 seconds), so that ...
User Manual
Page 11
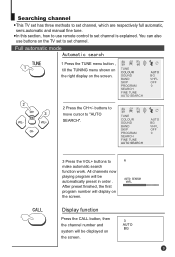
After preset finished, the first program number will display on the screen. buttons to move cursor to make automatic search function work. TUNE COLOUR SOUND BAND SKIP PROGRAM SEARCH FINE TUNE AUTO SEARCH AUTO BG VHFL OFF 0 2 Press the CH+/- TUNE COLOUR SOUND BAND SKIP PROGRAM SEARCH FINE TUNE AUTO SEARCH AUTO BG VHFL OFF 0 3 Press the VOL+ buttons to "AUTO SEARCH". All channels now playing program will be automatically preset in order . Display function Press the CALL button, then the channel number and system will be displayed on the TV set to set channel. ...
After preset finished, the first program number will display on the screen. buttons to move cursor to make automatic search function work. TUNE COLOUR SOUND BAND SKIP PROGRAM SEARCH FINE TUNE AUTO SEARCH AUTO BG VHFL OFF 0 2 Press the CH+/- TUNE COLOUR SOUND BAND SKIP PROGRAM SEARCH FINE TUNE AUTO SEARCH AUTO BG VHFL OFF 0 3 Press the VOL+ buttons to "AUTO SEARCH". All channels now playing program will be automatically preset in order . Display function Press the CALL button, then the channel number and system will be displayed on the TV set to set channel. ...
User Manual
Page 12
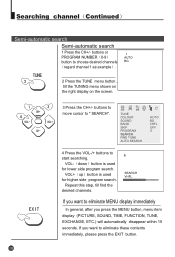
buttons to move cursor to choose desired channels regard channel 1 as example 1 AUTO BG 2 Press the TUNE menu button , till the TUNING menu shown on the right display on the screen. 3 Press the CH+/- Searching channel Continued Semi-automatic search Semi-automatic search 1 Press the CH+/- If you press the MENU button, menu item display (PICTURE, SOUND, TIME, FUNCTION, TUNE, EXCHANGE, ETC.) will automatically disappear within 15 seconds. VOL- VOL+ up button is used for lower side program search. down button is used for higher side program search. Repeat this step, ...
buttons to move cursor to choose desired channels regard channel 1 as example 1 AUTO BG 2 Press the TUNE menu button , till the TUNING menu shown on the right display on the screen. 3 Press the CH+/- Searching channel Continued Semi-automatic search Semi-automatic search 1 Press the CH+/- If you press the MENU button, menu item display (PICTURE, SOUND, TIME, FUNCTION, TUNE, EXCHANGE, ETC.) will automatically disappear within 15 seconds. VOL- VOL+ up button is used for lower side program search. down button is used for higher side program search. Repeat this step, ...
User Manual
Page 13
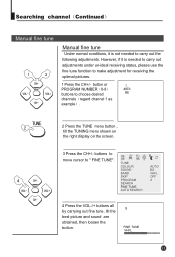
buttons to move cursor to choose desired channels regard channel 1 as example 2 Press the TUNE menu button , till the TUNING menu shown on the right display on the screen. 3 Press the CH+/- Searching channel Continued Manual fine tune Manual fine tune Under normal conditions, it is not needed to carry out adjustments under un-ideal receiving status, please use the fine tune function to make adjustment for receiving the optimal pictures. 1 Press the CH+/- TUNE COLOUR SOUND BAND SKIP PROGRAM SEARCH FINE TUNE AUTO SEARCH AUTO BG VHFL OFF 0 4 Press the VOL-/+ buttons all by carrying ...
buttons to move cursor to choose desired channels regard channel 1 as example 2 Press the TUNE menu button , till the TUNING menu shown on the right display on the screen. 3 Press the CH+/- Searching channel Continued Manual fine tune Manual fine tune Under normal conditions, it is not needed to carry out adjustments under un-ideal receiving status, please use the fine tune function to make adjustment for receiving the optimal pictures. 1 Press the CH+/- TUNE COLOUR SOUND BAND SKIP PROGRAM SEARCH FINE TUNE AUTO SEARCH AUTO BG VHFL OFF 0 4 Press the VOL-/+ buttons all by carrying ...
User Manual
Page 14
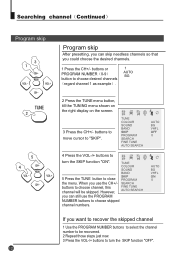
TUNE COLOUR SOUND BAND 5 Press the TUNE button to "SKIP". When you can skip needless channels so that you want to recover the skipped channel 1 Use the PROGRAM NUMBER buttons to select the channel number to be skipped. However, SKIP PROGRAM SEARCH FINE TUNE AUTO SEARCH you use the PROGRAM NUMBER buttons to choose skipped channel numbers. buttons to move cursor to close the menu. AUTO BG VHFL ON 0 If you could choose the desired channels. 1 Press the CH+/- buttons or PROGRAM NUMBER 0-9 button to choose desired channels regard channel 1 as example 1 AUTO BG ...
TUNE COLOUR SOUND BAND 5 Press the TUNE button to "SKIP". When you can skip needless channels so that you want to recover the skipped channel 1 Use the PROGRAM NUMBER buttons to select the channel number to be skipped. However, SKIP PROGRAM SEARCH FINE TUNE AUTO SEARCH you use the PROGRAM NUMBER buttons to choose skipped channel numbers. buttons to move cursor to close the menu. AUTO BG VHFL ON 0 If you could choose the desired channels. 1 Press the CH+/- buttons or PROGRAM NUMBER 0-9 button to choose desired channels regard channel 1 as example 1 AUTO BG ...
User Manual
Page 15
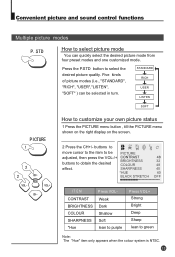
Press the P.STD button to select picture mode You can be PICTURE adjusted, then press the VOL-/+ CONTRAST 48 BRIGHTNESS 32 buttons to be selected in turn. SHARPNESS 40 *HUE 60 BLACK STRETCH OFF ITEM Press VOL- buttons to move cursor to the item to obtain the desired COLOUR 48 effect. Convenient picture and sound control functions Multiple picture modes How to select the desired picture quality. Five kinds of picture modes (i.e., "STANDARD", "RICH", "USER","LISTEN", "SOFT" ) can quickly select the desired picture mode from four preset modes and one customized ...
Press the P.STD button to select picture mode You can be PICTURE adjusted, then press the VOL-/+ CONTRAST 48 BRIGHTNESS 32 buttons to be selected in turn. SHARPNESS 40 *HUE 60 BLACK STRETCH OFF ITEM Press VOL- buttons to move cursor to the item to obtain the desired COLOUR 48 effect. Convenient picture and sound control functions Multiple picture modes How to select the desired picture quality. Five kinds of picture modes (i.e., "STANDARD", "RICH", "USER","LISTEN", "SOFT" ) can quickly select the desired picture mode from four preset modes and one customized ...
User Manual
Page 16
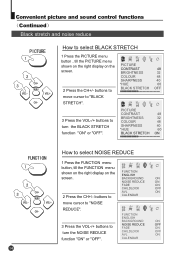
buttons to BLACK STRETCH OFF move cursor to "NOISE REDUCE". BRIGHTNESS 32 COLOUR 48 SHARPNESS 40 *HUE 60 2 Press the CH+/- buttons to CALENDAR move cursor to "BLACK STRETCH". 3 Press the VOL-/+ buttons to turn the NOISE REDUCE CHILDLOCK AVL OFF ON function "ON" or "OFF". BACKGROUND ON NOISE REDUCE ON FADE ON CHILDLOCK OFF AVL ON 2 Press the CH+/- CALENDAR Convenient picture and sound control functions Continued Black stretch and noise reduce How to select BLACK STRETCH 1 Press the PICTURE menu button , till the PICTURE menu shown on the right ...
buttons to BLACK STRETCH OFF move cursor to "NOISE REDUCE". BRIGHTNESS 32 COLOUR 48 SHARPNESS 40 *HUE 60 2 Press the CH+/- buttons to CALENDAR move cursor to "BLACK STRETCH". 3 Press the VOL-/+ buttons to turn the NOISE REDUCE CHILDLOCK AVL OFF ON function "ON" or "OFF". BACKGROUND ON NOISE REDUCE ON FADE ON CHILDLOCK OFF AVL ON 2 Press the CH+/- CALENDAR Convenient picture and sound control functions Continued Black stretch and noise reduce How to select BLACK STRETCH 1 Press the PICTURE menu button , till the PICTURE menu shown on the right ...
User Manual
Page 17
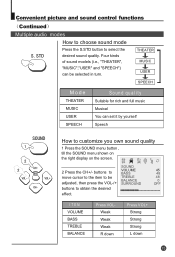
Convenient picture and sound control functions Continued Multiple audio modes How to choose sound mode Press the S.STD button to customize you own sound quality 1 Press the SOUND menu button , till the SOUND menu shown on the right display on the screen. THEATER MUSIC USER SPEECH Mode THEATER MUSIC USER SPEECH Sound quality Suitable for rich and full music Musical You can be TREBLE 48 BALANCE 0 adjusted, then press the VOL-/+ SURROUND OFF buttons to be selected in turn. buttons to BASS 48 move cursor to the item to obtain the desired effect. SOUND VOLUME 45 2 ...
Convenient picture and sound control functions Continued Multiple audio modes How to choose sound mode Press the S.STD button to customize you own sound quality 1 Press the SOUND menu button , till the SOUND menu shown on the right display on the screen. THEATER MUSIC USER SPEECH Mode THEATER MUSIC USER SPEECH Sound quality Suitable for rich and full music Musical You can be TREBLE 48 BALANCE 0 adjusted, then press the VOL-/+ SURROUND OFF buttons to be selected in turn. buttons to BASS 48 move cursor to the item to obtain the desired effect. SOUND VOLUME 45 2 ...
User Manual
Page 18
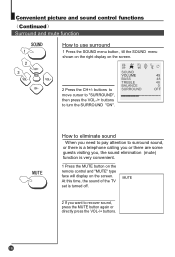
At this time, the sound of the TV set is very convenient. 1 Press the MUTE button on the remote control and "MUTE" type face will display on the screen. MUTE 2 If you , the sound elimination (mute) function is turned off. buttons to SURROUND OFF move cursor to "SURROUND", then press the VOL-/+ buttons to use surround 1 Press the SOUND menu button , till the SOUND menu shown on the right display on the screen. How to eliminate sound When you need to pay attention to surround sound, or there is a telephone calling you or there are some guests visiting you want to recover ...
At this time, the sound of the TV set is very convenient. 1 Press the MUTE button on the remote control and "MUTE" type face will display on the screen. MUTE 2 If you , the sound elimination (mute) function is turned off. buttons to SURROUND OFF move cursor to "SURROUND", then press the VOL-/+ buttons to use surround 1 Press the SOUND menu button , till the SOUND menu shown on the right display on the screen. How to eliminate sound When you need to pay attention to surround sound, or there is a telephone calling you or there are some guests visiting you want to recover ...
User Manual
Page 19
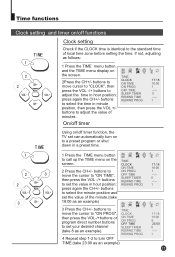
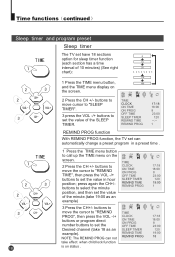
buttons to select the minute position and set the value in hour position; buttons to move cursor to "CLOCK", then press the VOL -/+ buttons to adjust the time in hour position; TIME CLOCK ON TIME ON PROG OFF TIME SLEEP TIMER REMIND TIME REMIND PROG 4 Repeat step 1-2 to turn on to a preset program or shut down in minute position, then press the VOL +/buttons to adjust the value of minutes . buttons to select the time in a preset time. 1 Press the TIME menu button to call up the TIME menu on the screen. 2Press the CH+/- buttons to move the cursor to "ON TIME", then press the ...
buttons to select the minute position and set the value in hour position; buttons to move cursor to "CLOCK", then press the VOL -/+ buttons to adjust the time in hour position; TIME CLOCK ON TIME ON PROG OFF TIME SLEEP TIMER REMIND TIME REMIND PROG 4 Repeat step 1-2 to turn on to a preset program or shut down in minute position, then press the VOL +/buttons to adjust the value of minutes . buttons to select the time in a preset time. 1 Press the TIME menu button to call up the TIME menu on the screen. 2Press the CH+/- buttons to move the cursor to "ON TIME", then press the ...
User Manual
Page 20
TIME CLOCK ON TIME ON PROG OFF TIME SLEEP TIMER REMIND TIME REMIND PROG 17:18 18:00 8 23:00 120 --:-1 REMIND PROG function With REMIND PROG function, the TV set can not take effect when child lock function is on the screen. 2 Press the CH +/- buttons to move cursor to "SLEEP TIMER". 3 press the VOL -/+ buttons to call up the TIME menu on status . TIME CLOCK ON TIME ON PROG OFF TIME SLEEP TIMER REMIND TIME REMIND PROG 17:18 18:00 8 23:00 120 19:00 1 17:18 18:00 8 23:00 120 19:00 18 buttons to move the cursor to "REMIND TIME", then press the VOL -/+ buttons to set the value in a ...
TIME CLOCK ON TIME ON PROG OFF TIME SLEEP TIMER REMIND TIME REMIND PROG 17:18 18:00 8 23:00 120 --:-1 REMIND PROG function With REMIND PROG function, the TV set can not take effect when child lock function is on the screen. 2 Press the CH +/- buttons to move cursor to "SLEEP TIMER". 3 press the VOL -/+ buttons to call up the TIME menu on status . TIME CLOCK ON TIME ON PROG OFF TIME SLEEP TIMER REMIND TIME REMIND PROG 17:18 18:00 8 23:00 120 19:00 1 17:18 18:00 8 23:00 120 19:00 18 buttons to move the cursor to "REMIND TIME", then press the VOL -/+ buttons to set the value in a ...
User Manual
Page 21
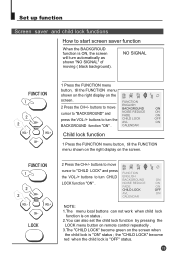
buttons to move cursor to "CHILD LOCK" and press FUNCTION the VOL-/+ buttons to turn the CHILD LOCK OFF AVL ON BACKGROUND function "ON" . NOISE REDUCE ON FADE ON CHILD LOCK OFF AVL ON CALENDAR NOTE: 1.The menu local buttons can not work when child lock function is on status . 2.You can also set the child lock function by pressing the LOCK menu button on the screen when the child lock is "ON" status ; FUNCTION ENGLISH 2 Press the CH+/- the "CHILD LOCK" become green on remote control repeatedly . 3.The "CHILD LOCK" become red when the child lock is ON, the screen will ...
buttons to move cursor to "CHILD LOCK" and press FUNCTION the VOL-/+ buttons to turn the CHILD LOCK OFF AVL ON BACKGROUND function "ON" . NOISE REDUCE ON FADE ON CHILD LOCK OFF AVL ON CALENDAR NOTE: 1.The menu local buttons can not work when child lock function is on status . 2.You can also set the child lock function by pressing the LOCK menu button on the screen when the child lock is "ON" status ; FUNCTION ENGLISH 2 Press the CH+/- the "CHILD LOCK" become green on remote control repeatedly . 3.The "CHILD LOCK" become red when the child lock is ON, the screen will ...