

User Manual
Page 1
19T3/22T3 ( )(MSD 119 ) TABLE OF CONTENTS Important Safety Instructions 1 Product Introduction...3 Features ...3 Listing...9 Installing...10 Front Panel Control Keys ...13 Remote con trol...14 Basic Operation Instruction 17 Power On...17 Standby...17 Signal Source Selection...17 Menu Operation Instruction...18 TV SETTING ...19 Auto Tuning...19 DTV Manu al Tuning...20 ATV Manual Tuning...20 Progra m Edit...21 Select Channel with CH+/CH -...21 Select Channel with Numeri c keys...22 PICTURE ...22 SOUND ...23 TIME ...24 SETUP...25 LOCK...26 Simple Troubleshooting...27
19T3/22T3 ( )(MSD 119 ) TABLE OF CONTENTS Important Safety Instructions 1 Product Introduction...3 Features ...3 Listing...9 Installing...10 Front Panel Control Keys ...13 Remote con trol...14 Basic Operation Instruction 17 Power On...17 Standby...17 Signal Source Selection...17 Menu Operation Instruction...18 TV SETTING ...19 Auto Tuning...19 DTV Manu al Tuning...20 ATV Manual Tuning...20 Progra m Edit...21 Select Channel with CH+/CH -...21 Select Channel with Numeri c keys...22 PICTURE ...22 SOUND ...23 TIME ...24 SETUP...25 LOCK...26 Simple Troubleshooting...27

User Manual
Page 2
...before using the machine, and keep the sleeping mode for too long time. 8 Please put this product, please dry your hands, pull the cord by grasping the plug. The exchange cost is recommended to use the liquid cleanser or aerosol cleanser. Its design can work normally for the panel. .... 4 The power cord must be scratched. It is very high. 1 19T3/22T3 ( )(MSD 119 ) Important Safety Instructions Thank you to choose the LCD TV monitor made by our company, a valuable product with the following safety instructions. 1 Read the manual and marking label before using it and comply...
...before using the machine, and keep the sleeping mode for too long time. 8 Please put this product, please dry your hands, pull the cord by grasping the plug. The exchange cost is recommended to use the liquid cleanser or aerosol cleanser. Its design can work normally for the panel. .... 4 The power cord must be scratched. It is very high. 1 19T3/22T3 ( )(MSD 119 ) Important Safety Instructions Thank you to choose the LCD TV monitor made by our company, a valuable product with the following safety instructions. 1 Read the manual and marking label before using it and comply...

User Manual
Page 3
... of correct operation according to the user manual but no parts which can be repaired by users themselves. A. The product was fallen down or the case is overturned from low temperature place to high temperature one, or install and use by yourself. Unusual sound or smell sends...operable. 19) The machine should be connected or pull out only after power supply is possibly to cause fire or electric shock. 20) The attaching plug should not suffer from waterdrop or watersplash, do not touch the power cord and antenna cable. 17 When the following troubles occur, please pull out the plug...
... of correct operation according to the user manual but no parts which can be repaired by users themselves. A. The product was fallen down or the case is overturned from low temperature place to high temperature one, or install and use by yourself. Unusual sound or smell sends...operable. 19) The machine should be connected or pull out only after power supply is possibly to cause fire or electric shock. 20) The attaching plug should not suffer from waterdrop or watersplash, do not touch the power cord and antenna cable. 17 When the following troubles occur, please pull out the plug...
User Manual
Page 10
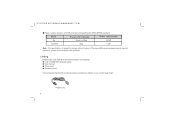
If there are complete LCD TV MONITOR (Include base); 19T3/22T3 ( )(MSD 119 ) Power supply : Comply with EPA standard,compatible with VESA DPMS standard. If any of the following items are differences between manual and real operation, please do according to change without notices. Standby Green or Blue Red Note: This specification is missing, please contact your dealer or our service department. Power cord 9 User manual; Power cord; Remote control; Listing Please make sure that all of above listed items is subject to real operation.
If there are complete LCD TV MONITOR (Include base); 19T3/22T3 ( )(MSD 119 ) Power supply : Comply with EPA standard,compatible with VESA DPMS standard. If any of the following items are differences between manual and real operation, please do according to change without notices. Standby Green or Blue Red Note: This specification is missing, please contact your dealer or our service department. Power cord 9 User manual; Power cord; Remote control; Listing Please make sure that all of above listed items is subject to real operation.

User Manual
Page 11
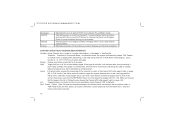
You can find more connectors when you take off the cover board on the left of the rear cover [ Fig.2] Antenna connection [Fig.1] Antenna or CATV socket. 19T3/22T3 ( )(MSD 119 ) Installing Note: Pull out the power plug before installing or taking down the unit. Power Switch Power Supply Y Pb Pr Input Audio Input Outdoor Antenna CATV Video Input L R Y Pb/Cb Pr/Cr Connect to DVD Fig.1 10
You can find more connectors when you take off the cover board on the left of the rear cover [ Fig.2] Antenna connection [Fig.1] Antenna or CATV socket. 19T3/22T3 ( )(MSD 119 ) Installing Note: Pull out the power plug before installing or taking down the unit. Power Switch Power Supply Y Pb Pr Input Audio Input Outdoor Antenna CATV Video Input L R Y Pb/Cb Pr/Cr Connect to DVD Fig.1 10

User Manual
Page 12
... speakers. Power Cord Connection [Fig.1] Plug one side of the audio cable into the PC Line-Out, then plug the other end into the audio input port of PC. Connect left and right audio output end of DVD to the display adapter of your machine . Note: HDMI connector can connect audio or video output end of DVD and games consoles to the monitor. Earphone connection [Fig.2] To use and earphone, you can realize DVI connector function with external HDMI/DVI...
... speakers. Power Cord Connection [Fig.1] Plug one side of the audio cable into the PC Line-Out, then plug the other end into the audio input port of PC. Connect left and right audio output end of DVD to the display adapter of your machine . Note: HDMI connector can connect audio or video output end of DVD and games consoles to the monitor. Earphone connection [Fig.2] To use and earphone, you can realize DVI connector function with external HDMI/DVI...

User Manual
Page 15
..., ZOOM2 Switch off sound when viewing a program. Move cursor up / down/left / right in no-menu mode. Press this key to set time of current channel EPG.Press Press to adjust the volume. To change date of standby mode. Press this button to return to display signal source selection menu Channel changing keys. Press this key to last watching channel NICAM For Teletext 14 Display the information of current program. Input number. Press this button to display Channel List menu...
..., ZOOM2 Switch off sound when viewing a program. Move cursor up / down/left / right in no-menu mode. Press this key to set time of current channel EPG.Press Press to adjust the volume. To change date of standby mode. Press this button to return to display signal source selection menu Channel changing keys. Press this key to last watching channel NICAM For Teletext 14 Display the information of current program. Input number. Press this button to display Channel List menu...
User Manual
Page 16
... Mix Display press number 0 9 'CH+'or'CH-'key to set or display your favorite programs. remote control user manual about teletext TeleText: Press 'Teletext' key, It loops in 3 modes: Mix Display Text Mode TeleText Off Thereinto Text Mode is held , the hold on or off Teletext or to the acquisition mode. When the page is Automatic Mode In Automatic mode, the system automatically selects TOP, Fastext, or Default mode...
... Mix Display press number 0 9 'CH+'or'CH-'key to set or display your favorite programs. remote control user manual about teletext TeleText: Press 'Teletext' key, It loops in 3 modes: Mix Display Text Mode TeleText Off Thereinto Text Mode is held , the hold on or off Teletext or to the acquisition mode. When the page is Automatic Mode In Automatic mode, the system automatically selects TOP, Fastext, or Default mode...

User Manual
Page 17
... should replace with the polarity of commission. 5. The mix use of new and old batteries is insufficiency it influences the remote control distance, you should point it out of remote control battery box. Note: Appearance of remote control: 1. Precautions for the thermal energy will cause the distortion of illumination or this picture, please according to operate the remote control. 4. When using remote control you should use of the remote control...
... should replace with the polarity of commission. 5. The mix use of new and old batteries is insufficiency it influences the remote control distance, you should point it out of remote control battery box. Note: Appearance of remote control: 1. Precautions for the thermal energy will cause the distortion of illumination or this picture, please according to operate the remote control. 4. When using remote control you should use of the remote control...

User Manual
Page 18
... Plug power cord into the electrical socket, press power switch button on right lower of the back cover , then press '' '' key on the front panel, or press ''POWER'' key on the remote control to turn on . 2.TV set will be displayed on the front panel to choose the signal source such as DTV, ATV, AV, SCART, YPBPR, VGA, HDMI. TV will automatically turn to standby when the preset time...
... Plug power cord into the electrical socket, press power switch button on right lower of the back cover , then press '' '' key on the front panel, or press ''POWER'' key on the remote control to turn on . 2.TV set will be displayed on the front panel to choose the signal source such as DTV, ATV, AV, SCART, YPBPR, VGA, HDMI. TV will automatically turn to standby when the preset time...
User Manual
Page 19
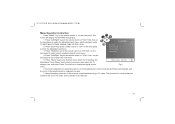
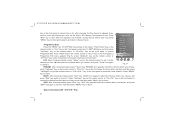
... to display the signal source Fig.6 menu. 6. 19T3/22T3 ( )(MSD 119 ) Menu Operation Instruction Press ''MENU'' key on the remote control or on the front panel to enter the adjustment sort menu. Press ''Left/Right'' key on the remote control or ''VOL+/ VOL-''on the front panel to select the adjustment sort menu, which can take it as reference. 18 During the operation, the selections which includes 6 sorts, TV SETTING TV SETTING, PICTURE, SOUND, TIME, SETUP, LOCK...
... to display the signal source Fig.6 menu. 6. 19T3/22T3 ( )(MSD 119 ) Menu Operation Instruction Press ''MENU'' key on the remote control or on the front panel to enter the adjustment sort menu. Press ''Left/Right'' key on the remote control or ''VOL+/ VOL-''on the front panel to select the adjustment sort menu, which can take it as reference. 18 During the operation, the selections which includes 6 sorts, TV SETTING TV SETTING, PICTURE, SOUND, TIME, SETUP, LOCK...
User Manual
Page 20
..., a dialog box of ''Please select country first, then select start button, finally press ''OK'' key to exit Auto Tuning. Note: If the Lock System in LOCK menu is set . Press ''Up/Down'' key on the remote control or ''CH+/CH-'' key on the front panel to choose the item you'd like to adjust or set On, you need to update info'' appears on the remote control, a dialog box of...
..., a dialog box of ''Please select country first, then select start button, finally press ''OK'' key to exit Auto Tuning. Note: If the Lock System in LOCK menu is set . Press ''Up/Down'' key on the remote control or ''CH+/CH-'' key on the front panel to choose the item you'd like to adjust or set On, you need to update info'' appears on the remote control, a dialog box of...
User Manual
Page 22
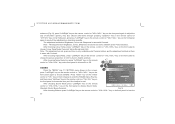
...MENU'' key, TV SETTING menu shows on the screen. Fig.11 RENAME: After choosing channel press ''Green'' key, RENAME icon appears behind the channel which you choose, and press ''Red'' key again to move the cursor position. Press ''Down'' key on the remote control or ''CH-'' key on the front panel to enter the TV SETTING menu...FAV: After choosing channel, press ''Yellow'' key on the remote control to set the Skip in ATV Manual Tuning menu for No. And then press ''MENU'' key to return. Press ''MENU'' key to return. 19T3/22T3 ( )(MSD 119 ) key on the front panel to choose Yes or...
...MENU'' key, TV SETTING menu shows on the screen. Fig.11 RENAME: After choosing channel press ''Green'' key, RENAME icon appears behind the channel which you choose, and press ''Red'' key again to move the cursor position. Press ''Down'' key on the remote control or ''CH-'' key on the front panel to enter the TV SETTING menu...FAV: After choosing channel, press ''Yellow'' key on the remote control to set the Skip in ATV Manual Tuning menu for No. And then press ''MENU'' key to return. Press ''MENU'' key to return. 19T3/22T3 ( )(MSD 119 ) key on the front panel to choose Yes or...

User Manual
Page 23
... adjust or set. Select channels with the Return key you can switch the two favourite channels as you will go to select TV channels. 3. Operations to select channels with 3 digits (100-399): Press the number keys with 1 digit (0-9): Press the number keys (0-9)on the front panel to select TV channel directly. 2. After choosing Contrast, press ''Left/Right'' key on the remote control or ''VOL+/VOL-'' key on the remote control to enter Contrast adjusting Picture Mode...
... adjust or set. Select channels with the Return key you can switch the two favourite channels as you will go to select TV channels. 3. Operations to select channels with 3 digits (100-399): Press the number keys with 1 digit (0-9): Press the number keys (0-9)on the front panel to select TV channel directly. 2. After choosing Contrast, press ''Left/Right'' key on the remote control or ''VOL+/VOL-'' key on the remote control to enter Contrast adjusting Picture Mode...
User Manual
Page 24
... on the remote control or ''VOL+/VOL-'' key on the front panel to choose Colour Temp Mode: Personal, Warm, Normal and Cold Note The adjustment on the front panel to tune the 23 Treble Bass Balance Auto Volume Surround Sound 50 50 0 Off Off After choosing Sound Mode press ''Left/Right'' key on the remote control or ''VOL+/VOL-'' key on red, green and...
... on the remote control or ''VOL+/VOL-'' key on the front panel to choose Colour Temp Mode: Personal, Warm, Normal and Cold Note The adjustment on the front panel to tune the 23 Treble Bass Balance Auto Volume Surround Sound 50 50 0 Off Off After choosing Sound Mode press ''Left/Right'' key on the remote control or ''VOL+/VOL-'' key on red, green and...
User Manual
Page 25
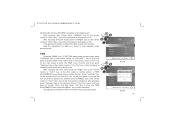
... on the remote control or ''CH+/CH-'' key on the front panel to choose Close, and then press ''OK'' key to close the TIME ADJUSTMENT menu and press ''MENU'' key to return last menu. Clock Off Time On Time Sleep Timer Auto Sleep Time Zone TIME 20/ Jul 13:12 08:18 00:00 Off On London GMT MENU: Return OK: Enter Fig.15 Clock Off Time On Time Sleep Timer Auto Sleep Time Zone TIME Repeat...
... on the remote control or ''CH+/CH-'' key on the front panel to choose Close, and then press ''OK'' key to close the TIME ADJUSTMENT menu and press ''MENU'' key to return last menu. Clock Off Time On Time Sleep Timer Auto Sleep Time Zone TIME 20/ Jul 13:12 08:18 00:00 Off On London GMT MENU: Return OK: Enter Fig.15 Clock Off Time On Time Sleep Timer Auto Sleep Time Zone TIME Repeat...

User Manual
Page 26
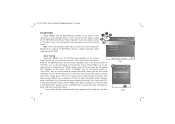
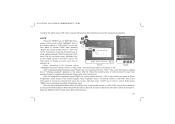
... SETUP Language Audio Language Subtitle Language Country Restore Setting English English English Austria MENU: Return OK: Enter Fig.17 LOCK Lock System Off Change Password Block programme Parental Guidance 15 MENU: Return OK: Enter Fig.18 After choosing Restore, press ''Right'' key on the remote control or ''VOL+'' key on the front panel to adjust or set. SETUP Press ''Menu'' key, TV SETTING menu shows on the screen, press ''Left/Right'' key on the remote control...
... SETUP Language Audio Language Subtitle Language Country Restore Setting English English English Austria MENU: Return OK: Enter Fig.17 LOCK Lock System Off Change Password Block programme Parental Guidance 15 MENU: Return OK: Enter Fig.18 After choosing Restore, press ''Right'' key on the remote control or ''VOL+'' key on the front panel to adjust or set. SETUP Press ''Menu'' key, TV SETTING menu shows on the screen, press ''Left/Right'' key on the remote control...
User Manual
Page 27
... Change Password, press ''Right'' key on the remote control or ''VOL+'' key on the front panel, a dialog box of remote control to input new password twice to complete the password change and return to enter default password 0000 for entering LOCK menu (Fig.18), and then press ''Up/Down'' key on the remote control or ''CH+/CH-'' key on the screen (Fig.19). After pressing ''Down'' key on the remote control...
... Change Password, press ''Right'' key on the remote control or ''VOL+'' key on the front panel, a dialog box of remote control to input new password twice to complete the password change and return to enter default password 0000 for entering LOCK menu (Fig.18), and then press ''Up/Down'' key on the remote control or ''CH+/CH-'' key on the screen (Fig.19). After pressing ''Down'' key on the remote control...

User Manual
Page 28
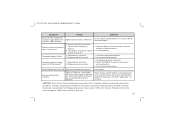
... antenna cable type(VHF/UHF) 3. No image. Antenna cable connector is loose, cable is exposed to reduce interfearance. 1. TV image is loose, power cord don't connect well. Power plug is better, but has noise. Use high directional antenna. 2. 19T3/22T3 ( )(MSD 119 ) Note: With the mode of antenna is incorrect. 1.Volume setting is too low. 2.Sound is muted. Antenna cable type is weak. Direction of AV, SCART, YPBPR, VGA and HDMI, all functions and adjustments are similar with external HDMI/DVI...
... antenna cable type(VHF/UHF) 3. No image. Antenna cable connector is loose, cable is exposed to reduce interfearance. 1. TV image is loose, power cord don't connect well. Power plug is better, but has noise. Use high directional antenna. 2. 19T3/22T3 ( )(MSD 119 ) Note: With the mode of antenna is incorrect. 1.Volume setting is too low. 2.Sound is muted. Antenna cable type is weak. Direction of AV, SCART, YPBPR, VGA and HDMI, all functions and adjustments are similar with external HDMI/DVI...
User Manual
Page 29
... display,and prompt no signal input,red indicator LED twinkling. Signal cable is loose or fallen off , reconnect again. Remove objects, obstructing the receiver window of remote control was covered by warranty. 28 Use auto-adjustment function. 2. Display mode is faint. 1. Enter "PICTURE" to turn on the TV again after 1-2 minutes. However, this trouble can't be repaired , Which isn't covered by objects. 2. Computer display is incorrect. 1. Receive window of remote control. 2. The battery energy...
... display,and prompt no signal input,red indicator LED twinkling. Signal cable is loose or fallen off , reconnect again. Remove objects, obstructing the receiver window of remote control was covered by warranty. 28 Use auto-adjustment function. 2. Display mode is faint. 1. Enter "PICTURE" to turn on the TV again after 1-2 minutes. However, this trouble can't be repaired , Which isn't covered by objects. 2. Computer display is incorrect. 1. Receive window of remote control. 2. The battery energy...


