
User Manual
Page 2
... Convenient picture and sound control functions 13 Multiple picture modes 13 Black stretch and noise reduce 14 Mute function 15 Time functions 16 Clock setting and timer on/off functions 16 Sleep timer and program preset 17 Setup function 18 Screen saver and child lock functions 18 AVL functions 19 Calendar functions 20 Position exchange function 21 Others Connection to the external audio and video equipment 22 Troubleshooting guide 23 Specifications 24...
... Convenient picture and sound control functions 13 Multiple picture modes 13 Black stretch and noise reduce 14 Mute function 15 Time functions 16 Clock setting and timer on/off functions 16 Sleep timer and program preset 17 Setup function 18 Screen saver and child lock functions 18 AVL functions 19 Calendar functions 20 Position exchange function 21 Others Connection to the external audio and video equipment 22 Troubleshooting guide 23 Specifications 24...

User Manual
Page 4
... your batteries with the +/- Installation Aerial connection Generally speaking, to enjoy a clearer picture, we recommend that you use a CATV system or an outdoor antenna .In different places, the suitable antenna type and position are different. 300 twin-lead cable Antenna adapter (additional purchase) 75 coaxial cable Plug (additional purchase) Mixer additional purchase Antenna input 75 standard AC power socket coaxial type Note * It is recommended...
... your batteries with the +/- Installation Aerial connection Generally speaking, to enjoy a clearer picture, we recommend that you use a CATV system or an outdoor antenna .In different places, the suitable antenna type and position are different. 300 twin-lead cable Antenna adapter (additional purchase) 75 coaxial cable Plug (additional purchase) Mixer additional purchase Antenna input 75 standard AC power socket coaxial type Note * It is recommended...

User Manual
Page 5
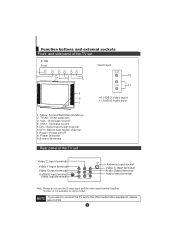
Video: 2.A-IN/V-IN: Audio Input/Video Input 3. CH-/CH+: Select next lower channel / Select next higher channel 7.Power Indicator 8.Sensor Windows 9.Power: Power on/off Note: The cabinet and buttons of the TV set 21FA1/21TA1 Signal receiver TV/AV switch Menu Volume down/up Channel down/up Power switch VIDEO L/R audio Power indicator 1407 12 34 5 6 1. TV/AV TV/AV switching 4. Menu: Access/Exit Main M (Menu) 5.VOL-/ VOL+ : Decrease sound/Increase sound 78 9 6. Function buttons and external sockets Front and side panel of TV is only for reference.
Video: 2.A-IN/V-IN: Audio Input/Video Input 3. CH-/CH+: Select next lower channel / Select next higher channel 7.Power Indicator 8.Sensor Windows 9.Power: Power on/off Note: The cabinet and buttons of the TV set 21FA1/21TA1 Signal receiver TV/AV switch Menu Volume down/up Channel down/up Power switch VIDEO L/R audio Power indicator 1407 12 34 5 6 1. TV/AV TV/AV switching 4. Menu: Access/Exit Main M (Menu) 5.VOL-/ VOL+ : Decrease sound/Increase sound 78 9 6. Function buttons and external sockets Front and side panel of TV is only for reference.
User Manual
Page 6
....VIDEO:Video input 11.AUDIO:Audio input 1. Menu: Access/Exit Main M (Menu) 2. TV/AV:TV/AV selection 3. VOL+: Increase sound 5.CH-: Select next lower channel 6.CH+: Select next higher channel 7.Power: Power on/off 8. S-video is not available for some model . If you want to connect the TV set to the other audio/video equipment, please refer to P22. Function buttons and external sockets Front and side panel of the TV set Video Cb Input terminal Video Y Input terminal Y Video Output terminal S-VIDEO OUT S-VIDEO input...
....VIDEO:Video input 11.AUDIO:Audio input 1. Menu: Access/Exit Main M (Menu) 2. TV/AV:TV/AV selection 3. VOL+: Increase sound 5.CH-: Select next lower channel 6.CH+: Select next higher channel 7.Power: Power on/off 8. S-video is not available for some model . If you want to connect the TV set to the other audio/video equipment, please refer to P22. Function buttons and external sockets Front and side panel of the TV set Video Cb Input terminal Video Y Input terminal Y Video Output terminal S-VIDEO OUT S-VIDEO input...

User Manual
Page 7
Tune menu Picture menu Exit screen display MENU VOL + CH- PICTURE TUNE EXIT Buttons and Descriptions Mute Button Press to conceal the sound of programs. Stand by Button Screen Display Button Swap function Button TV and AV Exchange Button To exchanger between TV and other available video inputs Digital selector Program number Button Program scan Button Time menu Picture mode selection Function menu Menu Select/ Adjust Button Use this button to adjust the menu, the volume and the channels. Buttons on the remote control MUTE CALL TV/AV POWER SWAP -/-- 1 4 7 SCAN P.STD 2 3 5 6...
Tune menu Picture menu Exit screen display MENU VOL + CH- PICTURE TUNE EXIT Buttons and Descriptions Mute Button Press to conceal the sound of programs. Stand by Button Screen Display Button Swap function Button TV and AV Exchange Button To exchanger between TV and other available video inputs Digital selector Program number Button Program scan Button Time menu Picture mode selection Function menu Menu Select/ Adjust Button Use this button to adjust the menu, the volume and the channels. Buttons on the remote control MUTE CALL TV/AV POWER SWAP -/-- 1 4 7 SCAN P.STD 2 3 5 6...
User Manual
Page 8
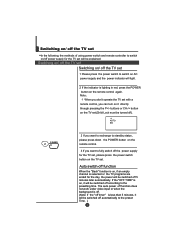
.... The auto power off function does not work under video input or when the background is off. (Note: If the "off timer" is lighting in red, press the POWER button on the remote control again. buttons or CH-/+ button on the TV set(Child Lock must be turned off). 4 AUTO BG POWER 2 If you want to switch on AC power supply and the power indicator will be switched off automatically to the presetting time. Switching on...
.... The auto power off function does not work under video input or when the background is off. (Note: If the "off timer" is lighting in red, press the POWER button on the remote control again. buttons or CH-/+ button on the TV set(Child Lock must be turned off). 4 AUTO BG POWER 2 If you want to switch on AC power supply and the power indicator will be switched off automatically to the presetting time. Switching on...
User Manual
Page 9
... VOL-/+ buttons to select a channel number in number increasing direction. Press the CH- buttons to select Sound then press the VOL-/+ buttons to save the setting. To select channel numbers from 10 ~ 99 press [-/--] button and enter the two digit channel number To select channel numbers from 100 ~ 218 press [-/--] button twice and enter the 3 digit channel number 2 Using the CH+/- TUNE CH+ VOL - Press the EXIT button to select the sound system. Watching TV program How to adjust the volume level...
... VOL-/+ buttons to select a channel number in number increasing direction. Press the CH- buttons to select Sound then press the VOL-/+ buttons to save the setting. To select channel numbers from 10 ~ 99 press [-/--] button and enter the two digit channel number To select channel numbers from 100 ~ 218 press [-/--] button twice and enter the 3 digit channel number 2 Using the CH+/- TUNE CH+ VOL - Press the EXIT button to select the sound system. Watching TV program How to adjust the volume level...

User Manual
Page 11
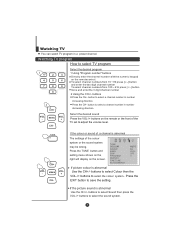
... use the buttons on the screen. You can also use the remote control to set the channels, which are respectively full automatic, semi-automatic and manual fine tune. TUNE COLOUR SOUND BAND SKIP PROGRAM SEARCH FINE TUNE AUTO SEARCH 2 Press the CH+/- After the search has finished, the first program number will display on the TV set to set channel. TUNE COLOUR SOUND BAND SKIP PROGRAM SEARCH FINE TUNE AUTO SEARCH AUTO...
... use the buttons on the screen. You can also use the remote control to set the channels, which are respectively full automatic, semi-automatic and manual fine tune. TUNE COLOUR SOUND BAND SKIP PROGRAM SEARCH FINE TUNE AUTO SEARCH 2 Press the CH+/- After the search has finished, the first program number will display on the TV set to set channel. TUNE COLOUR SOUND BAND SKIP PROGRAM SEARCH FINE TUNE AUTO SEARCH AUTO...

User Manual
Page 12
... the desired channel. If you press the MENU button, the menu item EXIT display (PICTURE, TIME, FUNCTION, TUNE, EXCHANGE, ETC.) will automatically disappear within 15 seconds. buttons or PROGRAM NUMBER 0-9 buttons to select " SEARCH". Searching channel Continued Semi-automatic search Semi-automatic search 1 Press the CH+/- buttons to choose desired channels I.E. CH+ VOL - The VOL+ up button is used for lower side program search. down button is used for higher...
... the desired channel. If you press the MENU button, the menu item EXIT display (PICTURE, TIME, FUNCTION, TUNE, EXCHANGE, ETC.) will automatically disappear within 15 seconds. buttons or PROGRAM NUMBER 0-9 buttons to select " SEARCH". Searching channel Continued Semi-automatic search Semi-automatic search 1 Press the CH+/- buttons to choose desired channels I.E. CH+ VOL - The VOL+ up button is used for lower side program search. down button is used for higher...

User Manual
Page 13
CH+ VOL - Searching channel Continued Manual fine tune Manual fine tune If the picture and/or sound are obtained. 1 FINE TUNE 152.25MHz MENU VOL + CH- 1 Press the CH+/- channel 1 1 AUTO DK TUNE 2 Press the TUNE menu button , till the TUNING menu shown on the right display on the screen. MENU VOL + CH- 3 Press the CH+/- buttons or PROGRAM NUMBER 0-9 button to select " FINE TUNE". Do not use this feature unless...
CH+ VOL - Searching channel Continued Manual fine tune Manual fine tune If the picture and/or sound are obtained. 1 FINE TUNE 152.25MHz MENU VOL + CH- 1 Press the CH+/- channel 1 1 AUTO DK TUNE 2 Press the TUNE menu button , till the TUNING menu shown on the right display on the screen. MENU VOL + CH- 3 Press the CH+/- buttons or PROGRAM NUMBER 0-9 button to select " FINE TUNE". Do not use this feature unless...

User Manual
Page 14
... skipped channel 1 Use the PROGRAM NUMBER buttons to select the channel number to be displayed by directly using the CH+/- VOL - However, you use the PROGRAM NUMBER buttons to turn the SKIP function "OFF". TUNE COLOUR SOUND BAND SKIP PROGRAM SEARCH FINE TUNE AUTO SEARCH AUTO BG VHFL OFF 0 AUTO BG VHFL ON 0 If you do not wish to close the menu. Searching channel Continued Program skip CH+ VOL - channel 1 1 AUTO BG TUNE 2 Press the TUNE menu button , till...
... skipped channel 1 Use the PROGRAM NUMBER buttons to select the channel number to be displayed by directly using the CH+/- VOL - However, you use the PROGRAM NUMBER buttons to turn the SKIP function "OFF". TUNE COLOUR SOUND BAND SKIP PROGRAM SEARCH FINE TUNE AUTO SEARCH AUTO BG VHFL OFF 0 AUTO BG VHFL ON 0 If you do not wish to close the menu. Searching channel Continued Program skip CH+ VOL - channel 1 1 AUTO BG TUNE 2 Press the TUNE menu button , till...

User Manual
Page 15
... to adjusted, then press the VOL-/+ buttons to green Note: The "Hue" item only appears when the colour system is NTSC. PICTURE CONTRAST BRIGHTNESS COLOUR SHARPNESS *HUE BLACK STRETCH 48 32 48 40 60 OFF CH- MENU VOL + 2 Press the CH+/- STANDARD RICH USER LISTEN SOFT PICTURE How to select picture modes You can be selected in turn. Convenient picture and sound control functions Multiple picture modes...
... to adjusted, then press the VOL-/+ buttons to green Note: The "Hue" item only appears when the colour system is NTSC. PICTURE CONTRAST BRIGHTNESS COLOUR SHARPNESS *HUE BLACK STRETCH 48 32 48 40 60 OFF CH- MENU VOL + 2 Press the CH+/- STANDARD RICH USER LISTEN SOFT PICTURE How to select picture modes You can be selected in turn. Convenient picture and sound control functions Multiple picture modes...

User Manual
Page 16
... available for some model FUNCTION LANGUAGE ENGLISH BACKGROUND ON NOISE REDUCE ON CHILD LOCK OFF AVL ON CALENDAR MENU VOL + CH- Convenient picture and sound control functions Continued Black Stretch-(Automatically Increases the Contrast Rage) Noise Reduce - (Picture Noise & Grain Reduction Circuit. buttons to select BLACK STRETCH PICTURE 1 Press the PICTURE menu VOL - BLACK STRETCH ON FUNCTION CH+ VOL - Only use on poor reception.) Black stretch and noise...
... available for some model FUNCTION LANGUAGE ENGLISH BACKGROUND ON NOISE REDUCE ON CHILD LOCK OFF AVL ON CALENDAR MENU VOL + CH- Convenient picture and sound control functions Continued Black Stretch-(Automatically Increases the Contrast Rage) Noise Reduce - (Picture Noise & Grain Reduction Circuit. buttons to select BLACK STRETCH PICTURE 1 Press the PICTURE menu VOL - BLACK STRETCH ON FUNCTION CH+ VOL - Only use on poor reception.) Black stretch and noise...

User Manual
Page 17
Convenient picture and sound control functions Continued Mute function Sound mute MUTE 1 Press the MUTE button on the remote control and "MUTE" type face will display on the lower part of the TV set is turned off. MUTE 2 If you want to recover the sound, press the MUTE button again or directly press the VOL-/+ buttons. At this time, the sound of the screen.
Convenient picture and sound control functions Continued Mute function Sound mute MUTE 1 Press the MUTE button on the remote control and "MUTE" type face will display on the lower part of the TV set is turned off. MUTE 2 If you want to recover the sound, press the MUTE button again or directly press the VOL-/+ buttons. At this time, the sound of the screen.

User Manual
Page 18
... adjust the value of the minute.(take 23:00 as an example). MENU VOL + CH- 1 Press the TIME menu button, and the TIME menu display on the front panel, the clock loses power and will only work if the TV set if left turned on or in hour position; TIME CLOCK ON TIME ON PROG OFF TIME SLEEP TIMER REMIND TIME REMIND PROG 17:18 18:00 1 --:-0 --:-1 On/off timer Using...
... adjust the value of the minute.(take 23:00 as an example). MENU VOL + CH- 1 Press the TIME menu button, and the TIME menu display on the front panel, the clock loses power and will only work if the TV set if left turned on or in hour position; TIME CLOCK ON TIME ON PROG OFF TIME SLEEP TIMER REMIND TIME REMIND PROG 17:18 18:00 1 --:-0 --:-1 On/off timer Using...
User Manual
Page 19
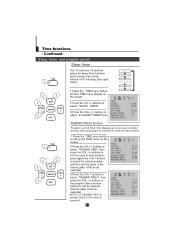
... TIME menu button, 180 and the TIME menu display on a different channel is due to operate CHILD LOCK must be turned off. buttons to select "REMIND PROG", then press the VOL -/+ buttons or the program direct number buttons to select the minute position, and then set the desired channel (take 19:00 as an example). The TV set the value in hour position; MENU VOL + CH- 1 Press the TIME menu button to adjust the SLEEP TIMER level. buttons to select "SLEEP TIMER...
... TIME menu button, 180 and the TIME menu display on a different channel is due to operate CHILD LOCK must be turned off. buttons to select "REMIND PROG", then press the VOL -/+ buttons or the program direct number buttons to select the minute position, and then set the desired channel (take 19:00 as an example). The TV set the value in hour position; MENU VOL + CH- 1 Press the TIME menu button to adjust the SLEEP TIMER level. buttons to select "SLEEP TIMER...

User Manual
Page 20
... control buttons to turn the BACKGROUND function "ON" . The power switch will turn the TV set off. buttons to select "BACKGROUND" and press the VOL-/+ buttons to turn CHILD LOCK function "ON" . MENU VOL + CH- 1 Press the FUNCTION menu button, till the FUNCTION menu shown on the right display on the screen. 2 Press the CH+/- MENU VOL + 1 Press the FUNCTION menu button, till the FUNCTION menu shown on the right display on the screen...
... control buttons to turn the BACKGROUND function "ON" . The power switch will turn the TV set off. buttons to select "BACKGROUND" and press the VOL-/+ buttons to turn CHILD LOCK function "ON" . MENU VOL + CH- 1 Press the FUNCTION menu button, till the FUNCTION menu shown on the right display on the screen. 2 Press the CH+/- MENU VOL + 1 Press the FUNCTION menu button, till the FUNCTION menu shown on the right display on the screen...
User Manual
Page 23
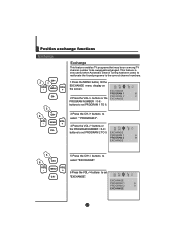
... swapped/exchanged. EXCHANGE PROGRAM 1 6 PROGRAM 2 9 EXCHANGE This feature is very useful when Automatic Search Tuning has been used, to reallocate the found programs to select " PROGRAM 2". CH+ 3 Press the CH-/+ buttons to the correct channel numbers. VOL - EXCHANGE PROGRAM 1 6 PROGRAM 2 9 EXCHANGE 5 Press the CH+/- MENU VOL + 6 Press the VOL-/+ buttons to set CH- EXCHANGE PROGRAM 1 6 CH- the PROGRAM NUMBER 0-9 buttons to set PROGRAM 2 TO 9. VOL - CH+ 1 Press the MENU button, till the VOL...
... swapped/exchanged. EXCHANGE PROGRAM 1 6 PROGRAM 2 9 EXCHANGE This feature is very useful when Automatic Search Tuning has been used, to reallocate the found programs to select " PROGRAM 2". CH+ 3 Press the CH-/+ buttons to the correct channel numbers. VOL - EXCHANGE PROGRAM 1 6 PROGRAM 2 9 EXCHANGE 5 Press the CH+/- MENU VOL + 6 Press the VOL-/+ buttons to set CH- EXCHANGE PROGRAM 1 6 CH- the PROGRAM NUMBER 0-9 buttons to set PROGRAM 2 TO 9. VOL - CH+ 1 Press the MENU button, till the VOL...
User Manual
Page 24
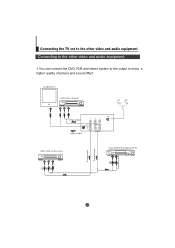
Connecting the TV set to the other video and audio equipment Connecting to enjoy a higher quality of picture and sound effect. an additional TV DVD, VCD or otherunits Video output Audio output Y Cb Cr OUT IN VIDEO L-AUDIO-R DVD, VCD or other video and audio equipment You can connect the DVD,VCR and stereo system to the output to the other units Laser DVD with output terminal To video input To audio input To audio output
Connecting the TV set to the other video and audio equipment Connecting to enjoy a higher quality of picture and sound effect. an additional TV DVD, VCD or otherunits Video output Audio output Y Cb Cr OUT IN VIDEO L-AUDIO-R DVD, VCD or other video and audio equipment You can connect the DVD,VCR and stereo system to the output to the other units Laser DVD with output terminal To video input To audio input To audio output

User Manual
Page 25
... voltages in location possible faults use help guide below. Electrical interference which can be repaired by a qualified registered service person. Adjust the BALANCE item in SOUND menu as you wish in the cabinet expanding with the mains power switch for 15 minutes. When the power is turn on overhead power cables. 1. Only 1 speaker has no sound No Picture No sound The aerial direction and connection This is called ghosting which...
... voltages in location possible faults use help guide below. Electrical interference which can be repaired by a qualified registered service person. Adjust the BALANCE item in SOUND menu as you wish in the cabinet expanding with the mains power switch for 15 minutes. When the power is turn on overhead power cables. 1. Only 1 speaker has no sound No Picture No sound The aerial direction and connection This is called ghosting which...


