
User Manual
Page 1
TABLE OF CONTENTS Important Safety Instructions 1 Product Introduction 3 General information 3 Features 4 listing 9 Installation & Connection 10 Front Panel Control Keys 17 Remote control 18 Basic Operation Instruction 20 Power On 20 Standby 20 Signal Source Selection 20 Menu Operation Instruction 21 PICTURE 21 SOUND 23 OSD 24 ADVANCE 25 TV 26 Simple troubleshooting 30
TABLE OF CONTENTS Important Safety Instructions 1 Product Introduction 3 General information 3 Features 4 listing 9 Installation & Connection 10 Front Panel Control Keys 17 Remote control 18 Basic Operation Instruction 20 Power On 20 Standby 20 Signal Source Selection 20 Menu Operation Instruction 21 PICTURE 21 SOUND 23 OSD 24 ADVANCE 25 TV 26 Simple troubleshooting 30

User Manual
Page 2
... machine are going to pull out the power cord from this machine in installation. 10 The power cord must be placed correctly so as to avoid be taken off before you clean the machine. Important Safety Instructions Thank you to choose the LCD TV monitor made by grasping the plug. Never pull the cord itself. 7 If you more audiovisual enjoyment...
... machine are going to pull out the power cord from this machine in installation. 10 The power cord must be placed correctly so as to avoid be taken off before you clean the machine. Important Safety Instructions Thank you to choose the LCD TV monitor made by grasping the plug. Never pull the cord itself. 7 If you more audiovisual enjoyment...

User Manual
Page 3
... injury as the product is used as the disconnect device, the disconnect device shall remain readily operable. 19) The machine should be connected or pull out only after power supply is turned off. 16 During a thunder rain weather, do not touch the power cord and antenna cable. 17 When the following troubles occur, please pull out the plug and call the professional...
... injury as the product is used as the disconnect device, the disconnect device shall remain readily operable. 19) The machine should be connected or pull out only after power supply is turned off. 16 During a thunder rain weather, do not touch the power cord and antenna cable. 17 When the following troubles occur, please pull out the plug and call the professional...

User Manual
Page 4
... of Mp3 format. 3 seeing film and playing game may directly connect your DVD, vidicon etc. Intelligent image mode and sound mode can be more clear. Automatically operated convenient with VGA or HDMI connectors. Support USB interface, you can greatly eliminate background noise caused by menu interference and the noise caused by interlace signals. Also it can totally eliminate the screen dithering caused by weak signals so as a computer monitor with...
... of Mp3 format. 3 seeing film and playing game may directly connect your DVD, vidicon etc. Intelligent image mode and sound mode can be more clear. Automatically operated convenient with VGA or HDMI connectors. Support USB interface, you can greatly eliminate background noise caused by menu interference and the noise caused by interlace signals. Also it can totally eliminate the screen dithering caused by weak signals so as a computer monitor with...

User Manual
Page 5
...-p 75 Imbalance 16~300 100mW+100mW Working Environment: Atmosphere pressure: 86kPa 104kPa Temperature: 5 40 Humidity: 10% 85% Storage Environment: Atmosphere pressure: 86kPa 104kPa Temperature: -20 55 Humidity: 5% 95% 4 Features interface specification: Interface VGA HDMI CVBS Input/Output S-VIDEO Input YCbCr/Ypbpr Audio Input/Output TV(RF) Earphone Specification DB-15, 75 0.5~0.7Vp-p H/V:TTL Level (Support mode refer to VGA Input Mode ) Video signal: 1080p, 1080i, 720p, 576p, 576i, 480p...
...-p 75 Imbalance 16~300 100mW+100mW Working Environment: Atmosphere pressure: 86kPa 104kPa Temperature: 5 40 Humidity: 10% 85% Storage Environment: Atmosphere pressure: 86kPa 104kPa Temperature: -20 55 Humidity: 5% 95% 4 Features interface specification: Interface VGA HDMI CVBS Input/Output S-VIDEO Input YCbCr/Ypbpr Audio Input/Output TV(RF) Earphone Specification DB-15, 75 0.5~0.7Vp-p H/V:TTL Level (Support mode refer to VGA Input Mode ) Video signal: 1080p, 1080i, 720p, 576p, 576i, 480p...

User Manual
Page 10
If there are complete LCD TV MONITOR (Include base) User manual Power cord Remote control If any of the following items are differences between manual and real operation, please do according to change without notices. Mode On Standby Power LED indicator Off On Power consumption 45W(18.5"/21.5") 55W(20") 65W(23") 2W Note: This specification is missing, please contact your dealer or our service department. Listing Please make sure that...
If there are complete LCD TV MONITOR (Include base) User manual Power cord Remote control If any of the following items are differences between manual and real operation, please do according to change without notices. Mode On Standby Power LED indicator Off On Power consumption 45W(18.5"/21.5") 55W(20") 65W(23") 2W Note: This specification is missing, please contact your dealer or our service department. Listing Please make sure that...
User Manual
Page 11
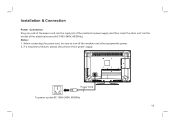
When connecting the power cord, be sure to turn off the machine and other end into the input port of the electrical source (AC 100V-240V, 60/50Hz). AC To power socket AC 100V-240V, 60/50Hz 10 If a long time at leisure, please disconnect it from power supply. Installation & Connection Power Connection Plug one end of the power cord into the socket of the machine's power supply and then insert the other equipment's power. 2. Notes: 1.
When connecting the power cord, be sure to turn off the machine and other end into the input port of the electrical source (AC 100V-240V, 60/50Hz). AC To power socket AC 100V-240V, 60/50Hz 10 If a long time at leisure, please disconnect it from power supply. Installation & Connection Power Connection Plug one end of the power cord into the socket of the machine's power supply and then insert the other equipment's power. 2. Notes: 1.
User Manual
Page 12
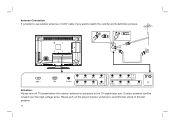
AC Attention: Please turn off TV power before the outdoor antenna is better to use outdoor antenna or CATV cable if you want to watch the colorful and hi-definition pictures. Outdoor antenna can't be located near the high-voltage wires. Please pull out the plug of outdoor antenna to avoid thunder shock in thunder weather. 11 Antenna Connection It is connected to the TV signal input port.
AC Attention: Please turn off TV power before the outdoor antenna is better to use outdoor antenna or CATV cable if you want to watch the colorful and hi-definition pictures. Outdoor antenna can't be located near the high-voltage wires. Please pull out the plug of outdoor antenna to avoid thunder shock in thunder weather. 11 Antenna Connection It is connected to the TV signal input port.
User Manual
Page 13
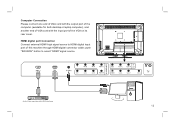
HDMI digital port Connection Connect external HDMI high signal source to select "HDMI" signal source. Audio/Video machine with the input port of this machine through HDMI digital connector cable; push AC "SOURCE" button to HDMI digital input port of the VGA on its rear cover. Computer Connection Please connect one end of VGA cord with the output port of the computer (available for both desktop or laptop computer), and another end of VGA cord with HDMIinterfaces 12
HDMI digital port Connection Connect external HDMI high signal source to select "HDMI" signal source. Audio/Video machine with the input port of this machine through HDMI digital connector cable; push AC "SOURCE" button to HDMI digital input port of the VGA on its rear cover. Computer Connection Please connect one end of VGA cord with the output port of the computer (available for both desktop or laptop computer), and another end of VGA cord with HDMIinterfaces 12

User Manual
Page 16
... the monitor. 15 YPbPr/YCbCr Input Connection If the signal source is DVD, Digital wired receiver or equipments with the YPbPr/YCbCr output, recommends you choose the YPbPr/YCbCr signal, please set signal source selection under YPbPr pattern. G Green (Y) B Blue (Pb/Cb) W White(AUDIO-L ) R Red (AUDIO-R, Pr/Cr) Y Yellow (VIDEO) AC G B R W R Y W R AV connection If you need watch image of DV and connect your TV game machine, you can connect audio or video output end...
... the monitor. 15 YPbPr/YCbCr Input Connection If the signal source is DVD, Digital wired receiver or equipments with the YPbPr/YCbCr output, recommends you choose the YPbPr/YCbCr signal, please set signal source selection under YPbPr pattern. G Green (Y) B Blue (Pb/Cb) W White(AUDIO-L ) R Red (AUDIO-R, Pr/Cr) Y Yellow (VIDEO) AC G B R W R Y W R AV connection If you need watch image of DV and connect your TV game machine, you can connect audio or video output end...

User Manual
Page 17
... wall surface, please do not install this machine on the wall mounting stand. 3-4 mm of Hanging arm hardware's structure. Wall Mounting Stand Wall Mounting Board Wall Mounting subassembly installation Installation for VESA Wall Mounting 1. Take off the base subassembly 2. Spin M4 bolts into the left-right nuts on ceiling or vehicles. 16 Fasten the wall mounting board. ( The height can be confirmed by the user) 3. Then lock the two bolts on the rear...
... wall surface, please do not install this machine on the wall mounting stand. 3-4 mm of Hanging arm hardware's structure. Wall Mounting Stand Wall Mounting Board Wall Mounting subassembly installation Installation for VESA Wall Mounting 1. Take off the base subassembly 2. Spin M4 bolts into the left-right nuts on ceiling or vehicles. 16 Fasten the wall mounting board. ( The height can be confirmed by the user) 3. Then lock the two bolts on the rear...
User Manual
Page 18
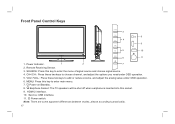
... between modes, please according to enter the menu of signal source and choose signal source. 4. Earphone Socket: The TV speakers will be shut off when earphone is inserted into this key to add or reduce volume, and adjust the analog value under OSD operation. 5. Service: USB interface. 11. CH+/CH-: Press these two keys to enter main menu. 7. Front Panel Control Keys 3 8 4 HDMI-2 9 service 5 10 6 11 1. Remote...
... between modes, please according to enter the menu of signal source and choose signal source. 4. Earphone Socket: The TV speakers will be shut off when earphone is inserted into this key to add or reduce volume, and adjust the analog value under OSD operation. 5. Service: USB interface. 11. CH+/CH-: Press these two keys to enter main menu. 7. Front Panel Control Keys 3 8 4 HDMI-2 9 service 5 10 6 11 1. Remote...

User Manual
Page 19
... button to last watching channel 16:9 "FULL", "MOVIE", "CAPTION", "4:3", "PANORAMA" Color Color temperature mode selection button: Normal Warm Cool P/N Color system mode selection button: PAL NTSC(SECAM) Auto AUDIO Optional OK Confirm operation 18 analog add or reduce VOL+/VOL- Remote control Power POWER MUTE Numerical key Smart sound F1 SMART S SMART P OK Volume Info Time Color VOL INFO MENU SOURCE CH 16:9 COLOR P/N AUDIO Key Function Mute POWER Turn on or standby MUTE Eliminate sound Numerical key Number input button F1 Freeze picture Program list...
... button to last watching channel 16:9 "FULL", "MOVIE", "CAPTION", "4:3", "PANORAMA" Color Color temperature mode selection button: Normal Warm Cool P/N Color system mode selection button: PAL NTSC(SECAM) Auto AUDIO Optional OK Confirm operation 18 analog add or reduce VOL+/VOL- Remote control Power POWER MUTE Numerical key Smart sound F1 SMART S SMART P OK Volume Info Time Color VOL INFO MENU SOURCE CH 16:9 COLOR P/N AUDIO Key Function Mute POWER Turn on or standby MUTE Eliminate sound Numerical key Number input button F1 Freeze picture Program list...

User Manual
Page 20
... not set or place the remote control under direct sunlight, for the thermal energy will cause the distortion of new and old batteries is under direct sunlight or intense illumination, the remote control may hinder normal operation. 2. when not to practicality. Do not use of illumination or this picture, please according to use of remote control. 3. Remote control battery installation method: Take off the cover of battery box, fix...
... not set or place the remote control under direct sunlight, for the thermal energy will cause the distortion of new and old batteries is under direct sunlight or intense illumination, the remote control may hinder normal operation. 2. when not to practicality. Do not use of illumination or this picture, please according to use of remote control. 3. Remote control battery installation method: Take off the cover of battery box, fix...

User Manual
Page 21
... remote control or ''MENU" key on the screen. TV AV1 AV2 SVIDEO YPbPr HDMI1 HDMI2 PC USB 20 Basic Operation Instruction Power On Plug power cord into the electrical socket, press power switch button on right side lower part of the back cover , then press '' '' key on the front panel, or press ''Power'' key on the remote control to turn to standby when the preset time of turning off the power supply for a long time...
... remote control or ''MENU" key on the screen. TV AV1 AV2 SVIDEO YPbPr HDMI1 HDMI2 PC USB 20 Basic Operation Instruction Power On Plug power cord into the electrical socket, press power switch button on right side lower part of the back cover , then press '' '' key on the front panel, or press ''Power'' key on the remote control to turn to standby when the preset time of turning off the power supply for a long time...

User Manual
Page 22
... operations in other modes are similar to adjust in TV mode. PICTURE Select to exit the main menu when the TV displays PICTURE CONTRAST BRIGHTNESS HUE S AT U R AT I O N SHARPNESS PICTURE MOD E SCALE COLOR TONE 3D NR 50 50 50 50 50 S TA N D A R D FUL L NOR MAL MID DLE SEL ADJ MENU E X I T the Main Menu; Menu Operation Instruction Press ''MENU'' key on the remote control or on the front panel to adjust analog value...
... operations in other modes are similar to adjust in TV mode. PICTURE Select to exit the main menu when the TV displays PICTURE CONTRAST BRIGHTNESS HUE S AT U R AT I O N SHARPNESS PICTURE MOD E SCALE COLOR TONE 3D NR 50 50 50 50 50 S TA N D A R D FUL L NOR MAL MID DLE SEL ADJ MENU E X I T the Main Menu; Menu Operation Instruction Press ''MENU'' key on the remote control or on the front panel to adjust analog value...
User Manual
Page 26
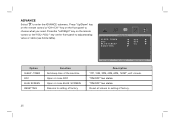
... you need. TIMER DCC BLUE SCREEN RESETTING OFF OFF ON Option SLEEP - "ON/OFF" two states. Press the "Left/Right" key on the remote control or the"VOL+/VOL-" key on the front panel to adjust analog value or state (see below table). TIMER DCC BLUE SCREEN RESETTING Function Set sleep time of the machine Open or close DCC Open or close BLUE SCREEN Resume to setting of factory SEL ADJ MENU...
... you need. TIMER DCC BLUE SCREEN RESETTING OFF OFF ON Option SLEEP - "ON/OFF" two states. Press the "Left/Right" key on the remote control or the"VOL+/VOL-" key on the front panel to adjust analog value or state (see below table). TIMER DCC BLUE SCREEN RESETTING Function Set sleep time of the machine Open or close DCC Open or close BLUE SCREEN Resume to setting of factory SEL ADJ MENU...

User Manual
Page 30
... the remote control to select channels with some of move U dishes, please replace move hard drive, also can realize DVI connector function with Mp3/JPG. User can 't connect move U dish. 29 USB support file format with external HDMI/DVI commutator. Select Channels with TV. Operations to select TV channel directly . 2. It isn't compatible with 1 digit (0-9): Press the number keys (0-9)on the remote control or front panel to enter. Note: With the mode of TV, operation is invalid), press "OK" key to select USB signal...
... the remote control to select channels with some of move U dishes, please replace move hard drive, also can realize DVI connector function with Mp3/JPG. User can 't connect move U dish. 29 USB support file format with external HDMI/DVI commutator. Select Channels with TV. Operations to select TV channel directly . 2. It isn't compatible with 1 digit (0-9): Press the number keys (0-9)on the remote control or front panel to enter. Note: With the mode of TV, operation is invalid), press "OK" key to select USB signal...

User Manual
Page 31
... disturb. 1.Use high directional antenna cable. Don't use signal amplifier. Use FINE TUNING of "TV". 2.Adjust toward direction of antenna cable. 1.Enter "PICTURE" to add up color saturation. 2.Enter "TV" to change sound system. 30 Simple troubleshooting Symptom Factor Snowflake speckle and sound noise. Enter to change color system. 1.Adjust volume to proper value. 2.Press "MUTE" button on remote control to eliminate mute. 3.Enter "TV" to "TV" menu, reset sound system again . 1.Check power cord whether or not connect well...
... disturb. 1.Use high directional antenna cable. Don't use signal amplifier. Use FINE TUNING of "TV". 2.Adjust toward direction of antenna cable. 1.Enter "PICTURE" to add up color saturation. 2.Enter "TV" to change sound system. 30 Simple troubleshooting Symptom Factor Snowflake speckle and sound noise. Enter to change color system. 1.Adjust volume to proper value. 2.Press "MUTE" button on remote control to eliminate mute. 3.Enter "TV" to "TV" menu, reset sound system again . 1.Check power cord whether or not connect well...

User Manual
Page 32
... shadow' in range of remote control. 2.Change battery. 1.Use auto-adjustment function. 2.Use commend mode 1.Use auto-adjustment function. 2.Enter "GEOMETRIC" to adjust horizontal or vertical position. 3.Use recommended mode. Symptom Computer no display, and prompt no signal input, red indicator LED twinkling. Remote control distance is normal. It is short, lose control. Press "power switch" button to turn off . However, this machine . Computer display image excursion, not full screen, over screen. 1.Adjustment is incorrect. 2.Display mode is incorrect. Exterior influence...
... shadow' in range of remote control. 2.Change battery. 1.Use auto-adjustment function. 2.Use commend mode 1.Use auto-adjustment function. 2.Enter "GEOMETRIC" to adjust horizontal or vertical position. 3.Use recommended mode. Symptom Computer no display, and prompt no signal input, red indicator LED twinkling. Remote control distance is normal. It is short, lose control. Press "power switch" button to turn off . However, this machine . Computer display image excursion, not full screen, over screen. 1.Adjustment is incorrect. 2.Display mode is incorrect. Exterior influence...


