
User Manual
Page 2
... panel of the TV set 5.4 Rear panel of the remote control 4..3 Function buttons and External Connections 5... Installation 4..3 Antenna Connection 4.. CAUTION:VISIBLE AND INVISIBLE LASER RADIATION WHEN OPEN AND INTERLOCK DEFEATED.DO NOT STARE INTO BEAM. DVD Operation DVD Features 1188 Advanced Playback 1199 Special Function Playback 2.200 DVD System Setup 2.212 Playable Discs 2.256 Disc Protection and DVD Characteristics 2267 Others Connection to the external audio and video equipment 2278 Troubleshooting guide 2298 Specifications 3209 Warranty...
... panel of the TV set 5.4 Rear panel of the remote control 4..3 Function buttons and External Connections 5... Installation 4..3 Antenna Connection 4.. CAUTION:VISIBLE AND INVISIBLE LASER RADIATION WHEN OPEN AND INTERLOCK DEFEATED.DO NOT STARE INTO BEAM. DVD Operation DVD Features 1188 Advanced Playback 1199 Special Function Playback 2.200 DVD System Setup 2.212 Playable Discs 2.256 Disc Protection and DVD Characteristics 2267 Others Connection to the external audio and video equipment 2278 Troubleshooting guide 2298 Specifications 3209 Warranty...
User Manual
Page 3
... your home, consult your appliance dealer or local power company. WATER AND MOISTURE Do not use this Owner's Manual for attachments, as a bookcase or rack unless proper ventilation is provided or the manufacturer's instructions have been adhered to. 10. Quick stops, excessive force, and uneven surfaces may cause hazards. 7. POWER SOURCE This unit should be operated only from the wall...
... your home, consult your appliance dealer or local power company. WATER AND MOISTURE Do not use this Owner's Manual for attachments, as a bookcase or rack unless proper ventilation is provided or the manufacturer's instructions have been adhered to. 10. Quick stops, excessive force, and uneven surfaces may cause hazards. 7. POWER SOURCE This unit should be operated only from the wall...
User Manual
Page 4
... Instructions 11. This is a safety feature. POWER-CORD PROTECTION Power-supply cords should still fail to fit, contact your electrician to proper grounding of the mast and supporting structure, grounding of the lead-in a risk of the grounding-type plug. 12. LIGHTNING To protect your obsolete outlet. OVERLOADING Do not overload wall outlets and extension cords, as contact with respect to replace...
... Instructions 11. This is a safety feature. POWER-CORD PROTECTION Power-supply cords should still fail to fit, contact your electrician to proper grounding of the mast and supporting structure, grounding of the lead-in a risk of the grounding-type plug. 12. LIGHTNING To protect your obsolete outlet. OVERLOADING Do not overload wall outlets and extension cords, as contact with respect to replace...

User Manual
Page 5
... equipment, turn on the product. e. It may cause speaker overheating and fire. 27. Read the owner's manual of the other hazards. 21. DISC Do not use a cracked, deformed, or repaired disc. These discs are required, be sure the service technician uses replacement parts specified by a qualified technician to restore the unit to qualified service personnel under the following the operating instructions. Adjust only those...
... equipment, turn on the product. e. It may cause speaker overheating and fire. 27. Read the owner's manual of the other hazards. 21. DISC Do not use a cracked, deformed, or repaired disc. These discs are required, be sure the service technician uses replacement parts specified by a qualified technician to restore the unit to qualified service personnel under the following the operating instructions. Adjust only those...

User Manual
Page 7
Function Buttons and External Connections Front panel the TV set Rear panel of the TV set Video output terminal Audio left channel output terminal Coaxial terminal Audio right channel output terminal COAXIAL DC IN DC input socket Video input terminal Antenna/ CATV input socket Audio left channel input terminal Audio right channel input terminal
Function Buttons and External Connections Front panel the TV set Rear panel of the TV set Video output terminal Audio left channel output terminal Coaxial terminal Audio right channel output terminal COAXIAL DC IN DC input socket Video input terminal Antenna/ CATV input socket Audio left channel input terminal Audio right channel input terminal
User Manual
Page 8
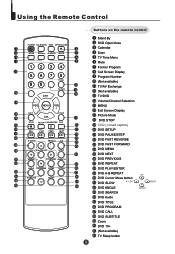
.../PBC SEARCH AUDIO PROGRAM ZOOM D.CALL SUBTITLE 10+ SLEEP Buttons on the remote control Stand By DVD Open/close Calendar Scan TV Time Menu Mute Former Program Call Screen Display Program Number (Not available) TV/AV Exchange (Not available) TV/DVD Volume/Channel Selection MENU Exit Screen Display Picture Mode DVD STOP CCD ( closed caption) DVD SETUP DVD PAUSE/STEP DVD FAST REVERSE DVD FAST FORWARD DVD MENU DVD NEXT DVD PREVIOUS DVD REPEAT DVD PLAY/ENTER DVD A-B REPEAT DVD Cursor Move button LEFT DVD SLOW DVD ANGLE DVD SEARCH DVD Audio DVD TITLE DVD PROGRAM DVD CALL DVD SUBTITLE Zoom DVD 10...
.../PBC SEARCH AUDIO PROGRAM ZOOM D.CALL SUBTITLE 10+ SLEEP Buttons on the remote control Stand By DVD Open/close Calendar Scan TV Time Menu Mute Former Program Call Screen Display Program Number (Not available) TV/AV Exchange (Not available) TV/DVD Volume/Channel Selection MENU Exit Screen Display Picture Mode DVD STOP CCD ( closed caption) DVD SETUP DVD PAUSE/STEP DVD FAST REVERSE DVD FAST FORWARD DVD MENU DVD NEXT DVD PREVIOUS DVD REPEAT DVD PLAY/ENTER DVD A-B REPEAT DVD Cursor Move button LEFT DVD SLOW DVD ANGLE DVD SEARCH DVD Audio DVD TITLE DVD PROGRAM DVD CALL DVD SUBTITLE Zoom DVD 10...

User Manual
Page 9
... and 0). OPEN/CLOSE Button: Press this button to open or close the DVD disc tray . Sleep Timer Button: This feature allows you through each option. To cancel, keep pressing button until you the current channel number. DVD/TV Button: Press this button to change between TV and DVD. TV/AV input Button: This button has five setting A)Video1, B)Video 2,C)TV . Using the Remote Control (Continued) Remote Features Power Button: To turn off the TV volume. To select a two-digit channel, press the...
... and 0). OPEN/CLOSE Button: Press this button to open or close the DVD disc tray . Sleep Timer Button: This feature allows you through each option. To cancel, keep pressing button until you the current channel number. DVD/TV Button: Press this button to change between TV and DVD. TV/AV input Button: This button has five setting A)Video1, B)Video 2,C)TV . Using the Remote Control (Continued) Remote Features Power Button: To turn off the TV volume. To select a two-digit channel, press the...

User Manual
Page 10
... Channel Display Cancel Button: This button allows you to recall the previously viewed channel. Using the Remote Control (Continued) Channel (+/-) Select Button: You can increase the volume by pressing VOL (+) button and decrease VOL(-) button. You can go up and down the channels by pressing CH (+) button and CH (-) button. Program Scan Button: This feature automatically scans the available channels. Time Menu Button: TIME When pressed it again stops the channel scanning. Last Channel Recall Button: This feature allows you to select 2 digit channel numbers...
... Channel Display Cancel Button: This button allows you to recall the previously viewed channel. Using the Remote Control (Continued) Channel (+/-) Select Button: You can increase the volume by pressing VOL (+) button and decrease VOL(-) button. You can go up and down the channels by pressing CH (+) button and CH (-) button. Program Scan Button: This feature automatically scans the available channels. Time Menu Button: TIME When pressed it again stops the channel scanning. Last Channel Recall Button: This feature allows you to select 2 digit channel numbers...
User Manual
Page 11
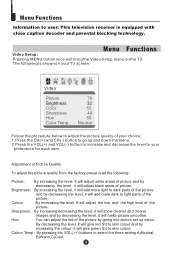
.... Menu Functions Information to user: This television receiver is shown on the TV. By decreasing the level, it will give red tint to skin colour and by decreasing the level, it will add more dark to select the three setting A)Neutral, B)Warm,C)Cool. Colour: By increasing the level. Menu Functions Video Setup: Pressing MENU button once will make picture smoother. Adjustment of the picture...
.... Menu Functions Information to user: This television receiver is shown on the TV. By decreasing the level, it will give red tint to skin colour and by decreasing the level, it will add more dark to select the three setting A)Neutral, B)Warm,C)Cool. Colour: By increasing the level. Menu Functions Video Setup: Pressing MENU button once will make picture smoother. Adjustment of the picture...
User Manual
Page 12
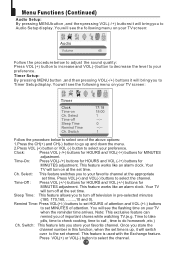
Timer Setup: By pressing MENU button ,and then pressing VOL(-/+) buttons it will bring you to select the channel. Switch 17:18 18:00 1 --:-0 --:-1 Follow the procedure below to adjust the sound quality: Press VOL (+) button to increase and VOL (-)button to decrease the level to your preference. This feature works like an alarm clock. Ch. Time-Off : Press VOL (+/-) buttons for HOURS and VOL (+/-) buttons for...
Timer Setup: By pressing MENU button ,and then pressing VOL(-/+) buttons it will bring you to select the channel. Switch 17:18 18:00 1 --:-0 --:-1 Follow the procedure below to adjust the sound quality: Press VOL (+) button to increase and VOL (-)button to decrease the level to your preference. This feature works like an alarm clock. Ch. Time-Off : Press VOL (+/-) buttons for HOURS and VOL (+/-) buttons for...

User Manual
Page 13
... reduces video noise interference so the viewer is no input signal to the set it ON or OFF. When the Black Stretch function is on the screen automatically in decoder displays the audio portion of the picture on your screen). AVL: Automatic Volume Limit control reduces effect of large volume changes such as French or any other modes of the picture on your screen). C.Caption: Press VOL (-/+) buttons to select...
... reduces video noise interference so the viewer is no input signal to the set it ON or OFF. When the Black Stretch function is on the screen automatically in decoder displays the audio portion of the picture on your screen). AVL: Automatic Volume Limit control reduces effect of large volume changes such as French or any other modes of the picture on your screen). C.Caption: Press VOL (-/+) buttons to select...
User Manual
Page 14
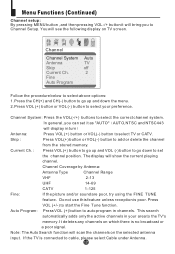
... selected antenna input. Skip : Press VOL(+) button or VOL(-) button to start the Fine Tune function. Channel Coverage by Antenna: Antenna Type Channel Range VHF 2-13 UHF 14-69 CATV 1-125 Fine: If the picture and/or sound are poor, try using the FINE TUNE feature. Menu Functions (Continued) Channel setup: By pressing MENU button ,and then pressing VOL-/+ button it as "AUTO" AUTO,NTSC and NTSC443 will display in turn Antenna: Press VOL (+) button...
... selected antenna input. Skip : Press VOL(+) button or VOL(-) button to start the Fine Tune function. Channel Coverage by Antenna: Antenna Type Channel Range VHF 2-13 UHF 14-69 CATV 1-125 Fine: If the picture and/or sound are poor, try using the FINE TUNE feature. Menu Functions (Continued) Channel setup: By pressing MENU button ,and then pressing VOL-/+ button it as "AUTO" AUTO,NTSC and NTSC443 will display in turn Antenna: Press VOL (+) button...

User Manual
Page 17
... to select "B" or "U' . Password The "Default Password" preset by the manufacturer is locked, you can not see the following rating table on your own password, just choose any four digits that can not use the AV. This channel can press CH(+/-) buttons to go up and down the menu, then press VOL(+) button to accept the V-CHIP signal. Program Lock: When it is turned off . Parental Lock off " mode...
... to select "B" or "U' . Password The "Default Password" preset by the manufacturer is locked, you can not see the following rating table on your own password, just choose any four digits that can not use the AV. This channel can press CH(+/-) buttons to go up and down the menu, then press VOL(+) button to accept the V-CHIP signal. Program Lock: When it is turned off . Parental Lock off " mode...

User Manual
Page 21
... title menu. AUDIO D.MENU Press this function. Press the digit buttons to input the item you want. This will cancel this function. Press the program number buttons to select the program number that you require. Pressing this key will cycle through each setting when cycling through "Title Elapsed", "Title Remain", "Chapter Elapsed", "Chapter Remain" and "Display off ". IF YOU PLAY OTHER FORMAT DISCS, THE OPERATION AND ON SCREEN DISPLAY...
... title menu. AUDIO D.MENU Press this function. Press the digit buttons to input the item you want. This will cancel this function. Press the program number buttons to select the program number that you require. Pressing this key will cycle through each setting when cycling through "Title Elapsed", "Title Remain", "Chapter Elapsed", "Chapter Remain" and "Display off ". IF YOU PLAY OTHER FORMAT DISCS, THE OPERATION AND ON SCREEN DISPLAY...

User Manual
Page 23
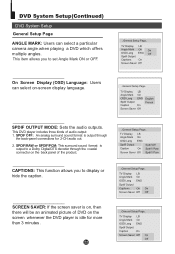
... original film to be viewed without any side cropping. TV Display LB 4 3:.Ps Angle Mark On 4 3:.Lb OSD Lang ENG 16 9 Spdif Output Caption On Screen Saver Off 4.Press EXIT key or press SETUP repeatedly to confirm. ..General Setup Page.. Parental Password Default 1 Kid Saf 2 G 3 Pg 4 Pg 13 5 Pgr 6 R 7 Nc17 8 Adult SETUP PLAY/ENTER General Setup Page ASPECT RATIO DESCRIPTION When using a widescreen TV. Back bars...
... original film to be viewed without any side cropping. TV Display LB 4 3:.Ps Angle Mark On 4 3:.Lb OSD Lang ENG 16 9 Spdif Output Caption On Screen Saver Off 4.Press EXIT key or press SETUP repeatedly to confirm. ..General Setup Page.. Parental Password Default 1 Kid Saf 2 G 3 Pg 4 Pg 13 5 Pgr 6 R 7 Nc17 8 Adult SETUP PLAY/ENTER General Setup Page ASPECT RATIO DESCRIPTION When using a widescreen TV. Back bars...
User Manual
Page 24
... on the back panel of audio output: 1. This DVD player includes three kinds of the product. ..General Setup Page.. SPDlF OFF: An analog surround sound format is output to a Dolby Digital/DTS decoder through the back-paneI connections for more than 3 minutes . ..General Setup Page.. TV Display LB Angle Mark On OSD Lang ENG English Spdif Output French Caption On Screen Saver Off SPDlF OUTPUT MODE: Sets the audio outputs. TV Display LB Angle...
... on the back panel of audio output: 1. This DVD player includes three kinds of the product. ..General Setup Page.. SPDlF OFF: An analog surround sound format is output to a Dolby Digital/DTS decoder through the back-paneI connections for more than 3 minutes . ..General Setup Page.. TV Display LB Angle Mark On OSD Lang ENG English Spdif Output French Caption On Screen Saver Off SPDlF OUTPUT MODE: Sets the audio outputs. TV Display LB Angle...

User Manual
Page 26
Parental Password Default Reset Note: Some functions may not be available depending on the type of disc. Press ENTER to the manufacturers original settings. DVD System Setup(Continued) DVD System Setup SETUP PLAY/ENTER DEFAULT: Resets all settings (except password and parental lock status) for this DVD player back to perform the reset. ..Preference Page..
Parental Password Default Reset Note: Some functions may not be available depending on the type of disc. Press ENTER to the manufacturers original settings. DVD System Setup(Continued) DVD System Setup SETUP PLAY/ENTER DEFAULT: Resets all settings (except password and parental lock status) for this DVD player back to perform the reset. ..Preference Page..

User Manual
Page 29
Connecting the TV set to the other video and audio equipment Connection of AV input /output terminal You can connect the DVD,VCR and stereo system to the output to enjoy a higher quality of picture and sound effect. an additional TV DVD, VCD or otherunits Video output COAXIAL DVD, VCD or otherunits Digital Amplifier To video input To audio input
Connecting the TV set to the other video and audio equipment Connection of AV input /output terminal You can connect the DVD,VCR and stereo system to the output to enjoy a higher quality of picture and sound effect. an additional TV DVD, VCD or otherunits Video output COAXIAL DVD, VCD or otherunits Digital Amplifier To video input To audio input

User Manual
Page 30
... the brightness and contrast are not turned down. Troubleshooting guide To assist in the cabinet expanding with room temperature changes. BREAKDOWN PHENOMENON PICTURE SOUND CHECKING Picture with snow Double or Triple Image Disturb Noise Normal Noise The aerial direction and connection This is turned on /off house hold appliances such as TV set and turned on overhead power cables. Electrical interference which can also minimize...
... the brightness and contrast are not turned down. Troubleshooting guide To assist in the cabinet expanding with room temperature changes. BREAKDOWN PHENOMENON PICTURE SOUND CHECKING Picture with snow Double or Triple Image Disturb Noise Normal Noise The aerial direction and connection This is turned on /off house hold appliances such as TV set and turned on overhead power cables. Electrical interference which can also minimize...

User Manual
Page 32
... agent or employee is free, under normal use with the screen size of this LIMITED WARRANTY statement to : a. CARRY-IN PARTS & LABOUR WARRANTY PERIODS: • Audio Products: 1 Year (Remote Control, if applicable -90 Days) • DVD Products: 1 Year (Remote Control -90 Days) • LCD & Plasma Display TV: 1 Year (Remote Control -90 Days) • Television Products: 1 Year (Remote Control -90 Days) • VCR Products: 1 Year (Remote Control -90 Days, Video Heads -6 Months) • Home Appliances: 1 Year o Microwave...
... agent or employee is free, under normal use with the screen size of this LIMITED WARRANTY statement to : a. CARRY-IN PARTS & LABOUR WARRANTY PERIODS: • Audio Products: 1 Year (Remote Control, if applicable -90 Days) • DVD Products: 1 Year (Remote Control -90 Days) • LCD & Plasma Display TV: 1 Year (Remote Control -90 Days) • Television Products: 1 Year (Remote Control -90 Days) • VCR Products: 1 Year (Remote Control -90 Days, Video Heads -6 Months) • Home Appliances: 1 Year o Microwave...


